Saturday, September 15, 2012

Ain't Verlinden...

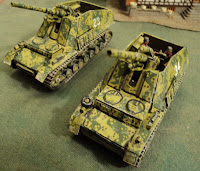
 At last: finished. Well, sort of finished.  The Hummels have been built, painted and one of them at least has a crew - two figures from the Airfix SdKfz234/4 Armoured Car kit.  This first picture was taken before 'weathering', the others after.   This might not be apparent in most pictures.  I have a fairly minimalist approach to weathering, though these vehicles could stand more, methinks.


Close up of the fighting compartment, with crew added.  This won't win any prizes - the number could be touched up, and certain other little flaws reveal themselves.  This ain't Verlinden quality modelling by any stretch.  But on the whole I'm not at all unhappy with the end result.

I have found the best method of getting track to look right is glue and staple the ends together.  To the objection that the staple will spoil the appearance of the vehicle, the answer is [A] make sure the stapled but is up under the superstructure overhang, and [B] paint it out with some dark colour - black, even.
 As mentioned earlier, the gun came without some of the extra bits like hydraulic elevating gear, and traversing and fine adjusting wheels and handles.  Figuring that as they would in general be hidden in the superstructure, I was not at first going to bother with them.  I am glad I changed my mind about that.  On the other hand, unlike the original ESCI kit, which moulded them in, I left off the seats either side of the gun and the boxes on the floor near the rear.  Another good decision, I feel.
 Vehicles 23 and 34 in battery.  Well, they won't be part of the same unit for long.  Brian (A Fist Full of Plastic) will get one of them; the other will remain in my own army forming a Command Decision SP battalion with 2, maybe 3, 10.5cm Wespes.
Have gun; will hunt.


Whilst working on the Hummels, I also began some repair and refurbish work on some other vehicles Brian had given me or that I had had waiting (clamouring) for my attention for some considerable time.  

This Hunting Tiger just needed the tracks put on, the mudguards re-attached and the gun refitted.  In painting this vehicle I discovered that 'German Cavalry Brown' is very reddish in colour.  I know, I know - I ought to have used 'Chocolate' but my feeling is that it is rather a brownish sort of brown, and I did want reddish in the camo.

 Rear view of JagdTiger going off to hunt something.  I rather like this simplistic ESCI kit.


Also in my possession were a couple of Tigers that badly needed a refurbish.  The one Brian gave me looked OK, but the paint scheme didn't 'fit' with my preferred livery.  So they both got a repaint.  Probably they would have benefited at that from having their original paint job stripped off, but I wasn't prepared to put up with the hassle.

I painted over the top.  It shows a bit - these vehicles are a tad rough, but, seen at the usual distance one views these things on the war games table, they look rather better than these pictures indicate.


My real bugbear are the tracks.  For one thing, they were put on differently for each vehicle, they were flimsy, flopped about all over the place, and the ends were untidily put together.  The bad part, I discovered, was that they were apparently glued up under the overhang.  At any rate, They could not be removed safely.  

Faute de mieux I left them as they were, except that I glued the road wheels down onto the tracks as well.  This was not a total success (as the right-hand track on Tiger 511 shows.  

But the key thing is, they are Tigers.  I now have the beginnings of a Tiger Company (Heavy Panzer Company 651 in the service of Orotina) which will comprise 3 Tigers (the third being a metal model from Dragon, painted Panzergrau), plus a Panzer IIIN with the short barrelled 7.5cm gun.

Further to the camo: I don't really know if the scheme I have here was ever used by the Germans.  But, for mine,  it looks as though it might have been.  What commends itself to me is that I doubt anyone will be using it, which identifies my stuff as being mine!  And, of course, it looks OK - well it does to me!

Wednesday, September 5, 2012

Hummels, Part the Third - and other toys.

 Assembly of this pair of Hummel SP guns more or less completed, now begins the paint job.  Contrary to my usual practice, I undercoated these chappies black before applying its 'factory finish' base coat of yellow.

Since my previous posting, I finally figured out how to do the louvres - unfortunately, after having already applied my 'lesser solution' of placing a rectangle of very thin plastic sheet which I was hoping to get away with simply painting them on.  As it happens, an even better solution might have been to cover the area with a box-type arrangement as seems to have been an occasional practice.  On these models the louvre assembly stands prouder of the vehicle sides than I would like, but I'm hoping that careful paint work will disguise this and other imperfections that I can see.
It was whilst typing the rest of this posting I finally - much too late - figured out how to do the louvres properly.  First off, cut out an appropriate sized rectangle at the appropriate location in the sheet forming the sides of the fighting compartment.  Back it with thin plastic sheet.  This backing will not be noticeable in the interior of the fighting compartment.  Then place in 4 strips of thin plastic sheet such that each overlaps the one below.  Place a thin plastic frame around the whole; and two thin strips at the 'third points' along the louvres.  This is pretty much how I did it except for the cut-out at the beginning.  Had I thought of it, the whole assembly would have been almost flush with the side armour.   But that is generally my experience with tackling unfamiliar tasks.  By the time I've finished, I figure I've just about learnt enough to begin.

 The right hand vehicle in this picture shows an arrangement I am tempted to use on the other.  My researches indicate this was quite a common arrangement: a couple of spare road wheels, and some of those red/white/red rods you often see attached to German ordnance.  That the guns look skew-whiff in this picture is not an illusion; they haven't been glued in yet.
 One of the problems of the black undercoat: the first top coat looks as rough as guts.  The farther vehicle has had a second coat applied.
 Some more toys that have been awaiting my attention.  My thanks go to Brian (A Fist Full of Plastic - see the sidebar for the link) for most of these (the PzIV and FlaK gun excepted), for which he'll be getting one of the Hummels I've been building.


The PzIV is missing a road wheel.  That, the Tiger I tanks and the FlaK 8.8cm gun have all been pre-painted.  Rather than go the Simple Green paint stripper way, I simply paint over the top.  The downside of course is that detail gets a bit obscured.  This will be rectified by black outlining.  The end result is generally satisfactory.  
The Wespe is a 'new' model I recently assembled.  Not much to say about it, really, except that along with one of the Hummels above, it will be part of my second (Orotina's 122nd) SP artillery battalion.  Whilst putting on the tracks, though, the left hand return wheel came adrift rather too easily for comfort.  I solved that by drilling a hole through it and the hull shoving in a short length of paper clip wire and gluing that in.  Seems to have worked...

The Jagdtiger,  assembled but for the side skirts and with the gun broken off, has been put together, and will probably form part of Orotina's 654th (Independent) Heavy Panzer Company.  Strictly, it ought to be counted as a Jagdpanzer Company as are my Jagdpanthers and Jagdpanzer IVs, but the latter form a small Abteilung.  The Jagdtigers I reckon should stand alone...


Sunday, September 2, 2012

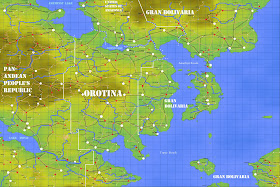
'Latin Wars' Map

Taking a brief break from the Hummels I am still in the throes of building, I thought I'd show the map of the particular area of the world in which the 'Latin Wars' (so-called by historiographers) are supposed to have taken place.  This map I began putting together over the weekend.  By no means complete, it is coming along nicely...

Now, I always imagined an east coast of Latin America, two major rivers forming a species of peninsula, with most of the campaign taking place on this peninsula.  But at the same time I wanted a quick and fairly random way of generating the sort of map I wanted.

A hunt among map generators and free downloads unearthed the Greenfish Relief Map Generator.  Several goes finally gave me a map I liked, except that I needed to flip it to get the orientation I wanted.  Probably I ought to have seen what it looked like with less water, though.   The Hungarian place names became upside down, and after resizing down and back again (a mistake) became illegible.  Never mind about that.

What the map gives you is a relief map, and a whole bunch of towns and cities and things in white, dark red, blue and green dots.  The green areas are plains, yellow hilly, and brown mountainous.  I really like this as a map generator, as it does the really irksome bits of the creative process, leaving me with the fun bits...

For the latter, I had recourse to the Windows Paint software - very useful for this kind of thing.  With it I've redone the towns and cities, resizing some of the dots, and recolouring as well, according to the following Legend:
White:  Towns/cities population > 10,000
Red: Towns/townships 9999 > population > 999
Blue:  Villages:  999 > population > 499
Green:  Hamlets and other settlements: 499 > permanent population > 50.

I've also added in the rivers, railroads (Black) and roads (Brown); established the borders, and added some place names.   As the only common border between Orotina and Gran Bolivaria I wanted to lie between the Amethyst and Topaz Rivers, I had to create a neutral democracy, The United States of Amazonia between the two north of the Amethyst River.   The USAz is a peaceable commercial state whose dexterous foreign policy is far more responsible for keeping the country relatively clear of dangerous military entanglements than is its exiguous military establishment.

Followers of Gowan Ditchburn's Oronegro saga will have observed that the three countries shown here share common borders with that oil-rich nation.  You are to imagine that in fact that these three extend south beyond the map boundaries perhaps 20 or 30 kilometers into almost uninhabitable mountainous country (the squares being some 16 kilometers or 10 miles of a side)  - the southern shore of the Bight of Bolivaria that you see here being just one or two squares off the map.  The Pan-Andean People's Republic (Pan-Andea) and Gran Bolivaria extend respectively in the same manner west and north, the former also reaching south deep into the west flank of Oronegro.

I will probably add further terrain features, such as forests, swamps, grasslands and perhaps tracts of desert or semi-arid country; and maybe add such interesting infrastructural elements such as factories, produce processing plants, mines, airfields, shipping facilities and what have you...