Tuesday, February 28, 2012

Mediaeval Cogs...


Every now and then a serendipitous discovery leads one down fascinating and exciting paths. Years ago, looking out for sources of buildings for wargames, I found copies of Usborne's books - Mediaeval Village, Sea Port and Roman Fort. There are others.

But the sea port included a feature I had not altogether expected: a 3-D paper sea-going vessel. There were a couple of 'flat' small craft as well - always good for a diarama - but it was this cog-type vessel that took my fancy.

There it is in the back cover depiction of the Sea Port completed: lying to against the the mole, or breakwater.

As you can see by this plan, I never did build the model in the book - though I will one day. I went one better. Using it as my template, I made one up using different materials...

... and here it is. The masts were lollipop sticks (Chup-a-chups, probably. I don't have much of a sweet tooth myself, but have been fortunate in my choice of family members...). Sails: tissue paper, chosen for their lack of stiffness compared with other types. The sails were criss-crossed with brown or black cotton. I didn't bother with rigging, but it could have been added with a little trouble.

The whole vessel was painted with enamels, acrylics and/or water colours as the mood took me. The shields draped about the fore- and after-castles, in order to lend them a military look, were made up in strips, with the designs in pen and felt-tip markers.

The bases were as prescribed for DBM 15mm scale. Given their derivation from the Usborne books that employ a broadly similar scale, they could probably have been crewed with 15mm figures as well, though I suspect 10mm would look better. All the same, these are not large vessels!

Having built one, I had to build more. A certain wargaming buddy was using Mediaeval Germans at the time, and wanted 3 cogs as his naval contingent.

This next cog was something of an experiment in building up the hull with strips of cardboard as strakes laid 'clinker fashion' with the upper edge of each strake oberlapping the next upper strake. Unfortunately the close-up picture showing this didn't come out, so I can't show it...

The thing wasn't an unqualified success by any means, yet the finished article looked OK. I gave that vessel the shields of a single sponsor that favoured a quartered argent and sable design.

The final vessel was slightly larger than the other two, but the overall design was the same. The foremast was raked forward slightly; the mizen slightly aft. I quite liked the look of this one.

Finally: some pictures to show how a fleet can be more exciting to look at than a single ship...


The next close-up was really just an arty shot to show foresails, forecastles and the ocean trodden by the three cogs in line abreast. The bases were simply painted, though a little sand laid out in ridges by way of a wake would have looked pretty good, I reckon.

With flags and pennons fluttering gaily in the breeze, one can well imagine the order of Edward the Third to his ship's captain: 'I wish to tilt with that one!'

Sunday, February 19, 2012

Byzantine Navy...


I guess I ought to be finishing the next part of the Raesharn Spring Offensive of 66941, but right now we have Broadband issues that dissuades me from that for the time being.

Instead, I thought I'd do something completely different. Years ago, whilst visiting Greece with my partner, Karen, we took a look, among a multitude of fascinating sites, sights and museums, the Nautical Museum of Greece, I think in Khania, Crete. Therein I found a couple of fine postcards featuring models of some of the Byzantine dromons on display.

You can see that the sketch that heads this post was modelled upon the first of the postcard pictures.

Having long had a Byzantine wargames army of the 11th century, I bethought myself to add some naval elements. To be honest, I never got past the first one.


I scaled the thing roughly at 500 to 1. The length of the vessel is 10cm (representing c.50m) long by 2cm beam - possibly a little beamier than it ought to be as the length width ratio seems to have been nearer 7:1 than the 5:1 I allowed myself.


The frontage of the element was the standard 40mm for a 15mm-scale army, but that meant, of course, a rather more depth than usual. The old DBM rules were pretty flexible in this regard, fortunately.

The materials used for this model were my usual assortment of cardboard, balsa, bits of skewer, tissue paper, cotton and pins. The shields lining the waist of the vessel were the severed heads of the pins I used for the oars.

One of the fascinating features of the dromon was its little fighting tower in the bow, with a long Greek fire projectors (syphons?) over the port and starboard quarters, and through the mouth of the dragon figurehead.

I really, really, must make some more of these...

Friday, February 17, 2012

A new Campaign, Part 1: Preparations


White we still have quite a bit of back history to fill in, Jono and I decided to begin the Campaign of 66941 with a attempt by Raesharn forces to break the deadlock imposed upon them by Kiivar's army just as late autumn morphed into the winter of the previous year.


The Raesharn-Omez High Command began by assaulting the centre of the front towards the city of Nazpu, which point had formed the high water mark of the Raesharn 'Operation Redbeard' the previous summer.
The rather bad photo, badly touched up, of the map is roughly how the the thing will look once the playing pieces of the respective armies have been prepared. The plan is to run the campaign on this map, with specific battles being settled by representative small scale actions as a table top wargame. Whenever the map play has to be suspended, all we have to do is photograph the thing for setting up next time.

The sector of front was held by a platoon of the 83rd Shing Wong Infantry Regiment, supported by a squadron of light tanks from 17th Wah-Hey Armoured. A dedicated composite battery of 1x15cm and 2x10cm howitzers gave artillery support. The Infantry platoon's two sections were each divided into 4-man fire teams, with an anti-tank rifle assigned to one from each section. It was also reinforced by a heavy machine gun and a medium anti-tank gun on either flank, and an infantry gun covering the centre. The front was covered here and there by barbed wire entanglements that covered rather tenuous mine 'strips'... Kiivar High Command had intended to garnish the whole position with anti-tank obstacles and extensive minefields, but shortages had left much of this work undone (I couldn't find my stuff). So, beneath the barbed wire, the engineers has placed a line of anti-tank mines - a slender enough defence, as it turned out.


Much weakened by earlier fighting, Raesharn units had not fully been made up to strength as the winter rains gave way to spring sunshine. The Raesharn had available a weak regiment of tanks (2 squadrons of two medium tanks apiece) and a rather attenuated battalion little more than company establishment; a troop of cavalry; some anti-tank guns, and a battalion of 4 artillery pieces.

The local Raesharn commander probably felt that his forces were none too many for the task, yet, as this action was to show, the outcome of battle is apt to be unpredictable.
(to be continued)

Monday, February 13, 2012

More on Naval Warfare in Jono's World...


Prospects seem fairly bright that Jono will be starting a blog of his own about his world - or in fact, several worlds - that have sprung from his fertile imagination.
For the time being, though, I'll be continuing the occasional posting as preparations for wars in the setting of Sideon IV continue to take shape.

For this posting: more work on navies. Readers will have seen elements of the Raesharn and Kiivar navies in past postings. The latter is merely a rump, much of it lost in heavy air attacks and interceptions on the high seas shortly after the declaration of war.


Here we see elements of the Sarbian Navy, a squadron comprising cruiser, aircraft carrier and battleship, under Raesharn air attack. The Raesharn attack comprises several stands of single-engined carrier-based aircraft, but a stand of land-based twin-engined bombers has joined the fight. Two stands of fighters from the Sarbian carrier attempt to fight off the attackers.

I've been calling a stand of aircraft a 'flight' and probably will continue to do so, but it is more cognate to a squadron of, say, 12 to 15 aircraft. In these navies, carriers, with a single exception, operate 4 'flights' (say 48-60 aeroplanes), that can be used as fighters, bombers or torpedo bombers as the player directs. The single exception is the Kiivar Carrier KNS Condor, a rather larger vessel than usual (I had an appropriate piece of wood I used as the flight deck that turned out to give a significantly larger vessel than the Raesharn had). The Condor - sole surviving carrier in Kiivar's possession - can operate 5'flights'.

It seems likely that I will be contructing stands of single aurcraft as 'scouts' or reconnaissance patrols.

Although I have limited the navies to the following vessels: Carriers, Battleships, (Heavy) Cruisers, Destroyers, Submarines, Landing Craft and Merchant Vessels (MVs), I find it already tempting to add 'in-between' types: battle cruisers, armoured cruiser/pocket battleships, light cruisers, and escort carriers. This leaves out smaller craft like mine layers and sweepers, flak ships, armed trawlers and Motor Torpedo Boats. But that is I think to over complicate something I would much prefer to keep simple.

Readers might ask why I have gone the 'cartooned balsa' route, rather than, say, obtaining 1:4800 or maybe 1:2400 scale models. One is expense, but the main one is that I have never found the tiny models particularly engaging. The balsa vessels have each a character of its own, which, by engaging their commanders' synpathies, I hope will have interesting effects on naval strategy.

Once I have organised a really simple naval wargame playable on a fairly small surface, then some back history (i.e. destruction of most of Kiivar's blue water navy) will be enacted by way of a play test. I have a couple of scenarios in mind already:
1. Battle of the River Bowl. A pair of Kiivar cruisers returning home from a pre-war diplomatic mission is to be intercepted by a Raesharn task force comprising several destroyers and cruisers supporting a single battleship. This task force has been split up into a number of groups patrolling athwart the Kiivars' likely course.

When one of the groups encounters the Kiivar ships, they call for aid from their friends, but have to engage the enemy to prevent their escape...

2. Amethyst Harbour/Pitchanto. A powerful air attack by carrier-borne aircraft attack a significant portion of the Kiivar fleet whilst they are still in port.

Some ideas to chew on for the next few weeks. The next posting is a generating circumstance of a Raesharn land offensive to capture a major Kiivar city. The Raesharn armour breaks through, but does that mean the battle is won?

Sunday, January 29, 2012

My British could use some work...

A couple of weekends back I had my first Panzer Marsch game since... oh, it must be April last year. This time I decided to field a British Army force, Northwest , against Tony Ormandy's Germans. A fossick among the long neglected infantry discovered what I had available, and what work needed doing. They had come through the earthquakes of the last 15 months (yep, we are still getting them from time to time...) more or less OK, but I hadn't even looked at these guys in all that time.

This action broke out on the 8th June 1944, whilst the situation in Normandy remained in a state of flux, about the village of Ste-Mere de la Croix. The high command on both sides had suddenly become aware of the importance of the road network in the neighbourhood of the place, and were determined to occupy, seize or carry the village for their own use.

The opening picture - a distant shot of Tony's fine German panzer grenadiers - A weak platoon of 2 Panthers, another of 2 Jagdpanzer IV/48, and a company of what we would now call 'armoured infantry'. This Kampfgruppe was commanded by Hauptmann Werner von Wiener, a highly experienced commander of armoured infantry.

I opted for something pretty straightforward: an infantry company and an armoured squadron:

A Company, 1st Battalion Codswallop Regiment;
3 Rifle Platoons (7th, 8th[mounted on M5 half-tracks], 9th)
1 Support Platoon
Section 2xVickers MMG
Section 2x6pr AT guns with tows
Section 2x3-inch Mortars, with carrier mounted FO.
Team PIAT
C Squadron (less one troop), 4th County of Yeoman Londonry; [Note: CYL, not CLY :)]
HQ: 1xM4 Sherman
3 Troops each comprising: 2xM4 Sherman; 1xM4 Sherman Firefly.

Here is 7 Platoon, advancing on the right accompanied by the 6pr guns, the Vickers section, and the Support Platoon's PIAT team. Unfortunately, this force was unable to find a decent position to hold, being on foot for the most part, and the enemy mounted upon half tracks.


The British (commanded by Major Hugh Billinghurst-Thorpington) made their main thrust upon their left, to the east of the village of Ste-Mere de la Croix.


Eight Platoon, mounted upon half-tracks, were to advance until they reached a point due east of the village, then wheel and assault its east face. The armour were to advance a little farther before wheeling into the rear of the place. Nine platoon were to push up the road at their best speed and seize as much of the village as they could, before the Germans intervened.


Awaiting the British armour, lay the Panther platoon, lurking hull down upon the east end of the ridge south of Ste-Mere. On the road leading in to the village, the Jagdpanzers were also waiting. Four German tanks against ten British... hardly a fair contest, is it...?

Here's the general view of the field, looking northwest from behind German lines. German tanks, lying in wait; panzergrenadiers advancing towards the village and through the wooded country to the west.
Jono laid out the terrain, and it's quite a nice tract of country he designed. Unfortunately Tony and I ought to have allowed him more room to lay out terrain at the extreme ends of the table. The British in particular were to feel acutely the want of a solid position at which to anchor their right and centre.

The County of Yeoman Londonry and the mounted platoon of Codswallop Infantry sweeps up the left flank. The platoon has dismounted as the armour begins to come under fire...

...and the Germans naturally single out the Fireflies for attention. Both from the leading troops (#1 and #3) are taken out in short order. But the German armour does not come out unscathed. A lucky hit from one of the M4 Shermans damages the drive sprocket of one of the Jagdpanzers on the road south of the village; and #3 Troop's Firefly strikes right hand target panther (#121) somewhere near the turret ring, causing heavy damage and jamming the turret so that it can no longer traverse.

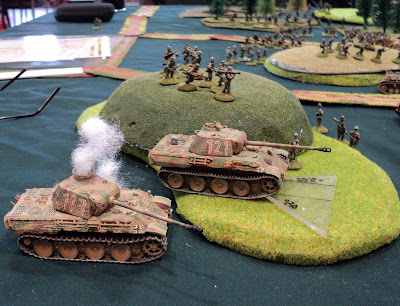
The British armour charges on. The last surviving Firefly (#2 Troop) scores a remarkable hit upon the undamaged panther (#113) - a hull down target into the bargain - and knocks it out. But this strike is swiftly avenged.

Meanwhile the British were starting to bring mortar fire down upon the intersection in the middle of the village - the observer being ensconced in the bell tower of the church a short distance to the north of the place. The first salvo took out a vehicle and a few infantry, but after that the British mortars proved ineffective for anything except setting buildings on fire. By the end of the action some 80% of the village was in flames, forcing its abandonment.

Minus its Firefly, #1 Troop wheeled to the west to assist an action against German infantry in the woods opposite the hamlet. These might have remained hidden, but had opened fire upon the #1 Section of 9 Platoon as it advanced through the fields northwest of the place. Retribution was swift: mortar, tank, Machine-gun and rifle fire reduced the panzergrenadier section to two or three survivors, and put them out of action for the duration.

Lacking targets, the Jagdpanzers were directed to intervene against the British armoured attack by the remains of #2 and #3 Troops. Here we both forgot that one of the Jagdpanzers had earlier been immobilized (a critical hit). It probably would not have made much difference, and I didn't remember until after the game, by which time, of course, it was too late. Possibly the aid to forgetting was the Shermans' failure subsequently to inflict further critical damage. What happened during the action, we can infer, was that the damage wasn't as severe as first thought, and the crew was able to effect a repair sufficient to get the assault gun moving again.

At any rate, the last Firefly and two Shermans were knocked out for trivial damage to the Germans, whereat the remnants of #2 and #3 troops made off back whence they came.
Away over to the west, 7 Platoon was trying to establish some kind of defence line against the oncoming German infantry. The latter had established a Mortar OP in the tree line at the north end of the ridge in front of 7 Platoon. A stonk had cost #2 Section three men, and then, when the Anti-tank section attempted to set up a position, and as #1 Section passed through it to take up a position along those same trees, another bombardment wrecked both guns, though without loss to any of the crew.

The village proving rather inflammable under British mortar fire - the British having to abandon one building when a short knocked over a couple of men and set their building alight as well - the Germans made a virtue of the necessity of evacuating their buildings, and subjected the British hold on the northern part of the place to a heavy close assault. British countermeasures were slow and muddled (my response was slow and muddled), and they were bundled out of the place with heavy loss.

On the right, 7 Platoon's #1 Section had discovered the German 4-man OP team among the trees as they approached. A brisk close range firefight cost both sides three men, the sole German survivor running off on foot.

But it was clear that, after successive defeats on the left and centre, and the right in an untenable position, the British would have to call off the operation as a whole. The Germans had won.

The butcher's bill reflected the result. The Germans lost about 20 men, a soft-skin vehicle, and one tank destroyed, another heavily damaged and (possibly) one immobilised. The British had to deplore the loss of 39 men, 5 tanks (including all three Fireflies) destroyed, and another with light damage, and 2 anti-tank guns wrecked.

Hauptmann von Wiener could rest content. For Major Hugh Billinghurst-Thorpington, it was not a good day.

Thursday, January 19, 2012

DIY terrain


It was a recent discussion in one of my yahoo groups on the subject of collecting or making one's own terrain pieces for wargames that has led me to begin an occasional series on the subject. The lead photo shows buildings, bridges and sections of pave that have all been scratchbuilt in some way. Only the river sections are manufactured items, though I've had to paint them myself.

The above building was constructed from a sheet of stone or brick patterned card I think originally designed for the facing stonework for the entrances of railway tunnels. Of course they are adaptable to a multiplicity of purposes. Buildings such as this simple design, for one. The roof tiles are made of cardboard strips (thin card is best)marked and notched along their length. The strips are about one-and-a-half to twice as wide as the tile rows to give the next row something to overlap and anchor to. The tile rows are then built from the bottom up to the ridge. The whole roof was painted with water colours.

This next building was made some 15 or 16 years back from cornflake packet - except for the 'railway tunnel' stone/brick card around the ground floor. The black timber work was made separately and applied (the pictures will show where wear and tear in the intervening years have caused some to fall out. Though it is true the plaster was supposed to be built out flush with the timbers, the '3D' effect of the applique timbers looked quite good, I thought. Took a bit of a while to make, but I feel I really ought to make more of these.

With a limited budget, it became a habit to look for the terrain potential in any piece of garbage lying about. Same goes for model scratchbuilding, whence comes to that.

Here is a clearer view of the 'brick paper' used for the ground floor. I had used a sheet of this stuff for stone walls, and the remainder seemed suitable for the purpose here.

You will observe in these last two pictures that the building stands upon a stretch of cobbled pave. What I did there was take the rather dark brick paper of the first building in this article and scan it as a picture file on my machine. Then I played around with the colours to get a lighter tone, and print out on paper.

As the paper was a bit thin, I pasted them onto something a little thicker, seen in reverse here (cornflake packet again).

And here they are: 3 areas of cobblestone pave. These sections can be used as open spaces such as town or village squares; or instead as the profiles (footprints if you will) of build up areas, with buildings and what have you placed on top.

Several years ago a friend received a whole wodge of timber off cuts of very interesting shape. Flat along one edge, the other formed an arc of a circle. These were maybe 10 inch to a foot long, and about an inch or so thick. The immediate thought was: bridges.

Individually, they were not going to be wide enough, but two carefully selected pieces glued side by side looked very promising. Then out with the stonework card, cut and paste gave us the sides. Originally I had two arches, but that looked odd with my river, so I settled for a bigger, single arch. As you will observe, I had no truck with cutting out the wood to make the arch, simply painting the area black. Good enough for me! The paving was provided (once more!) by my scanned and printed stonework paper.

The brick paper for the second bridge was provided by a different brick paper pattern from a piece that was unearthed during a clean out at the club and about to be thrown away. True, this card wasn't in the best condition, but I rather like my stuff having a well-used look. At any rate, there wasn't really enough to make a factory building from (which was my first intention), but when I at last got around to the bridges, its purpose became apparent.

I'll close here with some more pics of a few of my scratchbuild terrain pieces.

Quite a bit of the stonework paper got used to make pave sections for European village streets. These were backed on rather thicker card than the BUA/town square sections, because I felt for that purpose they needed to be more robust.