Saturday, November 16, 2019

Long Live the Revolution: The Railway Station (2)

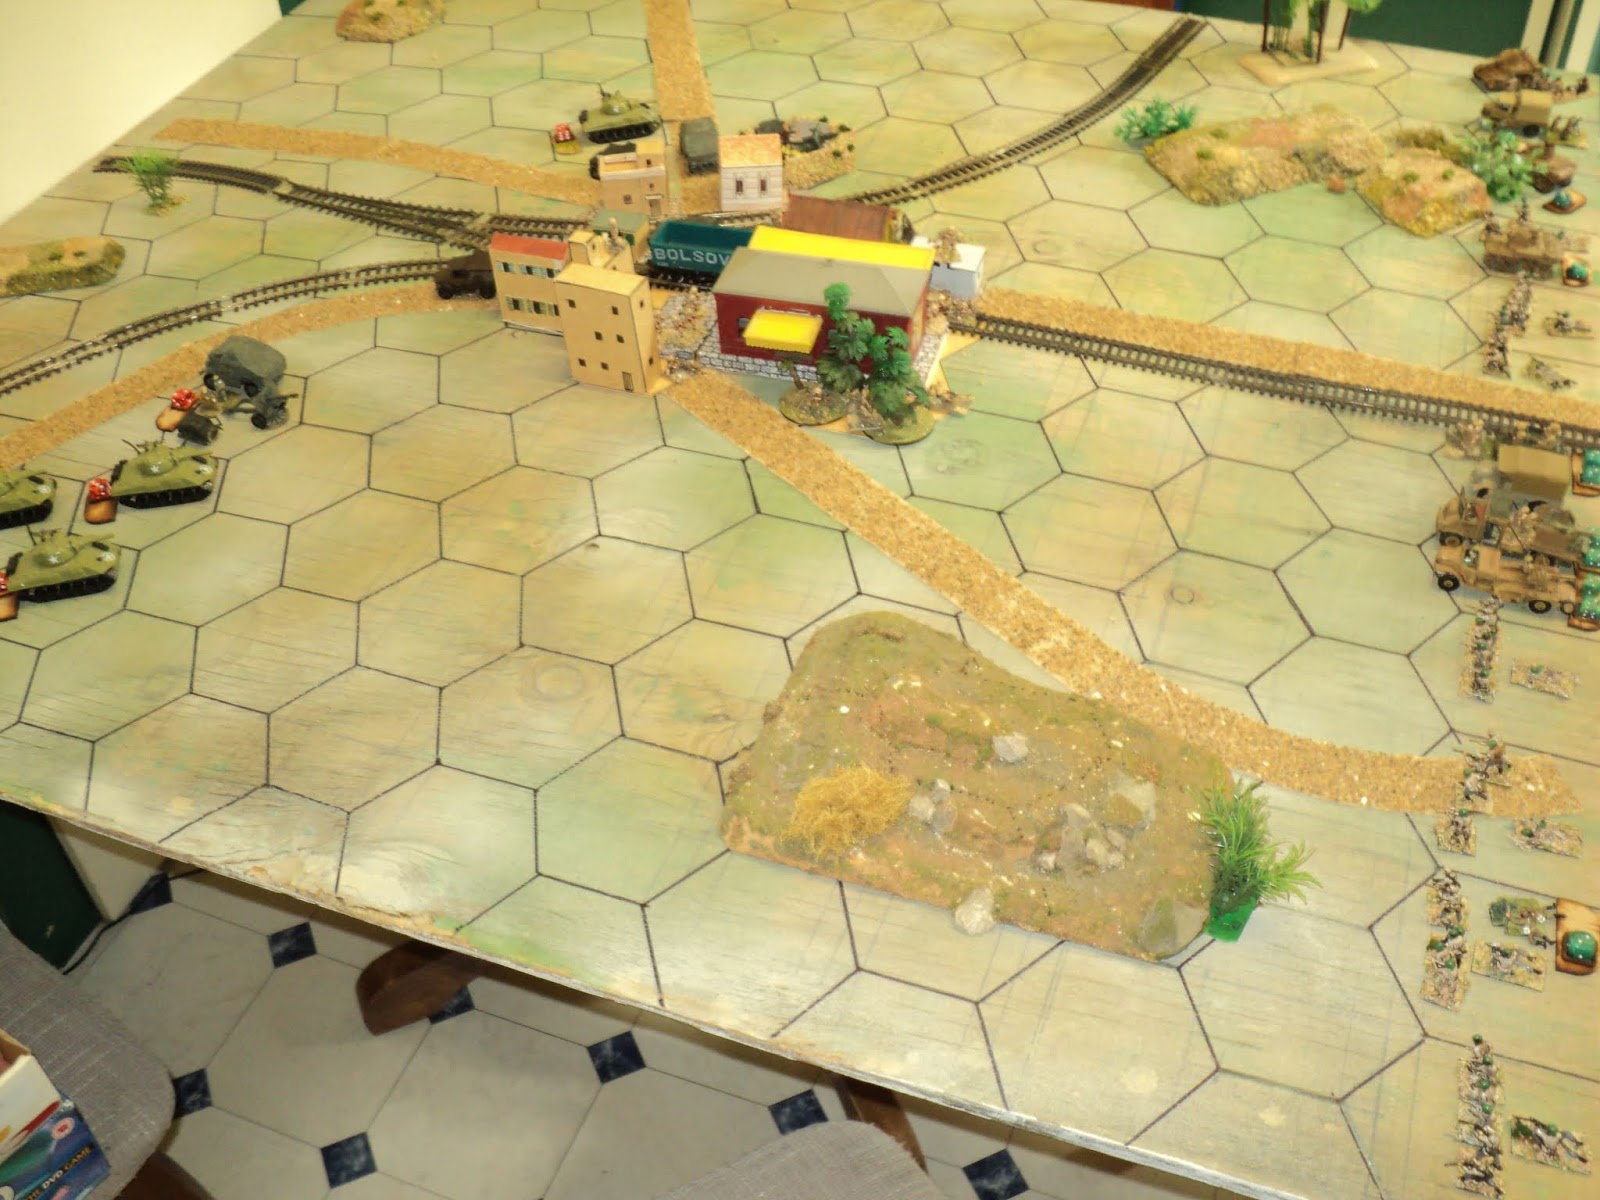
The Baluchistan Armed Revolutionary Front (BARF) attack upon Maibad Junction proved something of a replay of the battle of Maimajikwand.  Colonel Peenut Buttahjars threw forward both flanks to seize the high ground overlooking the town from northeast and southeast, from which vantages he intended the so-far-successful double envelopment.   Retaining for the moment only a vestigial mobile flank guard on the north side - a single squadron of tanks (D/ 6th Bananaramaputra Hussars) - Lt-Col Mugglethwaite retained a more powerful strike force close by the Khandibar branch line southwest of Maibad Junction - 3 Sherman squadrons backed by a gun battery.  It was hoped, of course, that the open plain would obviate the need to leaven this force with infantry.
The development of the BARF armoured thrust north of the town hastened the Lieutenant-Colonel to order two squadrons around the town to meet it, leaving just 'A' squadron to the south.
The hope was that the heavier weight of the Shermans would prevail over the lighter Stuarts. Although this might have seemed simply a hasty reaction to the BARF move, this had been Mugglethwaite's plan all along - to hold out the bait of a seemingly open flank in order to bring on the engagement he desired (well, that's one way to narrate events as they transpire!). For the rest, it was anticipated that the 25pr battery would switch to anti-tank mode (once the tanks got close enough) and flanking machine-gun fire would administer sufficiently discouraging hurt upon the enemy right wing.


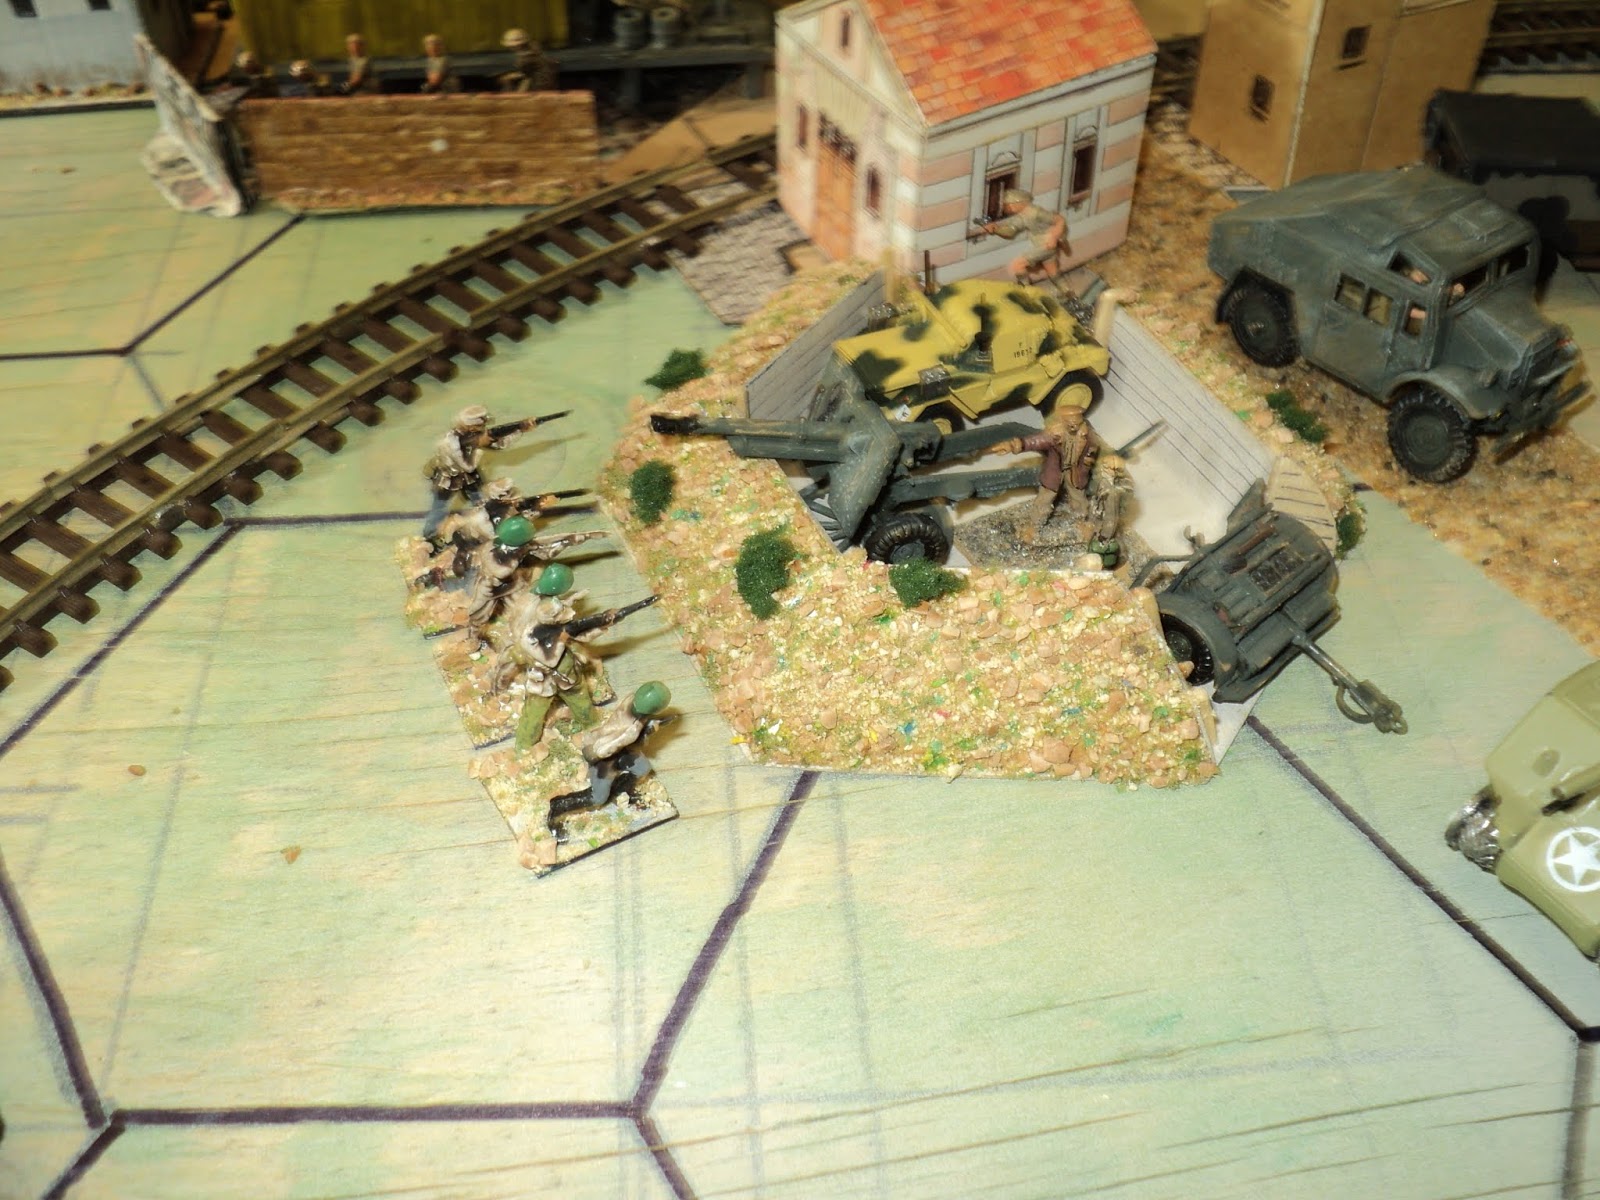
Events in the north developed quickly. First (BARF) company coming under gunfire, fell back alongside the battalion mortars. Under the cover of mortar fire 2nd Company made a dash for the fortified guns, bringing them under close assault, and at once neutralising them. The tank battle began with D Squadron knocking out some tanks of 3rd (BARF Armoured) squadron just as B and C Squadrons came up to engage at a range the lighter tanks could not match.    


At about this time, on the other flank, 6th Company made a dash for the Government machine position covering the southeast corner of the railway station. For a wonder, they drove back the gunners, and quickly effected a lodgment in the town. It was probably at this point that things started to go wrong for the Government, though at the time this was not apparent (Fact is, the dice rolling for the BARF infantry was phenomenal in this action!)


So far, the rest of the BARF forces had scarcely made any impact on the action. The portee anti-tank guns hadn't even moved from their start line, and the left wing hook had yet fully to develop. Only 2nd and 6th Companies were for the present closely engaged, the former having taken some loss (1SP) already.  Colonel Mugglethwaite had taken the the defence of 'B' Battery position personally in hand.  BARF were not to find the position easy pickings - in the event the battery position was never taken by force. 
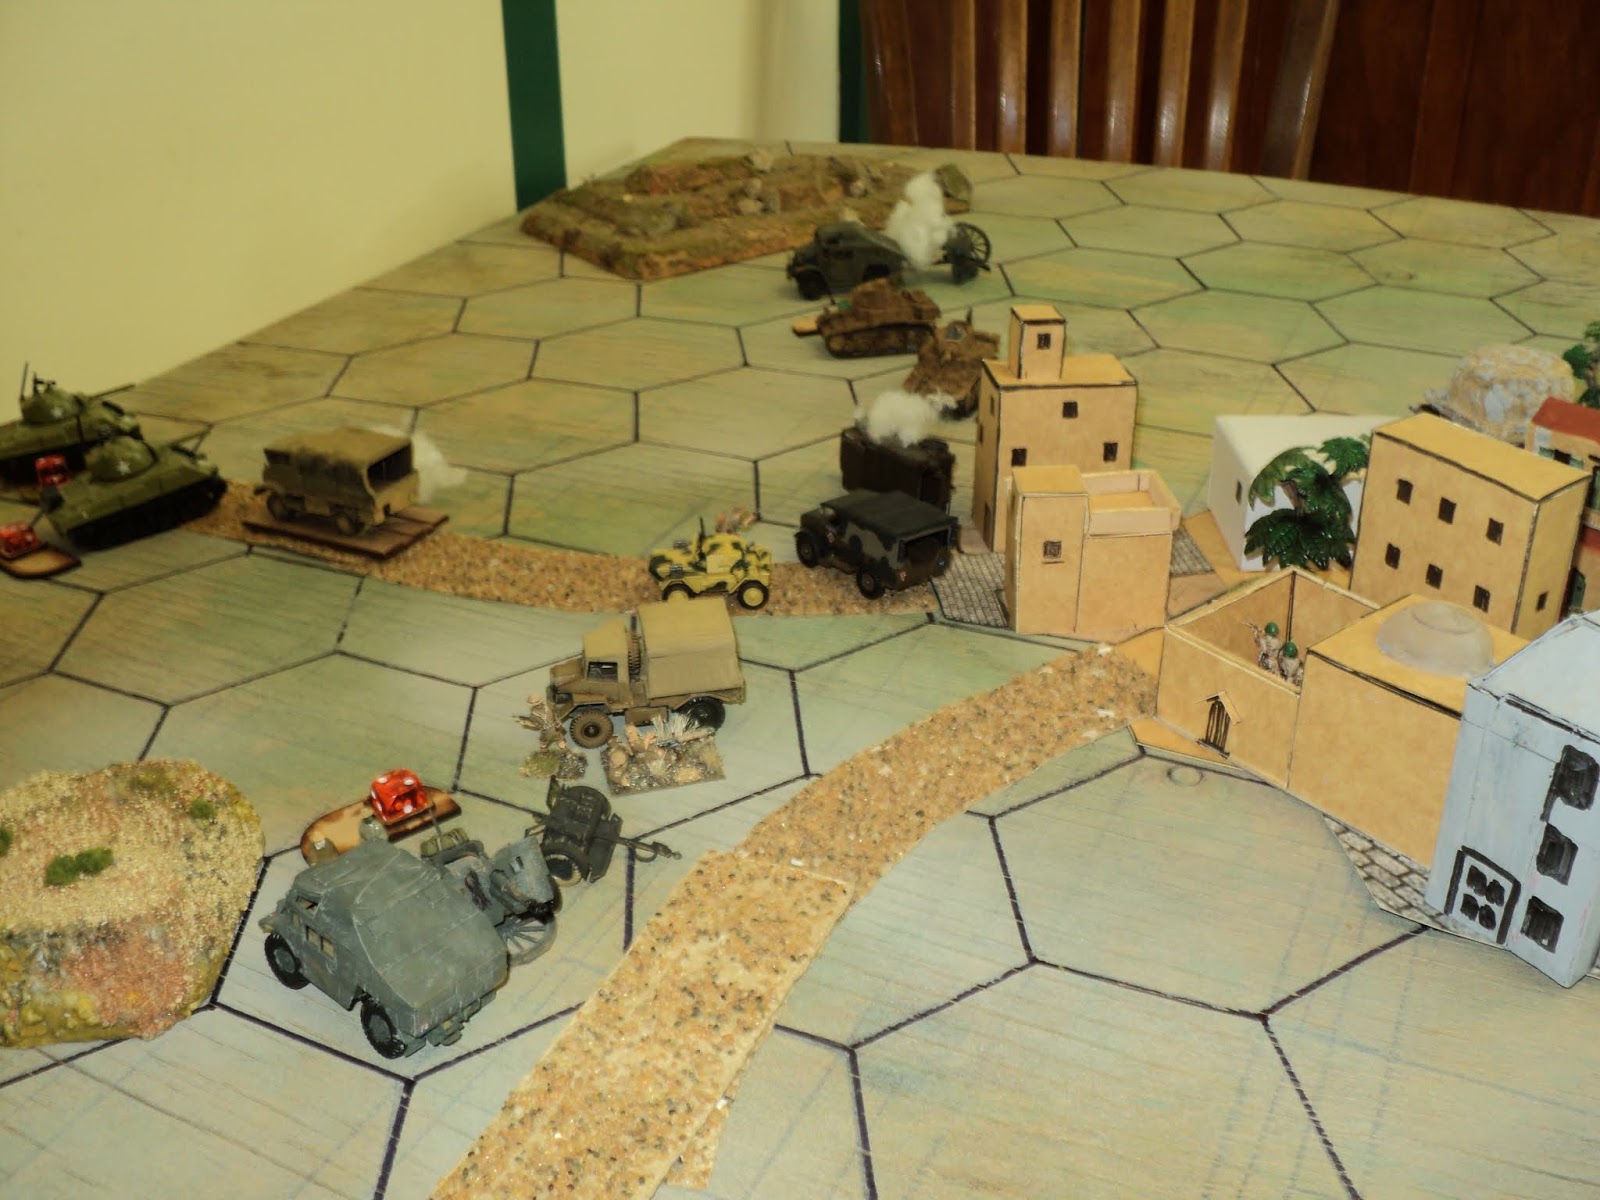
The action becoming entangled on the north front, the southern sweep gathered pace. A Government counter-attack threw 6th Company back out out of the town, but failed to recover the buildings there. The gun fire of A Battery and MG fire of A Squadron proved no discouragement to 8th Company that formed the BARF left flank. Help was racing up in the form of the portee-mounted anti-tank guns, as fully five BARF infantry companies, with MG and mortar support fire, were now assailing the little town from the south and southeast. The garrison was scarcely placed in a position to resist, as 3rd and 4th Companies, nor far distant were closing from the east. Only 1st Company were out of the range and out of the action. They would not be so for much longer.
The anti-tank guns were pulling up into battery position as the BARF infantry plunged into the town.  Less effective within the precincts, the machine gunners (2SP only) were very soon overwhelmed.  1st Company swung in behind and to the left of 2nd Company to close to engage C Company, and B Company had 3rd and 4th BARF to contend with.  That left A company, alone once the machine gunners were eliminated, facing 5th through 8th Companies.  A squadron was unable to intervene, neutralised by the portee guns, the 6-pounders of which knock out a small number of the tanks.  All the same, the rebels were finding town fighting to be no light matter.
That the tank battle went the Government way flattered to deceive.  The lighter BARF armour having lost perhaps half their tanks - 3rd Squadron was particularly hard hit - they fell back alongside the 1st Battalion mortar position.  But the equally battered Sherman didn't follow up, staying in place to for a protective screen.  The moment the opportunity presented, Colonal Mugglethwaite drew 'B' Battery out of its position, and ordered the evacuation of such troops remained with the town.  Under cover of the tanks, the artillery and truck-mounted infantry drew off to the west.
B Company was never to make it.  Almost surrounded, they tried to thread the eye of the needle of encroaching rebels, and seemed for a moment likely to break clear after all.  At least twice, importunate rebel attacks met a sharp and fatal riposte.  But there was no transport to take them out of the town, even had they made it so far.  Finally cut off, what remained of the gallant B Company laid down their arms.

The result of the this action, if not the overall outcome, came as a surprise in two ways.  The first was the relative ease with which the rebels overran the southern sector of the Government defences.  The other was that, so clear cut was the outcome foreseeable from an early stage, that the victory was complete before either exhaustion point was reached. 

Here, for the historiographer who likes numbers, the costs of the action:

Losses by Government:

  Brigade Group HQ, staffs etc   -
  6th Armoured:
     A Sqn -1SP
     B Sqn -
     C Sqn -1SP
     D Sqn -2SP
  17th Choklit Ghandi Rifles:
     A Coy -4SP
     B Coy -3SP (the remaining 1SP surrendered at the close of the action)
     C Coy -       (got clear away with negligible loss!)
     MG Platoon -2SP
  Artillery -

Total losses: 13SP, plus 1SP surrendered, 14SP (c.f. exhaustion point 14SP)

Losses by Revolutionaries:

   Army HQ, Staffs and hangers on -
   1st Battalion:
     1st Coy -1SP
     2nd Coy -2SP
     3rd Coy -1SP
     4th Coy -1SP
     Mortar detachment -
   2nd Battalion:
     5th Coy -2SP
     6th Coy -2SP
     7th Coy -2SP
     8th Coy -2SP
(Even successful urban fighting can be costly!)
     MG Platoon -
     Mortar detachment -
   Armoured Battalion:
     1st Sqn -1SP
     2nd Sqn -
     3rd Sqn -2SP
   Anti-tank Unit - no loss

Total losses: 16SP (c.f. exhaustion point 22SP)

The loss of such a vital rail communications nexus at last caused the Government administration some concern.  Lieutenant-Colonel Mugglethwaite was recalled to the capital, and, indications that BARF's next objective was to be the sea port Khandibar, Brigadier P.J. Damwright was selected to command the defence of the place.

To be continued...

Thursday, November 14, 2019

Long Live the Revolution: The Railway Station

Following their success at the Provincial capital of Maimajikwand, the Baluchistan Armed Revolutionary Front (BARF) rapidly gained momentum.  Within mere days, there they were, arrayed before Maibad Junction, a vital rail nexus connecting Provincial Maimajikwand with the National Capital, Nawabsbad, the major sea port, Khandibar, and the natural wealth that lay beneath the hills and mountains to the north (SEE MAP).

Still in command of the government forces charge with resisting the rebel advance, Lt-Col Mugglethwaite had had impressed upon him in no uncertain terms that Maibad had to be held, at all costs. Once again, the Government held the built-up area in strength, keeping one artillery battery in a fortified point north of the town, and another close by the Khandibar road to the south.  The 6th Bananaramaputra Hussar Armoured Regiment now had all four squadrons available.  'D' Squadron covering the north side of the town, the bulk of the armour stood waiting to the south.  The Government 'wings' presented a slight refused front, with the idea of taking any rebel envelopment in the flank.

The size of the Government force was determined by adding 30 to a roll of 3D6.  The roll was a good one: 14, giving 44 Strength Points.  Incidentally, the fortifications protecting 'B' Battery were not included in the calculation.

The Government forces comprised:
Command, HQ and staffs:  .....6SP
6th Bananaramaputra Hussars:
     4 Squadrons with M4 Sherman medium tanks @3SP .... 12SP
17th Choklit-Ghandi Rifles:
     3 Rifle Companies @ 4SP
     1 Vickers MMG Platoon @2SP
     2 Truck transports @2SP ..... 18SP
1st Tchagai Artillery
     2 Batteries, 25pr field artillery @2SP, plus Quad tractors @2SP ..... 8SP

13 units (median 7)
44SP, exhaustion point, -15SP


The size of the Revolutionary force was determined by adding 42 to a roll of 6D6.  The dice-roll came out at 23 - another good roll - for a total of 65SPs.

The Revolutionary forces comprised:
Command, HQ and hangers on:  .....6SP
1st Volunteer Rifles Battalion:
     4 Rifle Companies @4SP
     1 3" Mortar detachment @ 2SP
     1 universal carrier, Mortar carriage @2SP  ......20SP
2nd Revolutionary Front Battalion:
    (as 1st Vol. Rifles)
    plus 1 Vickers MMG platoon @2SP ...... 22SP
1st Tank Battalion:
     3 Squadrons with M3 Stuart light tanks @ 2SP (poor) .....9SP
'A' Battery, Anti-Tank:
     1 6pr medium anti-tank gun @2SP plus portee @2SP (poor) ....4SP
'B' Battery, Anti-Tank:
     1 2pr light anti-tank gun @2SP plus portee @2SP (poor) ....4SP.

17 units (median 9)
65SP, exhaustion point, -22SP   

Battle of Maibad Junction - opening moves.

Please pardon the delays in getting these written up.  The corpore is a little lacking in sano at the moment, so I'm taking things a bit easier.  In fact, the campaign is now 5 battles deep, with the fate of Tchagai still in the balance.  There are many questions to be answered!  So there is plenty more to come!

To be continued:


Sunday, November 3, 2019

Long Live the Revolution - The Provincial Capital (2)

Revolutionary infantry advancing; Government artillery score hits on AT portees and mortars.


As the rebel troops closed upon the town of Maimajikwand, the plan drawn up by Colonel Peenut Buttahjars became clear: a double envelopment by the infantry; a concerted assault upon the town, with the tank and anti-tank units ready to clear, or at least neutralise, the flanks. It was much the same plan as was used at Madasaiwannabe.


BARF assaults go in: 1st and 2nd Coys on the right; 5th
Coy on the left.
To begin with, the defence seemed to Lt-Col Mugglethwaite to be holding out comfortably enough. Accurate gunfire scored hits on the 6pr Anti-tank guns and portees, and on the mortars as well.  'A' Company of 17th Choklit Ghandhi Battalion (A/CGB) faded back into the southern built-up precincts as the 5th, 6th and 7th BARF Infantry Companies, backed by the anti-tank gun portees, fetched a wide sweep with the idea of assaulting the town.
So far, 1st, 2nd, 4th, 5th and 6th Coys have all lost 1SP.
Overall: Revolutionaries 8SP lost; Government, 2SP.
Meanwhile 1st and 2nd Companies early assailed the dug-in C/CGB from north and northeast. That the attacks by the centre - 3rd and 4th Companies - were slower to develop was all part of Col Peenut Buttahjars's broad plan. First, lead off with the flanks.  Then advance the centre.  Once the town's garrison was closely engaged, then would be the time to throw forward his limited and precious armour.   
1st and 2nd BARF Coys bring C Coy's fortifications
under close assault.  All three have taken losses.
The infantry put a brave front to the incoming Government gunfire, though it has to be said that it seemed to lose its accuracy as the Rebels advanced. Having reduced the 'open sights' modifier from +2 to +1, but adding in the 'unmoved' modifier, the 25pr guns hit on a 3-6 roll.  At first the BARF infantry were prepared to accept the odd SP loss to maintain their momentum (This was a major benefit to the game's fluidity of omitting the 'pin' feature, I think: it gave the attackers the incentive - and ability - to press attacks in the face of losses). At about this point a less sanguine commander than Col Buttahjars might have felt some concern about his mounting losses. At the cost of 8SPs the Rebels had inflicted the loss of 2SP only upon the enemy.
BARF light tanks move up the north side of town.
On the other hand, they were quickly closing in upon the south, east and northeast faces of the town.  Repulsed, 5th Company were replaced by 6th, attacking the machine gun posts. A quick counterattack by the lead squadron of Shermans was beaten back by the 6pr guns. The gun battery's attempt to silence them failed; in fact, their shooting henceforth became woeful - hardly any effect whatever. Seventh BARF Infantry Company had even the temerity to face off against the Sherman tanks.  
General view, looking west.  Attacks going in.
Now, as mentioned in the previous action, I have decided that tanks and assault guns, armed as they are with machine guns, can act as MG carriers in effect, choosing to shoot with MGs at appropriate targets, such as infantry, instead of the tanks' main guns.  The MG range is of course the same as the infantry weapon, and so is the rate of fire. My reason for adopting this course, is to give the tanks a more 'tankish' effect against infantry.
View looking northwest.  A rather tentative armoured counter-attack
achieves little so far.
Not that it was noticeable in this battle.  On more than one occasion, even unmoving (3 dice, hits with 3-6 rolls), the tanks scored not a single hit upon the enemy. Even when they did, it was a 'forceback' only and no loss. That did not prevent Nr7 Coy from reaching the town, where it came into close combat with A/CGB. 

The portee mounted AT guns form a protective gun line
 against Imperial armour.
By now, Nr6 Coy had broken into the southeast face of the town, defended by the MG platoon. Half the MGs were overrun (-1SP loss); the remaining half drew back towards the town centre. B/CGB was closely engaged with Nr4 Coy, whilst 3rd Coy had joined 1st and 2nd attacking the dug in C/CGB. Already badly depleted, the latter could not survive much longer.
Rebel tanks engaging a Government 25pr battery.
With the fight for the town having developed more-or-less in the manner planned, Col Buttahjars threw forward his light tank squadrons towards the gun line of 'B' Battery Tchagai Artillery. These 25pr gun/howitzers, muzzle brakes fitted for anti-tank action, I counted as light anti-tank. Now, as far as I can make out, under the DPWG system artillery has the same effect on armour as it does on any other target (P71: Artillery can destroy any type of ground unit). I'm none too keen on this, especially in 'area fire' mode. I'd have to think about that some. At any rate, the guns had been supporting C/CGB's defence (not very effectively) by the time the Stuarts got close, at which point they switched their targets. For the time being, the 'arty vs tank' question could remain moot.
Battle for the town.  The Revolutionaries have broken
into the southwest corner.
On the other wing, the 2pr portee battery had joined their 6pr comrades as some protection from the Shermans. At one point the Shermans drew close enough to engage the guns, got the worse of the encounter and drew back alongside the 25pr guns of 'A' Battery. 
A closer view.  1st Company has at last overrun
'C' Company, leaving 'B' Company almost surrounded.

'A' Squadron strikes 7th Coy in flank
Assailed by three Rebel companies supported by 3-inch mortars, 'C' Company finally collapsed, its scant survivors now prisoners of war. Now that the MG platoon had also been driven in, 'B' Company was left surrounded on 3 sides, under attack by no fewer than 4 Rebel companies (1st, 3rd, 4th, and 6th Coys). Col Buttahjars had, by this time, joined 5th Company just outside of town, ready if required to throw in this reserve.


'B' Coy is isolated...
The tanks' machine guns proving so ineffective, 'A' Squadron charged the flank of 7th BARF Company, hoping to over-run the importunate Rebel infantry. The Rebels' risky boldness paid off. Unable to shake the enemy's enthusiasm, the tanks, again, fell back.


Overhead view of the battle in the town.
The town fighting grew increasingly desperate, as C/GCB was no more, and B/GCB was almost surrounded. Col Mugglethwaite had joined the MG platoon in his scout car, but as yet 'B' Company was for the time being preventing any Rebel advance further into the town.  Yet it could be only a matter of time.  By this stage, the account of SP losses was rather more equal than before, though still in favour of the Government forces.
Government field artillery in trouble!


Isolated as it was in the plain northwest of the town, the light tanks caught up with the 25pr 'B' Battery. Whilst 2nd Squadron engaged the battery from in front, 1st Sqn fetched right hook into the battery's left flank. In the brisk exchange of gunfire that ensued, both sides lost heavily. The surviving guns hitched up in an attempt to make a run for it (a fair chance dependent upon the initiative rolls in the subsequent turns). 


'B' Coy tries to escape as the BARF fighters advance through
the town.
By now it was clear to Col Mugglethwaite that this battle, and the town with it, was lost. The Government forces' losses were close to, if they hadn't yet, reached their exhaustion point, as the rebels surged into the town. The Rebels were not yet so parlously placed.  When the MG platoon was forced back, the Colonel was lucky to escape with his life. 'B' Company's attempt to escape from behind enemy lines seemed clearly doomed, only 'A' Company remained of his fighting infantry.  But coming under heavy attack 'A' Company simply melted away like ice in the sun (some amazing dice rolling by 6th and 7th Coys!).
The Sherman tanks having failed to achieve anything against
BARF infantry are driven back by the boldly handled BARF truck-mounted AT guns.

His tanks had proved disappointingly ineffectual against the rebel anti-tank portees, and 'B' Battery had finally expired under Rebel tank gun fire.  Mugglethwaite ordered the evacuation of the town.
25-pr gun battery destroyed, the light tanks are free to run
for the road west, where the Government retreat has begun.
This would not be so easy to effect. There was nothing to prevent the Stuarts from racing up the couple of miles further to cut the highway west, apart from recalling the Sherman tanks to guard the road. 
Remnants of Govt infantry clinging to the edge of the town.
By early afternoon, what remained of the town's garrison were clinging to the northwestern edge of the place, in the face of steady rebel pressure. The MG platoon were able to reach its motorised transport betimes. But it was becoming clear that what remained of 'B' Company would after all break clear, if ever the enemy pressure eased. That determined band, resolved to cover the retreat of their defeated comrades, had effected their own.

Most of Maimajikwand is now in BARF hands, and the
BARF tanks have got in amongst Government transport.

Government troops make off, as
BARF take over the town's
administration.

Soon, the road west was covered with the transports heading west. A' Battery very nearly left its move too late, and already the road was coming under fire from the Rebels' light armour.  But the threat to cut the road didn't materialise. The Shermans arrived to protect the retreating column, and engaged the enemy tanks (This was possibly not quite 'per book', as the Government Army was long past its 'Exhaustion Point', but it seems to me the sort of rearguard action part a defeated army might undertake.  At that I didn't advance the Shermans past the road, to engage the enemy tanks at long range). The resistance of B/CGB in the town finally persuaded the Rebels to abandon their pursuit, and the Government troops were able - such as remained - to depart more or less in peace.

The battle was over.

Well, that was fun!  Quite a few little issues cropped up, but it was hard to determine their effect. They would become a little more acute in the following battle. This was mainly due to the appallingly cross-eyed shooting of the Government troops, especially the tanks and 'A' Battery. The MGs didn't cover themselves with glory, neither. Nevertheless, a couple of turns after the Government Brigade Group reached its exhaustion point (minus 13SP), they managed to tip the Rebels over theirs (minus 19SP). It was clearly a Rebel victory, but another costly one. It might equally well have gone the other way!

About to publish this, I thought the notes on the 'Butcher's Bill' - an invaluable historiographical document - had been lost to history. But lo! it was discovered behind an ancient desk in the Tchagai War Office during recent refurbishments.  Here is the tale:

Government's Losses:

A Coy: -4 SP *
B Coy: -3 SP
C Coy: -4 SP *
MG Pln: -1 SP
A Sqn: -1 SP
B Sqn: -
A Bty: -
B Bty: -2 SP *
Transport: -1 SP
* = destroyed
Total: 16 SP (Exhaustion point was 13 SP)

Revolutionaries' Losses:

1st Coy: -3 SP
2nd Coy: -1 SP
3rd Coy: -2 SP
4th Coy: -1 SP
5th Coy: -
6th Coy: -2 SP
7th Coy: -3 SP (The armoured counter-attack must have done some damage after all!)
6pr AT Coy: -1 (gun) -1 (portee)
2pr AT Coy: -1 (gun only)
Mortar Coy: -1 (carrier only)
1st Tank Sqn: -2 SP
2nd Tank Sqn: -1 SP
Total: 19 SP (Exhaustion point was 19)

From this list we can see that perhaps my narrative is over-critical of the fight put up by Mugglethwaite's Brigade Group!

To be continued: 'The Railway Station'

Friday, November 1, 2019

Long Live the Revolution - The Provincial Capital


The BARF forces on their start line as dawn breaks.
Following the capture of the regional capital, Madasaiwannabe, the Tchagai Rebellion/ War of Independence fell into something of a lull for several weeks.  The Rebel victory had cost dearly, and the Baluchistan Armed Revolutionary Front (BARF) army had just about to be rebuilt.  The Government forces had been even more comprehensively mangled; it would take months before the 22nd Punjanjoodi Battalion could be brought up to strength.  In the event, the BARF managed to assemble a sizeable force rather before the Government could.  


The Government defenders await the onslaught.

Despite his heavy defeat, Lt-Col E. Mugglethwaite not only kept his rank, but continued to hold his command.  The Court Martial had, to the Colonel's surprise and relief, been quite sympathetic.  The Rajistan Imperial Military Authority retained him in command, ordered him to gather what forces he could, and once more face the upstart rebellion.  He called upon the motorised 17th Choklit Ghandhi Battalion to replace the 22nd, and, to give his small force some heft, two squadrons from 6th Bananaramahputra Hussars.  They were equipped with Sherman tanks.  To round off his Brigade Group, the Colonel added two 25-pounder batteries from the 1st Tchagai Artillery Regiment.

Urgent rumour of BARF moves toward the Provincial capital, Maimajikwand, at the foot of the broad valley of the same name, Colonel Mugglethwaite made haste to secure the place before the rebels could arrive in force.  He was just barely in time.


Lt-Col Mugglethwaite trusts that his artillery and armour
will be enough to cover the plains flanking the town.

His army comprised:

Tchagai Counter-Revolutionary Armed Protectorate Brigade (CRAPB)

Command and HQ (scout car) = 6SP
17th Choklit Ghandhi Battalion:
     A Company = 4SP
     B Company = 4SP
     C Company = 4SP
     MG Platoon = 2SP
     Battalion Transport Pool: 4 trucks, e@2SP = 8SP
6th Bananaramahputra Hussars:
     A Squadron, M4 Sherman medium tanks = 3SP
     B Squadron, M4 Shermans = 3SP
1st Tchagai Artillery:
     A Battery, 25pr field guns, plus Quad prime movers = 2SP
     B Battery, 25pr field guns, plus Quad prime movers = 2SP

Total number of units, including infantry transport = 13.
Median = 7 (for determining activation)
Total strength points = 24 + 3D6 = 24 + 14 (Good roll!) = 38SP
Exhaustion Point = -13SP.

Notes:
1. I wrongly failed to account for the 25pr prime movers, on the rather specious grounds that they were integral to each 25pr unit, so in effect the Army actually had 42SPs.
2. I didn't count the HQ vehicle as a separate unit.
3. All units were regarded as 'Average'.


Not a whole lot of cover available for the attackers!

Disappointed at his failure to seize the town unopposed, the self-styled Colonel Peenut Buttahjars (actually still holding the rank of rissaldar in the Army of Rajistan) drew up his considerable force a mile or so east of Maimajikwand.   Better equipped now than it had been in the previous action, the BARF army had managed to purloin from various Imperial sources (easy, when you have sympathisers 'inside',  to stage breakdowns and other assorted incidents) a couple of squadrons' worth of M3 Stuart light tanks, and a similar number of portee-mounted anti-tank guns.

His army comprised:

Baluchistan Armed Revolutionary Front (BARF) 

Command and HQ (light truck) = 6SP
7 Infantry companies each @ 4SP = 28SP
2 Mortar platoons @2SP, with carriers @ 2SP = 8SP
2 Light tank squadrons each @ 3SP = 6SP
1 6pr (medium) Anti-Tank battery @2SP, with portee mount @2SP = 4SP
1 2pr (light) Anti-Tank battery @2SP, with portee mount @ 2SP = 4SP

Total number of Units (including transports)  = 18
Median = 9
Total strength points = 30 + 6D6 = 30 + 26 (another fine roll!) = 56SP
Exhaustion Point = -19SP

Note: All units were classed as 'Average', except for the portee mounted anti-tank guns, which were classed as 'Poor'. This was to reflect their comparative vulnerability as fighting vehicles (they being engaged in this and subsequent battles whilst mounted).  I was later to discover that maybe the tank-anti-tank aspect of the rule set could use some refining.  That will be a topic for later.


The opening moves ...
An early hit on the BARF's only
'artillery' support!

Lieutenant-Colonel Mugglethwaite's overall plan was to defend the built up area with his infantry, whilst covering the open plains on either flank of the town with his armour and artillery. For his part, Colonel Peenut Buttahjars resolved upon the tried and true plan of his previous battle, a straightforward double envelopment. And see how the Imperialists like it!


BARF's double envelopment taking shape, though an
artillery stonk causes some loss to the 6pr AT battery.

To be continued...

Wednesday, October 9, 2019

New Toys

The two 5-vehicle military truck sets from China.
 These interesting items arrived from China onto my doorstep yesterday. I had seen them on an Army Men group on facebook, noticed the Katyusha, and thought to myself of the Katyushaless state of my own Red Army.  The thing comes as part of a set of 5 trucks, the others of which I thought might also be of interest.  As the price seemed not too exhorbitant, I ordered two sets. The Company indicated the package should arrive about 10 October; I received them a day early.
Katyusha mounts.  Not quite right, but near enough for mine.

Let us then examine the loot. Well... It turns out the Katyushas weren't ...quite ... the thing: seven rockets placed between the rails instead of on them, and none underneath (16 rockets in all).  Looking up their mounts, I find that apparently the Katyusha frames could be mounted on any platform, pretty much. Most of the examples seemed to have been on 6x6 or 6x4 drive trucks. I found but one image of a 4-wheeled portee: 
That will do! For the rest, if it looks like what it's meant to be, then that is what it is: BM13 Katyusha rocket platforms.


The two flat bed trucks were welcome logistics or transport vehicles - no comment needed there. By the way, though, these are quite frankly toys, not models. They are made with a kind of friction motor. Draw the vehicle backwards along a flat surface, floor recommended, let them go, and watch them whizz across it. 
AA vehicles in the set.  Technicals in the service of
Tchagai perhaps?

The other three comprise a Quad AA mount, a large gun mount and a large (SAM?) rocket mount.  What to do with these? The only Quad AA mount for the Red Army I could find was the quad Maksim arrangement, arranged in a single row. Apart from the bracing struts, this looked more like the German Quad 20mm AA piece. Did the Soviets ever stick any captured examples on the back of trucks? The thing seems plausible enough, but what evidence is there that they did any such thing?

The big gun does look like a heavy-ish AA on a portee mount, and as I have seen such images, e.g. 
we might, just barely, accept these into our Soviet inventory. This and the other two, I rather suspect, will fetch up in the inventory of the Army of Tchagai as technicals of one sort or the other. Unfortunately, the big gun is fixed in 'carriage' mode, though it can swivel, and can't be elevated to look as though it's ready to shoot anything out of the sky.

Heavy stuff!  SAMs?  The nabob of Tchagai might well
be happy to add these to his arsenal.
This big rocket mount looks so cool, but I can find no images on the internet cognate to such an arrangement - certainly not for World War Two!   
A battery of ... erm ... 'mortars'...
Finally a couple more pics of the four vehicles likely to see a deal of action as time goes on. I simply haven't been able to find 1/76:1/72 scale Katyusha kits anywhere else, and it seemed to me that they were just the thing to equip my Guards Mortar units. Not precisely 'models', they offer the impression of Katyusha launchers. That'll do me.
You can't have too many trucks...