Friday, March 11, 2022

The Deuteros Raid - Combat on the Road

Battle lines drawn.  The Bulgars (green die)
with the initiative roll...
'Correctly anticipating that the Bulgar raiders would make their destructive way towards Deuteros, the defeated Commandant of Hapax gathered his small host, intercepted them on the way. Hard by the Forest of April, where the way narrowed, George Pithikos drew up his line, the peltastoi in ambush in the forest itself; the skoutatoi heavy infantry on the left, and himself with the kavallarioi in the centre. The light horse prokoursatores covered the front of the skoutatoi.

The Bulgars matched the Roman deployment: foot and light horse on the wings; heavy cavalry in the centre.  The Tarkhan Tiercel stood with the heavy horse. Having drawn up their battle array, the Bulgars at once surged forward, all along the line...'
Michael Psellophanes, Byzantiad


So fierce was the Bulgar onset that the protection of the forest availed the peltastoi nothing, and the extra weight of their horse (two units to one) drove in the Byzantine centre with loss. The Byzantine left held, but barely.


The Bulgars successful along the whole front. The 
red counter under the Tarkhan actually represents 
an SP lost to the Byzantine prokoursatores beside him

Having reached the Byzantine base line in just two turns, winning the initiative in both, the Bulgars quickly obtained the victory. Pithikos's command had been contemptuously brushed aside.
This action barely lasted ten minutes, and was all one-way traffic.  The Byzantine losses amounted to 3SP; the Bulgars, none.  The Tarkhan could be well pleased.  The next stop would be Deuteros - a large prosperous village, just ripe for the picking.  But there they were to find a formidable opponent, the Strategos, Yannis Zimiskes with a sizeable army...

The Deuteros Raid

 'The second year of Michael Ponos, Emperor, was a year of constant pressure from without the Byzantine Imperium, and revolt within.  The armies, provincial and imperial both, found themselves constantly on the march, when they were not in action, withal.  In the early spring of 998, a considerable Bulgar raiding party, led by the local kavkhan, Attishu, made an attack across the river Potomos in an attempt to seize the border village of Hapax.  This place being a border market town, wherein met every day peoples from both sides of the water, this was to be the lucrative beginning of what was hoped by the Bulgars to be a profitable foray.  The ultimate aim  was the rich town of Tetrakis, several miles inside Byzantine territories.

Pakourianos Dryos, the local commandant Hapax and its hinterland, had heard rumours of Bulgar preparations for the attack, and prepared according to the resources available to him.  He resolved in the first instance to oppose the river crossing at Hapax itself.  For all his determination, he still apprehended the small size of his force that he could bring against the Scythian* hordes...' 
Michael Psellophanes, Byzantiad.


Such is the generating circumstance of my second foray into Mark Cordone's 3x3 battleboard concept.  Since its inception, the concept has been expanded into 6 battlefields.  These six seemed to me to form the basis of a campaign comprising a sequence of battles - a raid, withal.  Here is the plot.

1. The battleboard maps:
Maps 1 and 2
Maps 3 and 4

Maps 5 and 6

2. The Bulgar raiders begin at the top of Map 1, and work their way, top down, through the maps in succession until they reach Map 6 - the bountiful town of Tetrakis.

3. The composition of the raiders' force is constant:
  • Commander, Kavkhan Attishu (who may be replaced if killed) 
  • 1 noble heavy horse archer with javelins and bow (elite)
  • 1 noble heavy horse archer with javelins and bow (average)
  • 2 light horse archers with javelins and bow (average)
  • 2 close order infantry with spear (average)

      
4.  The defending Byzantine forces vary over time.  They begin with
  • Commander, a local commandant name of George Pithikos, or a higher commander later on.
  • 1 heavy cavalry unit (kavallarioi) with lance and bow (average)
  • 1 light cavalry unit (prokoursatores)with lance and bow (average)
  • 1 close order infantry unit (skoutatoi) with spear and bow (average)
  • 1 loose order infantry unit (peltastoi) with spear and javelins (poor).
5.  Possibly for this campaign, the skoutatos unit should could as 'poor' spearmen when faced by other spearmen, but 'average' when facing horse and other foot; and 'average' for shooting.

5. For the battles in Maps 3 and 4, the Byzantines add a second heavy cavalry unit.

6. For the battles in Maps 5 and 6, the Byzantines add a third heavy cavalry unit.

7. For this campaign I used Developing the Portable Wargame rule set with Mark Cordone's 'Fall of Rome' 3x3 game system.

8. All units begin with 2 Strength Points only (2SP).  I did consider staying with the 'standard' Portable Wargames SP, but I tend to regard this 3x3 version as 'PW-Lite' or 'PW-Quickplay'.  As such the 2SP system 'feels' about right, here, and qualitative differences among the units - weapons, training, esprit du corps etc - have to be brought out by other means.  I've stayed with the PW 'standard' in this regard, but possible refinements might be considered.

Battle of Hapax 


To face the impending invasion, the commandant, George Pithikos, placed himself with his loose-order peltastoi spearmen in Hapax town itself, and line the river bank to the left with his skoutatoi foot and to the right with his heavy cavalry unit.  His light horse he retained in reserve.  


Initial set-up. The river is the border between Bulgar and Byzantine Empires; the town is Hapax, garrisoned by 1 unit of heavy and one of light cavalry; 1 unit of heavy infantry, and one of loose-order mediums. The last defends the town, led by the commandant in person.

The Kavkhan's plan was with his light horse to engage the flanks in a cross river archery duel in the hope of weakening the defenders before charging across with his heavies.  In the centre, he led his spearmen to storm the bridge into the town itself.  


First blood went to the raiders when accurate archery inflicted serious losses among the kavallarioi east of the town.


Bulgars close up to the riverbank, and a shooting war begins on the flanks. First blood to the Bulgars! Each counter represents an SP lost. 


Heavy losses on both sides from horse archery on the flanks, as the Bulgars have made no attempt yet to force the river crossings there; and battle royal as the Bulgar spearmen, led by Kavkhan Attishu storm the bridge.


The town being forced, the Byzantines win the next initiative roll, and the right to counter-attack. Had the Bulgars won the initiative roll, the battle would have ended, right there, with a Bulgar victory.  But now, so savage was the fighting that the peltastoi fought themselves into exhaustion in evicting the Bulgars the town, and slew the Kavkhan in the process! This looks like an ignominious end to the raid before it has properly begun!


Under the cover of the prokoursatores light horse, the skoutatoi infantry entered the village and prepare the place for defence. Note that as the condition for victory is to reach the enemy baseline in at least one sector, with no possibility of being driven back as has just happened, I took that as superseding the Strength Point loss criterion.  Meanwhile, although the peltastoi disintegrated, their Commandant remained in the fight, ready to lead where his presence would be most needed.

Momentarily taken aback by the reverses along the front, the Bulgars soon recovered their determination to take the town.  Command assumed by Tarkhan Tiercel, they were very soon once more pressing along the river line.

Battle of the bridge.  Both sides score hits...


...and both sides lose a Strength Point.


So  the fight was not yet over. Bulgar heavy horse finally forced the river crossings either side of the town, and the reserve body of spears, with light horse supporting (presumably with their arrows), tried once again to force a crossing. Already both sides took further losses.


Bulgars victorious! The skoutatoi were forced back, but there being no space available in the Reserve Area, they were eliminated. The Bulgars having forced the crossing all along the line, and only two Byzantine units remaining, it is not possible for them to recover all the lost ground, whichever side won the initiative at this point.

This was a pretty tough and hard-fought battle, with heavy losses on both sides, actually in favour of the Byzantines (6SP lost out of 8; Bulgars, 7 out of 12).  But, although facing defeat with the fall of the Kavkhan, it ended with an undoubted Bulgar victory.  Having given themselves over to a day or so sacking the town, the raiders gathered themselves together to plunge further into Imperial lands.  

 Awaiting them was George Pithikos, with his reconstituted command.

To be continued: Combat on the road.

* Scythian - generic Byzantine term for Asiatic hordes of just about any kind...

Sunday, March 6, 2022

More Progress...


My Byzantines, of course, must needs an opponent ... or two. I began with Bulgars, the arch-enemy of Byzantium for centuries, until Basil II Bulgaroctonos - Hammer of the Bulgars - over several decades fought them to a finish. Now, I built these 15mm armies for WRG originally, and very soon adapted them to the DBM game system - in my view a fine system wrecked by rules lawyers, over-frequent and ill-considered rules amendments, and a large margin in favour of who knows the rules best. But for mine, the main problem had to do with an unrelieved diet of one-off encounter battles against unhistorical opponents.  Win or lose - and, apart from the poor old Bulgars of whom I shall soon relate, I won more battles than I lost - I didn't enjoy the games. Boring - and I still believe that was not due to any fault in the DBM concept; it was they way it was used. Still and all, the figures can still be used for a DBA or DBM game with these guys. Or Hordes of the Things.

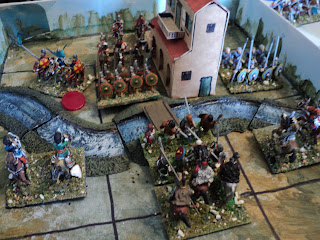
'Generic' barbarian army that might be Bulgar
or Abasgian (a.k.a. Georgian).

Unfortunately, my 'Barbarians', qua Bulgars, had to be the unluckiest army I ever owned. Even though 'irregular' according to the DBM system, they had very good heavy and light horse archer cavalry, and lots of them. Owing to the historical period I chose for it, their heavy spearmen were not so good, classed as 'inferior' to some average - Sp(I). That tended to mean that facing enemy foot, who generally were not (I), was a losing proposition. They weren't really solid enough to face cavalry classed as knights, either.

In one horror battle, my Bulgars were facing an enemy possessing knights and a war wagon or two (I have no memory what this army was). Doing well, too: my few light infantry took out one of the war wagons. Then a whole line of knights thundered down upon my line of spears.

Even though they were overlapped at one end, I reckoned my spearmen, though inferior, were on a winning proposition. So I watched in disbelief as just about the whole line vanished under the knights' hooves. Events such as these just plagued that army. Battle after battle saw one disaster after another. I'm talking winning propositions, here, rather than the occasional 'oops' moment that led to defeat. After beginning with a draw and a win in its first two battles, I think it was about Game 14 or so before it saw its next victory.

There was the occasion in which my line of LH(S) - 'superior light horse' - attacked an equal line comprising LH(F) - fast light horse - flanked by a fast knight element. The Kn(F) was the biggy - took him on, and destroyed that element. Fine beginning. So now I had the overlap, fast troops in their own turn count minus if out-diced ... this is heading for 'gimme' country...  

Nnnnnn...ope.  The enemy light horse held brilliantly and smote my horse archers hip and thigh, croup and fetlock. The whole line of LH(S) vanished at a stroke.  So, pretty much, did the command to which these light horse belonged. My Bulgar army fought well after that, but from that disaster there could be no recovery. 

And then there was the time when one of the commands had to traverse a tract of hilly country to get at the open plain beyond (I tended to be very lackadaisical about the terrain system!).  I could have chosen a better way than a long line, but I figured I could afford the occasional delay caused by a bad PIP die roll. I might have known. Half way through, the command stalled, and could not be got going again. To this day, I remember exactly the sequence of PIP rolls that kept a whole third of my army out of the battle:
1 - OK, we counted on that happening - a nuisance, but factored into our planning.
1 - Damn.  A bit unlucky, but don't reckon the delay too damaging.
1 - Oh, come on! Three ones in a row?!  This is getting serious.
3 - Yay! but not quite clear of the hills yet...
1 - WTH?!
1 - WTFH??!!  Curse you Red Baron, wherever you are!
2 - Too late, and enough only to clear the hills, and nothing more.

By this time, despite heroic deeds of valour, the rest of the army had succumbed to odds of three to two...

Well... you gotta laugh, eh? Or try a different army.
Light horse, and a rather motley bunch of 
heavy cavalry from a variety of sources.

So I tried them out - same figures - as early Georgians.  The heavy cavalry were classed as 'fast knights' - Kn(F) - rather than 'superior cavalry' - Cv(S); the spears ordinary (O) instead of (I), and the army included a useful contingent of close(ish) order archers as well. 'Fast knights' really denotes cavalry of no huge weight that are armed with lances, and like to rush up and to poke people with them. That army did very well - certainly won more battles than it lost. So the problem didn't lie with 'Irregular' vs 'Regular' armies, then! I rather think that, as Georgians, this was a better balanced army, that included an element of shock and a little bit of distant firepower, too.
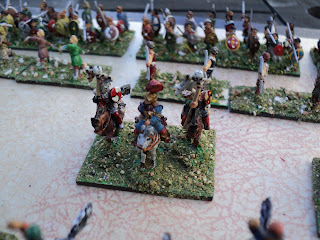
These six light horse elements are I think Essex
Bulgar figures - very nice! They go well with just 
about any army requiring light horse. 

The thing with Dark Ages and Mediaeval 'Barbarian' types, is that the figures representing them are, within reason, fairly interchangeable. As I mention in my previous posting, you could also almost use Byzantine figures for Georgian heavy cavalry - they weren't so very different. My main unit of heavy cavalry I bought as Bulgars (Essex figures, I think) but in my view they serve very well, possibly even better, as Abasgians/Georgians!
I have no idea what these figures are except they 
simply add to the light horse contingent.

'Barbarian' heavy cavalry - very attractive figures
from (I think) Essex.  I was chuffed to discover that 
although they didn't use them (much) in battle, Abasgian 
heavy cavalry did carry bows and arrows. 
Used them mostly for hunting, I gather...

'Barbarian' close (loose?) order archers.  
Abasgians, these fellows.  Not a Bulgar type.

The Tsar of Bulgaria, or King of Abasgia,
according to occasion.

Barbarian light javelinmen fronting a unit of spears.
Several - not all - of the spears are pins. 
Great hazard to the careless and unwary.

More spears...

More spearmen - fronted by some rather 
crude and horrible light archers.

The whole ... 'army'

There's a little more work to be done on these
though they look fairly OK.

The eagle-eyed reader will observe that this army is a deal smaller than my Byzantine force exhibited in my previous posting. Hung up on DBM for so long tended to inhibit building this one aside from one order of 24 figures from Essex Miniatures and scrounging around picking up oddments from Bring-and-Buy sales. We're looking at 96 foot and 64 horse, not counting command. One hundred and sixty figures - the same number as my Byzantine infantry...

Saturday, March 5, 2022

Some Progress on Projects...

 The world has become a much darker place in the last few weeks - but that twilight has been deepening for years and years, and looks to have a lot more darkening to happen.  It is looking as though we're losing the human race. It has got to the point at which I start to ask myself - just quietly so far - why do I war game?  The heart isn't really in it.

So, rather than fight battles, I've been working towards completing (for a given value of 'completion') a couple of projects that have long been waiting for work to be done.  I gave priority has been with my Mediaevals - Armies and Enemies of Byzantium.  Here is the story - well, the Byzantine part of it:


Command elements.  Another has gone walkabout
- dunno where...

Toxotai - bow armed psiloi light infantry

Blue shield Thematic kavallarioi. My convention is
that 'round shield' cavalry are thematic (militia)
'kite shield' are tagmatic (imperial regulars).

Light horse: prokoursatores leading
hyperkerastai, with trapezetai  following

More thematic heavy cavalry

Tagmatic heavy cavalry

More of the same

My third unit of thematic cavalry...

... and my third unit of tagmatic.

The super-heavies: kataphraktoi - a.k.a 
klibanophoroi.

The figures so far have been 'Tin Soldier' from
Australia.  These green shield guys are of different provenance.
I sometimes rope them in a Georgians, though strictly 
speaking they aren't quite the thing...

The Byzantine right...

... Byzantine left...


Skoutatoi.  The command element carrying the icon 
is the Emperor's Own.  The single element with small
shields are the 'semi-light' menavlatoi -
 carrying heavy throwing weapons
More skoutatoi
The other large unit of skoutatoi with its element 
of menavlatoi.
From front: akontistai javelin light infantry
Varangian Guard, my last unit of
skoutatoi
Psiloi - light infantry:
akontistai and sphendonistai.


The whole Byzantine army.
Whole army, rear view.


This whole army comprises 160 foot and 100 horse, not counting the command elements and the green kite shield fellows.  

Since this platform has been playing silly beggars with the ordering of my pictures (which I decided was too much work to correct), I'll do another posting for the 'enemies' of Byzantium.