Thursday, October 11, 2012

Pile of Shame: Part 1

Overview of Foot.
 Many years ago, about the turn of the century, I acquired a small British Napoleonic Army.  A wargaming buddy had for years been trying to flog it off, dragging it along to swap meets of a Saturday morning, and dragging it back home again of the Sunday evening.  I always did wonder why no business resulted, but it may have been that my pal was a bit too uncompromising on price, and upon an all-or-nothing sale.   It seems that there might have been a certain dissonance between what he wanted for the figures, what refurbishments he was willing to make to tidy up the army, and what potential buyers were prepared to buy and at what price.   
23rd Foot:  Royal Welch Fusiliers.
 Water under the bridge now, of course.  I didn't have the money to buy the army - not that I particularly wanted Brits anyway - but finally we did a deal.  I would organize and paint up a plastic army for his daughter (which features in a post early 2010: here), and he could have my 6mm SYW Austrians (after 10 years and more, I knew I was never going to do anything with it).

Well, in time I've had this army, it has seen no action - not since my French defeated it a year or so previous to our deal.  Every now and then I've hoiked it out and poked about with it.  One discovery was the shortage of artillerymen for the cannon (2x9pr, 2x6pr and a howitzer).  Fortunately I had some earlier generation Minifig gunners with brown jackets, painted up for service with the Archduchies of Trockenbeeren und Auslese.  All the gunners are Royal Horse Artillery figures, but only the 6pr guns will be so defined.
We also found there were no horses for the Heavy Dragoons (the Light Dragoons were fine).  Eventually I obtained some extra dragoons and additional horses to for two regiments of heavy dragoons, each with just 2 squadrons, as frequently found in the Peninsula.  I also nicked some from General Whitbread's (Wellington's) staffs...
A 2-Squadron regiment of Dragoons.
In the picture is part of the
3-Squadron Regiment of Light Dragoons.


Royal Welch Fusiliers advancing.
Although this army is emphatically a Peninsular War one, there are a number of ways I have played fast and loose with history.  For one thing, my cavalry units will be provided with flags and/or guidons.  For another, the units I name will be recognised as coming from Brigades that served at Waterloo.  The reason?  Flags.  The best and easiest source of flags has only the Waterloo ones.   Not a difficult decision to make...


Most of the figures are Minifigs, like these Fusiliers.  Although its flag and that of the Buffs (3rd Foot) were well painted in metal, I bit the bullet and replaced them with paper flags.   

This was for the sake of consistency.  As none of the other units had such flags, I would have to supply them with paper flags - no hardship: I prefer paper flags anyway.  All the same, destroying the original flags was a bit of a wrench.

You will notice, perhaps, a few toothpick bayonets.  There had already been quite a few breakages, and the earthquakes of recent times added to this.  My repairs are simply to carve out the bayonets, and/or the missing section of musket (if they are missing) and glue them back, and hope for the best.  

The unit below was not part of the original acquisition - or at least, most of it wasn't.  At a swap meet some years later I found twenty advancing musketeers, going for a reasonable price, that would be reasonably compatible with the Minifigs.  Except for the command element (Officer, drummer and two flag-bearers - all Minifig) these were slightly larger than the Minifig guys. I think they might have been Essex figures, but I don't know for sure.  At any rate, they became 3/14th Buckinghamshire Regiment of Foot.


A close view of 2/30th Cambridgeshire Infantry. Originally, it had been painted up as 'The Buffs' - and a very nicely presented unit it was, and all.  But it just didn't 'fit' with my plans.  Superman is not merely faster than a speeding bullet; he catches them in his teeth and  chews them. 

To its  right, the 33rd Foot (1st West Riding), and followed by 2/69th South Lincoln Infantry.  All the 'march attack' figures have been brigaded together, but as the fourth unit had the later 'Belgic' Shako, I decided to make that into a Portuguese unit (a picture appears later).  However, this Brigade is still wanting the 73rd Perthshire Regiment.  This had been originally a Highland regiment, but owing to recruitment difficulties, its 'Highland' status was stripped from it (in 1809 I believe), nor was it permitted to wear the regalia of a highland regiment.   Too bad: I want a highland regiment, so eventually the 73rd Perthshire Highlanders will augment this Brigade to 4 battalions.

Five, if you add in this Portuguese battalion.  The paint job here is only half-finished.  In addition to the line battalion, the brown-clad Hinchliffe figures form a 2-figure company of tiradores - the only two such figures in this Army.


33rd Foot: 1st West Riding.
 I had to supply the missing flagstaffs. 
Even less finished is this, the 33rd Foot.  This is a fresh paint job (I received this unit unpainted), but I have been very slack about finishing these guys.


Here's my half-battalion of riflemen: the 5/60th Rifles.  The full battalion seemed to me over-representative, so I gave half to a friend who was short of riflemen of any description.  I thought the 5 companies represented here a goodish number for the forces represented.


Overall, this 'Army' - really an expeditionary force - comprises:
1 Fusilier Battalion
5 Musketeer Battalions (4 British, 1 Portuguese)
1 Highland Battalion (projected)
1 Light Infantry Battalion (2nd West Riding - Hinchliffe figures.  Not pictured, for some reason...)
1/2 Rifle Battalion (5 Rifle Coys, plus Portuguese coy).
Battery RA (2x9pr , 1xHowitzer)
Battery RHA (2x6pr) 
4 Squadrons Dragoons (2 Regiments)
3 Squadrons Light dragoons (1 Regiment).


There you have it.  A small, self contained wargames army, pretty much all there, except for some work needed to round it off and finish it:  150 foot (eventually 170 including the Highlanders - each battalion comprises 20 figures), 28 horse (7 squadrons at 4 figures each), 5 guns - a little over 200 figures in all.  Overall a bit over-gunned, but it is likely my Brunswicker Black Corps will get the howitzer.  The shortage of cavalry is deliberate: a problem that Wellington always had to deal with.  This army has received from me rather less than the TLC it really deserved.  Perhaps over the next few weeks we can mend that.

Saturday, September 15, 2012

Ain't Verlinden...

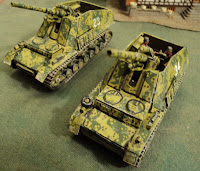
 At last: finished. Well, sort of finished.  The Hummels have been built, painted and one of them at least has a crew - two figures from the Airfix SdKfz234/4 Armoured Car kit.  This first picture was taken before 'weathering', the others after.   This might not be apparent in most pictures.  I have a fairly minimalist approach to weathering, though these vehicles could stand more, methinks.


Close up of the fighting compartment, with crew added.  This won't win any prizes - the number could be touched up, and certain other little flaws reveal themselves.  This ain't Verlinden quality modelling by any stretch.  But on the whole I'm not at all unhappy with the end result.

I have found the best method of getting track to look right is glue and staple the ends together.  To the objection that the staple will spoil the appearance of the vehicle, the answer is [A] make sure the stapled but is up under the superstructure overhang, and [B] paint it out with some dark colour - black, even.
 As mentioned earlier, the gun came without some of the extra bits like hydraulic elevating gear, and traversing and fine adjusting wheels and handles.  Figuring that as they would in general be hidden in the superstructure, I was not at first going to bother with them.  I am glad I changed my mind about that.  On the other hand, unlike the original ESCI kit, which moulded them in, I left off the seats either side of the gun and the boxes on the floor near the rear.  Another good decision, I feel.
 Vehicles 23 and 34 in battery.  Well, they won't be part of the same unit for long.  Brian (A Fist Full of Plastic) will get one of them; the other will remain in my own army forming a Command Decision SP battalion with 2, maybe 3, 10.5cm Wespes.
Have gun; will hunt.


Whilst working on the Hummels, I also began some repair and refurbish work on some other vehicles Brian had given me or that I had had waiting (clamouring) for my attention for some considerable time.  

This Hunting Tiger just needed the tracks put on, the mudguards re-attached and the gun refitted.  In painting this vehicle I discovered that 'German Cavalry Brown' is very reddish in colour.  I know, I know - I ought to have used 'Chocolate' but my feeling is that it is rather a brownish sort of brown, and I did want reddish in the camo.

 Rear view of JagdTiger going off to hunt something.  I rather like this simplistic ESCI kit.


Also in my possession were a couple of Tigers that badly needed a refurbish.  The one Brian gave me looked OK, but the paint scheme didn't 'fit' with my preferred livery.  So they both got a repaint.  Probably they would have benefited at that from having their original paint job stripped off, but I wasn't prepared to put up with the hassle.

I painted over the top.  It shows a bit - these vehicles are a tad rough, but, seen at the usual distance one views these things on the war games table, they look rather better than these pictures indicate.


My real bugbear are the tracks.  For one thing, they were put on differently for each vehicle, they were flimsy, flopped about all over the place, and the ends were untidily put together.  The bad part, I discovered, was that they were apparently glued up under the overhang.  At any rate, They could not be removed safely.  

Faute de mieux I left them as they were, except that I glued the road wheels down onto the tracks as well.  This was not a total success (as the right-hand track on Tiger 511 shows.  

But the key thing is, they are Tigers.  I now have the beginnings of a Tiger Company (Heavy Panzer Company 651 in the service of Orotina) which will comprise 3 Tigers (the third being a metal model from Dragon, painted Panzergrau), plus a Panzer IIIN with the short barrelled 7.5cm gun.

Further to the camo: I don't really know if the scheme I have here was ever used by the Germans.  But, for mine,  it looks as though it might have been.  What commends itself to me is that I doubt anyone will be using it, which identifies my stuff as being mine!  And, of course, it looks OK - well it does to me!

Wednesday, September 5, 2012

Hummels, Part the Third - and other toys.

 Assembly of this pair of Hummel SP guns more or less completed, now begins the paint job.  Contrary to my usual practice, I undercoated these chappies black before applying its 'factory finish' base coat of yellow.

Since my previous posting, I finally figured out how to do the louvres - unfortunately, after having already applied my 'lesser solution' of placing a rectangle of very thin plastic sheet which I was hoping to get away with simply painting them on.  As it happens, an even better solution might have been to cover the area with a box-type arrangement as seems to have been an occasional practice.  On these models the louvre assembly stands prouder of the vehicle sides than I would like, but I'm hoping that careful paint work will disguise this and other imperfections that I can see.
It was whilst typing the rest of this posting I finally - much too late - figured out how to do the louvres properly.  First off, cut out an appropriate sized rectangle at the appropriate location in the sheet forming the sides of the fighting compartment.  Back it with thin plastic sheet.  This backing will not be noticeable in the interior of the fighting compartment.  Then place in 4 strips of thin plastic sheet such that each overlaps the one below.  Place a thin plastic frame around the whole; and two thin strips at the 'third points' along the louvres.  This is pretty much how I did it except for the cut-out at the beginning.  Had I thought of it, the whole assembly would have been almost flush with the side armour.   But that is generally my experience with tackling unfamiliar tasks.  By the time I've finished, I figure I've just about learnt enough to begin.

 The right hand vehicle in this picture shows an arrangement I am tempted to use on the other.  My researches indicate this was quite a common arrangement: a couple of spare road wheels, and some of those red/white/red rods you often see attached to German ordnance.  That the guns look skew-whiff in this picture is not an illusion; they haven't been glued in yet.
 One of the problems of the black undercoat: the first top coat looks as rough as guts.  The farther vehicle has had a second coat applied.
 Some more toys that have been awaiting my attention.  My thanks go to Brian (A Fist Full of Plastic - see the sidebar for the link) for most of these (the PzIV and FlaK gun excepted), for which he'll be getting one of the Hummels I've been building.


The PzIV is missing a road wheel.  That, the Tiger I tanks and the FlaK 8.8cm gun have all been pre-painted.  Rather than go the Simple Green paint stripper way, I simply paint over the top.  The downside of course is that detail gets a bit obscured.  This will be rectified by black outlining.  The end result is generally satisfactory.  
The Wespe is a 'new' model I recently assembled.  Not much to say about it, really, except that along with one of the Hummels above, it will be part of my second (Orotina's 122nd) SP artillery battalion.  Whilst putting on the tracks, though, the left hand return wheel came adrift rather too easily for comfort.  I solved that by drilling a hole through it and the hull shoving in a short length of paper clip wire and gluing that in.  Seems to have worked...

The Jagdtiger,  assembled but for the side skirts and with the gun broken off, has been put together, and will probably form part of Orotina's 654th (Independent) Heavy Panzer Company.  Strictly, it ought to be counted as a Jagdpanzer Company as are my Jagdpanthers and Jagdpanzer IVs, but the latter form a small Abteilung.  The Jagdtigers I reckon should stand alone...


Sunday, September 2, 2012

'Latin Wars' Map

Taking a brief break from the Hummels I am still in the throes of building, I thought I'd show the map of the particular area of the world in which the 'Latin Wars' (so-called by historiographers) are supposed to have taken place.  This map I began putting together over the weekend.  By no means complete, it is coming along nicely...

Now, I always imagined an east coast of Latin America, two major rivers forming a species of peninsula, with most of the campaign taking place on this peninsula.  But at the same time I wanted a quick and fairly random way of generating the sort of map I wanted.

A hunt among map generators and free downloads unearthed the Greenfish Relief Map Generator.  Several goes finally gave me a map I liked, except that I needed to flip it to get the orientation I wanted.  Probably I ought to have seen what it looked like with less water, though.   The Hungarian place names became upside down, and after resizing down and back again (a mistake) became illegible.  Never mind about that.

What the map gives you is a relief map, and a whole bunch of towns and cities and things in white, dark red, blue and green dots.  The green areas are plains, yellow hilly, and brown mountainous.  I really like this as a map generator, as it does the really irksome bits of the creative process, leaving me with the fun bits...

For the latter, I had recourse to the Windows Paint software - very useful for this kind of thing.  With it I've redone the towns and cities, resizing some of the dots, and recolouring as well, according to the following Legend:
White:  Towns/cities population > 10,000
Red: Towns/townships 9999 > population > 999
Blue:  Villages:  999 > population > 499
Green:  Hamlets and other settlements: 499 > permanent population > 50.

I've also added in the rivers, railroads (Black) and roads (Brown); established the borders, and added some place names.   As the only common border between Orotina and Gran Bolivaria I wanted to lie between the Amethyst and Topaz Rivers, I had to create a neutral democracy, The United States of Amazonia between the two north of the Amethyst River.   The USAz is a peaceable commercial state whose dexterous foreign policy is far more responsible for keeping the country relatively clear of dangerous military entanglements than is its exiguous military establishment.

Followers of Gowan Ditchburn's Oronegro saga will have observed that the three countries shown here share common borders with that oil-rich nation.  You are to imagine that in fact that these three extend south beyond the map boundaries perhaps 20 or 30 kilometers into almost uninhabitable mountainous country (the squares being some 16 kilometers or 10 miles of a side)  - the southern shore of the Bight of Bolivaria that you see here being just one or two squares off the map.  The Pan-Andean People's Republic (Pan-Andea) and Gran Bolivaria extend respectively in the same manner west and north, the former also reaching south deep into the west flank of Oronegro.

I will probably add further terrain features, such as forests, swamps, grasslands and perhaps tracts of desert or semi-arid country; and maybe add such interesting infrastructural elements such as factories, produce processing plants, mines, airfields, shipping facilities and what have you...


Thursday, August 30, 2012

Hummels: Part the Second...

As indicated in my last posting, I have made progress on the two Hummel assault guns I have been building.
Progress so far.  The rear 'doors' are simply two squares of very
thin plastic.  Handles will be added later.

The front plates of the fighting compartment have been added.  I figured out a way of getting that bend close to the embrasure: scoring about 2mm parallel to the edge and using a rat-nose pair of pliers to snap the edge around.  Three of the four attempts were successful; the fourth I actually snapped the thing off.  As it was straight, I just glued it back the way I wanted it.  Gaps I tried filling with Green Stuff, and I'm here to tell you that damned gunk is a beggar to work with.  How people achieve what they do with it I can't imagine.
Gun shield attached to the hull decking, not the gun, for the
sake of strength.


The curved piece (gun shield?) immediately behind the front plate I glued direct to the hull, rather than to the gun (which I think ought to have been done).  I was rather puzzled how to make these, but solved it by using a plastic bottle that once held floor cleaner.  I wanted a thickish soft plastic for this piece.  It took several goes to get the dimensions more or less right, and the thing still required a little extra bending, but the result was satisfactory.
What to do about the interior of the fighting compartment?  The ESCI model had a couple of boxes close by the rear, and pair of seats beside the gun breech.  I'm very tempted to leave them out, partly because the ESCI seats don't look right anyway, but also to reserve the space for the gun crew.
Those front hatches haven't worked out so well...

A glance at the deck in front of the fighting compartment discloses a pair of hatches.  I wince each time I look at this.  Having no other source of plastic discs the appropriate size, I tried cutting the circles from very thin plastic sheet.  This was not very successful, the less so when I was stupid enough to glue them on anyway.  

As Hoffnung once remarked: 'I must have lost my presence of mind!'   Since taking these pictures, I have found that the judicious application of black marker pen effectively disguises the irregularities of shape.    There is reason, then, to hope a clever paint job will have the same effect.  Otherwise, if I do find something more appropriate, they'll have to be placed overall, as I'm never going to be able to get those botched hatches off again.
I wondered too how I was going to do the louvres at the sides of the fighting compartment (I suppose they are louvres).  Just painting them on I could not see as a satisfactory solution.  As anything more elaborate seemed to me fiddly and hard, I just attached an appropriate area of thin plastic card.  The pencil lines serve as painting guides/aides memoire for when the finishing touches are added to the vehicle.
To the basic ESCI guns, I added the cheeks (?) with holes to accommodate the guns' trunnions; the hydraulic elevating gear, and behind the cheeks, the wheels, handles and sighting gear in a very simplified form.  The result isn't hugely accurate upon close examination, but the overall dimensions are reasonably close.
I wasn't especially consistent here, trying out different materials for each.  The right hand side handle is a bit of staple for one gun, a two short pieces of plastic glued (with an infinitude of trouble) at right angles on the other.  Similar sorts of differences appear on the other side.  The final painting will disguise these disparities.
The following pictures show what the vehicles will look like once the guns have been properly mounted.  This I will not do until the guns and the interior of the fighting compartment at least have been undercoated.  
Except for those bally hatches (What was I thinking??)
These vehicles aren't looking too bad...
 To add a little colour to a rather monochromatic posting, allow me to reintroduce my ESCI model by way of comparison.  Incidentally, my finished model originally came in buff-coloured plastic, rather than the grey of the pieces I am using (also ESCI, if I haven't mentioned that before).
Three Hummels in battery.  However, one of the scratchbuilds is destined for the Army of Evil Uncle Brian (A Fist Full of Plastic), who supplied the kit bits you see in these pictures. In Command Decision game terms, I now have enough Hummels (two) for as many Self Propelled artillery battalions.  But not enough Wespes (three).  However, I do have a Wespe hull, sans (if memory serves) gun.  Now: does this become my fourth Wespe, or does it remain gunless as an ammunition resupply vehicle.  Decisions, decisions...
Three Hummels in battery.  One of the new fellows will end up looking like the chappy in the middle.  The other?  Don't know yet.

Saturday, August 25, 2012

The story so far...

Several weeks ago- getting on towards months now - I set myself the task of scratch building a couple of 15cm Self Propelled artillery pieces - Hummels.  I was given some of the bits: guns, running gear, lower hull, ammo racks and other small items, all from ESCI kits that had presumably been adapted to other purposes.  The upper hull and fighting compartments had to be built. 
The front drive sprockets having been glued previously needed to be re-fastened with reinforcing.  I drilled a hole through the centre of the sprocket right through the hull and shove in a brad.  The solution is OK, but better would have been thickish wire (about Nr 16 gauge) right through.  After all my effort, the sprocket still sticks out a bit...
The alignments aren't great, I have to admit, though
the top plate over the driver's compartment looks worse on
account of the skewed ink streak at the front edge.
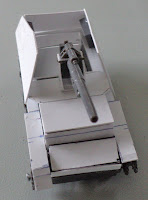
 Here's my progress thus far: none too impressive, I have to admit.  I've not used plasti-card for modelling to any extent before, and I'm finding it not very forgiving.  Getting things right is hard enough, but with a glue that grabs, it's hard to get things properly aligned as well, as these pictures show.


I'm hoping, therefore, that the final painting will disguise the less perfect aspects of these models.
Alignment problems and poor measuring left a gap
that you see in the centre.  Time to try out what
can be done with Green Stuff.
The grey pieces are from the ESCI 1:72 kit.  From the above picture I've mocked up how they should fit together.  The front of the fighting compartment has certain peculiarities I haven't yet figured out how to model: the slight inward bend edging the embrasure; and the cylindrical/frustum-shaped piece that forms the gun-shield(?) attached to the gun.  I'll also be making and fitting the hydraulic arms involved in elevating the gun in action.

A quick mock up with the bits assembled so far.
H'mmm... could be worse...
 The way things are going, I think the final product will at least be recognisable.  I'll be keeping one: Evil Uncle Brian (who provided the ESCI parts - Thanks Brian)) will be getting the other.
 Below is an ESCI kit made up many years ago when it was just about the only German ordnance (with the Wespe) that one could find in plastic that was not an Anti-tank or FlaK gun.  I still haven't figured out how to do the louvres at the sides, just above the tracks.
I have the crew figures.  I just need to glue them in...
 About the time my daughter was born (twenty years ago, now)  I used the ESCI model as a template for making a towed 15.0 cm gun/howitzer.  I've since removed the shield I had fitted, and I believe there are additions to be made.  The legs are too short, too, though I hope to disguise that by adding spades.  

Needs finishing: hydraulic elevating gear and spades; some crew figures.
Then finish off the base.
The whole thing was made from cardboard, balsa and plastic tube.
I never did finish the thing...


Finally, a couple of 7.5cm PaK40 Anti-tank pieces fashioned from the gun from the Airfix SdKfz234/4 Armoured Car kit.  The original kit was unsatisfactory from several points of view.  They will end up as fitted with scratchbuilt 75L24 guns as recon support vehicles (SdKfz 233).  One unfortunately I destroyed trying to fashion a Soviet BA64.  That experiment was not a success...

A use for the guns from the Airfix Armoured Car kit.
  I did at one point have a couple of scratchbuilt 7.5cm field guns
based on these, but dismantled them for other uses.
A bad decision!
The near piece has has the gun barrel replaced with plasctic tube, but the muzzle brake has been retained.  Not a wholly satisfactory solution.  I had shortened the original barrel to make 50L60 PaK38 AT guns - a mistake as I had no clear idea what the PaK38 looked like.  Oh well...