|
Allied centre... French 2nd Division has
pushed out of Papelotte. |
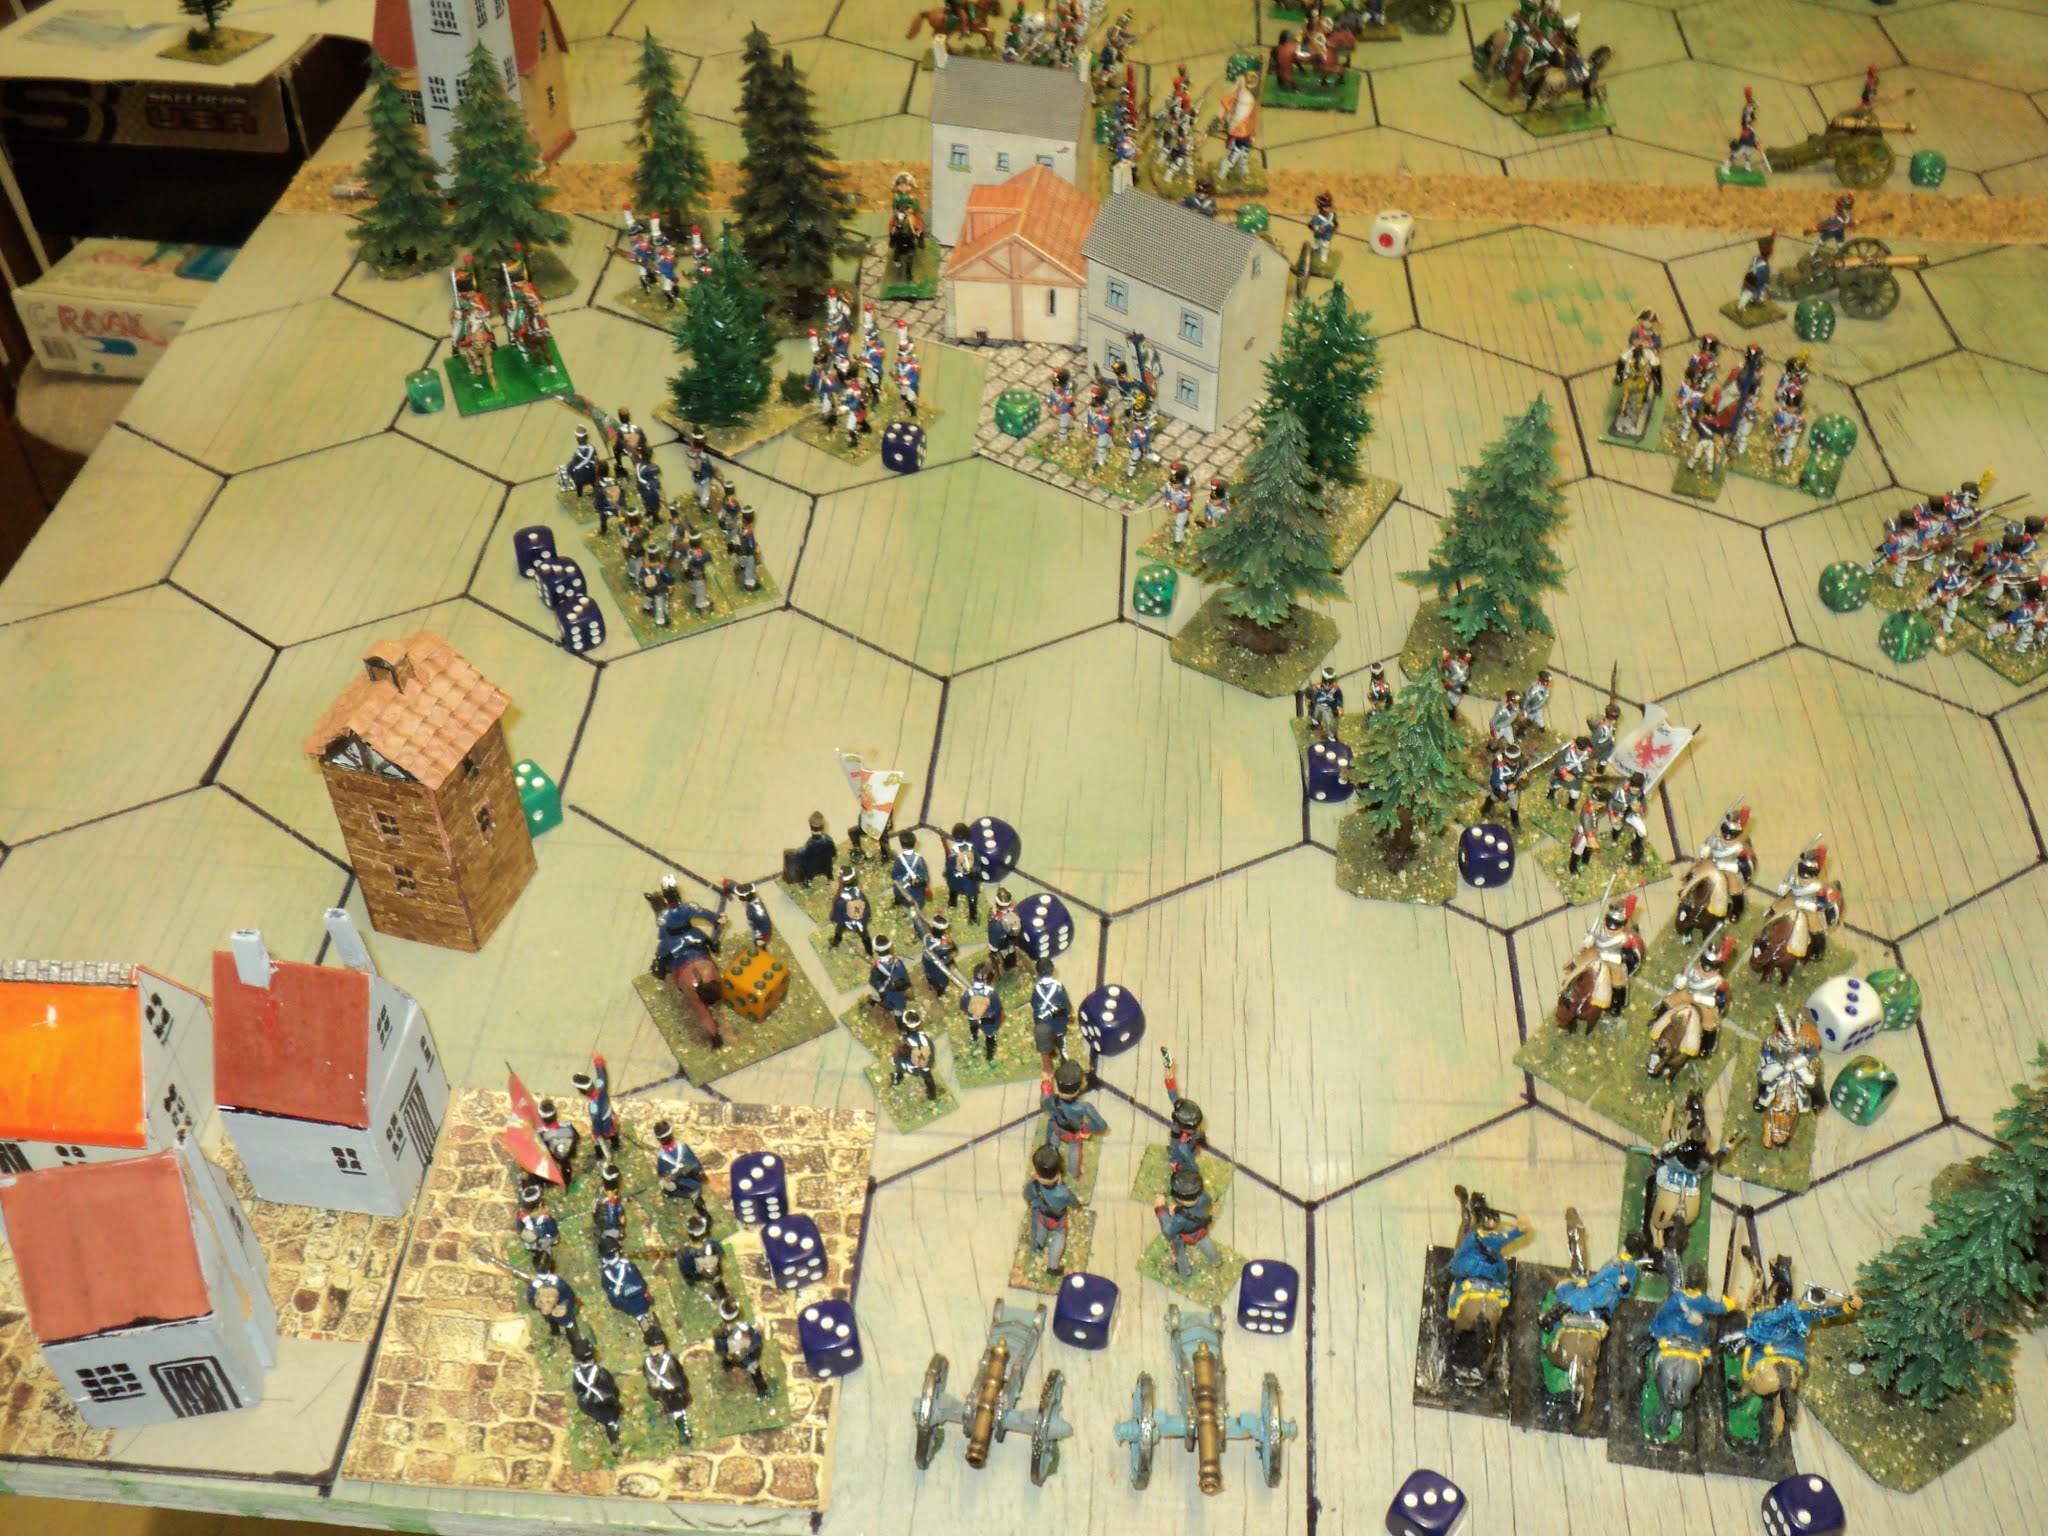
In continuing this battle narrative, I have uploaded the pictures in short 'sector sequences', rather than in my more usual 'move by move' uploads. What follows now is subsequent to event shown in this leading picture, in which 1st Brigade King's German Legion counterattacked just east of Hougoumont (in the distance) and drove the French 5th Division back as far as the attached woods. Meanwhile, 2nd Division had sortied from Papelotte and driven back 6th Division. This French success was offset by the depleted 3rd Division, under pressure from 2nd Dutch-Belgian Division and the British Household Cavalry, being forced back into the village vacated by the 2nd.
 |
| Prussians pushing out of Maransart |
On the far eastern flank, the French cavalry were finding it impossible to contain the building pressure from the Prussian infantry. The Guard Light Horse having been driven back towards Maison du Roi, 14th Brigade was able to push out from Maransart village, and to help drive off Pajol's lancers as well. In turn, 13th Brigade followed up the retiring lancers, pushed them through and beyond the tongue of woodland extending out from Plancenoit, and found themselves on the flank of the embattled Corps of Milhaud. For his part Pajol pulled his lancers right out of the fight, all the way back to the Mont St-Jean road to make way for Lobau's Corps, and was eventually to take part in a whole different fight!
 |
| 14th Brigade on the march toward Plancenoit |
Whilst 14th Brigade set out in pursuit of the Guard Light Horse, and 13th Brigade was advancing into the woods, 15th Brigade arrived, accompanied by General Freiherr von Bulow, commander of IV Corps, himself. The embattled French IV Cavalry Corps, losses mounting and in increasing isolation, fought on, its withdrawal from the fight against the Prussian cavalry becoming more and more problematic.
 |
14th Brigade runs into the light cavalry of
the Guard; Milhaud's Cavalry heavily engaged
near Paris Wood. |
To hold up the rapid advance of 14th Brigade, Lefebvre-Desnouettes flung in his elite light horse, already much reduced (2SP from 5), once again. The leading Prussian regiment, the 11th (Silesian) Infantry had also lost already a considerable portion of its strength (1SP from 3). But the heaviest losses the Prussians were enduring were being inflicted upon the cavalry already reduced by a third.
A little aside, here, concerning the cavalry fight between Milhaud's cuirassiers and the Prussian horse. This proved a very prolonged struggle, and was still ongoing at the close of the battle, though by then Milhaud didn't have much of his command still in action. One tends to imagine cavalry fights to be quickly decisive. What is going on? In situations like this, one tries to imagine what might be happening 'internally' - 'below the grain'. This was a fight between some 3000 experienced heavy cavalry against 4500 lights, not all of whom had much experience. One imagines what was happening was a series of charge and cavalry charge by groups of squadrons, with only a proportion of the formations engaged at any one time.
I also gave the cuirassiers a +1 on the combat dice for their extra weight, which effectively cancelled the extra Prussian Brigade, and gave the French an advantage on account of the presence of their Corps commander. However, the addition of the Prussian infantry to contend with meant a gradual erosion of the cuirassiers' strength, exacerbated when British light horse struck the cuirassiers in flank.
 |
| Kellermann in action |
The back-and-forth battle in and around the Hougoumont was also proving prolonged and costly to both sides. Elements of Clinton's 2nd Division were engaged on both sides of the chateau: the 3rd British and 3rd Hanover Brigade at the moment under attack from Kellermann's cavalry (led by Kellermann himself); and 1st KGL Brigade on the east side lunging forward and relieving some of the pressure on the garrison by driving back Bachlu's 5th Division.
 |
| Fighting in and around Hougoumont. |
In the pictures above and below one counts the losses in this sector as 11 Allied SP (out of about 36) and 13 French (out of 45, not counting commanders)! Heavy going - and the issue still in the balance.
 |
| Allied view... |
Rallying from their discomfiture, Bachelu led his Division and drove back the King's German Legionaries in their turn, back into the covered way behind Hougoumont. The presence of the British Footguards Brigade stopped the French further advance for the time being, but before the day was out there was to be further, and more serious action, in this part of the field.
Mixed fortunes also attended the fighting around Papelotte and Frichemont. The Highland Brigade sortied from Frichement and drive 4th Division to its left rear, where it blocked the movements of Lobau's Corps moving up to combat the Prussians. This attack also opened the way for the 4th and 6th Cavalry Divisions to push ahead - straight onto the flank of Milhaud's isolated corps. This passage was to be closed off briefly before the British horse could take advantage of it, but, forcing it open once more, they at once took their opportunity.
 |
| French right flank in peril... |
The whole of the d'Erlon's Corps could now be traced upon an almost north-south line, the 2nd Division in advance facing north, the other Divisions acutely angled back and facing more or less eastward. The whole French right flank looked to be unhinged and in deadly peril. In desperation, d'Erlon ordered counterattacks by 4th Division, helped by 1st Division, which had moved across betimes from the Corps left flank. The Highlanders were roughly bundled back into Frichemont. Closely following up, the two Divisions stormed the village.
 |
| French counter-attacks on their right flank |
In the light of this local success, the General led the depleted
3rd Division out of Papelotte against the
2nd Dutch-Belgian Division. By so doing, he eased the situation of
2nd Division, just then in a dangerous salient facing two infantry Divisions and a park of artillery into the bargain.
 |
| Defence of Frichemont |
 |
General view, looking south
|
The following pictures show the general situation, in turn looking south, looking west and looking north. The fighting around Hougoumont continues, its garrison hanging on by its teeth, the mutual mauling to the right, and Bachlu's Division attacking just northeast of the chateau, the lines of 2nd KGL Bde and the Footguards.
In the centre, the artillery of both side batter away, the French getting slightly the worse of it, probably because they tended to select infantry or cavalry targets if they could find them. Lobau's Corps has been irrevocably diverted towards the east flank. The Old and Middle Guard - even the Guard Heavy Cavalry are far to the rear still, and somewhat impeded by Subervie's (Pajol's) lancers, who have retreated so far already to leave open the way for Lobau's 20th Division. Nineteenth Division has already entered Plancenoit village, and are preparing the place for defence. The Young Guard are lining the woods adjoining to the south.
Freiherr von Bulow's Corps continues to force its way into the field, only Milhaud's cuirassiers offering any immediate resistance, apart from a quick counterblow from the Guard Light Horse. However, the barrier set up by Lobau and the Young Guard has been given time to assemble.

At last the Hougoumont deadlock was broken! After such a prolonged resistance against heavy odds, the chateau's fall was unexpected, the garrison survivors (1SP) being driven clear of the chateau complex. Foy's 9th Division quickly occupied the place, and from thence began to pour in a telling fire against the KGL troops outside. Attacked also by 5th Division, the KGL were chased back into the Merbe hamlet.
The Footguards also drew back to their right rear to cover the withdrawal of the KGL Brigade. Their isolation didn't last long: the hitherto unengaged 4th Division filled the line to their right, and the Brunswick infantry coming up on their left - a formidable line.

The French I Corps, also doing well, had reversed the tide that a few moments before had seemed set against them. Having forced the Highlanders into Frichemont, renewed attacks forced them out again. Having fought all day, the British 5th Division was looking much the worse for wear, just one third of its original strength remaining. First French Division reoccupied the village, whilst 4th Division sought to drive off the light horse flanking the place. At the same time the 3rd Division's counter-attack threw back the Dutch-Belgians.
Not everything went the way of the French. Leading the 3rd Division attack, General d'Erlon was wounded by a musket ball. Though carrying on, this rather took the impetus out of the I Corps resurgence. Instead of driving off the British light cavalry at the point of the bayonet, 4th Division wavered and fell back once more, and reopened the passage south they sought to close.
Of course, the British horse were not slow to take advantage of the opening, and they galloped down onto the IV Cavalry Corps left rear. Now Milhaud was in serious trouble, cut off, practically surrounded, his retreat impossible. Losses, so far serious enough, now began to mount rapidly.
Of course, neither Uxbridge nor the Prince of Orange were content to leave Papelotte and Frichemont in French hands. For the nonce drawing the infantry back out of the fight, in went the Netherlands Cavalry Division, all three brigades, carabineers leading. The Household cavalry joined in. All concentrated their charge against the exiguous 3rd Division.
The centre, so long neglected by the French, apart from a prolonged artillery barrage that was a deal less effectual than Napoleon would have hoped or expected, now became the scene of piecemeal French attacks. Perceiving that the II Corps artillery were somewhat depleted, and with some notion of aiding the attacks around Hougoumont, Reille flung in the 3rd Cavalry Division. The foray was an immediate success; the French Chasseurs rode over the battery. At once they were set upon by Hanoverian cavalry counter-attacking. Back went the French light horse, content with the success of their charge.


Closely following the charge of the 3rd Cavalry Division, the French mounted a more coordinated assault upon the Allied line. Ninth Division attacking from Hougoumont, and 5th Division to its right were joined by Pojol's lancers, having arrived betimes all the way from Marasart - from across almost the entire battlefield. Even so such a force must have been too weak to have had serious prospects of breaking through. Fewer than 10,000 troops (19SP) had little chance to defeating near-on 12,000 (23SP).
Moreover, the situation west of Hougoumont had by this time deteriorated sharply for the French. Losses among the cavalry on this front had been heavy, and when Kellermann was felled by a musket ball, all impetus was lost. Few were the remnants of III Cavalry Corps at the end of the day. There was not much of Jerome's Infantry Division, either.
All the while, the Prussian
IV Corps had been pushing relentlessly into the battlefield. Resisted by the
Guard light horse,
14th Brigade had pressed on as far as the woods edging Plancenoit village, where they began to encounter elements of the
Young Guard. Occupying the edge of the woods farthest from Plancemoit,
13th Brigade found itself on the flank of
Milhaud's cuirassiers, still battling the Prussian cavalry to their front. Shortly afterwards, British light horse, descending from the north near Frichemont, struck Milhaud's left flank. Practically surrounded, Milhaud's escape, if it were to achieved before his command melted away altogether, had to be effected by others.
Such help was in the offing. Penetrating the woods west of 13 Brigade, Lobau's 20th Division were now engaging the Prussians in a ragged firefight among the trees. Nineteenth Divison and the VI Corps artillery were also approaching the scene. Rallying once more 4th Division came up upon the flank of the British light horse fighting Milhaud's troopers.

Quite a battle was developing in this sector of the field, but it was to be a sorry remnant of his Corps that accompanied Milhaud from the field at the end of the day: just 1SP out of 6 surviving. They had in turn inflicted considerable hurt upon the Prussian horse, down to 3SP from 9. But they still had to fight their way out. Fifteenth Brigade's assault upon the woods eased for the moment the position of 13th Brigade. The relief didn't last long, as Lobau led his other Division, the 19th, into action against 13th. Meanwhile, the Young Guard and Guard Light Horse had between them seen off the 14th Brigade, the 11th Silesian Regiment breaking in rout (all 3 SP lost).

The battle that developed northeast of Hougoumont also proved a strenuous to-and-fro affair. Outnumbered as they were, the French infantry attacks were repulsed comfortably enough. As 5th Division fell back, the Allied 4th Division turned its attention to the Hougoumont chateau. The French here proved no eager to vacate the premises than the Allied garrison had been.
Unsuccessful as the infantry attacks were, Pajol's cavalry did much better, and forced the Brunswickers off the road almost as far as Merbe. Greatly daring, the lancers followed up... straight into the British Footguards. There they stopped.
It was about this time, with the Prussian I Corps, and Feldmarschall Blucher himself, about to arrive in the clear country east of Frichemont, I determined upon a count of losses. It seemed to me that the French and the Anglo-Dutch losses must have carried them fairly close to their respective exhaustion points.
So it proved. Several counts of the Anglo-Dutch showed that that army had indeed reached its exhaustion point, 53SP lost out of 153. Though the French army had not yet reached its exhaustion point, it was imminent. The 5 command SP lost (Kellerman's 3SP and 2SP from d'Erlon) had helped bring French losses literally within an ace of exhaustion: 57SP lost against an exhaustion point of 58. For their part, the Prussians had lost 11SP from the 55SP then on the field. I'll tabulate these at the end of this posting.
I called the battle here. Probably I could have played it out. From the Allied side, pull back the left flank to make way for Zieten's Corps, and had IV Corps continuing to press for Plancenoit and Maison du Roi. On the French side, try to rescue Milhaud while I still could, otherwise peel back the French line from north to south, using the unengaged Guard to hold the Maison du Roi road open. That sounds like a feasible and even interesting conclusion to a hard fought battle.
But I didn't. The Anglo-Dutch had been fought to a standstill; the French were in no condition to fight a second, nearly fresh army. It was to be an Allied victory - a 'near run thing'.
Now, counting the armies at approximately 500 men per strength point (excepting command SPs), the
armies came to:
Anglo-Dutch: 153SP (138+15command), lost 53SP.
69,000; lost perhaps 17,500 (taking 2/3 of SP losses as battle casualties)
Prussian:52SP engaged (49+3command), lost 11SP
24,500; lost about 3,500.
French:172SP (145+27command), lost 57SP (52+5command)
72,500; lost maybe 17,500, plus Kellermann (KIA) and d'Erlon (WIA).
Now, all this places one in an interesting situation, if I were to group this battle, together with the others of the Hundred Days that I fought out a couple of years back (including the fictitious ones), into a sort of Campaign narrative. If I were to 'do' a 'Ligny' battle, then we would have the situation in which Napoleon's army, though defeated, was still a force in being, and Marshal Grouchy has gone and complicated the situation by routing the Prussian III Corps at Wavre (
see here).
Might the Emperor have seen a way to continue the fight, despite his defeat?