Monday, October 31, 2022

Portable Ligny - Heads Up

The prep work for my final of my series of Hundred Days' battles having been waiting around for months to be played out, I have finally and at last brought the thing to the table top. I'll just post a 'heads up' trailer here, with a bunch of pictures, and follow up with more set-up detail and battle narrative in due course. 

Suffice to say, the Kavkaz campaign narrative will resume after a short interval.

The first four pictures show the starting positions of the armies before the first move.

View from behind the Prussian centre.  Close to the 
camera is Pirch's II Army Corps.  In the distance,
Ziethen's I Corps is holding a salient line.

View from the east, overlooking Thielmann's 
III Army Corps


View from the east, overlooking the Cavalry Corps 
of Pajol and Exelmans.  In the distance, Count 
Lobau's VI Corps, and elements of the 
Imperial Guard

View from behind French lines: VI Corps and Imperial Guard; 
in the middle distance, Gerard's IV Army Corps
is about to assault the Prussian lines about Ligny itself.


Opening clash: Pajol's light horse encounters the 
Prussian III Corps cavalry.

IV Corps d'Armee advances

Imperial Guard advances to support IV Corps;
VI Corps prepares to move to the right. 
A little bit of a traffic problem in the making, methiks!

General Vandamme's III Corps.  For the whole of the 
first turn, this formation did nothing, apart from a desultory (i.e. ineffective)
bombardment of Saint-Armand, because the activation roll
for all three of the formations that could move, was a '1'!

Prussian II Corps moving towards the right flank.


Of this action, more anon.  The game has just started; more to come.

Wednesday, October 26, 2022

Kavkaz Campaign - Battle of Khashuri


If Count Nikolai Pavlovitch Ignatiev was disconcerted to find a powerful enemy before him, he gave no indication of it to his subordinates, but confidently offered battle. However, he did order the hasty construction of field works - enough to cover his infantry and guns. Prompt upon the morning of 21 May 1875, the Turcowaz array surged forward, their right flank rather outpacing their centre and left...

The forces engaged were as follow.  

Turcowaz: Kars Command
Army Command, Staff and HQ: Abdul Abulbul Ameer (Average) 6SP


4th Division: HQ (3SP elite), 37th, 38th, 39th, 40th Regiment @ 4SP (poor) = 19SP
5th Division: HQ (3SP elite), 41st, 42nd, 43rd, 44th Regiment @ 4SP (poor) = 19SP
6th Division: HQ (3SP elite), 45th, 46th, 47th, 48th Regiment @ 4SP (poor) = 19SP
X Machinegun Battalion = 2SP (average)
2nd Cavalry Brigade: 21st, 22nd, 23rd Cavalry @ 2SP = 6SP
V, VI/ 3rd Mountain Artillery @ 2SP (average) = 4SP
101st, 102nd Medium Transport Battalion @ 1SP /2CP (carrying capacity) = 2SP/4CP
113th, 114th Pack Transport Battalion @ 1SP /2CP = 2SP/ 4CP

Totals: 
26 units, median = 13.  Units activated per turn = 12/13/14 
79 Strength Points (SP): Army Exhaustion Point -27SP; Rout Point -40SP 

Izumrud-Zeleniya Kavkaz Corps

Граф Никола́й Па́влович Игна́тьев

Corps HQ: General-Major Graf N. P. Ignatieff  (Good*) = 6SP

2nd Rifle Division: 
     HQ (3SP elite), 5th, 6th, 7th, 8th Regiments (Average) @4SP = 19SP
2nd Light Cavalry Division: 
     5th, 6th, 7th, 8th Regiments (Average) @3SP = 12SP
2nd Mountain Artillery Regiment:
      I, II Battalions (Average) @2SP = 4SP
Train: 
     5th Medium Transport; 1st, 2nd Pack Transport columns (Poor) @1SP/2CP = 3SP/6CP

Totals:
15 Units; Median = 8. Units activated per turn = 8/9/10 ('Good' Commander)
44 SP: Army Exhaustion point -15SP; Rout Point -22SP


Some notes:
1. I've taken this commander from G. MacD. Fraser's portrayal of the Russian diplomat and plenipotentiary in his Flashman books (Flashman at the Charge, Flashman and the Great Game).  In my world, he fulfils a similar role, but more as a military man on the fringes of the Czar's empire.
2.  Although the cavalry are grouped as a Division, they have no Divisional HQ as such, the units (stands) operating more or less independently.
3.  The infantry of Izumrud-Zeleniya were armed with rifles; the Turcowaz Bashi-Bazouks with muskets. The superiority of the rifles' range rarely, if ever, came into play, and even then with only trivial results. 
4.  There is a slight change to the Turcowaz and Zeleniyan transport columns. I'm not 100% sure yet what the carrying capacity really signifies - I have a bit of an idea, and will sort that as I go along.
5.  The artillery and MG transports (limbers), being integral to the artillery units, don't have a separate SP or CP allocation.
6.  The existence of the transport columns will actually contribute towards the flexibility of these forces, as in general, they are not likely to want to move unless and until the army wishes to withdraw from the field. 
7.  After considerable thought I've settled upon subcommanders (commanders of Divisions, say) at 3SP each. Like the Army command this is nominal and goes to Army morale, and not to the fighting ability of the element. 


I think the above map will help orient the reader as to events - I find it helps in interpreting the photographs. The Izumrud-Zeleniyan left flank was thrown forward to cover the river crossings at the bridge ('
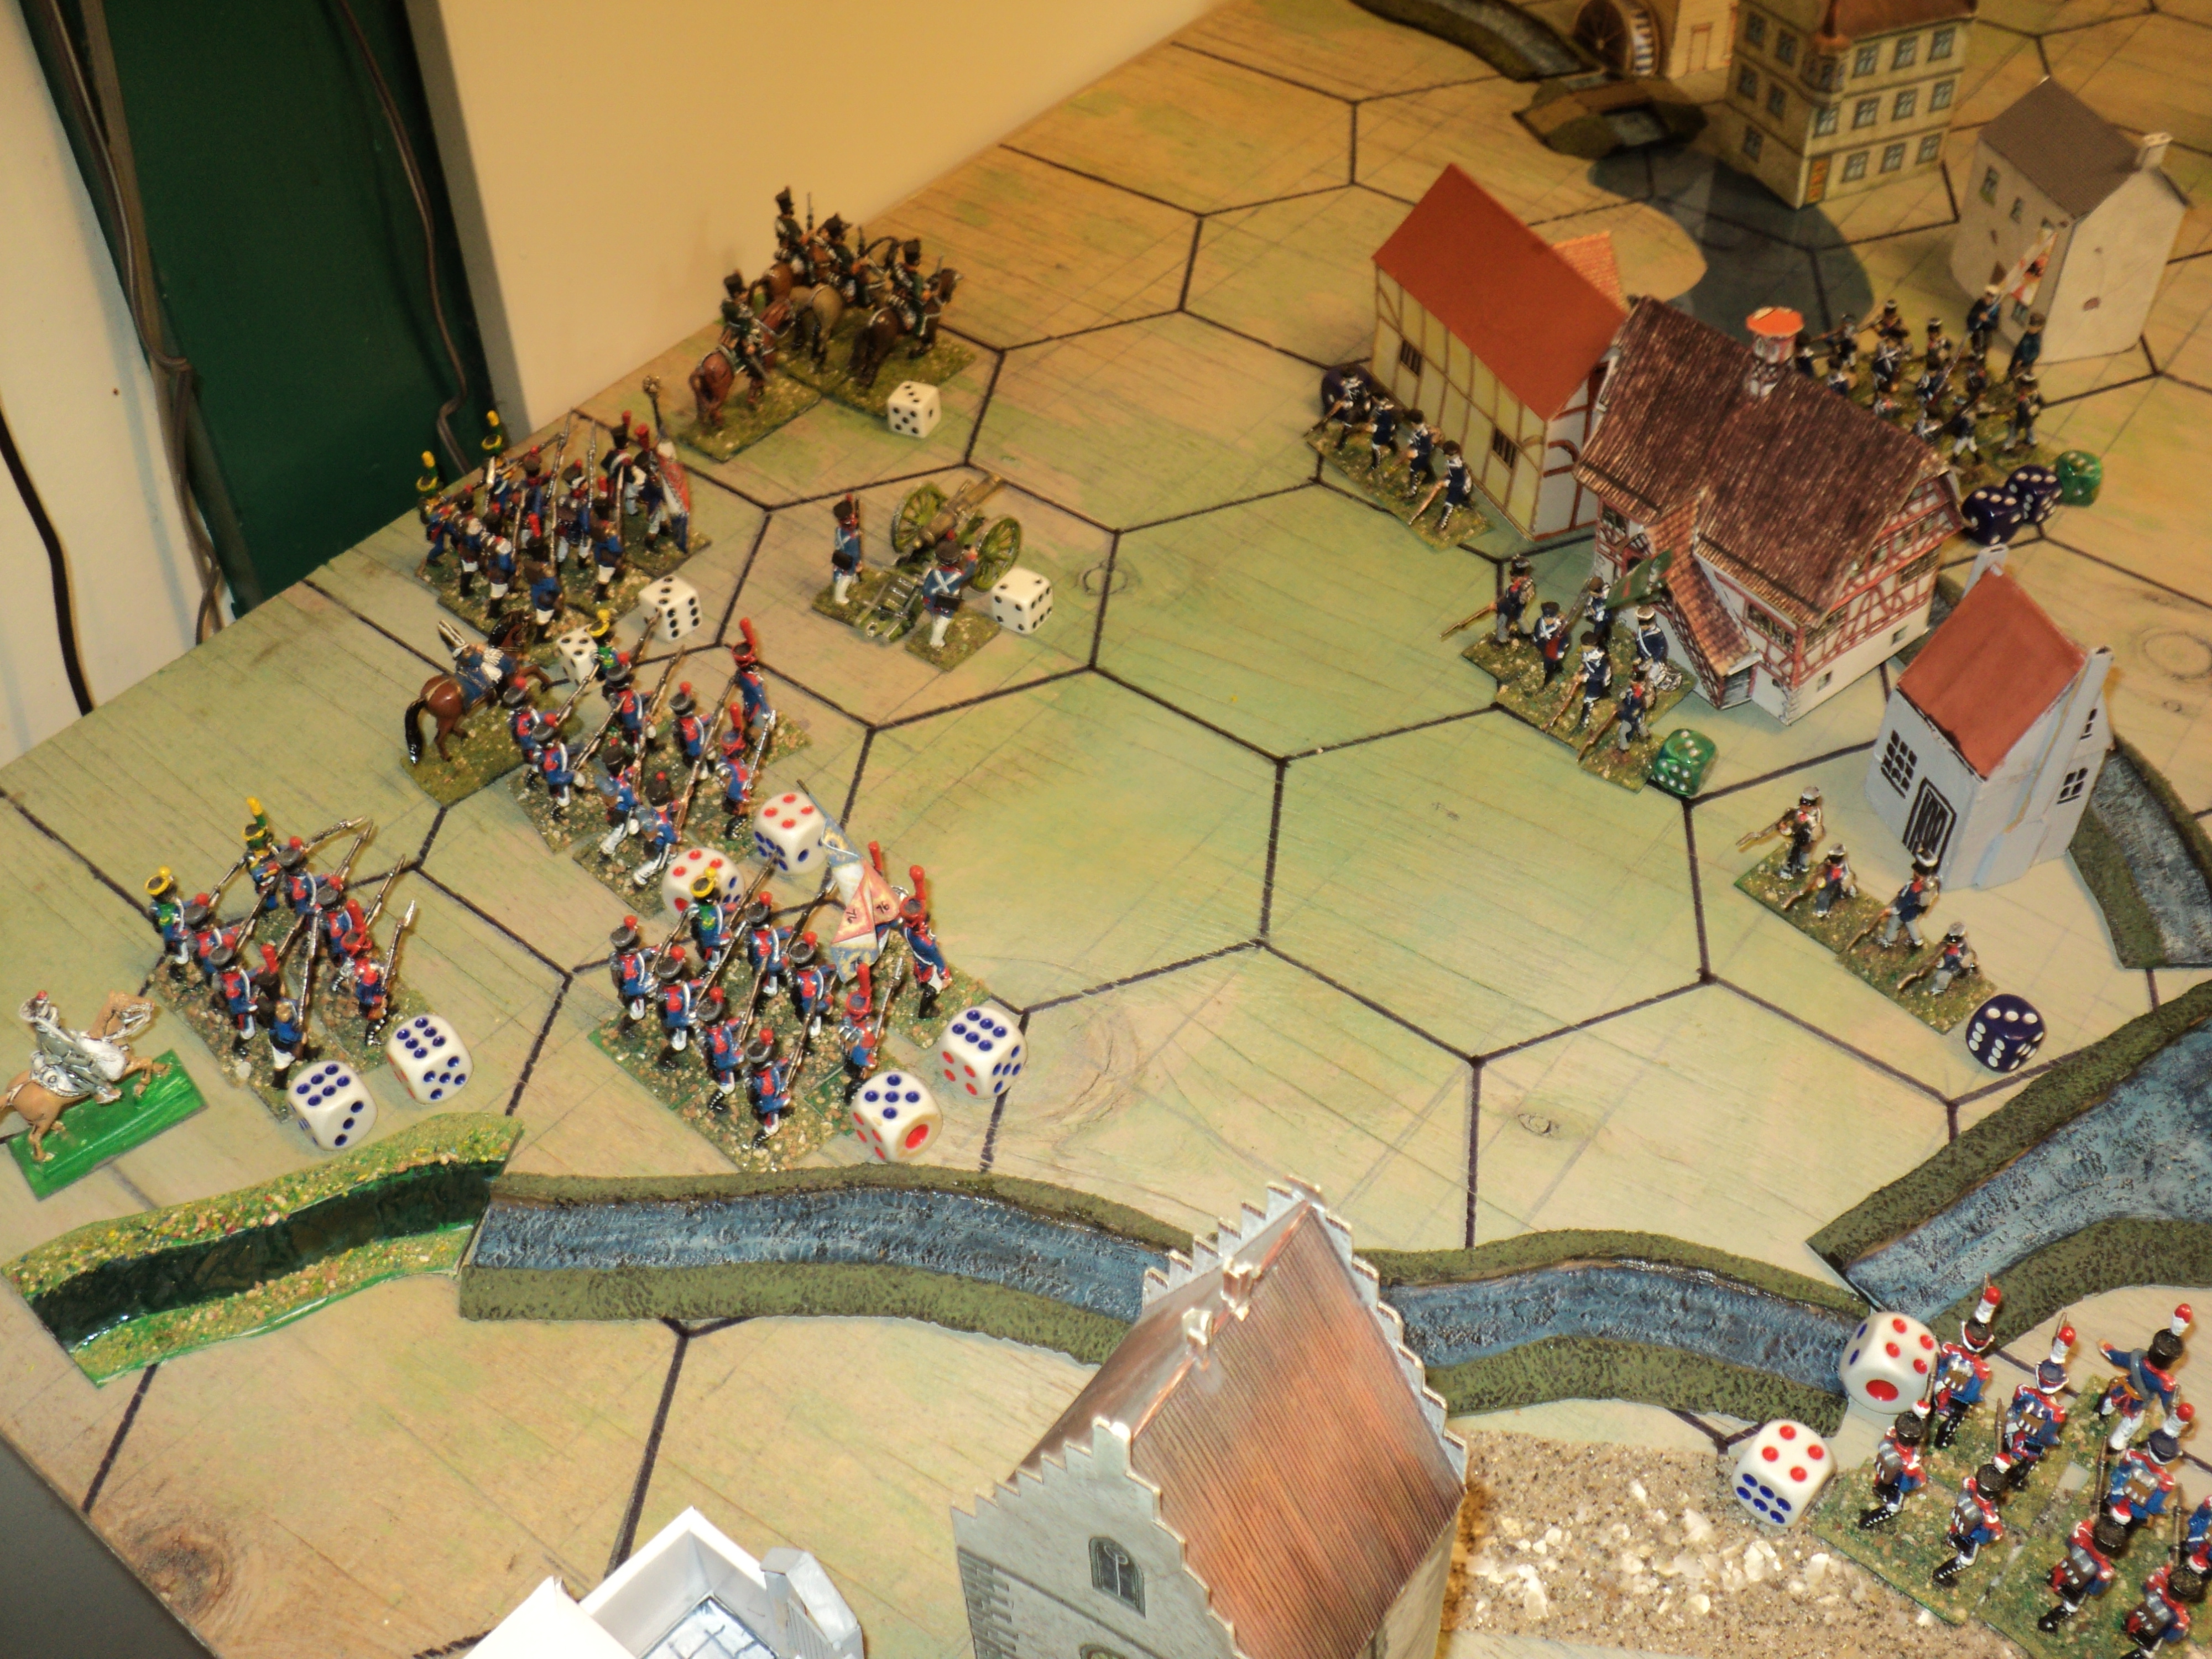
Вуди Бридж' - 'Woody Bridge' it became known as) and the farm. The cover afforded therein were augmented by earthworks, as were the positions of the remaining foot units. Sixth Rifle regiment covered the main Tbilisi highway approaches to the town, whilst the 5th occupied a tongue of woodland to the south. Between the two, the mountain artillery Ist Battalion covered the road and the fields directly to their front. The cavalry, split into equal halves, covered the flanks. Ignatieff was uncomfortably aware that his line was rather thin, and he lacked reserves, apart, perhaps, from the small brigade of cavalry standing on the ridge far to the left.

Abdul's battle on the right.

For his part, the Turcowaz commander tended to mass on his right flank, his early main effort directed to the river crossings where he hoped to seize or carry the farm and the woods on the far bank. Two whole Divisions, backed by V Artillery Battalion, were entrusted with this task. The early probing assaults brusquely swatted back, the Turcowaz began pressing between the defended strongpoints, eventually surrounding both on three sides.


Three regiments of Turcowaz 5th Division attacked the farm from three sides, 42nd directly across the river, 41st and 43rd from right and left. Meanwhile, the lead regiment of 6th Division, the 45th, had by now attempted to storm the village, to be sharply driven off by the garrison. As that unit fell back down the road, the 44th from 5th Division took up the attack on the town. 

Outnumbered three to one, the 7th (Zeleniya) Rifles were soon enough chivvied out of the farm, and out of the woods behind almost immediately afterward. They fell back to where the minor north road exited the town. The 7th could congratulate themselves that they had at least exacted a steep toll for the 5th Division's passage over the river - 4SP, for just one of its own.

With less room to coordinate its bridge assault, 4th Division was, to begin with, finding to going a deal tougher. The capture of the farm made things easier, and within a short time the lead elements of 4th Division had pushed forward alongside 41st Regiment, to face the Zeleniyan light cavalry on the ridge. The 7th Light Cavalry came to the aid of 8th Rifle Regiment's withdrawal, but even with the close support of II Artillery Battalion, the Zeleniyan line was being strained to the limit.

The strain was to increase. The 44th Bashi-Bazouk Infantry had meanwhile forced their way into the undefended northeastern quarter of the town, there to fetch up on the flank of the battered 7th Regiment. Once more the 7th was forced to fall back. The town itself had meanwhile fallen (of which more anon), and it seemed plain the battle was already lost. 

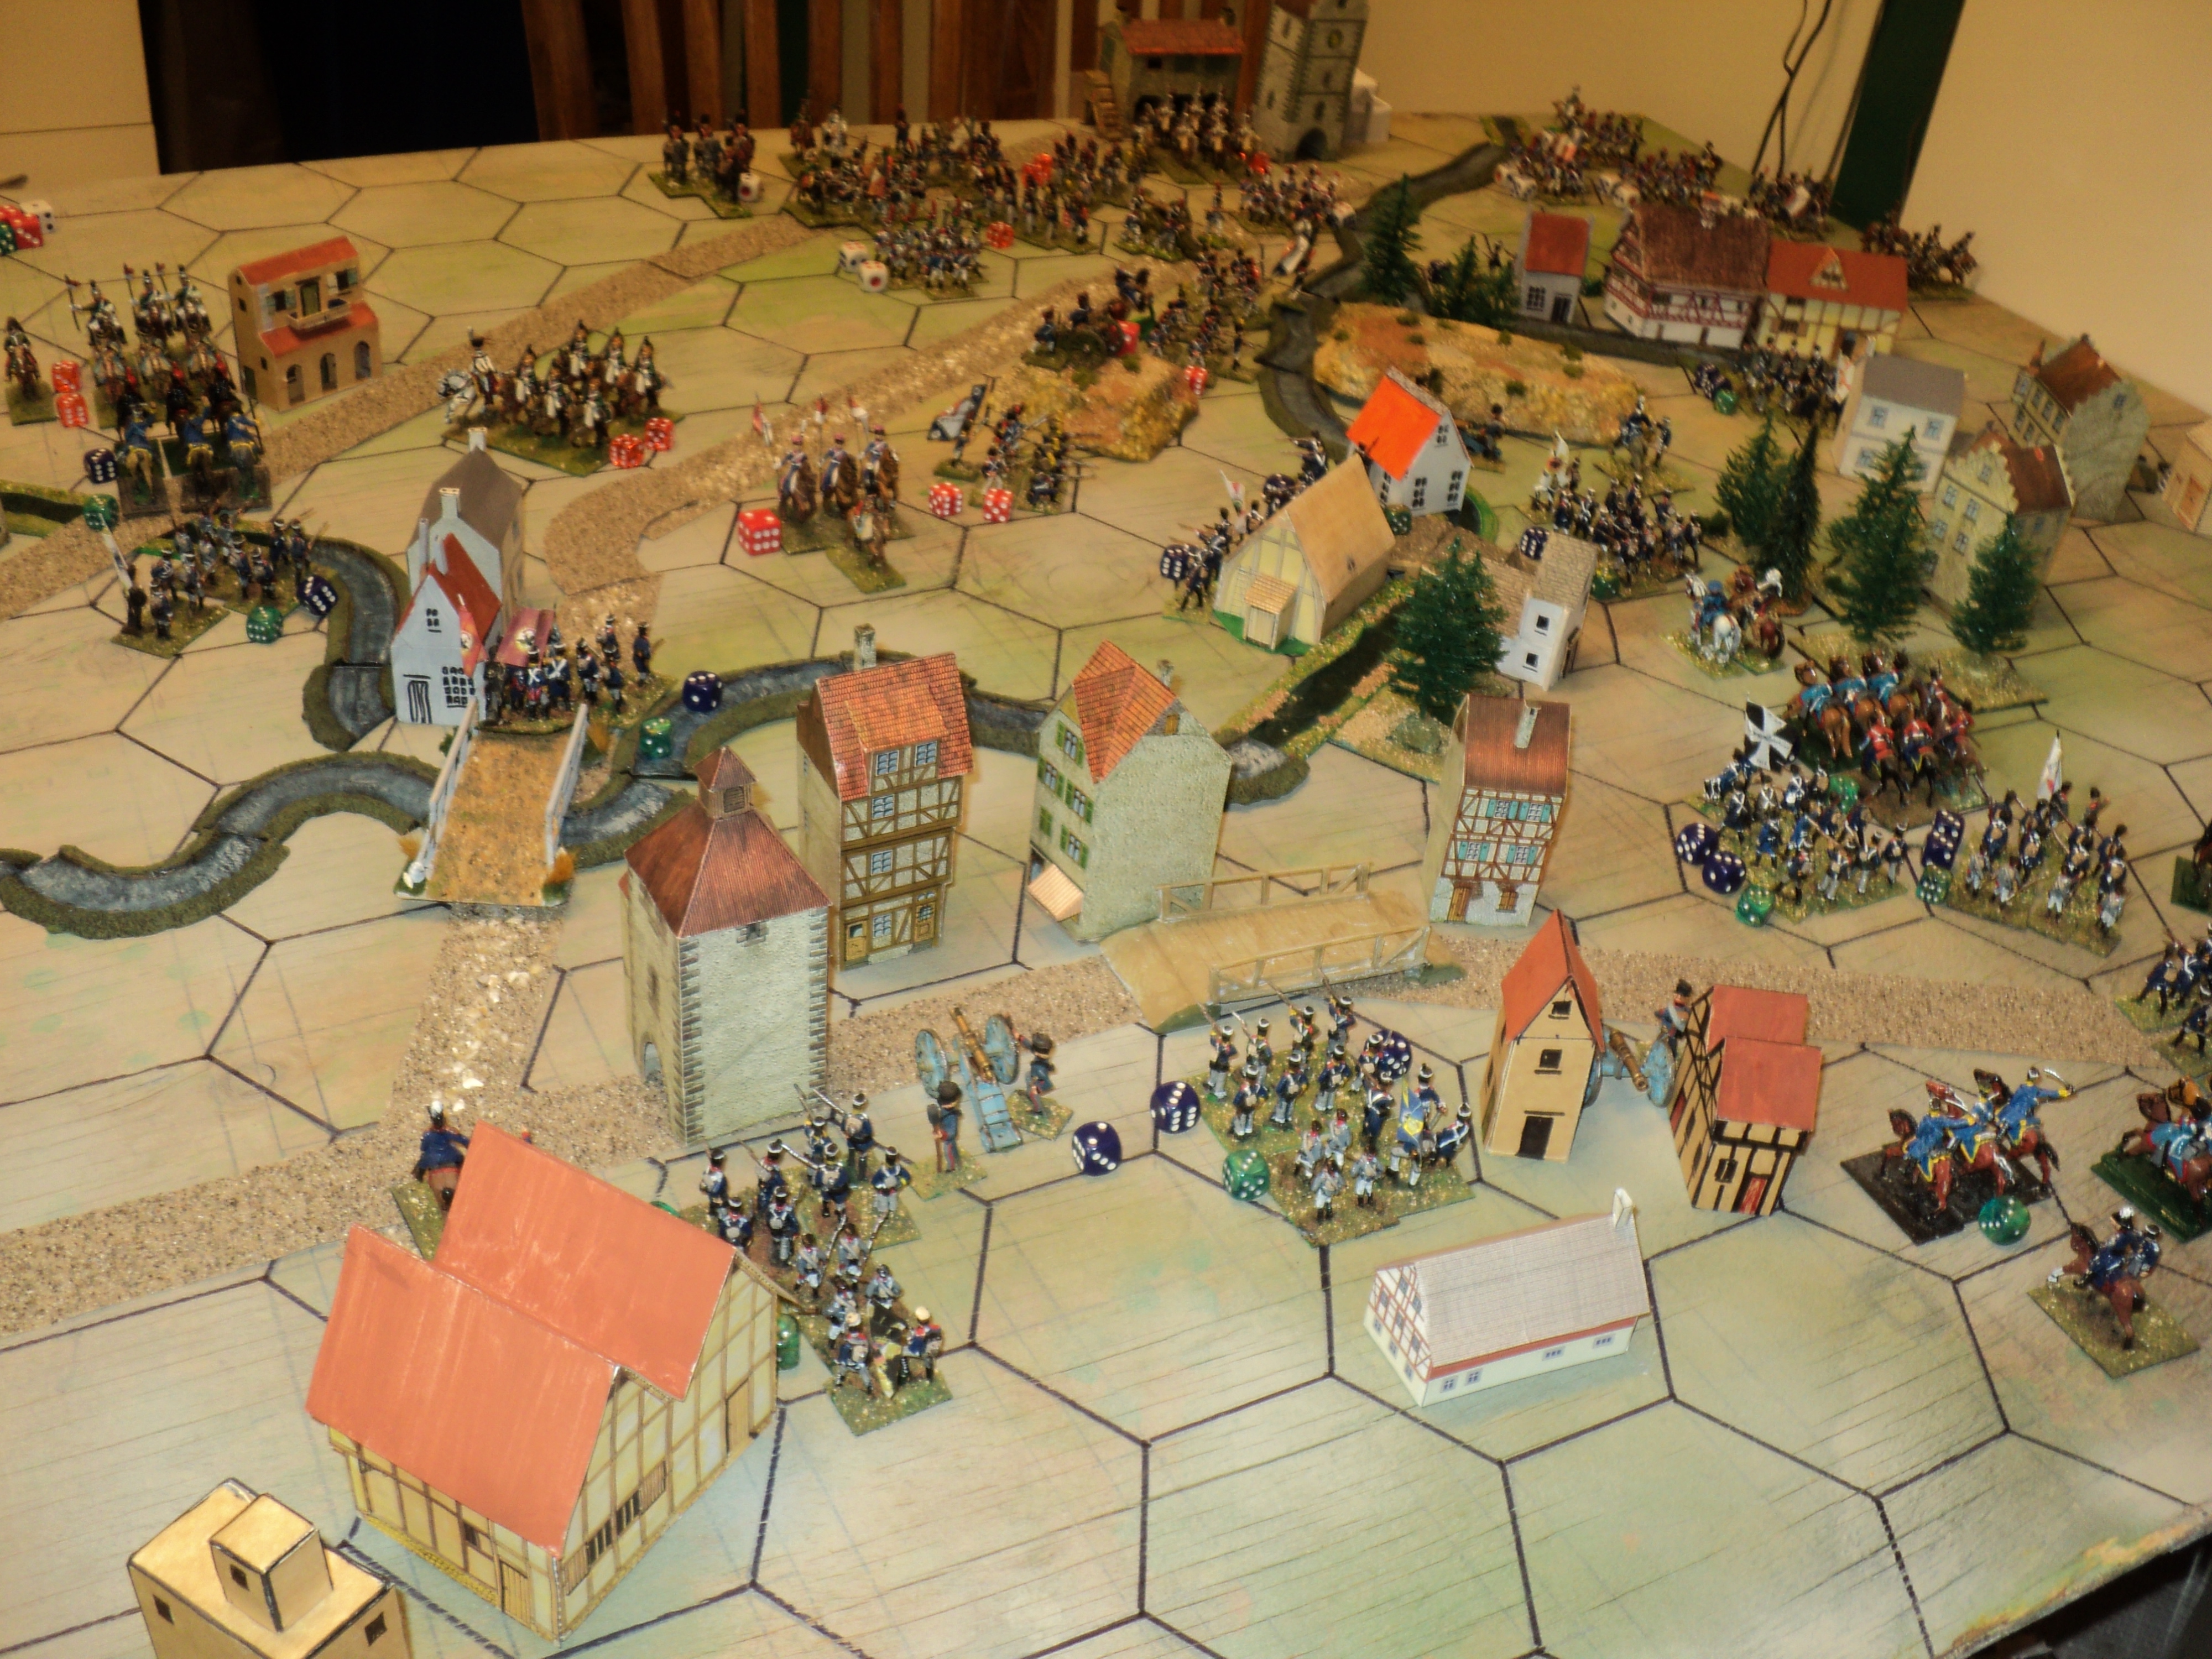
The Turcowaz have taken the town, and the 
Izumrud-Zeleniya corps driven back


The battle was indeed lost - certainly in this part of the field. The further withdrawal of 7th Rifles as far as the entrenched gun line has pretty much unhinged the Zeleniya ridge position. Covered by cavalry counter attacks, the Zeleniyans pulled out: the guns first, the infantry and then the cavalry. Putting some distance between themselves and the oncoming enemy (they won a vital initiative roll) the Zeleniyan left flank quit the field.


The Battle in the Centre.


The 45th Regiment having been driven back from the face of the town, defended by 6th Rifles with the Division Commander, General-Major I.I. Bondarevsky, the cudgels were taken up by the following Regiment, the 46th. The 44th of 5th Division also struck the place, and found an undefended quarter, with the result already related.

It took a rather long time for the 47th and 48th Regiments to close up upon the right of the Zeleniyan line - a problem for the 46th, assailed in flank by defenders' gunfire.


All the same, at fearful cost the 46th successfully broke into the town. In the running fight through the streets, General Bondarevsky was felled by a musket shot, and 6th Rifles finally driven out the western end of the town. (In writing up the foregoing, it occurred to me that it might have been a good idea to place the defending elements astride two squares. The defence is more difficult, as more attackers could be brought to bear, but it does to some extent obviate the flank attacks that proved the undoing of 7th Rifles).


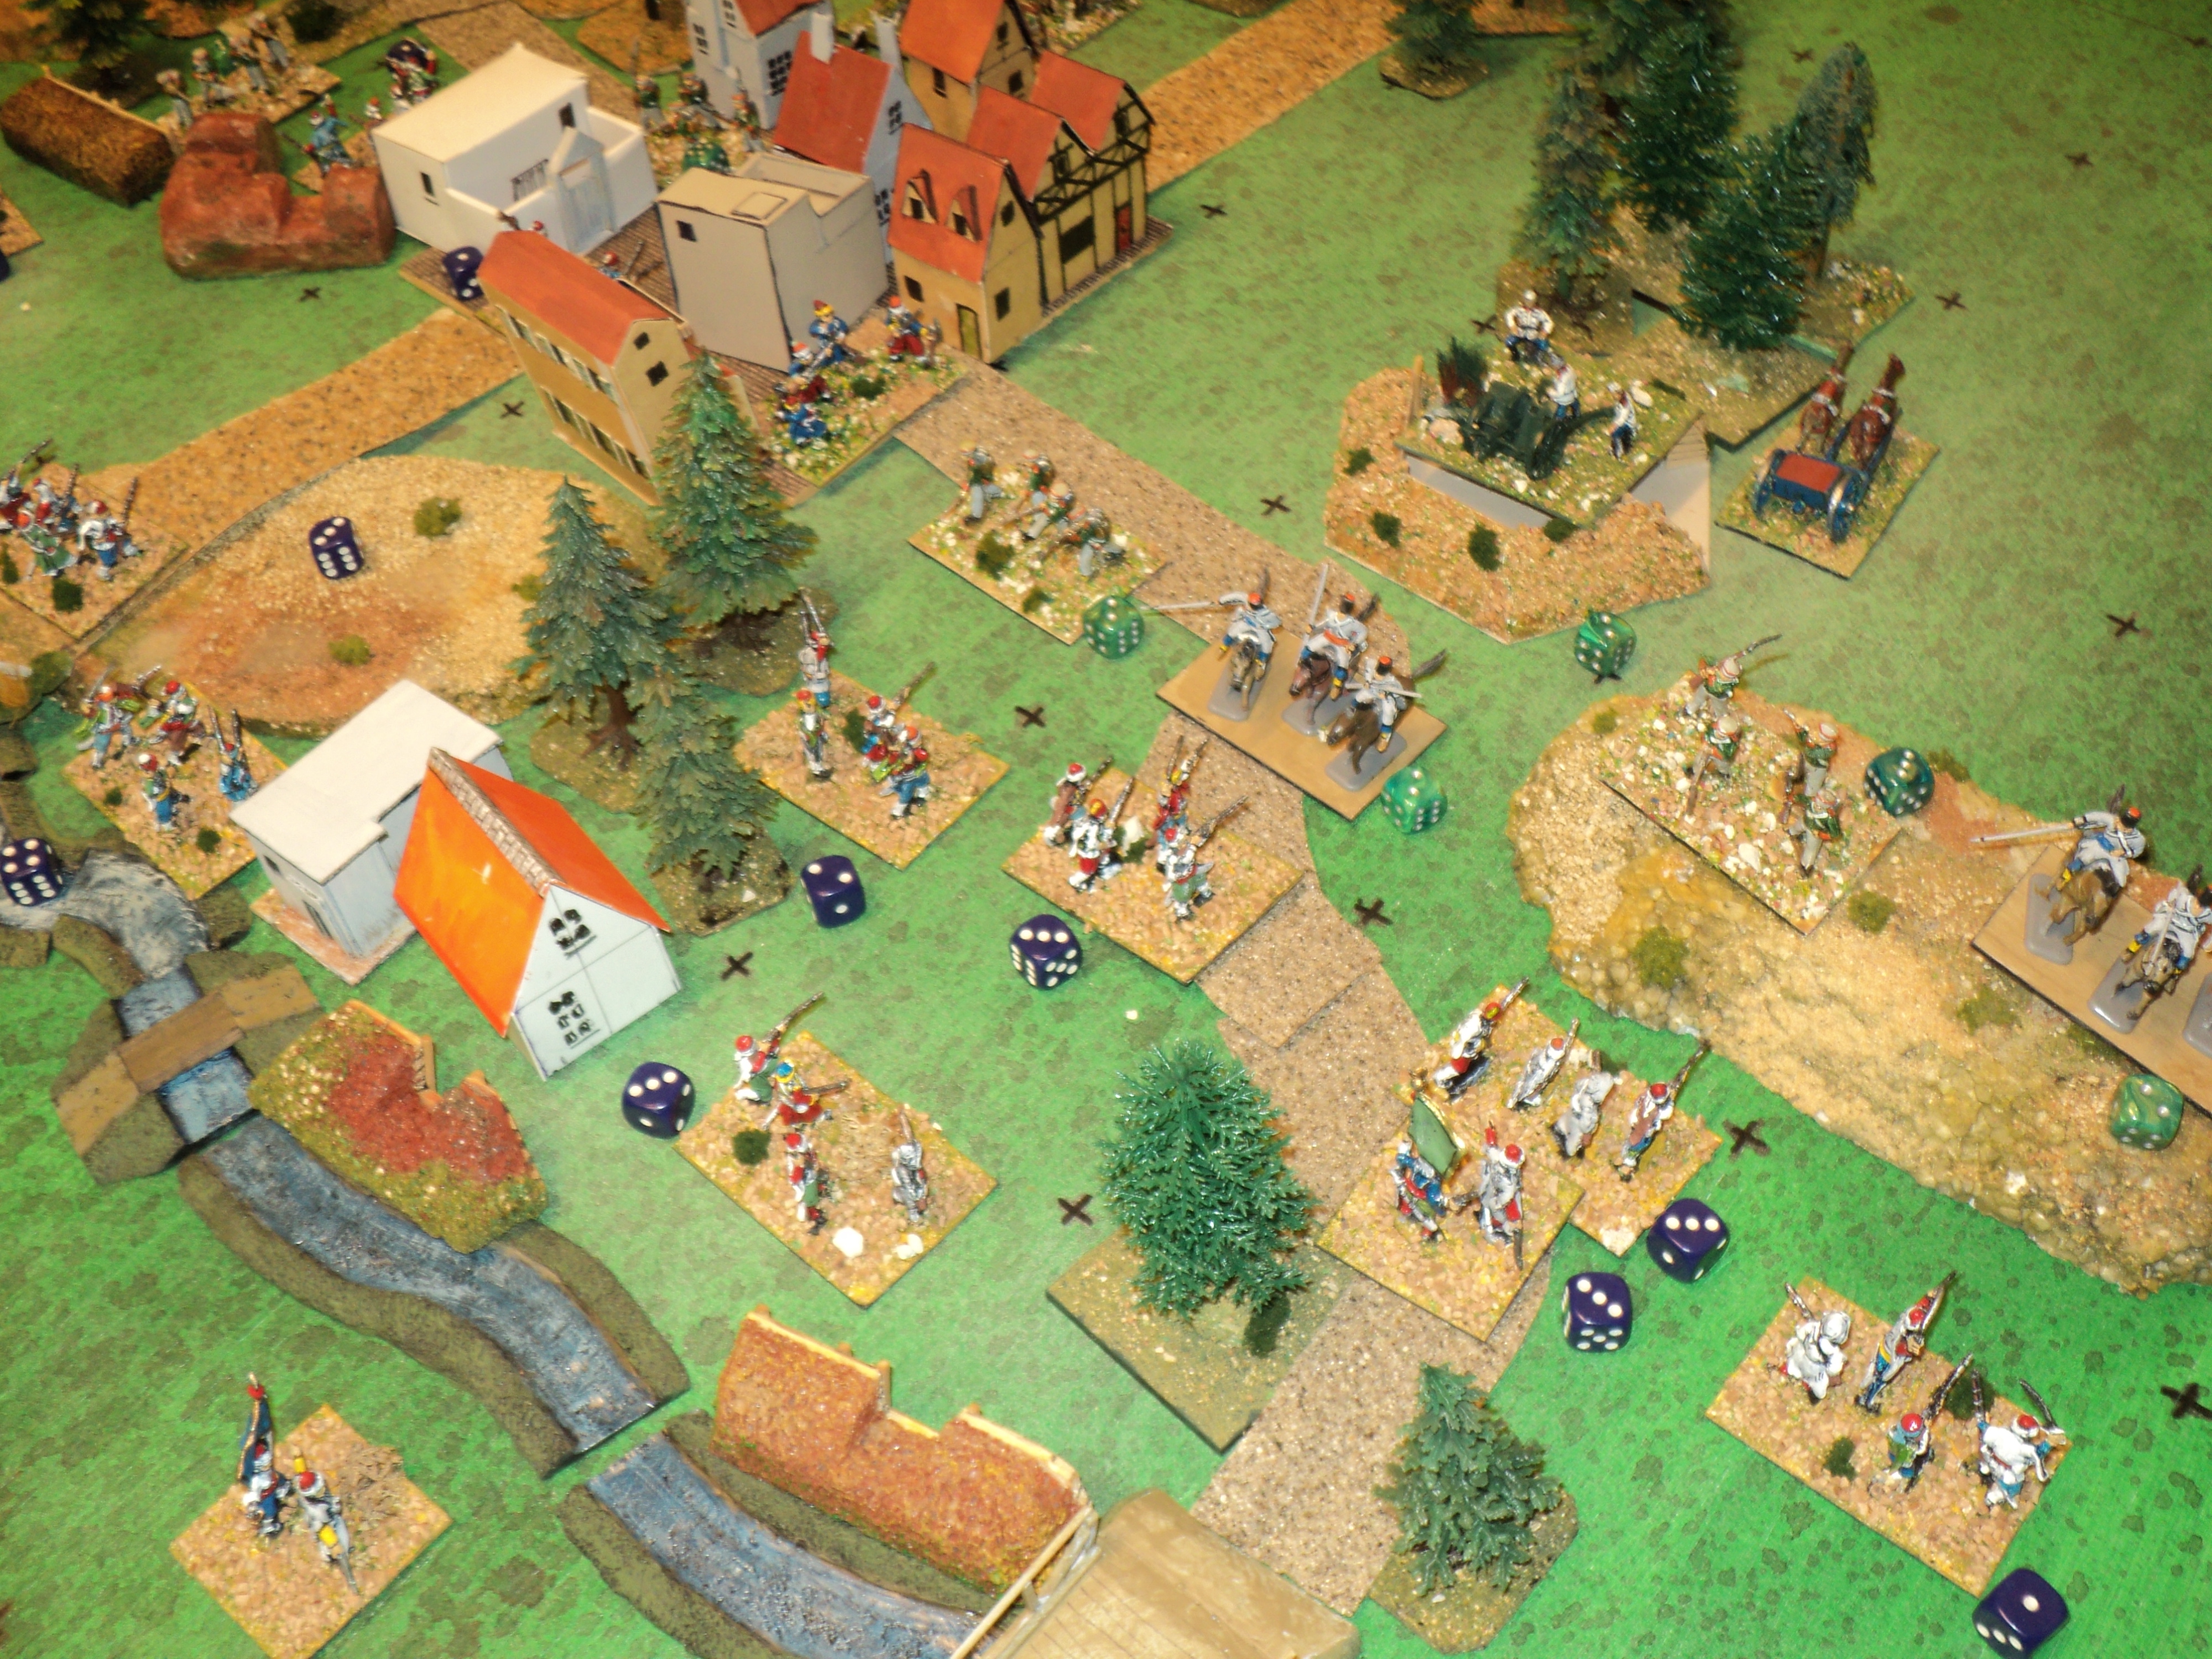
As the town fighting raged on, 47th Infantry closed upon the enemy mountain guns. The momentum of the wild Bashi-Bazouk charge could not be stopped, even with Count Ignatieff directing the defence. Already weakened by some accurate Turcowaz gunfire early in the action, the surviving half of Ist Artillery battalion fell back to the road. The Bashi-Bazouks followed up. Despite the presence of a road, the artillery were caught tangled in the trees of the wood through which it it passed. Few were the survivors who fled the scene, and half the battalions guns were left on the field.


This victory left 47th Bashi-Bazouk Infantry badly depleted (1SP left). The 48th still being some distance to the rear - barely within musket-shot, withal, that left the 47th somewhat isolated. The 5th Rifles were not going top let this opportunity go by. A sudden increase in the volume of rifle and musket fire from the town encouraged the 5th Rifles as much as it discouraged the 47th. 

The artillery having been destroyed, pretty much, Graf Ignatieff joined the defeated 6th Rifles. Delivering himself of a blisteringly short speech, he led the fired-up 6th into a counterattack into the village. It was at once successful, recovering the southwestern quarter. Although both 46 and 47th were then to hold for a time against the powerful counter-offensive, their depleted ranks were too far outnumbered by the Zeleniyans. The 6th bayoneted the 46th out of the town, whilst the 5th recaptured the gun position, though there were no artillery to reoccupy it.   

So few were the remnants of the two regiments that fled the place, Abdul Abulbul Ameer after the battle seriously considered disbanding 46th and 47th Regiments both. But before their demise they had both performed very well...
The recapture of the town, a glorious success in itself, did not constitute a victory in the battle as a whole. It really bought valuable time that the trains could be withdrawn safely before the army began its retreat. The retreat proceeded apace, covered by 5th Rifles, occupying and holding the town.
...


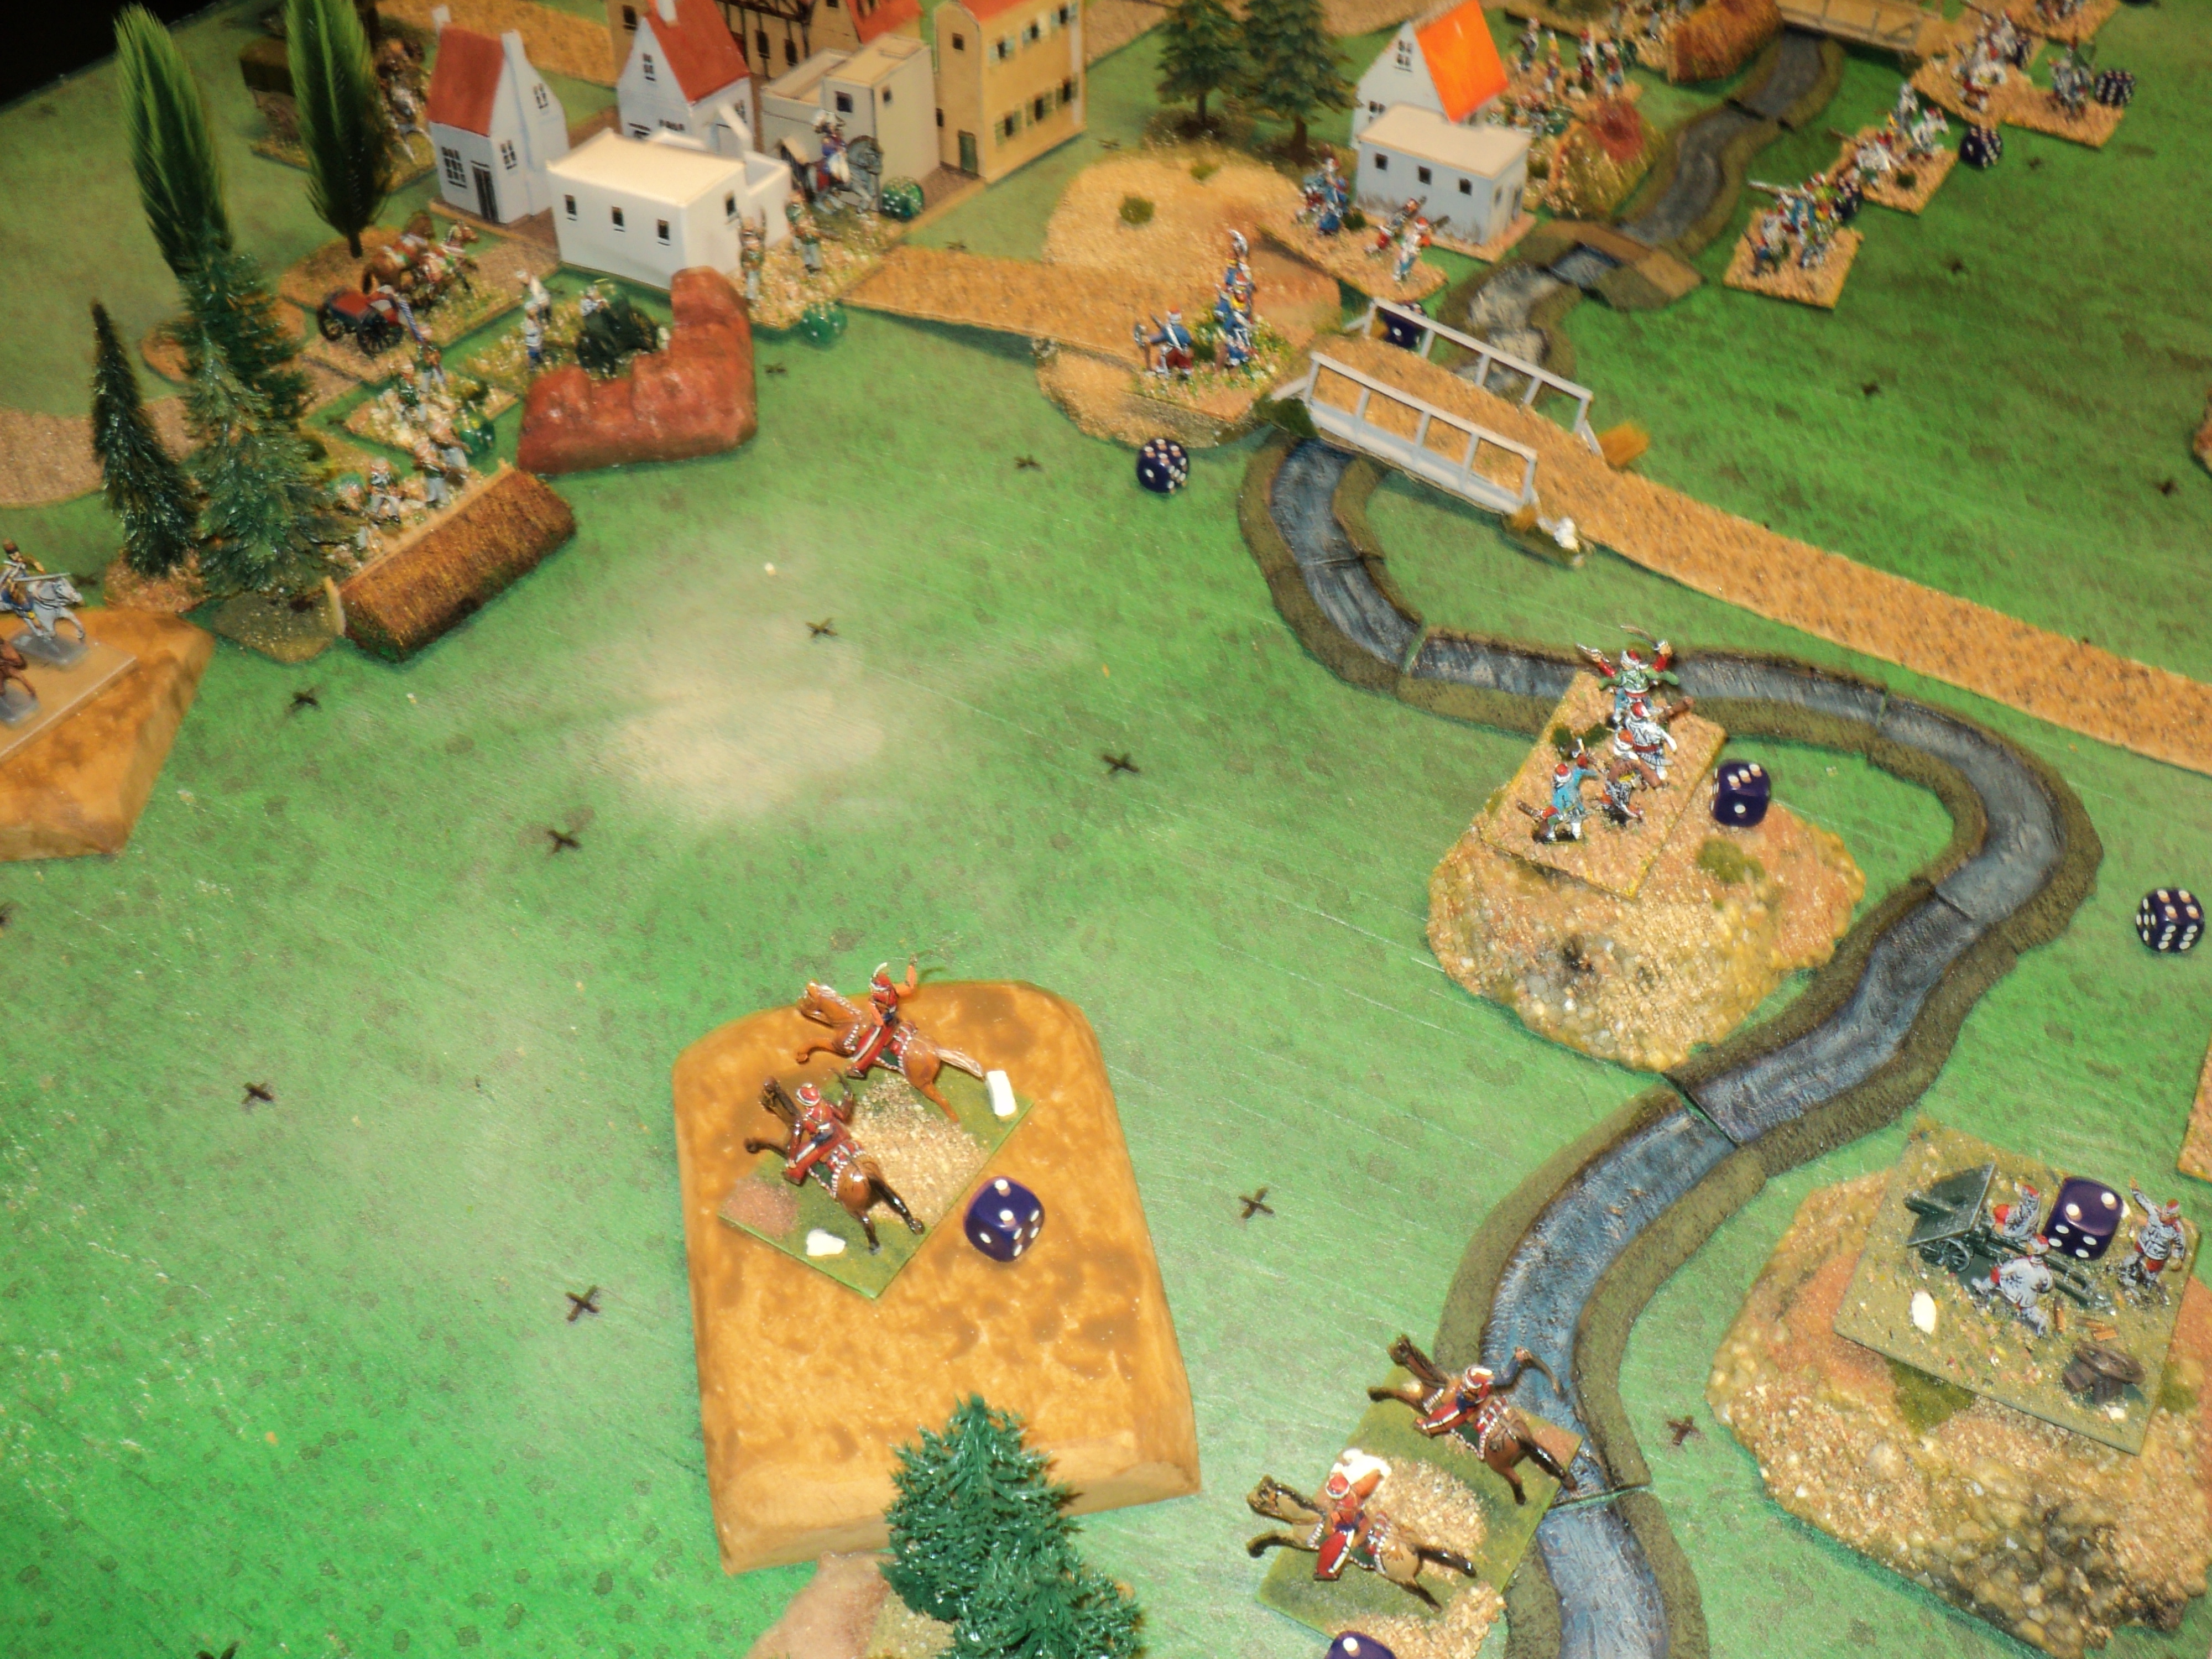
Left - The Cavalry Battle:

The Turcowaz light cavalry brigade, comprising three rather weak Mamluk regiments (good {average} fighters, but 2SP cavalry), seeming about the equal of the Zeleniyan cavalry facing them (2 units only, average, but 3SP each), both sides seemed eager to try conclusions. The result turned out to be some desultory skirmishing and general milling around, with not much result. Neither could fling back the other side in order to fall upon the enemy flank.


It was true that late in the day, one of the Turcowaz light cavalry units (21st Mumluk) was destroyed, but 5th and 6th Zeleniyan light horse each lost a strength point. Honours even, then. 


Once it became clear that the battle at large was lost, the Zeleniyan Horse drew back to the ridge line behind them at about the moment the 5th and 6th Rifles were winning their counter assaults around the town. Then, with one more bound, they formed a loose line southwest of the town. The remaining picture tell the story.


This was an undoubted Turcowaz victory - the success of the Izumrud-Zeleniya counterattacks around the town notwithstanding. The Zeleniyan Corps had reached its exhaustion point - or very close to it - and the Turcowaz, whatever their losses were, were still full of vim and vigour.  

A mistake, here.  The Mamluk Horse showing 1SP ought to have been
eliminated.  I'd taken the counter-die away to remind me...

It turned out that Turcowaz losses actually exceeded the Izumrud-Zeleniyan - some 19SP against 15SP.  But against that calculation had to be set the guns the Turcowaz captured or destroyed.  Now, I like to translate SP into numbers as they might be 'in the real world'.  Readers who might recall the Blackland War may remember that as a very sizeable series of operations - a war of nations.  This is something rather smaller. As, apart from Army Command, the numbers of figures per element (except artillery which we'll count as 2 figures, and transports and command elements as 1 apiece) equals the strength points of the element, it is a simple matter to count up the figures.  One figure represent 500 troops; one gun element represents 1000 men and 40 guns: 

Izumrud-Zeleniya:
44SP -> 37 figures ~ 18,500 troops
Artillery: 4SP ~ 2000 men and 80 guns
Turcowaz: 
79SP -> 68 figures ~ 34,000 troops.
Artillery: 4SP ~ 2000 men and 80 guns.


Battle losses in SP are halved in the reportage of men and guns lost, so the 19SPs lost to the Turcowaz comes to 9.5SPs ~ 4,750 officers and men. Rounding the SPs returns 10SPs to the army against the 19 lost - a net campaign loss of 9 figures.

The Izumrud-Zeleniya situation is a tad more complicated. They lost 15SP. Battle casualties are reported as 3,750. Eight (7.5SP rounded up) SPs are returned to the Army. However, 3 of those SPs were lost when General Bondarevsky bit the dust. Not only that, but 2SPs were lost to the artillery. The 8SP to be returned will have to be allocated:

3SP to replace the 2nd Division Commander
2SP to replace 4SP infantry lost
2SP to replace 4SP cavalry lost
1SP to replace 2 Artillery lost.

In effect, on top of the 3,750 battle casualties, Count Ignatieff's corps lost 20 of their guns.  


Abdul Abulbul Ameer enjoyed his evening hookah smoke with a certain sense of satisfaction: a victory to begin the campaign was always a good augury...

To be continued: After the battle...


Friday, October 21, 2022

Kavkaz Campaign: Opening Moves...

The campaign begins; the first 6 days.  The Turcowaz 
are late starters!

Of course, the Kavkaz campaign, and the war of which it formed the major part, was not unheralded by the usual to-and-froing of embassies, envoys and plenipotentiaries murmuring sweet nothings by way of promises and threats. The diplomatic traffic between Moscovgorod and Ionople grew to volumes not seen for many a long day, and some was directed to Tbilisi, Abkhasia's capital, as well. The Czar knew a moment's worry when it seemed that the Prince of Abkhasia might be inclined to accept the suzerainty of Moscovgorod, for, you must understand, certain considerations of autonomy. Fortunately - for the Czar - his envoy found a red line that could safely be crossed, and the anxious moments passed. (How to make bad faith seem oh so reasonable!). The Sultan and the Czar between them having successfully sailed the diplomatic ship into the safe harbour of failure, they made their separate preparations for invading Abkhasia. (If readers are finding something contemporaneously satirical in this passage, you are not wrong!)

On 1st May, 1875, hostilities commenced...
May 1st to 6th
The generating circumstances thus sketchily outlined, we turn here to the campaign mechanics. The moves are generated by a slight variation from Bob Cordery's system as presented in his The Portable Colonial Wargame (Eglinton Books, 2020). This is a card system in which one side is designated black, the other red, and cards drawn, without replacement, to generate moves. The progress of the campaign I hope will show how it works.

But two amendments I made:
1.  Move activation:
The Army of Izumrud-Zeleniya were Black; Turcowaz, Red. But as both armies had two widely separated and (for the opening moves at least) independent columns, I allocated the activations by suit:
- Club: Izumrud-Zeleniya Coastal Column
- Spade: Izumrud-Zeleniya Kavkaz Column
- Heart: Turcowaz Trebizond Command
- Diamond: Turcowaz Kars Command.

One special exception concerned the Aces. The moves could be allocated across the whole army of the appropriate side. You will observe later that this brought on the naval elements of both sides. These were to come under the Costal and Trebizond commands respectively. In future, the naval elements count as under the command of the respective coastal columns. 

2. Card draw:
The cards were drawn in sequences, continuing until a non-sequential suit repetition. In the picture above you will see six cards drawn. The seventh was a heart (as you will see below), which stops this sequence, and begins the next. Each card represents one campaign day, but instead of individual days, each sequence of cards should be seen as a period of so many days. So that first draw represents 6 days' campaigning. Only in a very limited sense is the order of cards drawn significant (e.g. upon contact, who carries out a reconnaissance, and/or who attacks).

You will observe that by 6th May, the Turcowaz Kars command has scarcely left that town; the Trebizond command hasn't left the coastal city at all. On the other hand, a Izumrud-Zeleniyan column has pushed well down the coast road towards Zugdidi. The Kavkaz Column has not only crossed the Kavkaz mountain range successfully, but has penetrated far into the Abkhasia valley. 
May 7th to 11th
During the course of the next five days, the progress of the Izumrud-Zeleniyan armies slowed, whilst the Turcowaz seemed eager to make up for lost time. The Kings giving the commands 5 hexes of movement were invaluable, but two draws exhausted the supply! There won't be any further occasion for such alacritous marching until the deck is reshuffled.
May 12th to 17th card draw
By 17 May, the Trebizond command had reached the vital seaport of Poti - nestled between the Amicable Sea, the Paliastomi Lake and the Rioni River. The Kars Command entered Tbilisi - to find the ruler absconded with most of his household. The Zeleniyan Coastal column had yet to reach Zugdidi, but the Kavkaz column, striking the Kutaisi-Tbilisi road, turned eastward, toward the Abkhasia capital. General-leytenant Malakhai Malodorivitch Kutizedhov little knew that ahead of him stood a large army, soon to be coming his way. 
May 12th to 17th moves
Reaching the town of Khashuri, the Zeleniyans were disconcerted to discover during the course of the next four days that a Turcowaz column had arrived, and was close by to the east. For his part, Abdul Abulbul Ameer was not at all displeased with the results of his reconnaissance. The enemy were in the town in no great strength - not compared with his own command. He ordered the battle for the morrow.
A word on reconnaissance. The Cordery system really applies to the two (or more) player campaign. This one is solo. However, there seemed me at least some potential to adapt it to solo campaigning. The results of the recon are determined by a roll of a single D6 die. A '1' score means the attacking army disdains a reconnaissance and carried on into the enemy occupied grid area. OK, we're looking at some kind of ambush, possibly. One might programme some kind of advance or attack, and then lay out the defence to meet it.

A roll of '6' indicates a very good and detailed reconnaissance. There one might lay out a defence formation, then tailor the attack according (e.g by massing on a flank, say, or by prohibiting the defender to move for D6 moves). In effect, we're looking at a surprise attack. Abdul in fact rolled a '5' - pretty decent recon - good enough perhaps, to refuse action did he not like the odds. Otherwise the scores 2-5 indicate a straightforward battle.

May 18th to 21st moves. Note the 
arrival off the coasts naval elements 
of both sides.
The country round about Khashuri was hilly, with several tracts of woodland, and, here and there, areas of cultivation. Some distance east of the town flowed north to south a small stream, really a creek,  bridged upon the Tbilisi road and a minor road northward, and at the farm, across the river from a cultivated field. This battlefield was generated using the Cordery system adapted for a 10x10 square-grid board. Bob uses an 8x8 square grid or 9x8 hex for the system he devised. My adaptation effectively adds 50% (more or less) to the possible numbers of features.  

Example: Hilly terrain. 
The basic system permits D6 + 4 hills - the scores ranging from 5-10, average 7.5.  I simply added an extra die: 2D6 + 4 hills.  The scores then range from 6-16, averaging 11.  On this occasion I scored 13 hills - moderately rugged country.

To begin the layout process, I roll 2 x D6's, counting down the left-hand side grid rows for the starting point, starting at 2 for the top left hand corner, then, reaching 12, coming back to the same corner.

One change I did make: I placed the town, 4 squares, as a 'given' - no dice roll. I rolled for other Features. Settlements - a '1' - which I decided was an outlying farm, having rolled on 2D6s, a '4' and then a '6' for location). 

Battlefield of Khashuri, 21 May 1875.


To be continued - Battle of Khashuri

* Note:  The gimlet eyed reader might have noticed the sudden appearance of a railway in the final campaign map of this posting. Quite right - something I had intended to research before beginning this campaign. It will probably not much feature, except maybe as LOC and logistics artery for the inland Turcowaz command.


Sunday, October 16, 2022

The Kavkaz Campaign

Having updated and up graded my TURQUOISE (Turcowaz) and GREEN (Izumrud-Zeleniya) armies in recent days, methought of a campaign in which to pit these longtime adversaries. At the far eastern end of the sea the Turcowaz called Karadeniz, lay a rich land, independent and known especially for its wine-growing. Until recently this land had lived an autonomous existence, somewhat protected by its mountain ranges, but also by its fierce fighters and, probably most of all, by its neighbours' fears that its superb vinous beverages might, with too much external meddling, be lost to the world. Even the supposedly abstemious Turcowaz were inclined to a certain ... lenity ... in respect of the existence and consumption of the products of Kakheti. 

In recent times, however, the ambitious Romanovitchskiy Czars had become disinclined to suffer the existence of independent states upon their borders. The latest of the House, Nikolai the Bibulous, something of a connoisseur of the Kakheti reds, roses, and ambers, had long harboured the notion of including the region - and the whole of Abasgia, withal - within his realms. He caused to be assembled two columns, one to march from the sea port of Sakhumi; the other from the Ciskavkaz towns, Pyatigorsk and Nalchik. The objectives were to take Tiblisi, and seize control of the whole valley between the Kavkaz Mountains and the Ktsia Range. 

Naturally, the usually indolent Sultan was moved in response to reports from his myriads of spies to order the mobilisation of military forces to oppose any such move by the Czar. Once more, he relied upon the bellicosity of the troublesome Abdul Abulbul Ameer, to direct operations in the Abasgian territory. Dividing his large army in two, he assembled the one at Trebizond, the other at Kars. The objective: to conquer the whole of the Abasgian valley, seize Tiblisi, and drive the Czar's army back across the Kavkaz mountains.

Such is the rather sketchy outline of the proposed campaign. First off, the maps.


A rather distorted map of the region to be fought over

I drew the above map roughly, distorting the east-west dimensions rather, because I wanted to get Trabzon (Trebizond) and Tiblisi both in the picture. The Kavkaz Mountains form a rather narrower range than the counterpart in our real world. Trebizond and Kars lie at the northeastern fringes of the Settee Empire of Turcowaz; The coastal town, Sakhumi, and the Kavkaz mountains form the southern frontier of the Czarate of Izumrud-Zeleniya.  This map was designed as the template for the hex map below...


Campaign Map of Abasgia.

Strictly speaking, the wine-growing regions lie east of Tiblisi, but that town really provides the only route from the west to reach them. Readers might recognise the region as modelled upon Georgia (the Republic thereof) but heavily distorted. I think this will be a fairly simple sort of campaign, though I do intend a naval dimension, which I'll expand upon in due course. My thoughts in that direction indicate a logistic support by sea for both (convoys of freighters and tramp steamers), but also a small sea-borne Czarist column.  
The entire navy of Rhumbaba. On loan to the 
Zeleniyan armed forces, they might choose to 
fly a different flag...


I thought of the Czar borrowing from the Hellenican navy, but that is starting to look a bit too much of a stretch. They may instead 'hire' the tiny Rhumbaba navy (small cruiser, torpedo boats and a possible armed merchant) for troop transport, supply, and possible raids along the coast near Trebizond. The Turcowaz Navy might send a protected cruiser (Hamidiye or Mecidiye) by way of escort for seaborne supply to Trebizond and any other sea port they might take and occupy.

One of the Turcowaz protected cruisers


At the moment, I'm looking both sides sending two columns, all quite disparate in composition. The Turcowaz is planning (that's a way around justifying any changes I may make to the campaign!) - is 'planning' to send a 'regular' column up the coast from Trebizond to Batumi and Poti. It will comprise the regular infantry and cavalry Divisions, two artillery regiments (each 2 guns) and a machine gun battalion. The 'irregular' column begins its march from Kars - a powerful column of Bashi-Bazouks, foot and a few horse, supported by an artillery regiment and machine guns. To rein in the possible Bashi-Bazouk tendency to excesses of behaviour towards the people and infrastructure of the region, Abdul Abulbul Ameer is to command this column in person. His known ruthlessness, incandescent temper and sharp readiness of scimitar seemed as likely a curb as any upon the excesses of indiscipline... 


Turcowaz and Rhumbaba naval units, in more 
halcyon times, rendering passing honours...


The stronger of the two Zeleniyan columns is to advance down the coast road Zugdidi. It will comprise 2 infantry and a cavalry Division, an artillery regiment, and the Naval detachment of machineguns and naval artillery mounted on field carriages. A much smaller column will leave from Nalchik and cross the Kavkaz mountains not far to the south. It comprises a single Division each of infantry and cavalry and a regiment of artillery.  

The quick witted reader will observe that these columns in no way are within supporting distance. Nor are they. Perhaps some concert of action might be achieved once these forces enter the theatre of operations...

The method of activating the columns and naval units is likely to be a variant of Bob Cordery's card driven campaign system outlined and exemplified in his book The Portable Colonial Wargame.  At the moment, I'm imagining the sides to be allocated a colour (RED for Turcowaz, BLACK for Izumrud-Zeleniya) and to each column a suit.  We'll see how that goes.

I reckon that will do for this posting ...

To be continued...