Tuesday, September 26, 2017

Aux Portes de Moscou...

Last evening Jacko (Painting Little Soldiers) and I got together for our fist head-to-head battles with the Memoir '44 game system. Following on from my purchase of the box game at the Club bring-n-buy at the beginning of the month, Jacko had looked into what extensions, additions and accessories that might be available. He got the Eastern Front extension.
...
Operation Luettich August, 1944.  The German forces represent
4 Panzer and 4 Infantry Divisions.  One of the infantry units
are panzer-grenadiers.


Reasonably quick to set up and play, we had two games, one from the basic Memoir '44 set - Northern Europe, 1944 - and one from the Russian Front. I took the Allies both times; I was defending both times.


The first game was the German counter-offensive at Mortain, Operation Luettich, 7 August, 1944. One of the striking things about this game system is that the scale of each battle is indicated only by the game map. The Luettich game map represents probably 16km, or 10 miles of front, a depth of roughly 11km or 7 miles, bearing in mind distortions to 'fit' the hex-grid board. The German offensive, comprising 6 Panzer (2 of them 'special') and 7 infantry units represents 4 Panzer Divisions and as many Infantry formations. Of the Americans, the defences comprised the 30th Infantry Division together with elements of 4th, 9th and 35th Infantry Divisions. In the north-west corner [the long axis of the board being roughly north (Cherance)- south (Mortain)], stand what I infer to be elements of 3rd Armoured Division.

(Note:  The scenario mentions the Panzer Lehr Division's involvement, but none of the sources I have found confirms that formation was present at all. Nor, indeed, does the set-up clearly suggest the presence of a fifth Panzer Division.)

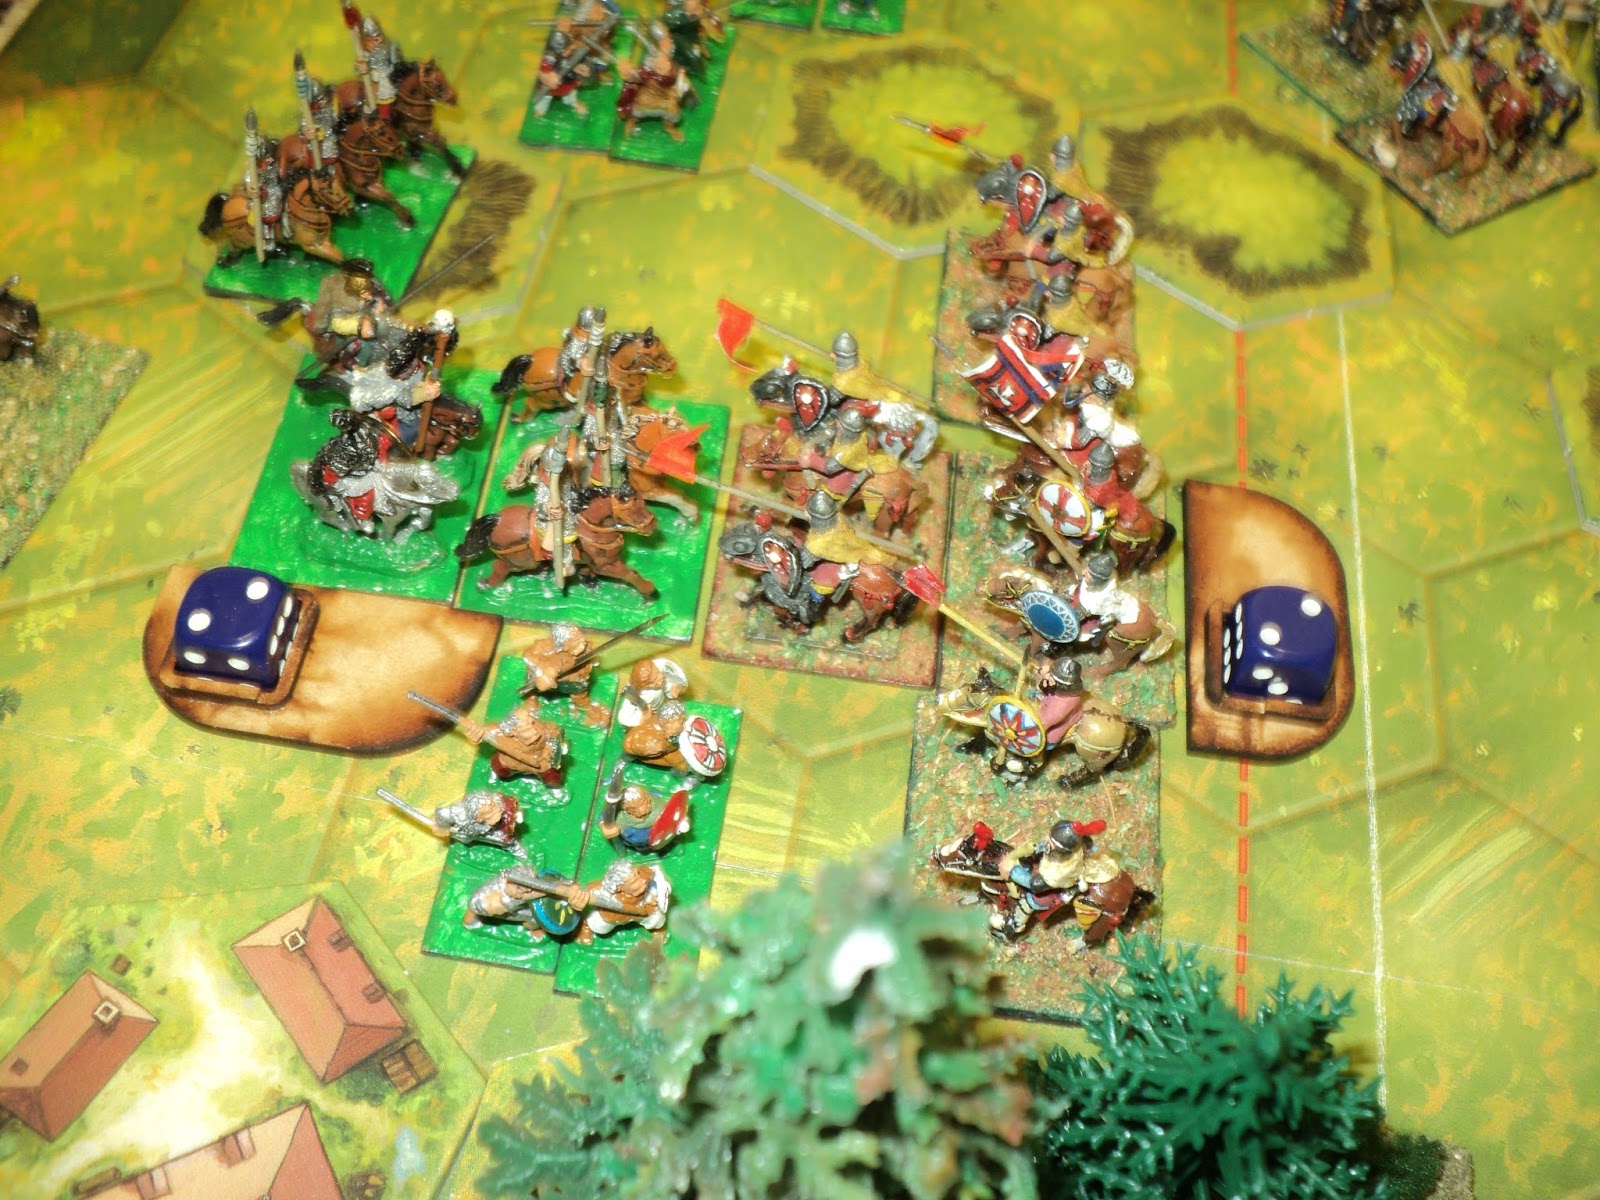
Germans quickly opted for a major thrust down the Mortain axis.
Hill 317 (barely in the picture on the right) was not to be held
for much longer!


I won't bore you with a blow by blow account, but mention a few incidents in the action. One was the difficulty both sides had getting their northern flanks into action. In fact, as the American commander, I never did get to move the units about Le Mesnil Adelee, which remained in situ the entire action. The German units north of the River See made scarcely more impact.

The German thrust in the central sector took a major
setback with the destruction of one of the SS Panzer
units.  But near Mortain, there is not much standing between
German panzers and their objective at St-Hilaire

What broke the back of the historical German offensive was the air power at the Allied command. This was represented by 'Recon' cards being used as 'Air Power' cards whilst a unit still held one of the Hill 317 hexes. They certainly did some execution whilst they lasted, drawing - and using - one Recon and one Air Power early in the battle. One of the SS (special) tank units took such damage that it was destroyed fairly easily later on. I did draw a second 'Recon' card, but never got to use it. As a 'section' card, it implied that the air strike had to be in the section - left, centre, right - indicated. The situation on the right flank was too urgent. Even so I was unable to prevent a panzer thrust that finally took St-Hilaire and won the action for the Germans.
Sure enough, the panzers brush aside the feeble
resistance and seize the town for a close-fought victory.

Then came the game that inspired the title of this posting: Operation Typhoon: the Gates of Moscow.  Same game board, using some of the Eastern front terrain tiles, the map represented a front of some 200 miles! - from Rzhev in the north to south of Orel.  So rather than Divisions, we're talking armies, here. On the German side, 2nd, 4th and 3rd Panzer Amries, and (possibly) 4th Army; on the Soviet side, maybe a dozen armies. Each infantry figure must have represented a whole army on the Soviet side.

Operation Typhoon.  Aptly named!  The map represents at least 200 miles of front.
...
It's a big action, too: once all the German forces were laid out, there was hardly anything left in the box.  Now, there is a special rule anent the Soviets, concerning the institution of commissars at this stage of the war.  The Soviet player (myself) had to select his order card the move previous to playing it.  This proved quite a challenge.  At one point, whilst still holding the ridge line west of Vyazma in some force, I issued a 'Close Assault' card that would have enable me to cause damage to four enemy units.  By the time the turn came around, only two such units remained to be so attacked.  Disappointing, but no real surprise.


Well into the operation.  The Sovier defence line west of Vyazma
is crumbling, though the isolated artillery element would
hold out for a surprisingly long time.

The Germans took enormous losses in armour forcing the main defence line, but eventually broke through. With the 'Medal' score standing 5-4 in his favour, an understrength (2 tanks) panzer unit seized the undefended bridge objective south of Kaluga. In passing, they wiped out (lucky shot this) a two-tank unit to the west. The two medals obtained in one turn completed a hard-won victory to the Reich.


What happened to the light quality (a bit of a puzzle)?  Soviet armour has recaptured
part of the ridge line, but a quick thrust down the south bank of the river near Kaluga
captures the river bridge (a major objective), and takes out a 2-tank unit
that was about to attack the Germans occupying that end of the ridge.  


I was curious as to losses in this game. A count determined that the Russians lost 19 infantry figures, 3 tank and 2 artillery. The Germans lost 16 panzers (wow!) and 9 infantry. Part of the reason for this investigation was a notion that occurred to me, inspired by the 'Medics and Mechanics' order Jacko played in the middle of the game. His five dice yielded not one recovered vehicle for the selected depleted panzer unit. Bad luck, but it didn't affect the overall outcome.


But suppose the battle were part of a campaign? We would want to recover some of our losses. What would happen if, after the battle, a die were rolled for each unit lost? Suppose we allowed the return of the appropriate figure were a soldier or tank to appear, with the player's choice for each star (to recover lost artillery, say). So I tried it out.


The Germans recovered 8 panzers and 9 infantry for a net loss of 8 panzers - a serious dent, in campaign terms, to their amour inventory (but bear in mind: Moscow has fallen!). The Russians recover all 3 tanks lost, 10 infantry and both artillery figures for a net loss of 9 infantry. Note that one may not recover more units of a particular type than one began. Well, it's an idea...

My thanks to Jacko for an enjoyable evening, even though we are now living under the yoke of global Nazism... 


Thursday, September 21, 2017

Encirclement or Breakout


To conclude - for the time being - this series of articles on the Byzantine and Bulgars, I thought I would try a proper battle, but with a certain extra something. From the Grant and Asquith Scenarios For All Ages (a.k.a. The Red Book {of Scenarios}), I thought Number 4, from which the title of this posting has been taken. The lead picture sets up the situation.
The pursuing Byzantine force.  
"It came to pass that in the first year of Emperor Dementius, the Bulgars along the border invaded the Theme of Thessaloniki, raided several towns and villages, burned a number of farms and caused an uproar throughout the region.  Gathering as many of his thematic troops as he could, together with some Imperial kavallarioi, the local Strategos, one Dmitrios Manikos, set off in pursuit of the miscreants.  Heavily laden with loot as the raiders were, Manikos anticipated overhauling them well before they reached the Bulgarian border.  The Bulgar Kavkhan of Sofia, Attishu, was well aware that the Byzantines could be relied upon to react and retaliate, and had prepared accordingly.


"Splitting his raiding force in three, he took the main body on the raiding expedition, leaving the other two forces - with promises of a share of the loot - flanking the return road at a distance, ready to entrap the pursuing Imperialists. Overconfident and heedless, Manikos caught up with the raiders not far from the frontier..."  Michael Psellophanes The Dementiad.


The game was played out on the 13x7 Memoir '44 hex board - none too roomy, as it happened, for the forces I chose.  The troops were laid out as in the leading picture. The forces were as follows:

Byzantine: 


  • Strategos, Dmitrios Manikos @ 6 SP = 6SP
  • 3 Kavallarioi Units, heavy cavalry, lance/bow, sword, shield @ 3 SP = 9SP (Note: Manikos remained with one of these units, which was classed as ELITE)
  • 1 Procoursatores Light Horse, lance/bow, sword, shield @ 2 SP = 2SP
  • 2 Skoutatoi Heavy Infantry, spear/bow, sword, shield @ 4 SP = 8SP
  • 1 Peltastoi Heavy Infanrty, spear, javelin, sword, shield @ 4 SP = 4SP
  • 1 Akonstai Light infantry, javelins, shield @ 2 SP = 2SP
  • Sphendonistai Light Infantry, sling, @ 2 SP = 2SP
Totals: 9 units; 33 SP, exhaustion point, 11 SP.  Except where stated, all troops are rated AVERAGE.


Bulgar:

Main Raiding Force ('Force Two' in the original scenario):

Bulgar raiding force.
  • Kavkhan Attishu @ 6 SP = 6SP
  • 2 Bulgar Noble units, Heavy Cavalry, javelins, bow, shield (One of these was led by Attishu himself and is classed as ELITE) @ 3 SP = 6SP
  • 2 Horse Archer units, Light Cavalry, javelins, bow, shield @ 2 SP = 4SP
  • 2 Slav Spearman units, Heavy Infantry, Spear, shield @ 4 SP = 8SP
Total 6 units, 24 SP.  All except one heavy cavalry are rated AVERAGE.  Possibly to balance the scenario more, the spearment could have been rated poor, but it seemed to me only the more reliable troops would have been taken on such an expedition - quite apart from the motivation in respect of whatever loot they might have been carrying.


'Force One' - the flanking Bulgar force.
Flanking force (Force One in the original):
  • 1 Heavy Cavalry unit @3 SP 
  • 1 Horse Archer unit @ 2SP
  • 2 Slav Spearmen units @ 4SP
Total: 4 units, 13SP, all classed as AVERAGE

'Force Three' - ready to slam the door shut behind the
Byzantines.
 Trapping Force (Force Three in the original):

  • 1 Heavy Cavalry unit @ 3SP
  • 2 Horse Archer unit @ 2 SP = 4SP
  • 2 Slav Spearmen units @ 4SP = 8SP
  • 2 Slav Archer ubnits @ 2SP = 4SP
Total: 7 units, 19SP, all classed as AVERAGE.

Now, there was but one Bulgar commander in an overall force of 17 units, 56 Strength points. Something I overlooked, but would certainly consider a second time, would have been to apply the Exhaustion Points to each of the three Bulgarian forces separately. That would have given the separate forces Exhaustion points of 8 (Attishu's), 5 (Force One) and 7 (Force Three) respectively.

First move won by the Byzantines ( a die roll) - they drew a 6.
The original scenario forces being translated to the Mediaeval period, it remained to transpose the map onto my Memoir '44 board. The tiles came in handy, here, and worked quite well, but addition of the trees gave it a more '3D' look.

Now, for the card activation system. This time I wanted to test the separate Black and Red decks idea. The Bulgar unit total of 17 indicated a 'median' of 8, so they got the red 8, 9, 10s from 2 packs. The 9 Byzantine units indicated a 'median' of 5, so they got the black 4, 5, 6s. The roll for first draw (a die roll seems good enough) gave the nod to the Byzantines' first move. They drew their top card: a six. It seemed to me that carrying on with the pursuit would be no worse that many another action!
Bulgar's first draw: a ten!  Auspicious for them!
They got close enough to send a few arrows chasing after their quarry, but without much effect.  Then the Bulgars drew - a ten. Bad news for the Byzantines! Attishu promptly turned some of his men around to face the pursuers; Force One (bottom left in the picture ) sent one spear unit into the farm near the large wood whilst the remainder skirted the other side of the wood to flank the Byzantine infantry. The advance of Force Three was limited to the light troops only. Even so, there were already indications that must have been worrying for Dmitri Manikos.
Byzantine foot turn to face 'Force One'.
Still, a good draw, and Manikos detailed his infantry to deal with the flanking move by Force One, which had already put a dent in the slingers.  The archery from one of the skoutatoi units removed several Bulgar nobles from their saddles.
Under pressure from in front by the horse of 'Force One'
the Byzantine infantry find the light troops of 'Force Three'
closing on their rear.

Things look dire for Manikos's bodyguard, too.
The following sequence of pictures depict the developing battle, as the  Bulgars contain Byzantine attempts to break out of the encirclement, and tighten the squeeze. Considering the odds on the dice, it has been a feature of these that the shooting and close combat has tended to be fairly ineffectual. So it proved in this action. The bonus for lances moving into contact availed the Byzantines nothing, and thereafter, all three kavallarioi units remained locked in close combat with the Bulgar light and heavy horse.  

The light archers covering their rear having been dispersed,
 the peltastoi turn to face the approaching enemy light troops
with javelins.

Desperate fighting as Manikos and his horse try to break out.


Having driven off the Bulgar archers for the moment,
the peltastoi return to try to sweep aside 'Force One'....

Four units shooting - two with arrows, two with javelins -
with just one 'kill'.  And that was only because the Bulgar
heavies has no retreat!

The leaders facing off against each other.
Both their bodyguards have taken losses.

The Byzantines are practically surrounded now!

One of the Byzantine heavy horse units looks to be in serious trouble...
In view of the foregoing picture, I should make some comment about unit facing using the hex grid system. My preference is to call the direct front, and right and left flank front of a unit, all three, as frontal. An attack from any or all three hexes, I regard as a frontal attack.  The flank-rear hex grid areas are outflanking areas. An attack from either or both these areas constitute a flank attack. Finally, an attack only from the area directly to the rear counts as a rear attack.

In these two diagrams, you will see to Manikos's right a unit of cavalry taking on two spear units: one directly in front, the other to the left flank front.  But a short distance to the left is the real danger: a unit of Bulgar heavy horse about to charge into their left flank rear - a flank attack.
The danger of missile attacks from front and rear.  Having no
retreats possible, the Byzantine foot start losing heavily.

Desperation: All four command points go to trying to sweep
'Force One' aside!  The Bulgar spears are struck front and flank


Success! - at least a partial one.  the 'Force One' heavy
horse are destroyed, but despite their parlous situation,
the spears hold out.

The failure to destroy the spears is a a disaster for the
Byzantine foot as the Bulgar lights fall upon their rear...


... and losses mount alarmingly.

There is simply no shaking off the determined Bulgar assaults.

The Byzantine infantry line crumbles. 

It is all up with the Byzantine army.  Manikos escapes the
destruction of his body guard ('effect on commander' die roll:
a one); and the infantry is dying on its feet.
By this time, the Byzantine force had long since sunk past its 'exhaustion point'. Their chances of escape, then, had dwindled to almost nil.  With the loss of his bodyguard, with most of his remaining units standing on just one SP remaining, nothing but scattered remnants could possibly escape the disaster. It would be noticed from the above picture that 'Force One' (bottom right), having lost the heavy cavalry (3 SP) and one from the spears (1 SP) had reached the 'exhaustion point' of 4 SP lost. Although I did not consciously apply these individually, 'Force One' had been committed pretty much to a holding action from early on. Attishu's command had also lost 4 SP, not enough to tip it over the edge.   

The loss of 8 SP was little enough in the light of the Byzantine loss of 20 when the battle finally ended.  

Saturday, September 16, 2017

Battles with Byzantines and Bulgars.


...
Byzantines and Bulgars in action om the Memoir '44 game board.

Over the last couple of days, I've been trying out the Portable Wargame 'Ancients' rules for my Byzantine and Bulgar armies.  As suggested by a reader, I used the Memoir '44 game board, with a few added features by way of a battlefield.  This board comprises a hex-array of 13x9 grid areas - 117 in all. The Portable Wargame suggests an appropriate army size for a given game board is a number of units not more than as many plus half the number of grid areas along the base line. That suggests 19 or 20 units maximum. I have been working on armies of 50SP (Strength Points) which easily fits within this maximum.  

Bulgar Army of 46 SP:  Commander, 4 heavy cavalry,
4 light horse, 4 spear units, 2 archer units.
In my previous posting, I suggested the troop types that might make up an army, but made no concrete recommendation on numbers. What follows is my suggestion as to selection. In the following I have NOT taken into account the suggestion in Developing the Portable Wargame of adding and subtracting 1SP to or from  the standard SP for ELITE or POOR quality units. That is an option I prefer to leave open.  As they are easiest, I'll lead off with the Bulgars:

Bulgar Army.

1x Commander as Heavy Cavalryman @6SP
1-6 Bulgar Nobles Heavy Cavalry, javelins, bow, sword, shield @ 3SP

  • 0-4 Bulgar Nobles may be classed as ELITE, the rest AVERAGE
3-6 Bulgar Horse Archer Light Cavalry, javelins, bow, sword, shield @ 2SP
3-8 Slav Close order infantry, spear, sword, shield
  • All Spearmen @ 4SP OR
  • All Barbarian Tribesmen @ 3SP 
  • Probably these are the likeliest troops to be classed as POOR. 
1-4 Slav Light Infantry, bow @ 2SP

Adding up the minima of each type gives 8 units at 29SP (includes the Commander); The maxima to 24 units and 76SP.  I had 1 more unit for each of the minima, but as that came to 40SP, it seemed to me unreasonable to be so prescriptive if one were choosing a 40SP army.

Otherwise, I am basing these lists roughly on the Army lists for WRG's DBM rule set.  If the Bulgar army is fairly simple to draw up, the Byzantine is a deal more complicated.  Some compromises have to be called for.


46SP Byzantine Army: Commander, 1 kataphraktoi, 4 heavy
cavalry, 2 light cavalry, 1 Varangian Guard, 3 skoutatoi
1 javelin light infatntry, 1 bow sling light infantry.

Byzantine Army.

Commander as Kavallarioi Heavy Cavalryman @ 6SP
0-2 Kataphraktoi fully armoured Extra-heavy Cavalry with mace/lance/bow, sword, shield:
  • @4SP if using 1 unit only OR
  • @3SP if using 2 units
  • Kataphraktoi are classed as ELITE
2-4 Kavallarioi Tagmatic or Thematic Heavy Cavalry, lance/bow, sword. shield @3SP
  • Up to 2 units may be classed as ELITE 
  • Up to 2 units may be classed as POOR.
1-2 Light Cavalry lance, javelins, shield (trapezitai) or lance, bow, shield (procoursatores) @2SP
3-6 Skoutatoi Close Order Infantry spear/pike/bow, sword, shield @ 4SP
  • A peltastoi unit (see below) may substitute for a skoutatoi unit (bringing the minimum down to 2)
  • Up to 1 skoutatoi unit may be class as ELITE quality
0-1 Rus mercenaries or Varangian Guard Heavy Infantry spear, sword shield @ 4SP
  • Class as ELITE
  • Alternatively may be classed as axemen @ 5SP, but do not receive a combat bonus for being charged frontally by cavalry  (My view on this is that would be appropriate for the 'axe-bearing guard' comprising Anglo-Saxon refugees from the Norman Conquest, post 1066)
1-2 Javelin Light Infantry @ 2SP
1-2 Sling or Bow Light Infantry @ 2SP
0-1 Skirmishing Heavy Spearmen (menavlatoi) @ 4SP
0-1 Peltastoi Close Order Infantry spear. javelins, sword, shield @3 or 4SP
  • May substitute for a skoutatoi unit
  • May be rated as 3SP or 4SP 
  • May be classed as AVERAGE or POOR irrespective of the SP rating.

Notes:

1. I have not included artillery or fire syphoners in this list.
2.Mounted on heavy wagons, artillery should be able to move, though probably not move and shoot in a single move.  They would have an SP = 2. Up to 1 such unit may be included in a Byzantine army.
3. Fire syphoners were light infantry with flame throwers.  If you must have any, then there should be not more than one such unit.  Such a unit would have SP=2, and have a range of 2, requiring 5 or 6 to hit.  Enemy units in an adjacent grid area take -1 from their D6 die roll for all combat.  For reasons that might not at first seem apparent, I would rate such a unit POOR - more a reflection of the risks involved, than any reflection on the courage or quality of the personnel.
4.  There has been some suggestion that Byzantine peltastoi of the late 10th and 11th centuries were not only less heavily armoured than skoutatoi, but that their role might have been more in the way of light-medium liaison between heavy and light foot, and able to operate in difficult country.  I have my doubts, but if you accept this, then you could allow a 3SP unit to move 3 grid spaces instead of the heavy infantry standard of 2.  It's shooting range (javelins) would be two grid spaces.

Adding up the minima gives 8 units and, including the Commander, 30SP - 29 if you take a 3SP peltastos unit in lieu of one of the skoutatoi.


Rather than give a blow-by-blow account of my play tests so far I'll just post pictures with light commentary. Both games were fun, but were not really suitable for such after action reports, being very much trial runs. 


The first action was a straight out solo game, all units activated in any given turn. Nothing sophisticated: just line 'em up and get tore in. A few interesting points emerged. Moving first put the Bulgars at something of a disadvantage, as it was the Byzantines who were able to get in the first kicks. Not that they did much damage - appalling shooting; appalling close combat skills.
All the same, as the action went on, the Byzantine advantage of lance-armed cavalry did become noticeable over time. My suggestion in a previous posting of giving the Bulgar horse a shooting advantage I have not adopted. The sole motivation for it at all was to balance the two armies, and it seems to me artificial and unconvincing.
As the battle wore on, losses were spread right across the board, and mostly on the Bulgar side. I was taken by surprise when a count revealed that the Bulgar Army had reached its exhaustion point at least two turns before. When just the second unit was destroyed - both lost being light - I checked the SP lost and reached 18!  Sixteen should have been the exhaustion point.

Played in this way, the action did look like a battle, with actual battle lines. There was plenty of to and fro action as well.
In some respects the Bulgars had the worse of the luck, more of the hits resulting in Strength Point damage than the Byzantines received. Having units that are just as happy shooting as getting up close and personal gives them good incentive to retreat rather than take a loss. In this first action, I seem to recall the kataphraktoi making at least three charges. They didn't lose a single SP all day, though were driven back more than once. 
It may have something to do with a quality of Ancient's armies, especially if they involve cavalry, is that when one of them reaches its exhaustion point, what then happens? They are unable to counter-attack, as aggressive moves are no longer permitted.  And yet, one feels there ought to be a place for a reserve body of cavalry capable of mounting a charge to discourage pursuit whilst the exhausted main body flees in headlong rout draws off . This might be limited to fresh (undamaged) mounted units, or maybe one unit accompanied by the Army Commander. At any rate, I called the battle when the Bulgars had reached their exhaustion point. The Byzantine loss had been comparatively trifling (8 or 9 SP as I recall). 

That was just to try out the combat systems. For the second game, with the same 46SP armies, I brought in the playing card activation system recommended in Portable Wargames. The number of units, counting the Commander as a separate unit, are totted up and halved, with halves rounded up. The 15 Bulgar units gave them a median of 8, so the RED 7s, 8s and 9s were their portion of the activation card deck. The Byzantines had 14 units, so in went the BLACK 6s, 7s and 8s.  Finally a couple of jokers went in to signal time to reshuffle.

I had hoped that the Bulgars' slight edge in activation would balance Byzantine advantage in lance-armed horse. It didn't happen that way. The early draws were fairly even, the Bulgars drawing slightly higher numbers. But then the Byzantines drew a long series of Black cards, which continued after a joker was reached and I had to reshuffle the deck.

It was getting embarrassing. The Bulgars were getting no opportunity to shoot, and only indifferent Byzantine practice was keeping their units alive. I think there might be a case, here, for the DBA/DBM convention of both sides shooting, rather that the moving player's army only. Targets may not be in a grid area adjacent to a unit of one's own army.

During such a string, so long had it been since I saw a red card, I felt forced to cheat in behalf of the Bulgars to discard a black card - only to draw another. That one I played, and then drew another black card!
Here's a thing. The presence of the jokers means that there is no guarantee than a long string of black cards is going to be balanced by a long string of reds.  That's what happened here. In fact the string itself was interrupted by a joker, the deck reshuffled, and the black string continued. It could only happen to the Bulgars.  I have never had any other army so unlucky. Poor wights. They fight well enough. Most of the time. But always something goes disastrously wrong, and they get on the wrong end of another heavy defeat.
The odd thing is, that I use the same figures as Georgians.  As Georgians - or Abasgians - they have a fine record in DBM, winning far more than they have lost.  So the Bulgars were being edged back as they tried to mitigate their losses, but they could not have kept that up forever.

I think I might try the same card system, but keep the Black and Red decks separate, including a single joker in each. The cards are then to be drawn alternately from each deck. To determine the first turn, both sides draw, with the higher card taking the first turn. The lower card is returned to the bottom if its deck. When a joker is reached, the decks are reshuffled. After reshuffling, both sides could draw again for the next turn, with the high card taking the move. If one of the cards is a joker, it is ignored and placed at the bottom of its pile, and the other side takes the turn. If both jokers are drawn, they are removed to the bottom of their piles, and the cards redrawn.  

Such a system still offers a reasonable chance that it some time, one side will get two turns in succession (or even three, but I imagine such occasions would be extremely rare). More often than not both sides would be in a position to undertake something active, every other move.
Meanwhile, the final three pictures show the situation as it developed late in the action. A rare red card gave the Bulgars the opportunity to throw the Byzantines back in places, but the right wing, where fought Khavkhan Apotaglu remained under heavy pressure .
At last the Bulgar line were being driven from the field. The khavkhan's bodyguard (counted as Elite) finally broke, and Apotaglu himself slain (rolled 1xD6 for fate of the leader: a six!). The situation in the final picture shows the dire fate of the remnants of the Bulgar army.