
As foreshadowed, this begins the account of Quatre Bras as fought using Bob Cordery's The Portable Napoleonic Wargame (PNW). I thought this would form a suitable finale to the series of PNW actions related earlier in this blog, beginning with :
... and continuing over the next five postings with a series of four battles, played as though they were part of a campaign. These began with a brigade level action, then continued on with a divisional level, Army Corps, and finally an Army level game based on Wavre. This Quatre Bras action is a little out of time sequence, but I had for some time been meaning to give it a try.
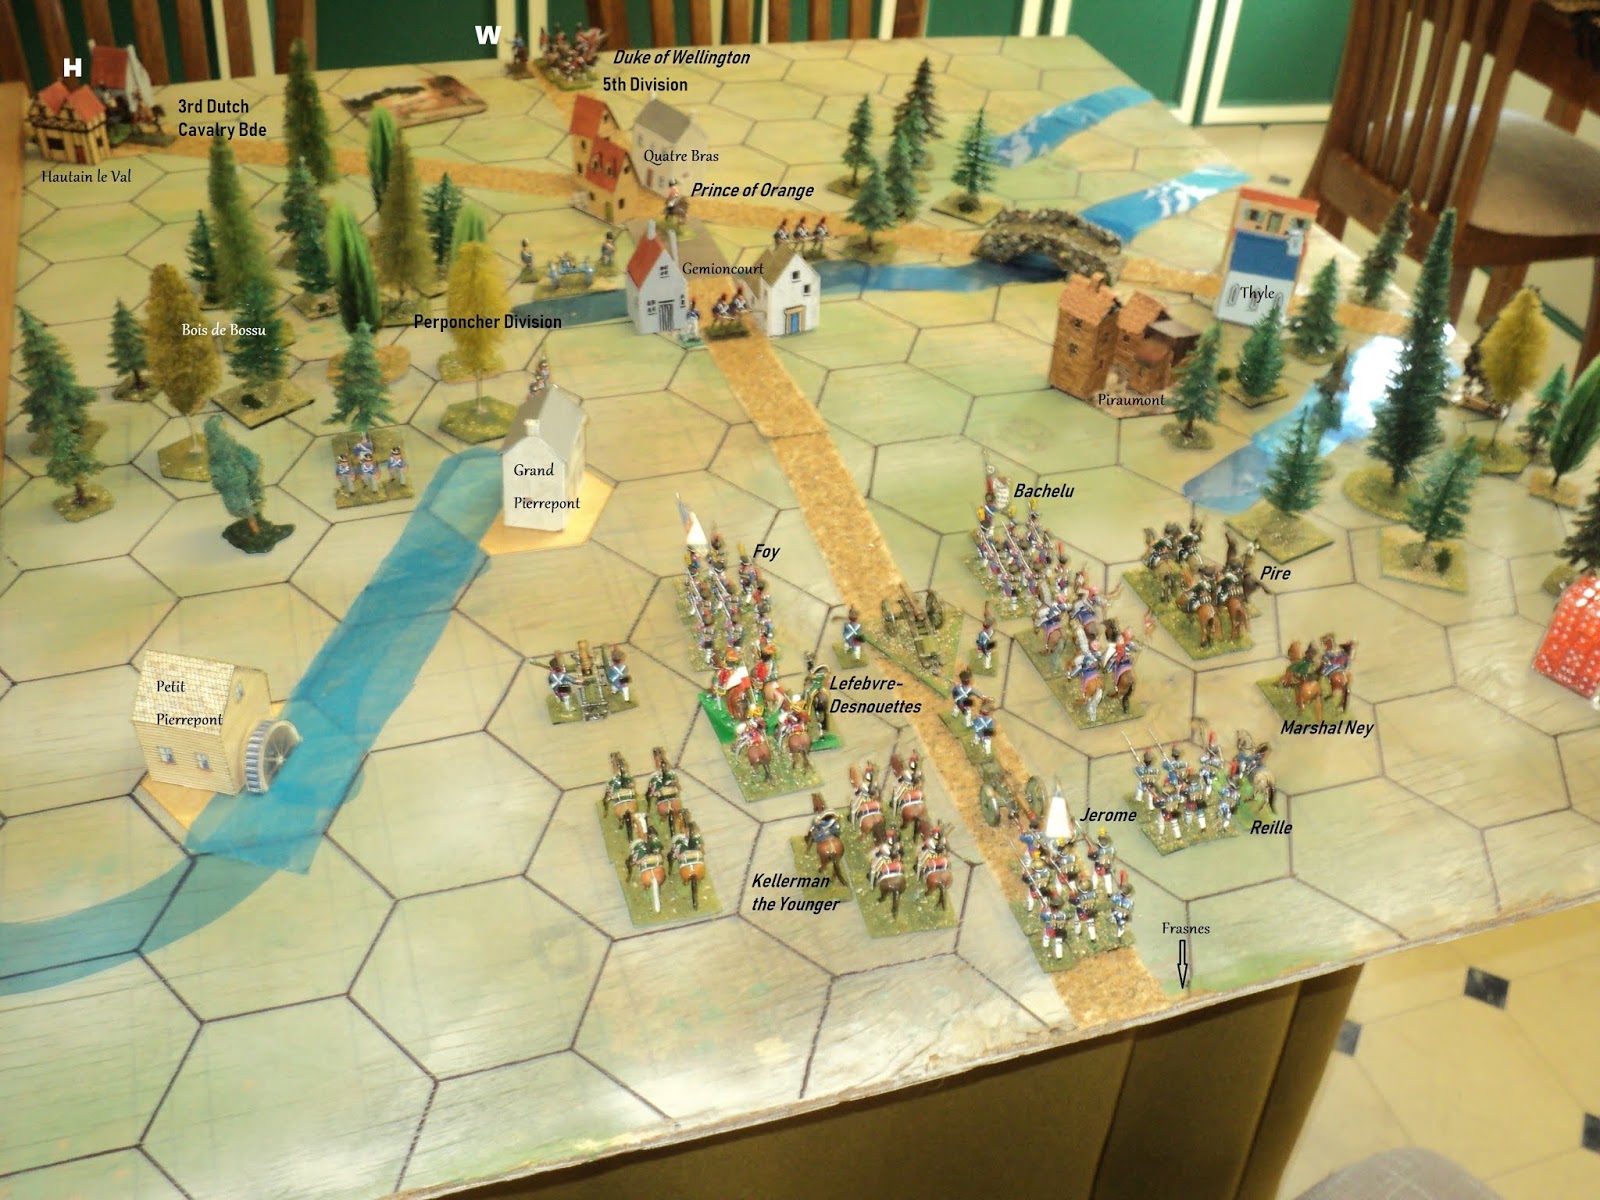 |
| Initial deployments for the Portable Quatre Bras |
For this action I took as a species of model, the scenario offered in the Col Wilbur E. Gray rule set Age of Eagles. Napoleon's strategy for the Armee du Nord was pretty much the same as he adopted in his first campaign in Italy, nineteen years before. This was to fight for the central position between separate wings of the enemy, then to defeat one wing whilst the other was held up by a small part of his own force.
The Duke of Wellington's over-sensitivity to his western flank led to a wider separation between the Anglo-Dutch and Prussian armies, scattering the former, and might have made Napoleon's strategy even more effective, by inflicting defeats upon the enemy not only in the main engagement at Ligny, but also in the secondary at Quatre Bras. Let's see how it might have gone.
The rules used were Bob Cordery's Portable Napoleonic Wargame set, with a couple of small changes that I discussed in the Wavre game. However, my organisation was more 'per spec' in terms of strength points (SP). As the top layer of command was 'Army' (Wing; 6SP)), the second was Corps (3SP), and the third (Division) was given just 1SP. This, by the way, was a saving on SP dice! I left them off, as the command stand survived a hit or it didn't.
Forces engaged:
French Left wing: Marshal Ney 6SP
II Corps: Reille 3SP5th Division: Bachelu 1SP
2nd Light 2SP Elite
61st Line 2SP Average
72 & 108th Line 2SP Avg
6th Division: Jerome Bonaparte 1SP
1st Light 2SP Elite
3rd Line 2SP Avg
1st Line 2SP Avg
2nd Line 2SP Avg
9th Division: Foy 1SP
92nd & 93rd Line 2SP Avg
4th Line 2SP Avg
100th Line 2SP Avg
2nd Light Cavalry Division: Pire 1SP
1st Chasseur-a-Cheval 2SP Avg
6th Chasseur 2SP Avg
5th Lancer 2SP Avg
6th Lancer 2SP Avg
Combined divisional artillery: 2SP Avg
II Corps Artillery Reserve: 2SP Avg
III Cavalry Corps (elements): General Kellerman the Younger 3SP
11th Cavalry Division: L'Heritier 1SP
2nd Dragoon 2SP Avg
7th Dragoon 2SP Avg
8th Cuirassier 2SP Elite
11th Cuirassier 2SP Elite
Horse Artillery 1SP
Imperial Guard Light Cavalry: Lefebvre-Desnouettes 1SP
Lancers of the Guard 2SP Elite
Chasseurs of the Guard 2SP Elite
32 units.
64 Strength points; exhaustion point: -22SP
The French forces begin on table as pictured.
Anglo-Dutch Army: Duke of Wellington 6SP
I Corps: Prince of Orange 3SP1st (Guards) Division: Cooke 1SP
1st (Guards) Brigade 2SP Elite
2nd (Guards) Brigade 2SP Elite
Foot Artillery 2SP Avg
3rd Division: Alten 1SP
5th Brigade 2SP Avg
1st (Hanoverian) Brigade 2SP Conscript (*Poor: see note)
Foot Artillery 2SP Avg
2nd (Dutch-Belgian) Division Perponcher 1SP
1st (D-B) Brigade (Bylandt) 2SP Conscript
2nd (Nassau) Brigade (Saxe-Weimar) 2SP Conscript
Foot Artillery 2SP Avg
Reserve Corps (elements): Rowland Hill 3SP
5th Division: Picton 1SP
8th (Highland) Brigade 2SP Elite
9th Brigade 2SP Elite
4th (Hanoverian) Brigade 2SP Conscript
Foot Artillery 2SP Avg
Brunswick 'Black' Corps: Duke of Brunswick 3SP
Light Infantry Brigade: 2SP Conscript
Line Infantry Brigade: 2SP Conscript
Light Cavalry Uhlan: 1SP Elite
Light Cavalry Hussars 2SP Elite
Brunswick Artillery: 2SP Avg
3rd Dutch-Belgian Light Cavalry: Merlen 1SP
6th Dutch-Belgian Hussar 2SP
5th Belgian Light Dragoon 2SP
29 units.
59 Strength Points; exhaustion point: -20SP
* The several units marked as Conscript from Age of Eagles, I have assumed to be 'Poor' according to the Portable Wargames terminology. Actually, I don't recall in the actual game treating any units as 'Poor'. Nor do I recall making the decision one way or the other, though I do remember thinking about it. This might be one for any who might want to give this PW scenario a crack 'to suck it and see.'
Only Perponcher's 2nd Dutch-Belgian Division begins on table deployed behind the stream passing by Gemioncourt, and at the edge of Bois de Bossu facing Grand Pierrepont. The rest of the Anglo-Dutch forces arrive from off-table. I suggest placing them at the beginning of the Turn of arrival on the table edge road hex, prior to dicing for initiative.

Turn 1:
Road H: 3rd Dutch Cavalry Bde
Road W: Duke of Wellington; Picton's 5th Division
Turn 3:
Road W: Duke of Brunswick, Brunswick cavalry and Brunswick Light Infantry
Turn 6:
Road H: Alten's 3rd Division
Turn 7:
Road H: Cooke's 1st Division
Turn 8:
Road W: Brunswick Line Brigade, and artillery.
Game lasts for 12 turns.
I'll offer only a brief narrative of events in this action. As I kept the French advance fairly compact, the advance up the road proved straightforward, with Marshal Ney in the middle of his troops, directing operations. However, the wings weren't always so easy to shift into motion.Despite being only 2 or 3 grid areas distant from Marshal Ney, Foy's Division incurred some delay in delivering his attack into the woods behind Grand Pierrepont, whilst Pire's Light Cavalry's sweep to the right toward the bridge on the Thyle road also floundered occasionally.
The delay there allowed Picton to establish a flank guard in ambush within the wooded tract on the north side of that bridge.

Meanwhile, Perponcher's Division was coming under increasing pressure from whole of the French infantry and most of their artillery. The Nassauer garrison of Gemioncourt was pounded by gunfire out of the place, though the French were unable to enter before the British Highland Brigade seized the place from under their noses. The cuirassiers lost their 8th Regiment attempting to storm the Dutch-Belgian gun line between Gemioncourt and the Bossu Woods; and Foy's Division's progress through the trees, though steady, was taking time. Bachelu's Division bypassed Gemioncourt, splashed across the stream and in short order put Perponcher's left flank to flight. Having placed himself there, the Prince of Orange suddenly found himself alone on the field. He hastily made off.

Eventually, Perponcher's entire Division had been destroyed, but for its artillery, still in action. Eight SPs lost to the Allies; the French had lost little more than half so many, though the loss of 8th Cuirassiers' 2SPs was a blow. Gemioncourt had been reoccupied by the Highlanders of Picton's Division. The rest of 5th Division had encountered Pire's light cavalry on the Thyle road. Though the woods favoured the infantry, the French horsemen came rather well out of the encounter. Though driven off themselves, they had induced one of the Allied brigades to fall back, with loss, into Quatre Bras itself. At this time, the Iron Duke himself stood in imminent danger of capture, as Bachelu came bursting over the stream in the wake of the Prince of Orange and the vanishing defenders of the riverbank.
It will be interesting to see what part the by-passed Gemioncourt will play now.
ReplyDeleteNot quite bypassed. Jerome's Division will be taking an interest in the place...
DeleteAnother impressive report.
ReplyDeleteHow do you make the rivers you use?
Thanks, Martin. The rivers are just pieces cut out from thin blue plastic sheet. By rounding the ends of the pieces I can overlap them, which makes them pretty adaptable. Unfortunately they don't quite 'look the thing' on this table.
DeleteBy the way, the thin blue plastic sheet I used because I had it available. Had I set out to choose the colour, I might well have preferred dark brown or dark green.
DeleteArchduke Piccolo,
ReplyDeleteThis looks like it is going to be a very interesting battle, I look forward to seeing the next instalment.
All the best,
Bob
Hi Bob -
DeleteWell, some issues did come up. I'll discuss those next time. At any rate, the result wasn't quite as I expected at the outset of the action.
Cheers,
Ion