 |
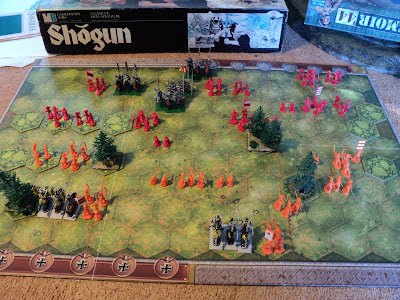
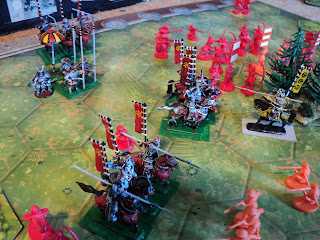
| Set up for Battle of Mikatagahara. The flagged units are those commanded directly by generals. The parasol is where Takeda Shingen has set up his pavilion. |
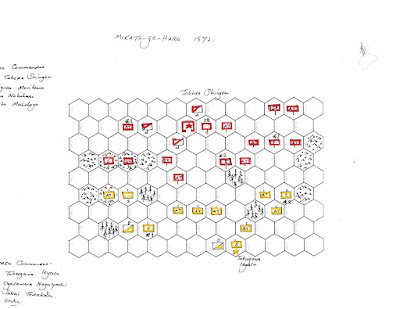 |
| Diagram of battle set-up. The 'fish-scale' formation may be just discernable... |
Lacking much in the way of motivation, lately, I thought I'd try something fairly easy to set up - another Sengoku action. The previous one was related here:
This action was based upon the 1572 battle of Mikatagahara, between the two redoubtable foes Takeda Shingen and Tokugawa Ieyasu.
After having neutralized, by securing alliances with, his rivals to the east, and awaiting the snows to close off the mountain passes to his great northern enemy, Uesugi Kenshin, the formidable Takeda Shingen led a 30,000-strong army south from his own capital, Kofu, into Totomi province from whence he aimed to march on Kyoto. His advance was to be opposed by the local warlord, Tokugawa Ieyasu. Heavily outnumbered as his own army was, Ieyasu overrode the advices offered him by representatives from his ally, Oda Nobunaga, as well as some of his own retainers, and chose to oppose Takeda's passage through his territories. For his part, Takeda actually hoped to avoid any direct clash with Ieyasu. That hope was to be denied him.
Encountering Ieyasu's army at Mikatagahara, a high plain in Totomi, Takeda drew up his army in a 'fish scale' formation - one that combined the virtues of defensibility and aggression - in the hope of inducing his outnumbered adversary to attack. In this, Takeda got his wish.
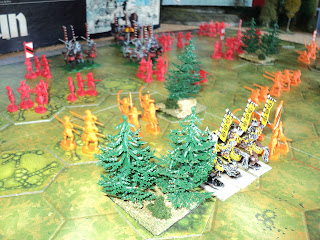
As can be seen from the pictures, this action was set up on my Memoir '44 game board, using Shogun game pieces, and Zvezda figures. A few trees representing small woodland areas added to the 3D look of the thing. Those Shogun game pieces are really very nice figures in their own right.

Command and control:
Planning to play test an idea about command and control, I did not use the 'Heroes' or 'Co-located Generals' rules. The generals being fixed to particular units, they survived, or otherwise, with their units. That is to say, if their unit was wiped out, the general went with it. This was to have certain implications in respect of command and control.Although M. Bourguilleau's army lists included just one general (army commander), it seemed to me that the rule set offered room for more than one. I have also been concerned that his method of unit activation would lead to rather 'piecemeal' sorts of battles: in general, less than half the army doing anything. This concern I found particularly acute given that close combat is not - and can not be - mandatory between enemies in adjacent grid areas. Now, it is possible, of course, that battles of the Sengoku wars tended to develop the way the rule set seemed to me to indicate.
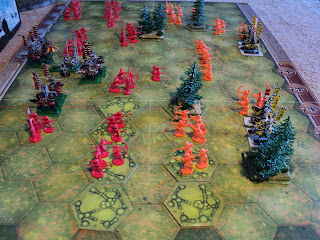
At any rate, methought this could be mitigated by having several commanders. I notice in reading accounts of the Sengoku wars that they are replete with personalities, including sub-commanding retainers or allies of some central figure such as Takeda Shingen and Uesugi Kenshin. The Samurai Warriors scenario having so many commanders, I reduced these to four on the Takeda side, and three on the Ieyasu. The units directly under their command may be seen in the leading picture and the hex-map.
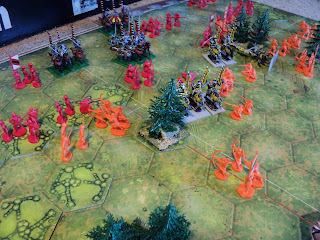 |
| Early attacks by Ieyasu's army |
There was one other idea I had in mind: a special Army Commander's unit. We'll come back to this.
Recap of unit activation:
Then whose move it was went through the following procedure to determine how many units could be activated. Let's go through Ieyasu's first turn by way of example.
1. Ieyasu's army comprised 13 units (I'll draw up the lists later on). This number is divided by 6, the quotient truncated, to yield a base line of 2 x D6 to be rolled.
2. A further D6 is added for an 'extant' general. There being 3 such worthies at the outset, we now have 5xD6 to be rolled.
3. I rolled these 5, the total to be divided by 2 and, again, the quotient truncated to a whole number.
4. The count is, of course, repeated turn by turn, so, as losses of units and generals mount, the fewer will be the dice activated. This got quite noticeable as the battle ran its course.
 |
| Ieyasu's quick strike did some execution among Takeda's hand gunners - one such unit being destroyed early on... |
It so happened that Ieyasu rolled huge in its first turn 5 dice, something like 6,5,4,4,4 - a total of 23. Divide by 2 to get 11. Eleven units moved out of thirteen! The army made good use of that, got tore in, and did a fair amount of damage. Out of 18 units (18/6 +4 generals - 7D6), from memory Takeda's army activated 10 or 11 in its own turn - slightly below average, as we will see.
It is not a bad idea to work out what might have been the expected mean activation scores for the two armies in their first turn:
Ieyasu: 5D6/2 = ((7/2)x5)/2 = 35/4 => 8 units out of 13.
Takeda: 7D6/2 = ((7/2)x7)/2 = 49/4 => 12 units out of 18.
It seemed to me that activating two-thirds of the army in a given move meant you could do a fairish bit, whilst retaining a level of uncertainty desirable for solo war games.
Late in the action, with Ieyasu hard pressed (having lost a general and several units, and reached his 'exhaustion point'), his army rolled a 9, and was able to activate just 4 units. Not a great roll when trying to break off an action!
(By way of comparison, suppose Ieyasu had only the 'per book' 3D6 to roll, and rolled 6,5,4 a total of 15. That would have reduced to 7 units activated out of 13 - a little over half the army. I think I like having the extra generals!)
Army Lists for the Battle of Mikatagahara:
Red Army:6 Foot Samurai units @ 4SP (Elite) = 24SP
3 Ashigaru Tepo units @ 2SP (Average) = 6SP
5 Ashigaru Yari units @ 3SP (Average) = 15SP
3 Mounted Samurai units @ 3SP (Average) = 9SP
1 Commander's Pavilion (Takeda Shingen) and bodyguard unit @ 4SP (Elite) = 4SP*
3 Sub-generals, each attached to a foot samurai unit.
Totals:
18 units, 58 strength points
Exhaustion Point -20SP, Rout Point -29SP
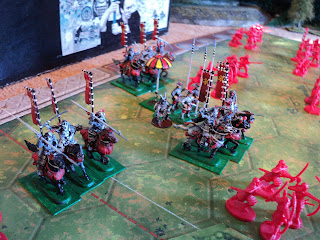
The commander's pavilion (or 'tent') was the 'special unit' I had in mind. I see this as a static unit that can fight, but does not move. It still adds, however, to the number of units counted for activation purposes.
 |
| Takeda Shingen in his 'pavilion' (the parasol) overseeing a mounted counter-attack. I'm thinking Of making a special pavilion stand - the Zvezda model being far too large for this board. |
Orange Army:
4 Foot Samurai units @ 4SP (Elite) = 16SP
3 Ashigaru Tepo units @ 2SP (Average) = 6SP
2 Mounted Samurai units @ 3SP (Average) = 6SP
1 Commander (Tokugawa Ieyasu) with foot samurai unit.
2 subgenerals, each attached to a foot samurai unit.
Totals:
13 units, 40 strength points
Exhaustion point -14SP, Rout Point -20SP
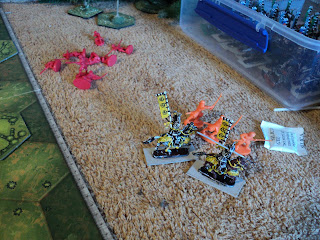 |
| Losses: 8 Red and 5 Orange (each representing a SP) - but the latter much heavier among the samurai. |

Glad to see you back on the battlefield.Regards.
ReplyDeleteCheers, Tony. Maybe with the lengthening days the enthusiasm will restore itself!
DeleteIon
This isn’t a period I game at all. I don’t know why - I still have some unpainted Dixon figures from, what? 40+ years ago or thereabouts. You might have thought I could have splashed some paint on some of ‘em during all that time. Clearly not…
ReplyDeleteIt’s good to see you’re getting some tabletop action Ion.
All the best,
Geoff
Geoff -
DeleteApart from the Shogun board game (Milton Bradley, a.k.a. Ikuza a.k.a. Samurai Swords, and not to be confused with the Dirk Henn 2006 'Shogun'), until last year I didn't game anything 'Far Eastern'. I was aware of the superb figures from Zvezda, though, but resisted getting into a whole new project.
Intrigued by the Sengoku chapter, I invested in a box of mounted Samurai, to complement the Shogun figures. What I have now is a very accessible war game, and probably a campaign system as well!
The irony is that my fairly sizeable 30YW armies - the reason for my purchasing the book in the first place - have been sadly neglected all this time. Those armies were intended as imaginary versions of historical armies, the identity of which you might guess from 'Severia' and 'Austeria'.
Cheers,
Ion
Nice one Ion.
DeleteThe Plastic Soldier Review site shows a heck of a lot of lovely 1/72 scale plastic figures for the 30YW. Hmmm…
My 30YW figures are in 2mm scale (so somewhat small) although I do have a few in 10mm and 15mm, albeit morphable forces from the ECW. Just add plenty of cuirassiers and a few Croats really 👍
My 30YW armies are almost exclusively Revell plastic figures. The exceptions are HaT Mamelukes as Croats, and some Swedish/Severian battalion guns fashioned from Airfix Napoleonic French artillery. The Swedish Horse and some dragoon stands have yet to be painted up.
DeleteI did make up my own rule set for these, and then, after a great deal of hesitation, based them up for DBR. BIG mistake. In my view, DBR was never properly 'finished', and in this part of the world, the following faded after a year or two.
Eventually, I dare say, I'll get around to finishing these armies, and putting them into the field...
Cheers,
Ion
The activation approach with leaders is interesting.
ReplyDeletePeter -
DeleteI quite liked how the thing went: plenty of action, but with losses of units, and the consequent loss of a general by both sides, command and control degraded and became a deal more chancy.
I'm thinking maybe maximising commanders to, say, 1 per 6, or part of 6, units. So an army of 13 units might have 3 commanders. If that proves too many, one can drop the 'part of 6'.
Cheers,
Ion
Another set of interesting ideas. Makes me want to paint some more samurai! Also this is giving me ideas about a 3x3 varient...
ReplyDeleteThe 3x3 would work, for sure.
DeleteToday I played out a game that I had organised months ago, but never got round to playing. This time, 13 units apiece; one general only. I'll be writing that one up, too, but (spoiler alert) I reckon I'll be formalising the multiple generals thing for future games.
In my view, the Japanese armies of the Sengoku period have something unique and special that I would like to see imbued in the war games battles and campaigns. I'm also looking at the art work with a view to illuminating my blog posts... Just a thought, at this moment.
Cheers,
Ion
Archduke Piccolo,
ReplyDeleteWhat an excellent repurposing of bits from other games to produce an enthralling battle report!
All the best,
Bob
Hi Bob -
DeleteIt sure makes for a nice quick set-up and play-through! The battle narrative itself will probably be pretty brief, as will the one that will follow it.
Cheers,
Ion