So begins the narrative of White Mountain: a refight of the battle that kicked off a European-wide war that lasted 30 years. The text will be by way of captions for the pictures immediately preceding.
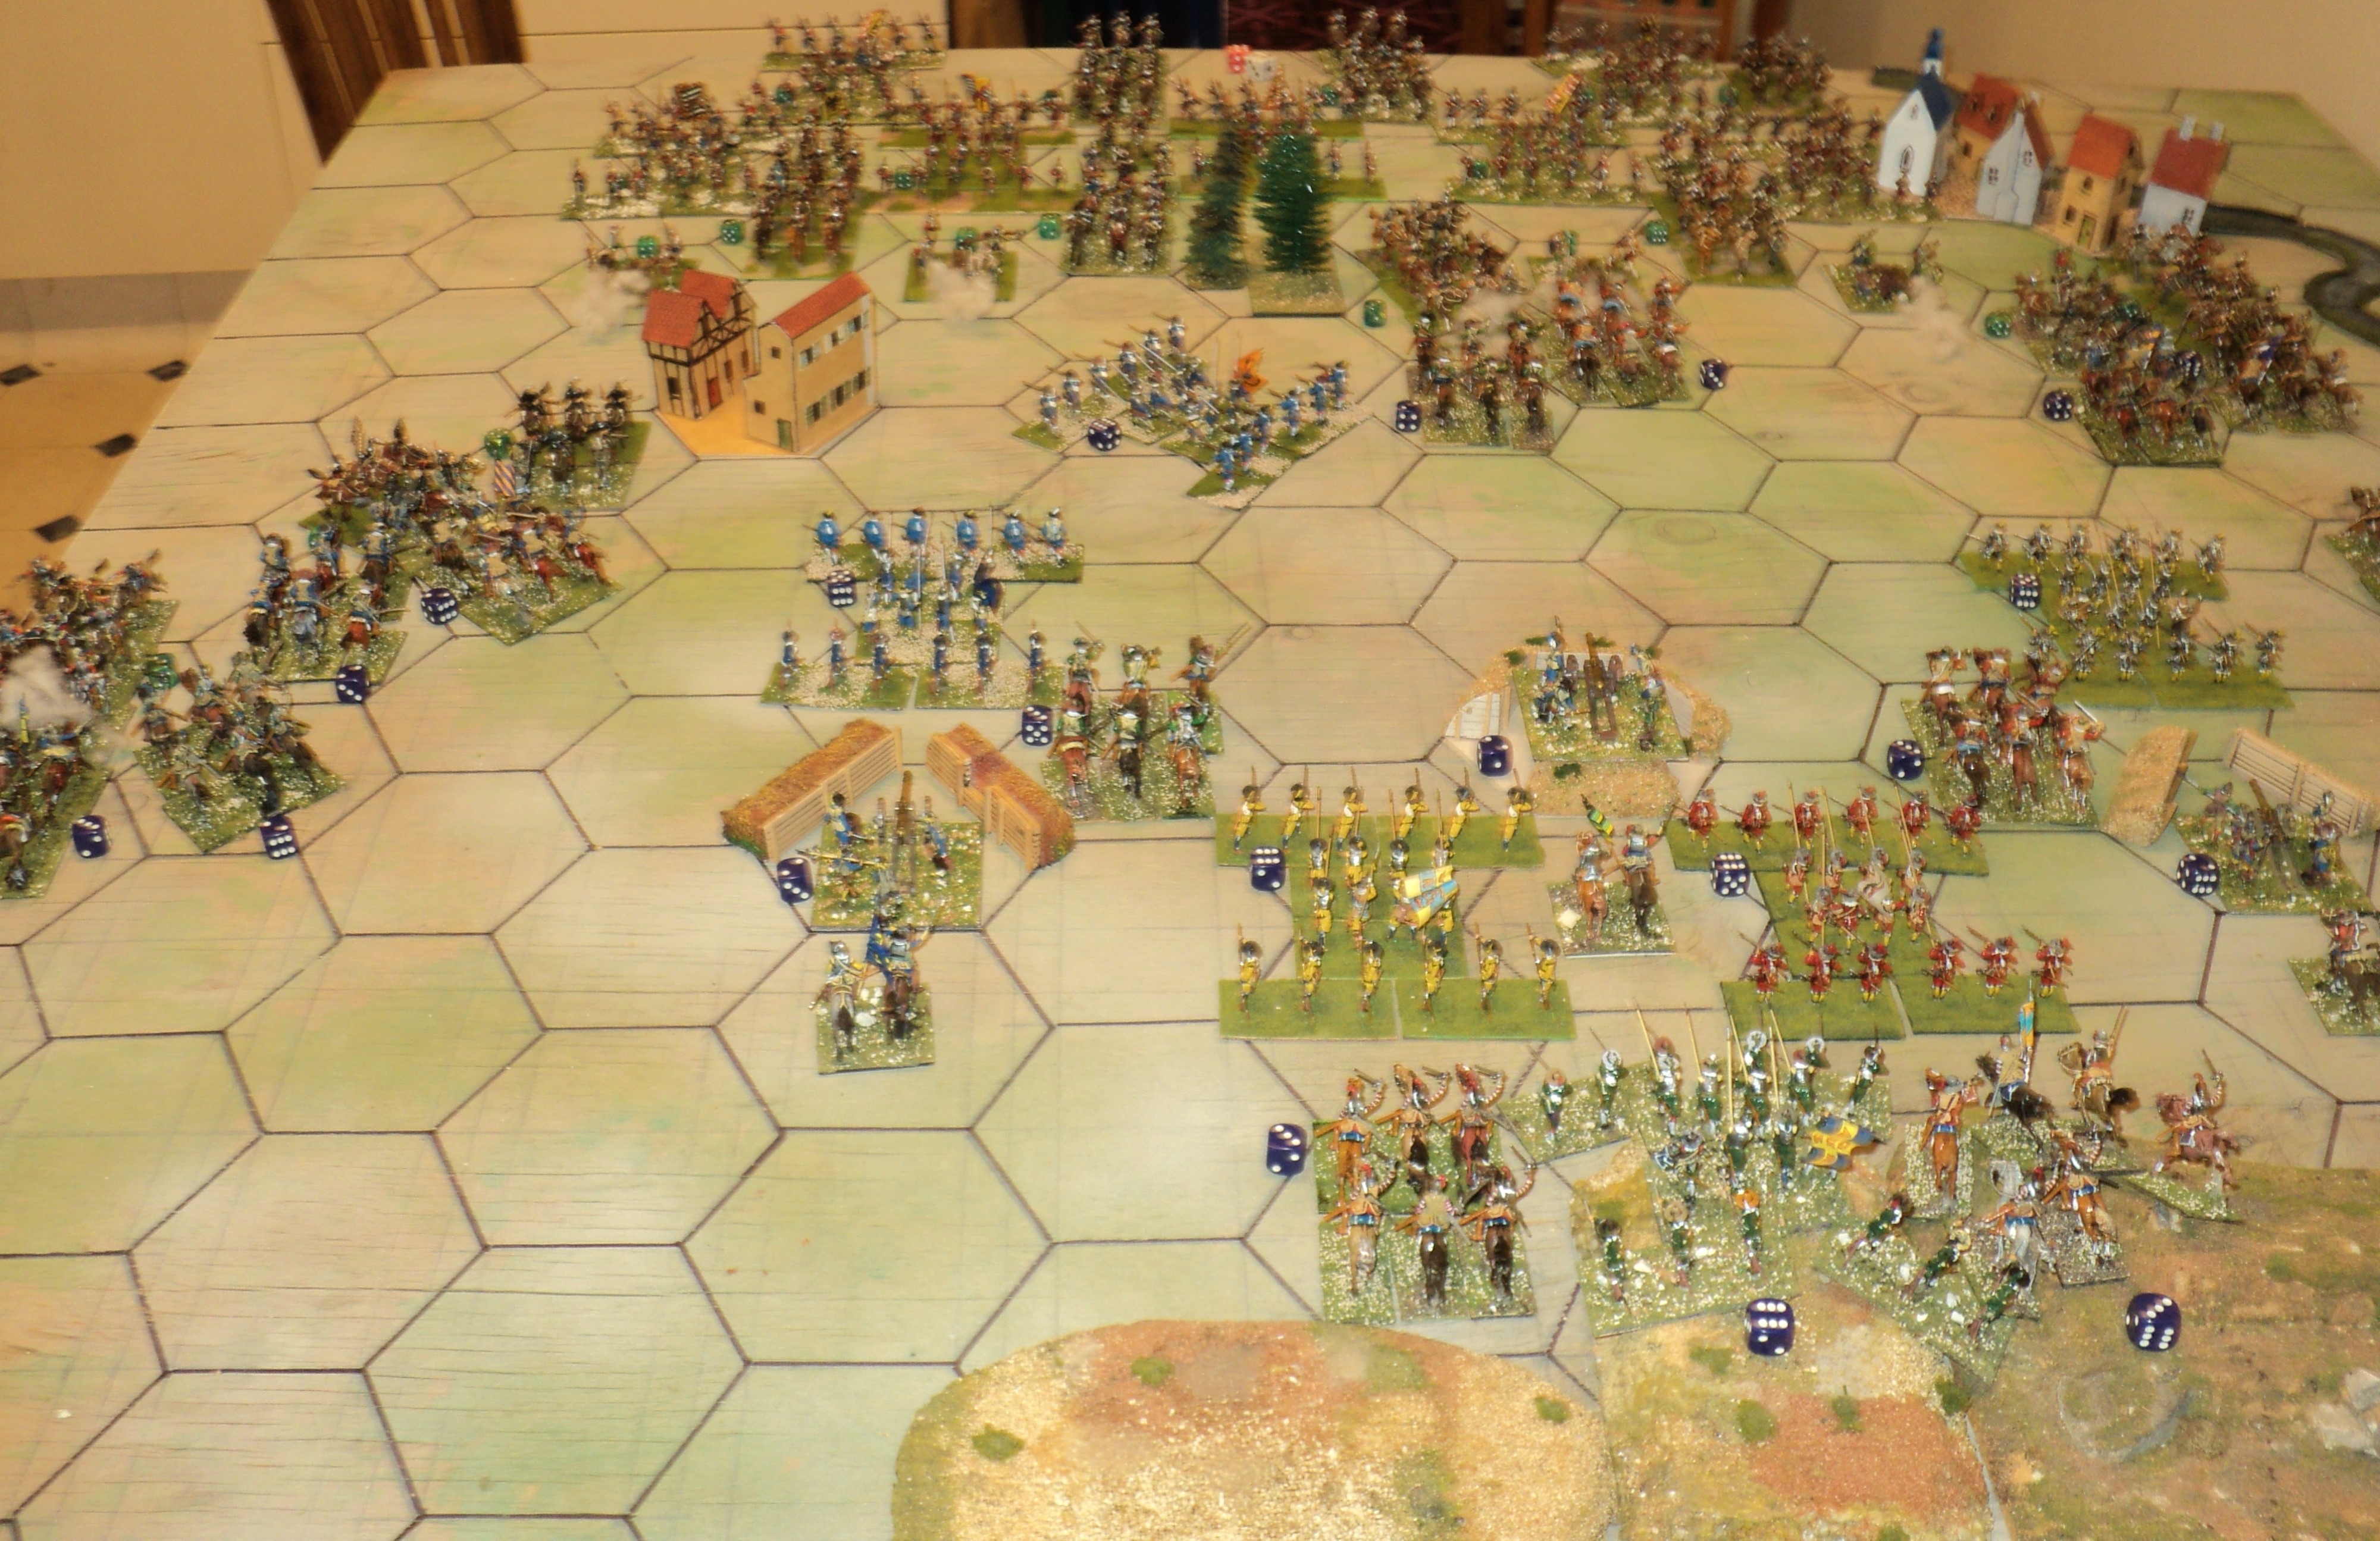
Facing the Imperialist host, the Bohemian Confederation Army lines the forward slopes of the Witteberg - White Mountain. Observe the very Swedish look to the Confederation Army. I had to use Swedish 'proxies'. I could instead have called the feature 'Cremefarbenberg' - Off-white Mountain - and the armies the bitter enemies, the Austerian Empire and the Kingdom of Severia.
Before them, the Imperialists advance: gun batteries in front; horse interspersed among the tercios. Note that, absent horsed teams, the guns of neither side can move. A bit of a nuisance for the infantry, but no real obstacle to friendly cavalry.

Beginning with the initiative, the Imperialist activation dice roll is truly dismal. The number of dice rolled is equal to the number of generals (three) plus whole multiples of 6 units (23/6 => 3), that is to say, 6 dice. That score is divided by 2, so the 6 dice must have rolled 14 to get to the 7 displayed in the battle box. All four gun batteries having fired, that left just three units to be activated. The Imperialist right flank cavalry, two cuirassier and one harquebusier units, move forward. That's it.
The second cuirassier unit beginning near the rear of the Imperialist army has a long way to catch up! The hope is that the Confederation's line might be outflanked and rolled up.

Well... the Confederation's activation roll wasn't a whole lot better than the Imperialists'. But as the artillery, masked by tercios in front, didn't fire, the army has a lot more flexibility. Question, then: should they wait on the defensive, or take the fight to the enemy? I'll give you three guesses...
Of course, they take the fight to the enemy. On the left, four cavalry units thunder out to meet the three oncoming Imperialist horse units. Close by the Remy hamlet a swirling cavalry fight develops that was to last more than half the duration of the battle, with heavy losses on both sides.
In the centre, two Confederation horse units attack one of the Imperialist gun batteries. They do some damage, but are in turn counter-attacked by couple of harquebusier units. Partly to clear the front of the centre gun emplacement, the centre Confederation tercio pushes forward and veers to their left, aiming for the gap between Remy and the nearby copse. The Imperialist gun battery there has already taken some toll upon the left hand Confederation tercio, standing guard over the left flank.
A couple of Confederation cavalry units attack the cuirassier and harquebusier units on the Imperial left in front of the Ruzyne village. Both sides take early hits.
Turn three: the Confederation activation roll is pretty good this time. The situation on the Imperialist left and left-centre: under attack by four Confederation cavalry units, with more coming up. Gradually the forward Confederation tercios also grind forward.

General view after three turns. Cavalry battles have developed all along the Imperialist front, which has the effect of stymying their push forward. The fighting is pretty savage, with most 'hits' being counted as SP losses. They mount up pretty quickly!
Reaching the Imperial battery between Remy and the wood, the Confederation tercio come under attack from two harquebusier units. The harquebusiers don't charge home; they do what they do best: engage the enemy in a fire fight.
Behind the battle lines about Remy, stand an Imperialist gun battery and tercio, awaiting the outcome...
The cavalry battle on the Imperialist right is thinning out, with fearful losses to both sides. The Imperialist harquebusiers have disappeared, and one of the cuirassiers units is badly depleted. The Confederation cavalry is in not much better shape. One of their cavalry units has also been dispersed, another - faced by a fresh cuirassier unit - is barely staying in the fight.
To the left of the copse, the Imperialists mount a telling fire action counter-attack upon the two Confederation cavalry units there. The latter badly need help, but it is not forthcoming.
The opposite is true about Ruzyne. Somewhat isolated beyond the village, the two Imperialist horse units find themselves under attack by Confederation charging Confederation cavalry. Both have taken hits.
Much of the Confederation's cavalry having carried the fight to their opponents, they are holding up the Imperialist advance. Meanwhile, the bulk of the Confederation stands to await the outcome. This was partly due to the generally woeful activation rolls on both sides, the Confederation Turn 3 roll being something of an exception. The early exchanges marginally in Imperialist favour, during Turns 3 and 4 the losses were fearful. Both sides lost heavily, but the Imperialists got the worse of it. The 'score' so far: Confederation lost 17SP, the Imperialists 21!
The larger picture shows the general situation at the end of Turn 3.
By now the Imperialist horse on the right has been badly worn down - just 3SP remaining of the 11 they began with. The Confederation horse still have 7SPs of their original 12.
Then, at the beginning of Turn 5 (and a reasonable - that is to say, about average - activation roll by the Confederation) one of the cuirassiers breaks and scatters, leaving a tired lone unit facing three, and odds of 6 to one.
 |
Turn 5 and one of the better Imperialist activation
rolls: just half a pip-score below the
statistical average! |
Even so, the last remnants of the Imperialist horse don't go without handing out a few licks of their own. Surrounded, facing odds of five to one, they finally break. But just 5SP remain of the Confederation horse, and two of the three units are badly depleted. The fourth unit has long since disappeared.
Meanwhile, on the other flank, matters are also going well for the Confederation. The harquebusiers conquered, three cavalry units assail a lone, battered unit of cuirassiers. The nearby tercio might have plodded around the village to lend a hand, but not whilst the situation nearer the centre remained problematic.
Instead, a unit of harquebusiers began filing across the river bridges and through the town...
... to fall, betimes, upon the flank rear of the Confederation unit itself attacking the flank of the cuirassiers.
Matters begin looking up for the Imperialists in the left centre as well. Although taking heavy losses themselves, the harquebusiers have been gradually asserting an ascendancy over their adversaries, helped of course by the musketry of the tercio between the two horsed units.
The encounter between horse, foot and guns near Remy was also stalled in a prolonged fire fight. Between them, the two harquebusier units have lost half their strength. Although having lost 2SP themselves, the Confederation tercio, with another looming up to assist, is maintaining itself amid gunfire and assaults from front and flank.
At this point, the end of Turn 5, we will defer the conclusion for another time. Losses have been heavy on both sides, with the Confederation down 25SPs, the Imperialists down 27. Pretty steep, considering that the Imperialist tercios in particular have hardly seen action!
To be concluded...


Another cracking report, it's been a hard bloody battle so far, still not sure what way it will go. Great looking game, great report, bring on the next part!
ReplyDeleteDonnie -
DeleteSo far it's pretty much a cavalry fight, although some of the Confederation tercios are getting themselves involved. In some ways this turned out to be a rather strange battle from a war gaming point of view, though not to my mind altogether 'unrealistic'.
Cheers,
Ion
What an epic encounter, and a great read.
ReplyDeleteMaudlin Jack:
DeleteSome strenuous fighting so far! Which reminds me: for battles of this size I have in mind a variant on the 'standard' PW combat outcomes. Helps keep up the pace, and makes use in other ways of qualitative differences (elite/average/poor) among similar troop types.
Cheers,
Ion
Looks to be an interesting fight so far, and a lot less one-sided than the historical account. I've been recently reading up on the Transsylvanian Prince Bethlen's attempts to link up with the Bohemian Revolt, and been wondering what would have happened if he had arrived in time. I'm following the developments with interest!
ReplyDeleteAndrew -
DeleteMy reading of the historical battle seemed to indicate that the Imperialist side was a deal more seasoned than the Bohemian Confederation. I toyed with making some of the latter 'poor', but as the selection would have been arbitrary just went with making everyone 'average'. As a result, the Confederation gave a very good account of itself.
Cheers,
Ion
The battle is well underway, if the Imperial tercios get involved, the tide may turn.
ReplyDeletepancerni -
DeleteSo far, but one of the Imperialist tercio has fired a shot. The cavalry fight between cuirassiers and harquebusiers on one side and 'charging cavalry' on the other has proved most tense and interesting - and they aren't all going one way!
Cheers,
Ion
Just a thought Ion, the dice seem to be producing "below statistical averages" for PIP roles regularly , which creates problems for both sides in tactical options and responses (not to mention slowing down the game). Have you considered a "base number" of activations, with the roll a variable additional number? It may make things flow better.
ReplyDeleteNeil
Neil -
DeleteOne of the standard PW options is to activate the median (+1/-1) of the median number of units. The original used cards; I preferred the dice. I've used it in a lot of games. One could stretch it out for armies with lots of units - e.g. my 23-unit Imperialist army on a D6 roll activation 12 + (-2, -1, 0, 0, +1, +2).
In the system I used for this battle, I could 'expect' (statistically) to move 10 units in either army (reducing as units and commands disappeared). A really amazing roll would enable 18 units to move; the nadir would be just 3. Most results would of course, cluster around the 10. In THIS battle, I think the best score was the 12 the Confederation once got.
As losses mounted, the activation dice reduced to 5, with an activation 'expectation' of 8 units.
The 'problem' (if it IS a problem) with these methods is that battles can take on a 'bitty', piecemeal aspect. This seemed to me particularly so with the PW Sengoku and Pike & Shot rule sets, which is why I added extra commanders.
There is an alternative method that I quite like, which I use for my ungridded Napoleonic battles: numbered priority chits. I've used them for WW2 as well. They have their drawbacks, but I find the action very involving, right across the board.
Cheers,
Ion
Ion, I was looking at it from the perspective of where you take a limited number of units and enlarge the scope for bigger armies and more units. IIRC the original PW used a limited number of units, far less than here. You see similar outcomes when taking say DBA and increasing from 12 elements to 36+, taking you outside the BBDBA suggestions.
DeleteIf it's not a problem for you, that's fine.
It's one of those dilemmas in wargaming whether to allow total freedom or restrict command and control and introduce friction.
While randomising activity via dice, playing cards or game specific cards (Commands & Colors) introduces a limitation in control and friction, it can be TOO random especially where the enemy have yet to be encountered or the unit test morale; command A advances for two turns, then stops unexpectedly for several turns.
OK, you can create all sorts of narratives to explain what's going on, but if the system is too random can stretch credibility.
Command B advances steadily, then halts, throws a "blunder" and starts to retreat, then suddenly turns around and advances in a berserk fury! What's going on there?
My understanding of real armies is that if poorly trained or poorly motivated troops there may be problems getting them moving, with the difficulty decreasing for better training and morale, but that once moving, they should only stop for the unexpected (terrain or hidden enemy for example) or due to morale failure. That is real armies tend to carry on moving to where they have been told to move to, only stopping because of some external influence. Likewise they don't keep blindly marching following orders unless totally oblivious to surroundings ( the Light Brigade springs to mind).
I guess it comes down to personal preference.
Neil
Neil -
DeleteI think we are in some respects on the same page: we like a bit of friction and uncertainty in our solo games; we dislike caprice and randomness.
I've never played BBDBA but have DBM and DBR - both good game systems, probably with high potential for solo play, but plagued by (a) rules lawyers and (b) a plethora of ill -considered
amendments.
On the matter of the 30YW battles fought so far, the action has been decidedly sticky. You'll see what I mean, possibly, in my next posting.
There is one other PW method that I rather liked that was a feature of the Portable Napoleonic wargame at Army (Corps) level. This was straight IGoUGo, but a unit's (Division or Brigade) response to orders (to move) depended upon its proximity to commanders. Seemed reasonable. In my Wavre action a couple or so years back a couple of Divisions attached to Grouchy's command, i.e. independent of III and IV Army Corps, proved very hard to shift on account of their distance from Army command.
In the Waterloo battle, the Anglo-Dutch proved very 'sticky' to move around owing to the Army Corps formations being scattered rather pell-mell across the whole front. I think (from memory) the formations of II Corps were more or less within easy reach of their commander. But the distances involved among the other corps led to many units (formations) failing to respond.
On the other hand, the tiny French Cavalry Corps allowed them to move about in quite sprightly fashion. I could I suppose have diced for corps response to Army Command, and then for lower formations' response to Corps, but with some allowance for local initiative. I am reluctant to add that extra layer of possible friction, as I suspect one would end up with almost the whole army doing a whole lot of nothing.
Your comment in respect of units or formations tending to continue carrying out some action unless there is some cause - an unexpected sighting, or orders from above - struck a chord. I've occasionally thought about that myself.
The mechanism MIGHT run along the lines of a given unit's default action is what it was doing last turn - marching along a road, advancing in line, halted etc. You would have to remember - or use some form of aide memoire - from move to move. But units or formations did sometimes halt their advance, to resume after an interval. There could be any number of reasons for this. I recall an account of a French regiment advancing up the Pratzen heights, and then halting whilst its commander carried out a personal reconnaissance. Had they recognised the troops in front of them as enemy, they would have attacked at once. Unsure, the commander halted his unit and went forward himself for a closer look. Even then identification was uncertain until something happened to clarify the situation. During the Atlanta campaign, probably the best chances Joe Johnston had of catching an isolated Union formation at a disadvantage were wrecked by unaccountable apprehensions by Corps commanders. You might recall the advance of the Confederates on day 3 of Gettysburg, in which the whole formation of perhaps 15000 men halted to dress their ranks.
Something to think about, I guess. One wants things to happen in our battles, but we do like a little bit of uncertainty. I want to see a story unfolding, and in my battles, they usually do.
Cheers,
Ion
Neil -
DeleteThere is one other convention that I adopted in most of my portable (and other) war games. All combats between opposing units in adjacent squares were close combats, and compulsory. It was therefore in the interests of the attacking side to get in close, take the SP hits instead of retreats. and engage in holding attacks. That freed up activation points with which to bring up reserves. It is true that it freed up the defender, too, but, less inclined to take the 'kills', would still find himself often enough with more things to do than the wherewithal to do it with.
To make this work with my 30YW game, I think I would have to increase movement, and musketry/ pistol ranges by 1 grid area (hex). How that would affect the handling of that remarkable troop type, the mounted harquebusier, I'm not sure.
Do I want to do this? At the moment, I don't think so. There is something in the present incarnation about the stately plod of the tercios and the versatility of the harquebusiers that gives the thing a flavour of its own.
In any case, not every battle will make such a feature of such a string of poor activation dice. I gather the weather was pretty damp on the day of the battle - unsurprising for early November in Bohemia.
Cheers,
Ion
Brutal and bloody given those SP losses Ion, and that's even with below average activation rolls. Looking forward to the next instalment, which feels like it will be a 'Gotterdammerung' one...
ReplyDeleteSteve J -
DeleteThe blood-letting is a consequence mainly of treating (most) 'hits' as SP losses. That kicked the action along nicely. With armies this size, the standard 'retreat or die' method would have meant a much longer game with overall much the same outcome. I am toying with the notion of making all 'hits' SP kills, but adding in the retreat or stay according to quality. A 'veteran/elite' unit will stand their ground more easily after a SP loss than would, say, a 'poor' unit.
This might go hand in hand with some ideas I have had recently concerning paring down the combat mechanics.
Cheers,
Ion
The battle seems to be a bit of a “meat-grinder” ⚔️⚔️💀
ReplyDeleteCheers,
Geoff
Geoff -
DeleteOddly enough, the thought hasn't until now crossed my mind. It is certain that the early 'spoiling' attacks by the Confederation cavalry turned out to be bloodier and more prolonged than I had anticipated. Possibly as losses mounted they could have broken off the action and retired behind the tercios. In fact, in one place at least, that's what they did (to be related in the concluding narrative).
Were it not for the 'battle parameters' that determined when the action would end, there is no doubt the thing really would have turned into a meat (plastic?) grinder.
Cheers,
Ion
Impressive!
ReplyDeleteCheers! The Revell figures paint up nicely, and I reckon I might have got some decent 'action' pictures.
DeleteIon