
 |
| Russian, 1813: Retreat from Smolensk. French troops (II and VI Corps) attempt to break through General Yorck's Prussian Corps barring the escape to the west. For the narrative, pray read on... |
My apologies to readers for the lengthy hiatus. What with one thing and another, finding the time and inclination to do much wargamery type stuff has been problematic of late. But, to continue...
The following was an extended play test of my Big Battles for Small Tables rule set (I need to come up with a better title by now), in particular the combat aspects, for a reasonably sized action. For this I chose Scenario 3 from Charles S Grant's 'Green Book' (Scenarios for Wargames), having recently been inspired to give it a crack by Ross Mac's blog account a couple of months back of an ACW action based on the same idea.
The following was an extended play test of my Big Battles for Small Tables rule set (I need to come up with a better title by now), in particular the combat aspects, for a reasonably sized action. For this I chose Scenario 3 from Charles S Grant's 'Green Book' (Scenarios for Wargames), having recently been inspired to give it a crack by Ross Mac's blog account a couple of months back of an ACW action based on the same idea.
Narrative:
For the rest of his life after the disastrous campaign of 1812, Napoleon allowed that instead of wintering his army in and about Smolensk, he would have had more success bringing Tsar Alexander to the negotiating table had he continued on to Moscow. The area around about the ancient border city was soon eaten out, though the bulk of La Grande Armee clung on through the entire winter season into 1813. But with the approaching thaw, the game was up. Becoming increasingly mutinous, despite the efforts of the Emperor and his Marshals to maintain discipline, the Army was perceptibly fraying at the edges. A further advance into the Russian vastness being out of the question, retreat remained the only option.
 |
| Mid-morning: French troops advancing 'off the march' to clear the road westward. II Corps from the left (south); Cuirassiers and VI Corps from the right (east). Prussians holding the distant ridges bar the way. |
From their position about Polotsk, the Corps of Marshal Oudinot (II) and General Gouvion St Cyr (VI) took as they withdrew a route parallel to that of the main Army, towards Vilna. Meanwhile, Marshal Macdonald's X Corps had stalled for good about Riga. Unable to take the place, even after continual bombardment had practically levelled what was left of it after the defenders razed the suburbs, the good Marshal had settled down to wait out the winter. Eventually learning of Napoleon's decision to pull out of Russia, Macdonald began a leisurely retreat.
Whether he was wise to place Yorck's Prussian Division as rearguard is hard to say. General Yorck was suborned by smooth-talking Russian envoys (accompanied by the renegade Colonel von Clausewitz) under a flag of truce. At any event, Macdonald lost contact with Yorck's Division, together with the cavalry, and made off barely with General Grandjean's Division alone. Outlying Prussian troops joining Yorck's command built up into a respectable Corps of troops.
 |
| Prussian 7th (Landwehr) Division, reinforced by artillery holding the north flank. |
That might have been the end of the Prussian involvement in the Russian debacle, but Russian intelligence indicated that two French Army Corps were approaching from the east. An urgent request arrived at Yorck's HQ on the evening of March 2 1813 to divert his march eastwards, and hold up the enemy moves near the village of Putinovo. Two roads converged there from east and south, a single westward road passing between wooded ridges. At that pass a stand might be made fatally to delay the French retreat...
 |
| Prussian 4th Division barring the road, whilst 3rd Division, with artillery support hold the high ground to their right. Behind them. 1st (Grenadier) Division and the Heavy cavalry, in reserve, await developments. |
Accompanied by a Brigade of Cuirassiers, the three Divisions of VI Corps (19th, 20th and 34th) approached the village by the north road; those of II Corps (6th, 8th and 9th) by the southern. In the early morning light, they found Yorck's small army standing athwart their line of retreat. Uncomfortably close behind the French, an indeterminate but large force of Russians were known to be pressing westward as fast as they could march. The was no option then: the passage west had to be forced, and forced before the day was out.
 |
| Midday: All the French troops are ready to go. But there isn't much time left in the day to clear the road westward. |
This action took place on a table 4ft (122cm) by 4ft 4in (135cm) - a very small surface for the size of the battle. The scenario was tailored partly to fit the playing surface, partly to fit my army organizations. The forces were as follows:
 |
| Midday: The French have at last all arrived on the field, but the Prussian line is not yet under any real pressure. The clock is ticking! |
BLUE FORCE: Prussians, defending:
Commanding, General Yorck
1st Infantry Division (Grenadiers) 24 figures (4800)3rd Infantry Division 24 figures (4800)
4th Infantry Division 24 figures (4800)
7th Infantry Division (Landwehr) 24 figures (4800)
1st (Heavy) Cavalry Brigade 12 mounted figures (2400)
2 batteries each with 3 crew (representing 1200 gunners and 48 guns overall)
Totals: 96 infantry figures, 12 cavalry and 6 gunners: 114 (22,800).
 |
| As the French swarm onto the battlefield, VI Corps artillery begins to bombard the Prussian 4th Division straddling the road. French gunnery was to prove quite effective throughout the day. |
RED FORCE: French, attacking:
Commanding, Marshal Oudinot
II Corps: Marshal Oudinot
8th infantry Division (Verdier) 24 figures (4800)
9th Infantry Division (Merle) 24 figures (4800)
Light Cavalry Brigade 12 Lancers (2400)Corps Artillery 1 gun with 4 figures (800 gunners with 32 guns)
VI Corps: General Gouvion St Cyr
19th Infantry Division (Deroy) 24 figures (4800)20th Infantry Division (Wrede) 24 figures (4800)
34th infantry Division (Morand) 24 figures (4800)
Light Cavalry Brigade 12 Hussars (2400)Heavy Cavalry Brigade (St Germain, attached) 12 Cuirassiers (2400) (attached)
Corps Artillery 1 gun with 4 figures (800 gunners with 32 guns)
Totals: 144 Infantry figures, 36 Cavalry and 8 gunners: 188 (37,600).
I had to 'massage' the numbers given by the original scenario. The French got a slightly better ratio of infantry (approximately 13 to 9 increased to 3 to 2) and artillery (2 guns each, but Prussians with 3 crew each instead of 4, representing a ratio of 64 French cannon to 48 Prussian). These adjustments in French favour came at the price of a heavy cavalry unit (one available, instead of two), and the BLUE (Prussian) horse was upgraded to heavy. I believe this preserved an approximate balance.
 |
| Return fire from the Prussian guns. In defence they took a considerable toll of their assailants. |
This action was intended to play test some combat mechanics for my large scale battles rule set. I'm still working on it, but trying to keep it simple isn't proving so easy.
 |
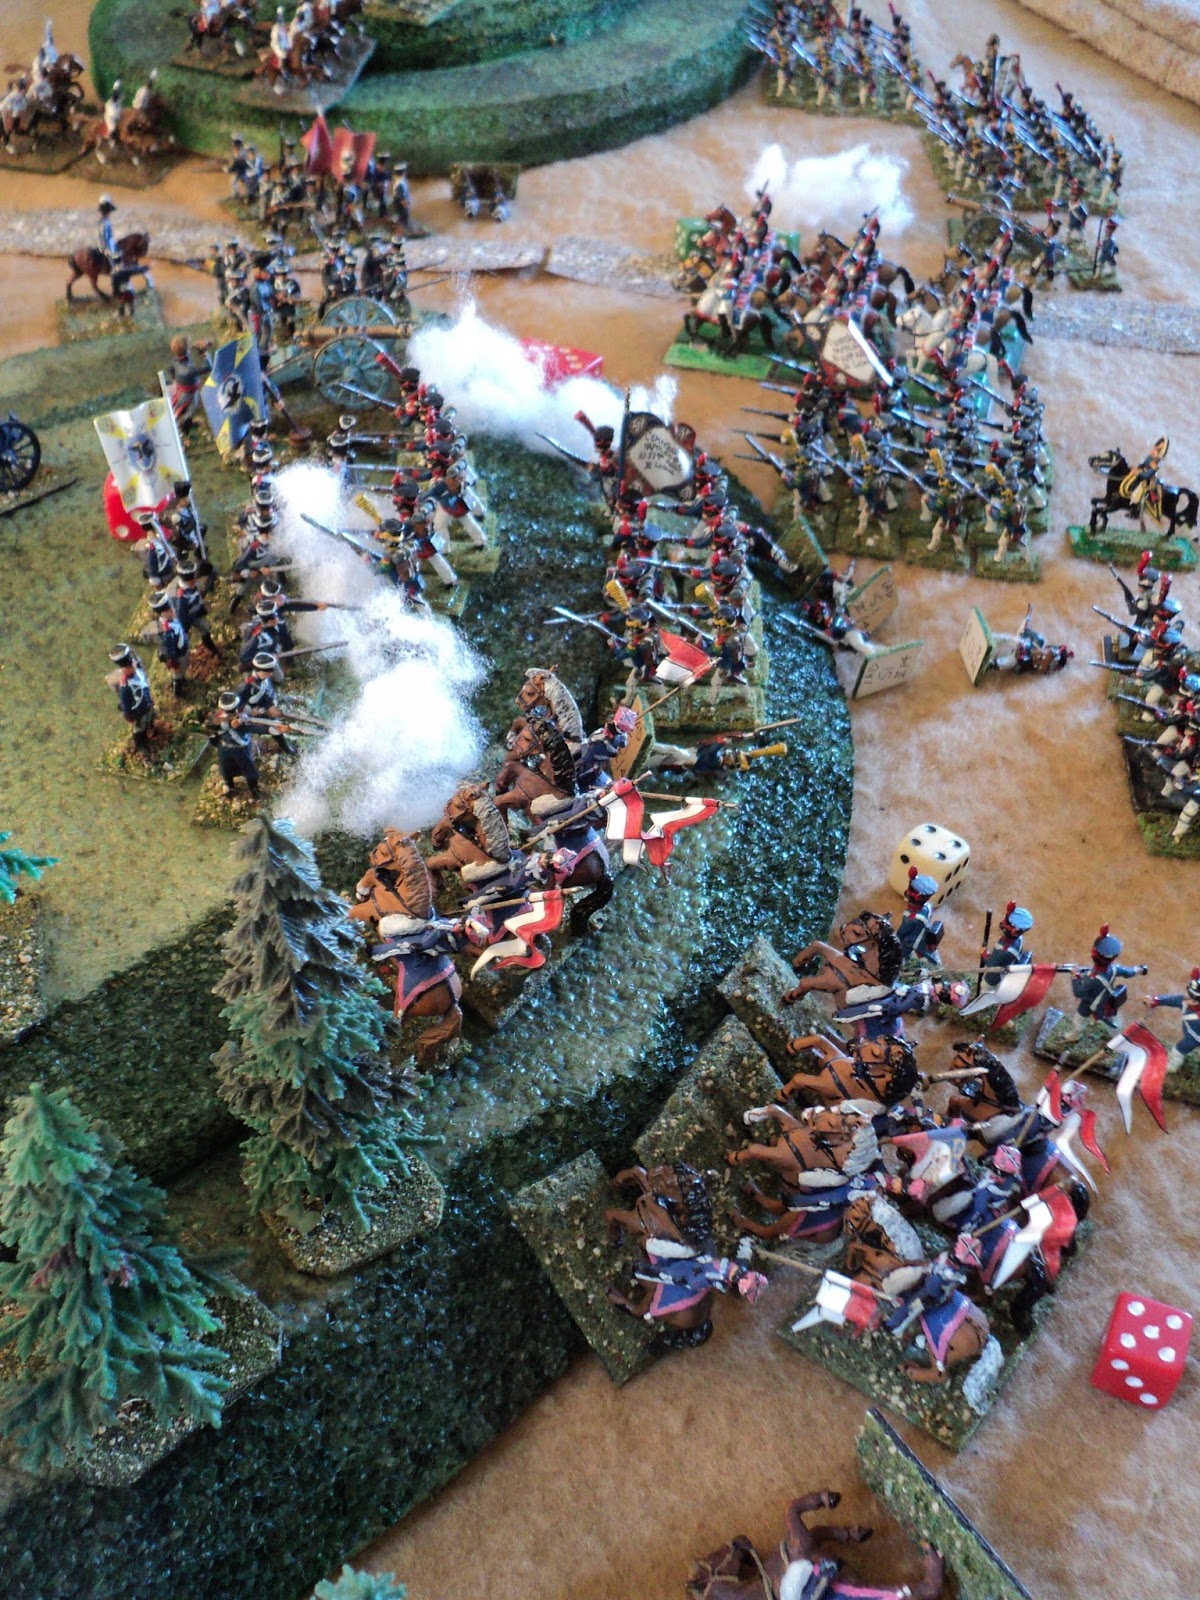
| II Corps light horse and 6th Division attacking with artillery support. Eighth and 9th Divisions hurrying into the action. VI Corps artillery pound the 4th Division squares beside the road, whilst the cuirassiers consider their options. |
At the same time, it was interesting to see how my rules for movement worked in the context of my ground and time scales (1:3600 ground scale; 1:60 time scale). The action was fought across the 4-foot width of the table.
 |
| Morand's Division hurries up to support its friends on the right. |
The French began the action marching onto the table along the south and east roads leading to the village of Putinovo. It quickly became apparent that it was going to take half the day (6 turns) to bring both Army Corps onto the table, even marching along the roads and arriving by separate routes. Actually it took 5 turns for II Corps, with the logistic element (supply train) arriving on the 6th. Sixth Corps was preceded by the Cuirassier Brigade, so took a turn (1 hour) longer.
 |
| Close quarter engagement on the Prussian flank. |
This was not going to leave a whole lot of time to clear the passage westward: six turns only to march across the board, bash a way through the defenders and carry on westward. Nor did the French quite make it, though they came very close. To have any chance at all, the French had to attack 'off the march' - no dallying around preparing a set piece attack!
Marshal Oudinot's Corps swung westward, bypassing Putinovo to the south, and made straight for the ridge flanking the west road to the south, and upon which stood the Prussian 3rd Division together with half the available artillery. The light horse (lancers) paused until the leading infantry Division (6th) together with the Corps artillery park hove alongside. Then, supported by the guns, horse and foot charged up the slope together, striking at the Prussian right flank end of the line. Under cover of the close action there, Verdier's Division column drew alongside and brought the remainder of the Prussian 3rd Division into action.
 |
| VI Corps in oblique order. This was adventitious, not planned! |
By this time, St Cyr's infantry were closing in upon the north ridge, where awaited the 7th (Landwehr) Division with the remainder of the Prussian artillery. Deroy's Division led, the the other two echeloned back to the left. The oblique order form of attack was due solely to St Cyr's haste, rather than any thought out plan.
 |
| Prussian 3rd Division begins to buckle under the pressure. |
 |
| The Prussians have been edged off the high ground south of the road, though the supporting artillery continue to defy the French. |
By mid-afternoon, the Prussians defending the south ridge were feeling the weight of the entire II Corps bearing down upon them. The right of the line shattered and fell back in rout; the artillery, together with what remained of 3rd Division held a short while longer. Then they too were driven off the hill into the plain beyond.
It was at this point that events developed in the centre. In an effort to reduce the pressure against 7th (Landwehr) Division, the counterattack by Prussian heavy cavalry struck the column of Morand's (34th) Division before the latter could form square. In the combat that followed, it was hard to tell whether the mechanics were appropriate, as the cavalry scored rather higher and the infantry much lower than anticipated. There was no question about it: the French infantry were defeated and flung back. The Prussian horse reined in and withdraw triumphantly behind their infantry.
At the same time, the French cuirassiers attacked the brigade squares of 4th Prussian Division in the hope that a quick success there would be decisive. The effort failed badly: the 12 heavy cavalry figures scoring one hit and taking three against the 8 enemy foot.
 |
| Morand's Division takes a knock from Prussian heavies. Prussians lose 2 figures; the French 5. Victory for the Prussians! |

These setbacks did nothing to speed the French towards achieving their objective of clearing the road westward. The VI Corps artillery resumed its effective bombardment against the Prussians covering the road, but otherwise, it was up to the infantry to loosen the Prussian hold by clearing the high ground.
 |
| Heavy French casualties as they struggle up the slopes in the teeth of fierce resistance. |
 |
| Legrand's Division makes way for Merle's for the final push. Guarding the road awaits the Prussian 1st (Grenadier) Division. |
The southern ridge in French hands, the Prussian 1st (Grenadier) Division swung right to face the enemy surging over that eminence. Risking the loss of time, Legrand's Division drew aside to allow Merle's fresh troops to pass through.
 |
| Close action on the French right.... |
As the Prussian cavalry had to rally from their counterattack, 7th (Landwehr) had to face two French Divisions unaided but for the supporting guns. First the left flank collapsed, whereat the VI Corps light horse (hussars) flooded through the gap. As the sun sank towards the western horizon, the remainder of 7th Division had perforce to abandon the high ground as well. The survivors streamed off down the road.
 |
| ... With the collapse of the Landwehr left flank, Deroy makes way for the VI Corps light horse to exploit the breach. |
 |
| General view of the action, with dusk drawing in, looking south to north. |
By now it was clear that the Prussian hold on the pass was no longer tenable. It remained, however, to dislodge them from their position astride the road. Facing II Corps swarming over the south ridge, the Prussian Grenadiers found themselves with the dilemma of staying in line to try and halt the French cavalry, or forming square in the face of French division columns. Hoping that their firepower would be enough to contain the light horse, the Prussian chose the former. In the gathering dusk, the lancers threw themselves upon the Prussian line. As they closed, the Prussian muskets emptied a number of saddles, but this served merely to enrage rather than dismay. With lance, sabre and pistol, the horsemen exacted a savage vengeance. The Grenadiers perforce joined the general retreat into the sunset.
 |
| The south ridge cleared, it remains to brush aside the Grenadiers and carry on westward. But the day is almost done... |
That was the final action of the day. In the fading light, the remnants of General Yorck's command made off into the darkness. But although the pass was now safely in French hands, it was too late for them to resume their march. Both sides, therefore, had grounds for self-congratulation. The Prussian holding action had cost the French more than half a day's march (A wargames foot unit can march 10 foot [representing 6 2/3 miles]on a road. The width of the table was just 4 foot. So the fight cost the French 6 foot [4 miles] of march) I'll come back to this parenthetical remark.
 |
| Resistance of the Prussian 7th (Landwehr) Division collapses with the fading light. |
It was interesting to survey the damage, here - the 'butcher's bill'. The Prussians lost some 43 figures overall, including 2 cavalry and 4 artillerymen. These last might well represent the loss of the representative number of cannon: 32 out of 48. French casualties were heavy enough in storming the pass: 38 figures. of which five were cavalry, the rest foot. I mention these less for the record than to confirm that in the course of the action the casualty rate remained within the realms of plausibility.
 |
| The last action of the day as the II Corps light horse charge the Prussian Grenadiers. In the face of rapidly approaching infantry columns, the Grenadiers had to face the charge in lime formation. It did not go well for them... |
 |
| Prussian Landwehr attacked by the Divisions of Deroy and Wrede. Deroy is already closely engaged; Wrede hurrying up in support. |
A number of issues arose in the course of this action.
1. Time. I begin to think that a slight increase in movement rates might not after all go amiss: say 2" (5cm) across the board. This would revert to the movement rates I began with, but that seemed a little on the generous side at the time. It seems to me that a less than seven miles per day march rate can reasonably be improved upon.
2. The combat mechanics will need considerable refinement. What struck me as a simple scheme is proving less than simple in the fine tuning.
3. Morale. For the sake of simplicity, morale was reduced to two simple mechanics: losses exceeding 50% and the outcome of close combat. The latter was compromised somewhat by the basing of the Prussian formations. I may add some refinement, but so far this 'working system' will do - at least for now.
4. The Prussian were given to me as an alternative to their being deep-sixed (which I thought an undeserved fate). However, most had been mounted 2x2 on 3cmx4cm bases. This doesn't fit at all with my planned scheme of Divisions drawn up in two single rank lines with a gap of, say, 2cm between them. I planned to treat the double-rank bases as though they were successive lines, but forgot when it came to the crunch - at least in terms of what happened as a result of the close combats. The Prussian lines ought to have fallen back as it were onto a supporting line (a 2cm recoil). This would have delayed the French more, but also led to heavier losses to Prussia.
Never mind: it was certainly an exciting enough action, with plenty happening. A promising project!
What a bloody nice report! Well done...I'm a bit sad for the cuirassiers!
ReplyDeleteThanks, Phil.
DeleteThe French Cuirassiers? I admit that was a try-on looking for a quick decision. The game mechanic for now goes like this: Close combat each figure rolls (it's unashamedly a fist full of dice game), 5s and 6s hit. Standard Cavalry vs Infantry in Square get 2 dice for 3 figures; armoured heavies upgraded to 1 die per figure. So the Cuirassiers got 12 dice. Foot in square vs horse get 3 dice per 2 figures. As the horse are thought of as rather flowing around the square, all figures count.
So both sides got 12 dice. The foot did well with 3 hits; the Cuirssiers rather poorly with precisely 1. In my view the 50-50 odds constitutes a losing proposition even for Cuirassiers (or lancers, which get the same bonus), especially when on bears in mind the whole brigade was attacking a mere third of an Infantry Division.
In the light of that, I might have been a little ungenerous to the mounted arm...
Excellent read!
ReplyDeleteThanks Francis!
DeleteWonderful. Very enjoyable report and splendid layout.
ReplyDeleteThanks, WM - I was quite pleased with the way the pix came out, and how the action unfolded too. The 'Retreat from Smolensk' narrative foreshadows some ideas that I'll discuss later...
DeleteGrant's scenarios are an excellent source for inspiration and your game looks terrific.
ReplyDeleteAlthough I do not have Grant at hand, Scenario #3 that you replayed looks very similar to Scenario #1 Holding Action that I fought a couple of times. Mine was st in the Peninsula. I will check Grant when I return home to confirm the differences between #1 and #3. I often find a little more generous movement rate adds to more dynamic games.
Very enjoyable BatRep!
Thanks for you comment, Jonathan.
DeleteThis is Scenario #3, but it is titled 'Holding Action (1)'. 'Holding Action (2)' by the way, will be the topic of my next posting, but that I've given an American Civil War setting. The battle has been fought, the pictures taken: it just need the story written.
On the matter of movement rates, I have taken as my benchmark a ground scale of 1 inch to 100 yards (1:3600) and a time scale of 1:60 (1 turn represents an hour; 12 turns an equinoctal day). To reconcile the difference between scales, I took a logarithmic mid-point such that 3600/m=m/60. With a bit of maths and rounding, and taking a rapid pace of an infantry column of march on a good road of, say, 4mph gave us a move of a little over 9 inches. I have rounded that (rather generously) to ten, and scaled back movement in other formations and terrains.
In the action, the last formation to arrive on the field, Morand's Division, I kept in march column, along the road, for as long as I could. They formed into an assault column just the move previous to the attack upon them by the Prussian horse.
Really, the ground scale is what constrains making greater adjustments, and that in turn is limited by the space and surfaces I have available. As a 6' by 4' table is the largest surface I can use at home, I want it able to accommodate, say, Waterloo, at least. On the whole I wasn't too dissatisfied with the outcome of the game. It did 'show' that Napoleon's idea that an Army Corps should be able to look after itself for one day was not unreasonable.
I rechecked my BatRep and Grant. It WAS Holding Action #1 that I refought. Great little scenario.
DeleteNow THAT is what I consider a bsttle on a smsll table. Plenty of troops but room for some manouver and some depth to the game. Looks good but effective.
ReplyDeleteWhen considering daily msrch rstes vs battlefield, keep in mind that when a corps marches all day, individual units only march a few hours. Ususlly the lead elements are already making camp at the next stop before the last elements have left the previous camp.
Good points, Ross, and thanks. I think your reminder was timely - certainly helpful. Your own projects for smallish tables has helped immensely in keeping this project going. I still prefer 'free form' rather than grids for my own games, but find what you do always interesting and inspirational.
DeleteBack with a bang Ion. Nice AAR!
ReplyDeleteCheers, mate. Some more stuff coming along... Gradually...
Delete