
My recent Battle of Lutzen (1632) project threw up several thinking points, mostly occasioned by the way my armies have been designed and based. Having switched from a design of my own to the DBR game system (huge mistake, but not due, apart from a want of 'finish', to any real problem with that system) I found myself unable to make the reverse decision. Perhaps that was a bullet I ought to have bitten, after all.
What this has led to is having to create units with multiple stands. Now, that's OK, but I have a feeling that the Antoine Bourguilleau designed Portable Pike & Shot Wargame calls for single-based units - even unto Swedish brigades and Spanish tercios. A tercio comprising 9 figures of pikemen forming a square, with 3 musketeers/arquebusiers capping each of the four corners, with each figure occupying a 15mm (front) and 20mm (depth) base would fit easily within my square grid cells, and not too badly within my hex grid cells. The latter would overlap the cell boundaries only a trifling amount.
Well, not to be: too bad. Let's work with what we have.
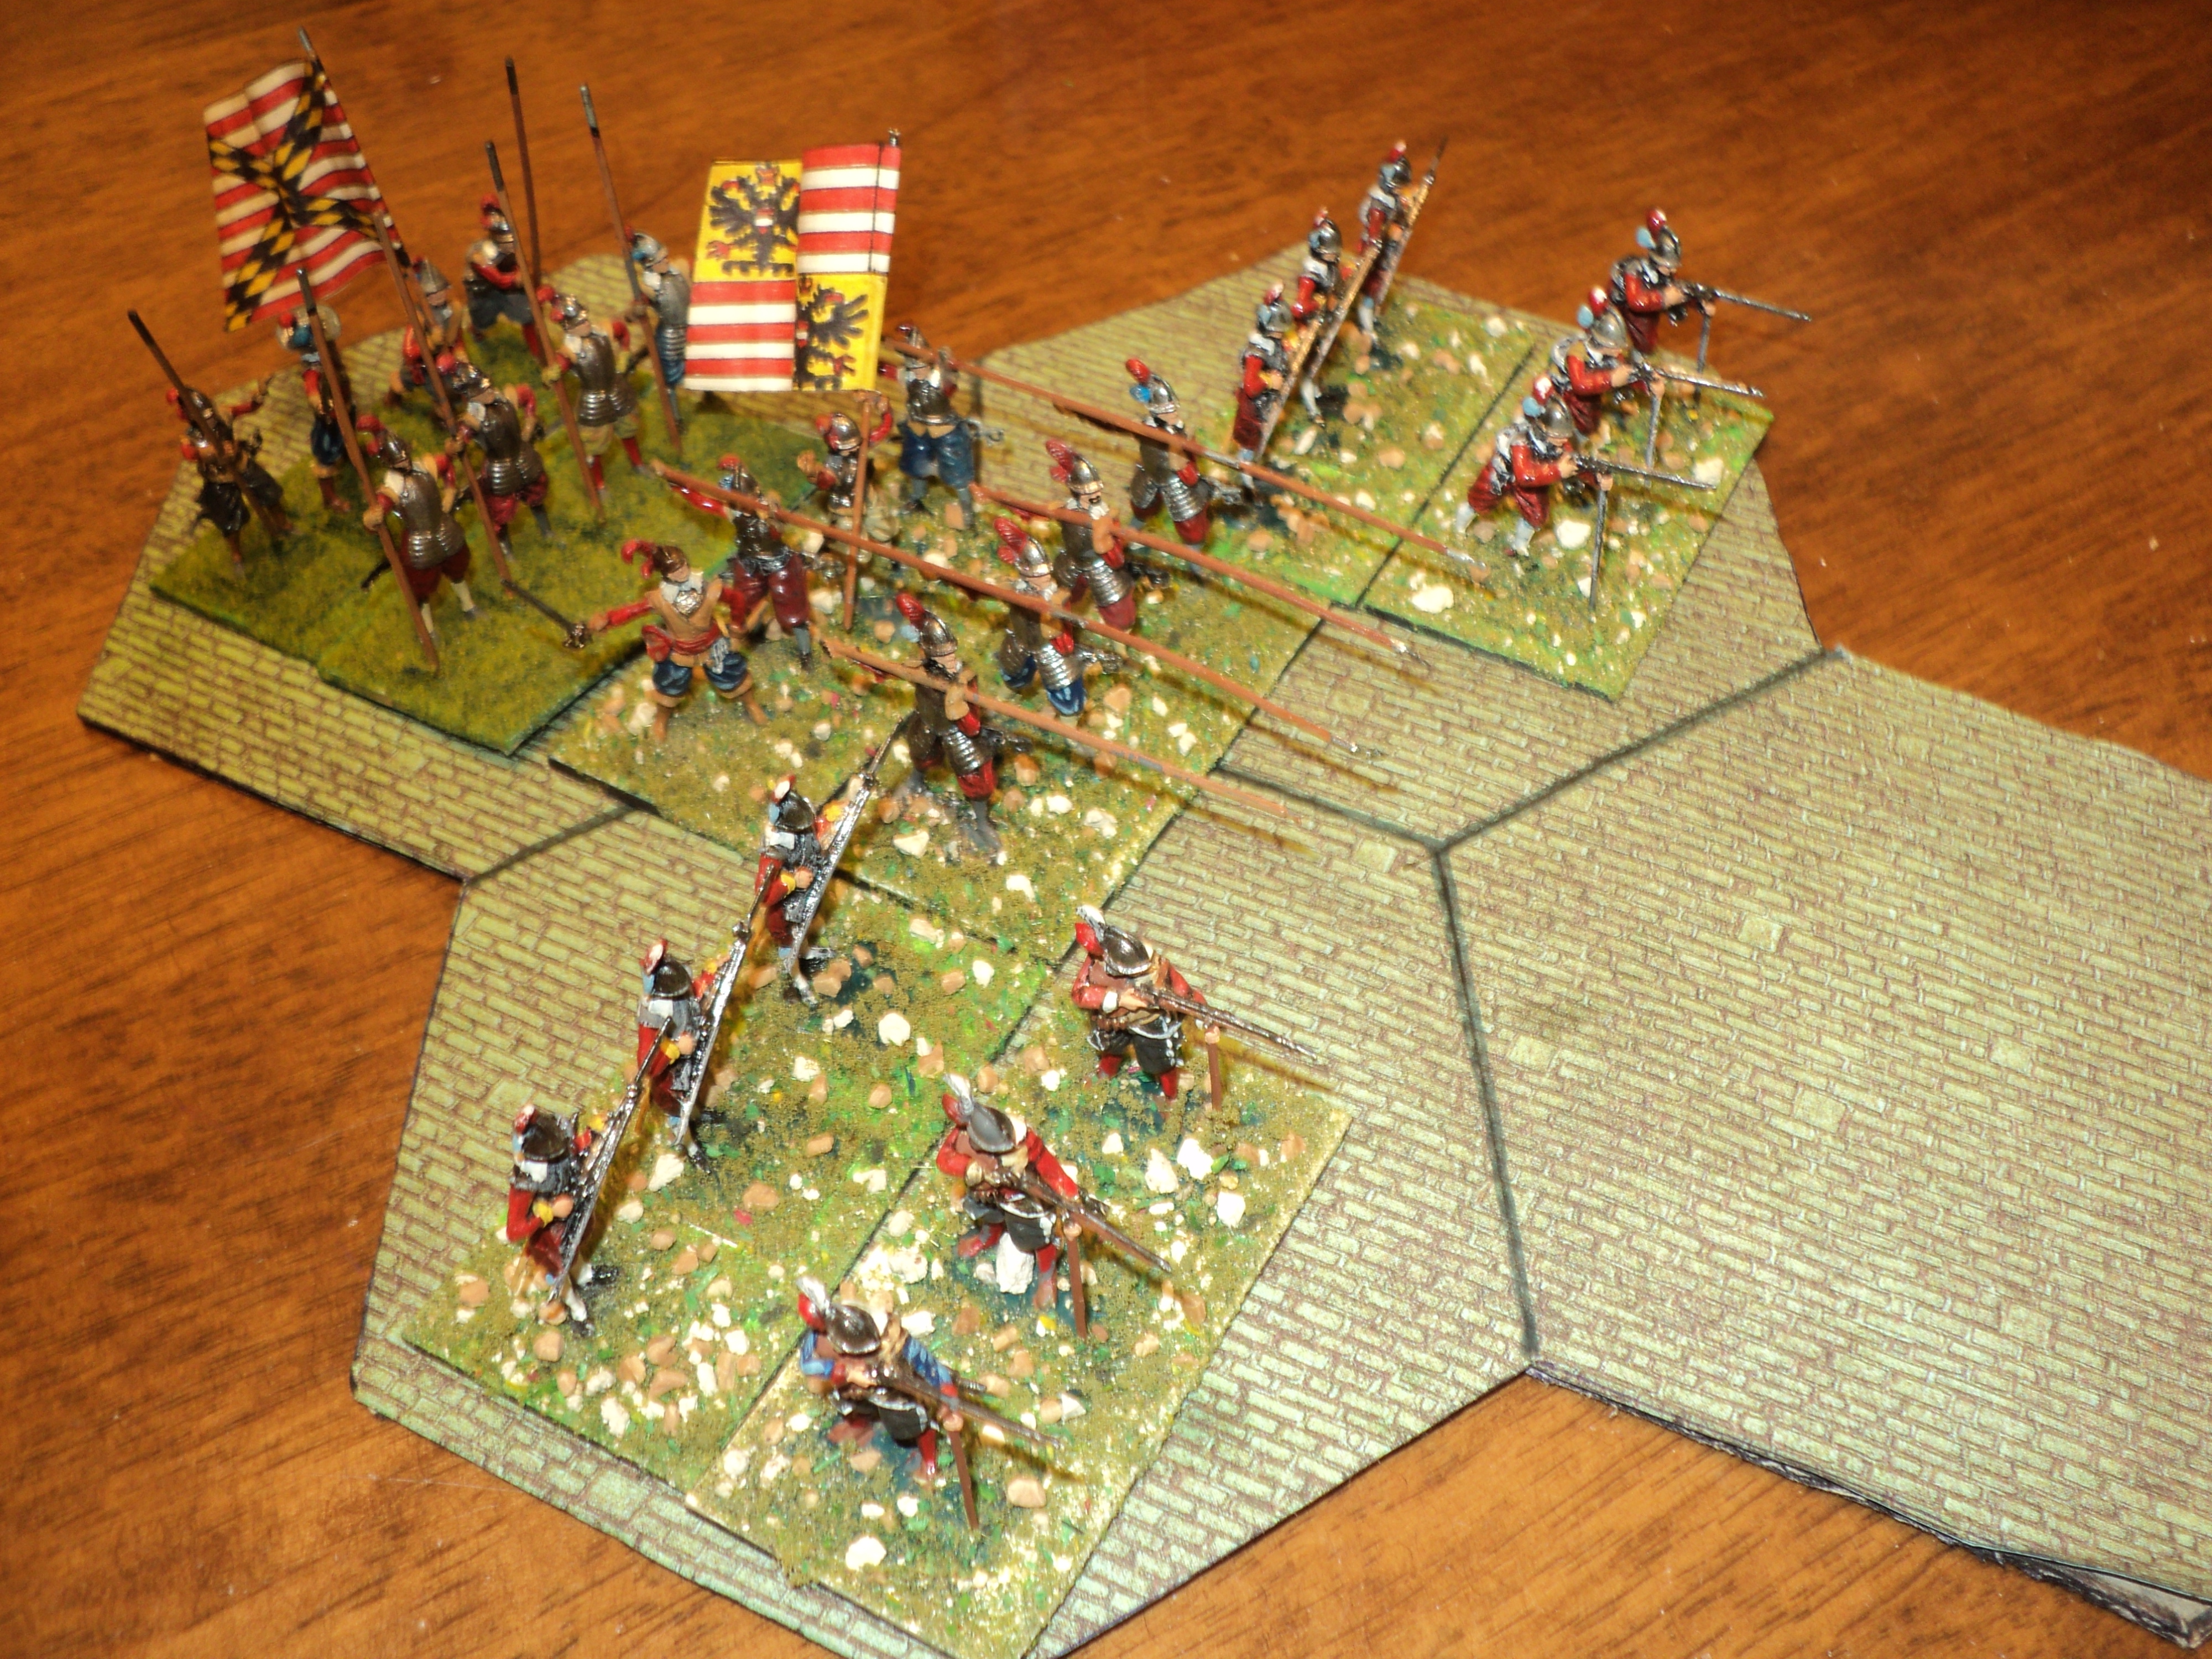
What I had in mind was that the infantry units would default to a 6-stand battalion, comprising a centre of 2 x 4-figure pike stands, and wings of 4 x 3-figure shot. Like these fellows on the right of the picture:
 |
| On the right, four Swedish battalia, each of 20 figures. The Imperialist foot facing them comprise 8 extra pikemen |
The concept seemed to work, although it did lead to a staggered 'line' drown up 4 tercios abreast at the outset of the Lutzen battle. Shaken out into a lozenge formation, the four tercios looked the part.
Before continuing with the topic of unit sizes, and their implications, I want first to outline where I intend to adapt the original concept to my own set up. I intend to try out several changes to the system
1.Artillery:
1.1 Artillery is divided into 'field' and 'battalion' guns1.2 Field artillery can not move, except to change facing, unless there is a horse team available to move it. Once hitched (taking one move) the artillery may move two hexes per turn.
1.3 Battalion guns can be manhandled 1 hex per turn
1.4 Artillery present no obstacle to the movement of other units, apart from preventing their landing on the same grid area. A foot or horsed unit may simply 'pass through' friendly artillery. Enemy artillery overrun may simply be removed from play
(I am very tempted to permit the 'capture' of artillery with the idea they they may be turned upon their former owners. Wouldn't that be fun?)
1.5 For the purposes of the game, I increased the range of my 'field' artillery to 6 grid areas - hexes or squares. I'm very tempted to make it 8. At a 6-hex maximum, short range is 2 grid areas.
1.6 The firing range of battalion guns is the same as for artillery in the Portable set: 1 grid area at short range; 3 at long.
1.7 Rather than limiting shooting to along a single line of hexes or squares, I propose this:
When firing through a a square or hex side, the 'firing arc' is the grid area immediately in front, and one grid area either side of the centre line thereafter.
 |
| Firing arcs; Field battery: Red (short) and pink (long) Battalion guns: Orange (short) and yellow (long) |
1.8 I am considering the option to shoot though a hex corner (not square corners if using a square grid). The reason for this has to do with the size and shape of my foot units. If so, the 'arc' of fire will be 1 hex either side of the center line - a firing arc 2-3 hexes wide.
2. Horse.
2.1 There is but one real adaptation I want to make, here, and that is to the 'Dutch' cavalry - harquebusiers - as defined under the PP&SW game system. These fellows tend not to go in for the up close and in your face stuff, but prefer to stand off and shoot. They also, it seems, favoured rather deep columns, which, shooting by introduction in a species of caracole, kept up a considerable rate of short-ranged fire whilst slowly moving forward (at least, that is how I figure it). This is quite in contrast to the 'Swedish' school of thought, which was to get tore in with the sword. The question is, how does one make it worthwhile to depict the deep columns of 'Dutch' harquebusiers? I propose that such a unit -
(a) adds 1 to its shooting dice if it has a third rank,
or alternatively,
(b) counts 1SP per rank, up to a maximum of 3.
2.2 Light Horse.
The Imperialists often fielded Croats, Cossacks and Hussar light horse. I have added them to the mix: Move 4 hexes, 2SP each, counting as 'poor' or 'average'.
3. Foot
3.1 Forlorn hope:These for single stand units, rather like a skirmish line, with 1SP only. They may be classed as 'poor' or 'average'. Actually, these fellows were often brave men who volunteered for some reward or perhaps commutation of punishment. The chances of survival were pretty slender! However, brief experience, especially as defenders of a protected position, have shown them hard to shift, so they don't count as elite.
3.2. Battalia/ Brigades:
The three-stand battalia or 'brigades' I used for the Lutzen battle I reckon ought to be 3SP instead of 4. They each have the same firepower as the tercio, but eight of them still double the firepower of the 4 tercios.
However, I also have in mind fielding 6-stand 'battalia'. Now, these of course, span 2 grid areas wide - reasonably convenient on a square grid battlefield; less so with a hex grid. On the latter, the unit would 'naturally' face the hex corners, as shown here:

4. Combat results.
For the size of the game, I seems more convenient - certainly speedier - that all hits result in a SP loss. Whether a unit taking that loss gets also pushed back one grid area might depend upon its quality (poor, average, elite). For the most part I applied the hit=SP loss during the Lutzen battle, and the thing went quite briskly considering the size of the game.All these ideas will require play testing some time. Meanwhile, I am doing some prep work for the Battle of White Mountain (1620). My Swedish army will be co-opted to represent the Protestant Bohemian Army.
To be continued...
 |
| Battle map for White Mountain |
Excellent, the firing arcs for the grids is a good way to go, though makes hex based fire more flexible than square based - though having gone through this some years ago, I don’t really think there is much one can do about this. It does highlight that for the period, the restrictive nature of squares might be the better fit for linear warfare.
ReplyDeleteNorm -
DeleteI think you're probably right about the square based grids being probably better suited to linear warfare of the type we're looking at here. I really ought to hoik out my own square based board and see what the thing looks like. As it is only 10x10 4-inch squares, the battles will necessarily be smaller, if course.
Meanwhile, the arrangement of the forces, especially the tercios, in the proposed White Mountain game, is a pretty fair representation of the actual battle so far as I can make out. Conveniently, at least one of the sources indicates that the Bohemians favoured 'charging' cavalry; the Imperialists their cuirassiers and reiter (harquebusiers).
Just by the way, there is nothing to stop my using my 30YW armies in an ungridded game.
Cheers,
Ion
Having played Phalanx, I'm a convert to using the hex spine facing for linear periods. It solves all sorts of problems to do with facing and flanks. Perhaps I need to revisit the PW Pike and Shot set.
ReplyDeleteMartin -
DeleteYou have aroused my curiosity. 'Phalanx' - I don't know the game system at all. But if 'hex spine facing' is a thing that has been tried elsewhere with success, then it is something definitely worth a look. I'll have to determine whether it can accommodate within reason the older style of tercio (the 'lobster' tercio in my final photo above was I gather, a late version).
I'll have to see how that system works. It might be worth looking into their effect on my 'Byziantiad' project as well.
Cheer, and thanks for the heads up,
Ion
Hey great break downs and reasoning, I love doing stuff like this as most of the time it’s really useful, also cheers for the reminder on my graph paper.
ReplyDeleteDemetri -
DeleteI always think it useful to discuss game mechanics and the justifications for them. They can go to understanding how events develop during a table-top battle.
In the times before personal computers and laptops, I used often to map out projected battlefields on graph paper, as a useful guide to dimensions. Before I knew war gaming was a thing, I used to build armies with building bricks, hand drawn cut-out figures and even bits of straw (in the garden). Sometimes navies too.
Everyone has a personal style, and they all have their points of interest.
Cheers,
Ion
Always good, if time permits, to reflect upon a game and what improvements etc can be made. One day maybe I will get around to some more PW style games, as they have an awful lot to offer.
ReplyDeleteSteve -
DeleteI agree. I reckon I have done more in the way of actual wargaming since Portable Wargames saw the light of day than ever I did before. It also inspired me to create my gridded playing surfaces.
Cheers,
Ion
Regarding the artillery - I’d have thought that friendly foot and/or horse might be able to pass through friendly artillery, but surely this would (at least) disrupt one or both. I would imagine, as a minimum, that there would be some shuffling about as the various troops carefully intermingled, before re-dressing after they “passed through”.
ReplyDeleteWhat to do when enemy artillery is taken/captured? Surely the most competent gunners would be artillerymen. How capable would other troops be to man the gun, load it correctly and safely, and then aim and fire it? I would argue there would be a fair few “minus factors” here. Otherwise, your changes for artillery and horse all sound good. 👍
Regarding the Forlorn Hope - perhaps making them “poor” is doing them a disservice. As you mentioned, this was a dangerous task and would require brave soldiers capable of facing the hazards of combat (as they would generally be deployed with an expectation of facing combat.
Regarding Battalia/Brigades - I don’t have anything to offer here, as much depends on whether the battlefield is hexes or squares and, in any event, that it gives the correct “feel” of battle that you’re looking for.
Combat results? A speedy (or, at least, speedier) result is a good thing. I dare say what we’re looking for is to determine the outcome of the combat (and not to consume too much time with lengthy mathematical calculations).
White Mountain? Hmmm… that’s not going to end well for the Protestant Bohemans 😢
Cheers,
Geoff
Geoff -
DeleteGood points, well worth bringing up.
Artillery
As I understand it, at this period the guns were placed fairly widely apart (to provide elbow room to the crews and to avoid accidents), had surprisingly small crews, and, having been placed, stayed there. I think the interval between guns would have been 10 to 15 yards, if intervals at later times are anything to go by. Horse teams were kept well out of the way. I don't reckon the gun lines would have presented much of an obstacle to friendly troops passing through.
Because the guns were for practical purposes immobile, capturing and using the enemy guns would have had certain attractions. It seems likely enough (I'm guessing, here) that, their own troops having passed through, the gunners would follow and take over any captured ordnance. One thing for sure; absent the teams, the guns could not have been dragged off. Bear in mind, too, that the gunners themselves were professionals, the gun team handlers by and large were civilians. Using captured guns would have presented no problem apart from the task of turning them around.
As it happens one does hear stories of captured guns being turned on their former owners, Lutzen being one of the instances. Enraged by news of the demise of Gustav Adolf, the troops charged the Imperialist line, overran the enemy guns, lost them, overran them a second time, and turned them upon the enemy. This according to J.F.C Fuller and Cicely Wedgewood, anyhow. That such historians believed that sequence suggests its plausibility at any rate.
Forlorn Hope.
For this battle, I made everything 'average', but in any case most of the time I played every hit was a 'kill'. Given a game with over 350 figures (all right, over 50 units) this made the thing a lot quicker to play out, and gave a very satisfactory result.
In close combats between foot units, an advantage is given to the 'heavier' units in the fight. In descending order; tercio, battalia, commanded shot, forlorn hope. That extra 'weight would have offset the protection of the ditches. I have a nasty feeling I forgot this in all the excitement.
Something to remember another time. I think I'll be 'doing' Lutzen again, and hope Pappenheim turns up this time!
The dice for SP loss OR retreat does take more time, although, given a retreat, a following up enemy can get a second shot in. I admit to being none too consistent with how I applied these results, especially where Gustavus Adolphus was involved. There, I DID apply the 'kill or retreat' thing, though the King himself was always at hazard. He survived several tests before he went under. But in future I think I'll just do the hit = SP loss thing. It seemed to work well enough.
White Mountain.
My first thoughts were that this would be pretty one sided, as it was historically. But although somewhat outnumbered, I think the Protestant Bohemians might be able to give a good account of themselves - especially the cavalry. I'm not going to disadvantage them with 'poor' units (apparently their morale was about as cheerful as the November weather in the cusp of autumn and winter). Seems their cavalry were of the 'charging' persuasion, which gives them a close combat plus against pistoleers and cuirassiers. The W.M. battle map will be explained when I 'do' that article.
Thanks for your comments, Geoff. Appreciated,, and helped with my thinking.
Cheers,
Ion