 |
| Imperialist left driving back Gustavus's wing. |
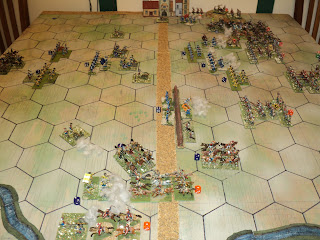
We left the Lutzen action last time with matters not going at all well for the Swedish Army. The Imperialist harquebusiers were putting up a huge fight along the banks of the Flossgraben stream, destroying one, then two, of the Swedish cavalry units there. King Gustavus Adolphus himself went in danger of his life, as his bodyguard unit was scattered. Alone with his immediate entourage, he made his way to a fresh unit coming up, and with it took up the fight once again. It did not go well. Although the Imperialist horse was barely holding, a pistol shot lowered the King himself.
 |
| What has happened to the Swedish king?! |
Their successes, and the disaster to the Swedes from losing their beloved monarch (one fewer dice for the activation roll), were not coming to the Imperialists without cost. Although two-thirds of the forlorn hope were still in action, little more than half their left wing cavalry were carrying on the battle - just 6 Strength Points (SP) remaining of the 11SP with which they began.
 |
| Colloredo's Imperialists standing like a stone wall. |
On the other wing, the Swedes were in an even worse case. Battering away at the enemy gun line, the Swedish horse suffered an emphatic repulse - a costly one that left the Imperialists barely scratched. It seemed hardly likely that the reserves to hand could alter the result, but it had to be tried.
 |
| Swedish brigades approaching... |
So far the foot in the centre had been hardly engaged. Having cleared the ditch of the part of the forlorn they had encountered, the right flank 'brigade' began to bring a telling musketry fire upon the lead tercio. By this time it had already lost a SP. So had the brigade.
 |
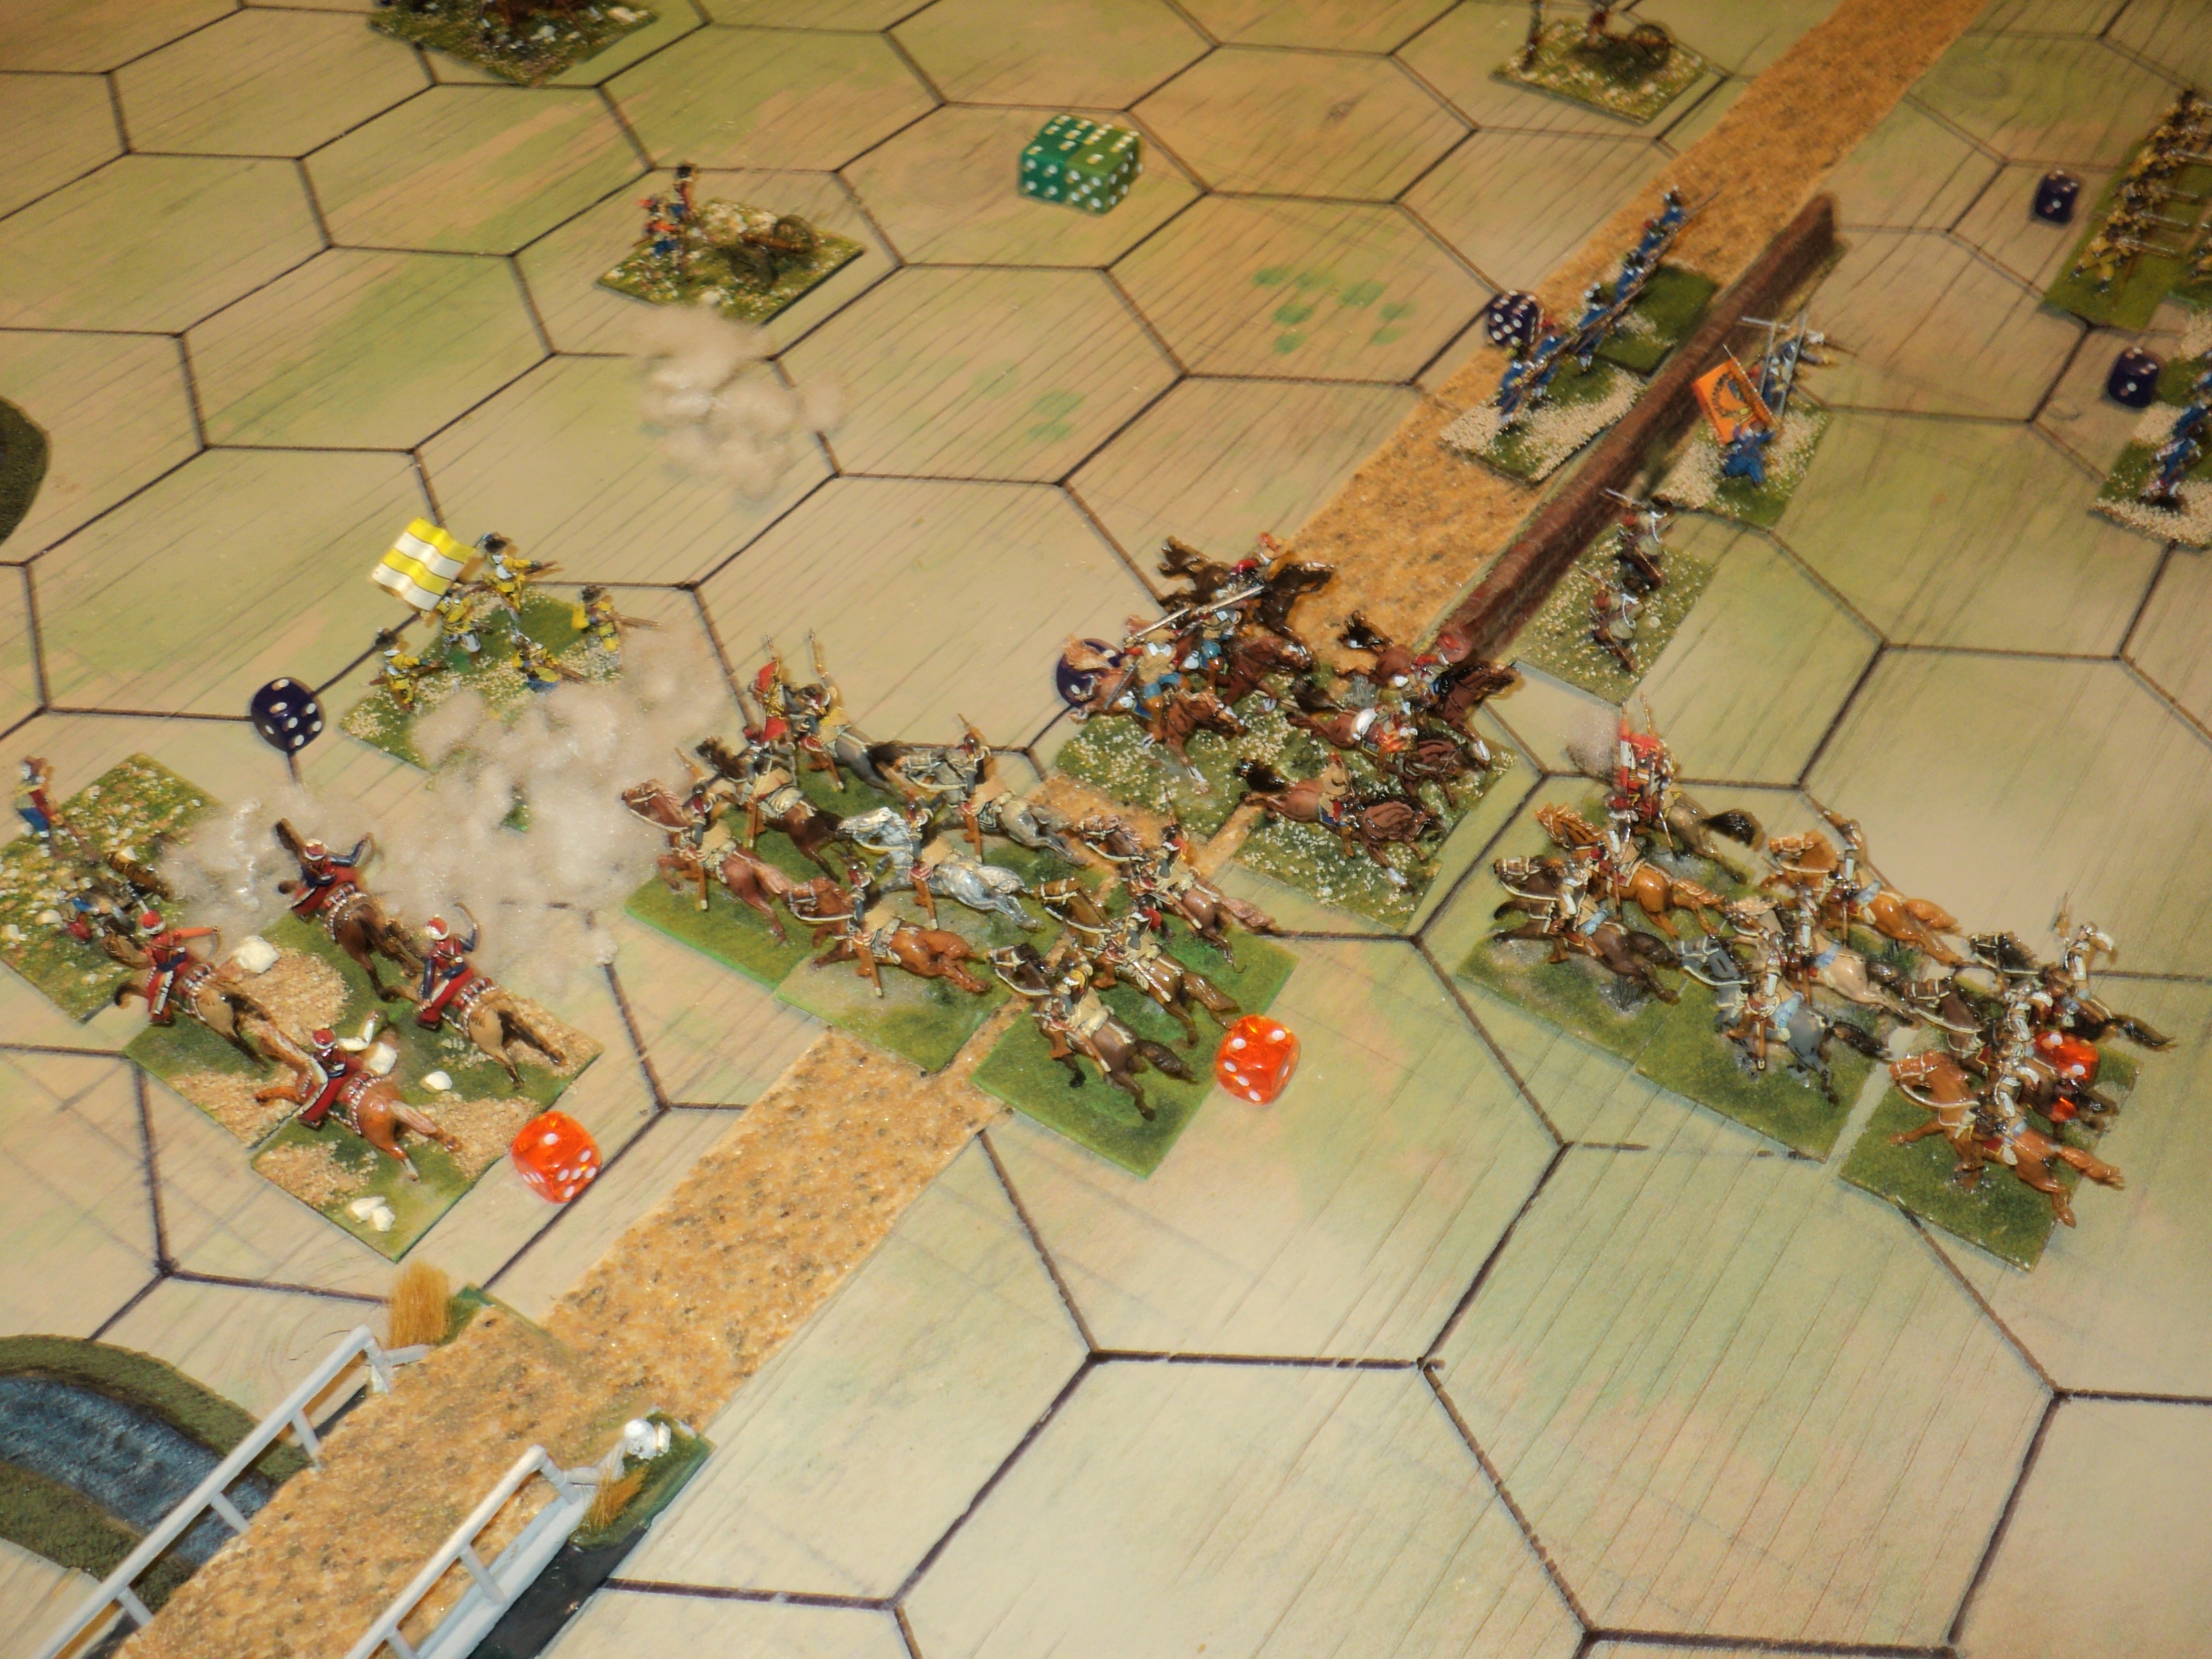
A harquebus unit vanishes in rout. The turning of the
tide, perhaps? |
The two brigades to their left joining the first, they swept on to close with the lead tercio, whilst the rear right flank brigade occupied the abandoned part of the roadside ditch. The three Swedish brigades might have halted to bring on a fire action, but, against that decision, the tercio would certainly have used its extra weight more closely to engage the enemy foot.
 |
Terrible bloodletting as a tercio takes on
three brigades. |
Probably this was not a good decision by the Swedish foot, but the results were spectacular enough! The picture tells the story. Although the centre Yellow brigade was merely checked - it had lost a SP to earlier fire action - both flanking brigades handed out and accepted terrible punishment. The right flank Blue brigade was down to half-strength, but so was the tercio. Overall losses in the centre were so far about even.
Near the burning town, the Swedes returned to the charge, their left somewhat covered by a unit of commanded musketeers. So far the extreme right flank Imperialist unit had taken a knock, but Colloredo's wing was still comfortably holding off the Swedes.
 |
Another great activation roll for the Imperialists. Losses
have reduced the number of dice from 6 to 5. |
By this time we were about up to Turn 7, the initiative won by the Swedes. Losses by now had reduced the Imperialists to 5 dice only (the Swedes were down to 8, almost to 7, by now). And then the Imperialist roll this array of activation dice: 5 or 6 more units might be activated than expected. Naturally they could be put to good use.
That bit of paper is still extant, with the addition of the SP losses so far: Imperialists 14SP; Swedish 33SP! Such a level of hurt ought possibly have terminated, if not the battle as a whole, but all aggressive moves by the Swedes. That was not going to happen! I think I just got carried away.
 |
Imperialist left still fights on, though badly depleted.
Both sides are mere shadows of themselves. |
But I also rather think I added something to the Swedish count that ought not have been there. Most of the PW rule sets assign 6SP to the Army commander, but the Pike and Shot rule set doesn't. The commanders go towards command and control, and not so much to morale. I had placed a SP marker (die) beside the King's command element (as I had done also for Wallenstein), but need neither for identification purposes. It was simply force of habit. I think.
At any rate, the loss of just 27SP instead of 33 would justifiably have kept the Swedish Army in the fight. Compared with the much lighter Imperialist losses, 27 was bad enough!
The Swedes weren't done yet. On the Flossgraben wing, they still had reserves in hand. As Graf zu Pappenheim was still somewhere on the road, the Imperialists had no such luxury. Their tide of success began to ebb, beginning with the rout of one of the harquebusier regiments. Just 5SP out of 11 remained of this wing.
 |
| A second tercio enters the fray ... |
In the centre, the plight of the lead tercio was slightly - and momentarily - relieved by the left hand tercio ranging up alongside to engage one of the enemy brigades.
 |
| The Swedes are very much battered and depleted in this front |
And on the Imperialist right, Bernhard of Saxe-Weimar led his cuirassiers, pistoleers and commanded muskets once more to the charge.
 |
Initiative roll: Imperialists win; Pappenheim still
a no-show... |
Turn 8 and the initiative (red die) once more passed to the Imperialists. How they would have welcomed the arrival of Pappenheim's command (white die). No. Still not happening...
 |
In their Turn, Swedes make a good
activation roll... |
For their part, the Swedish activation dice were now down to 6 (having begun with 9). But this was a pretty good toll - 27 - and badly needed. The Swedes were now in action all along the front, still trying to break through on the flanks, and to grind down the powerful centre. There were still plenty of reserves in hand.
 |
Imperialist left once again under pressure, though little remains
of this wing for either army. |
The Imperialist left exhibiting signs of imminent collapse - down to 4SP out of 11, and most of the forlorn hope (though not all) having been overrun; the injection of commanded musketeers and battalion guns, with the arrival of the last unengaged cavalry on this wing, promised to finish off the harquebusiers and Croats. In the absence of Pappenheim, that would have left open the flank of the tercio foot.
The closely engaged infantry there were also exhibiting signs of wear and tear: the Imperialists having lost at least 4SP, the Swedish brigades 5. The whole of the latter's first line of brigades were now engaged, although, the right hand brigade was satisfying itself with a long range musketry duel.
On Colloredo's wing, the Imperialists were starting to take losses, so far 1SP from each arm of horse, foot and guns. But that could scarcely compensate for the innumerable losses incurred by Bernhard's troops. By now, though, the Swedes were starting to inflict slightly heavier losses than they were taking - 5 to 4.
Winning the initiative once more (green die) - and Pappenheim still swanning around in the boonies - the Swedish army continued to press....
 |
Disaster for the Holk's Imperialist command.
Almost nothing remains of it |
... and at last broke through! A second harquebus regiment collapse in rout, and the remaining, with the Croats, were just barely hanging on. On this wing, the Imperialists were down to 2SP (from 11 - 3 from 14 if you included the remnants of the forlorn hope, still clinging to their roadside ditch).
 |
An Imperialist tercio collapses in rout. But they take
a brigade with it. |
In the centre, the lead, having destroyed one brigade, found little relief in so doing. Inserting itself in the gap thus left, a reserve brigade maintained such pressure, that the tercio collapsed, reduced to a cloud of fugitives. Their comrade tercio to their left was also feeling the heat, getting rather the worse of the firefight with the brigade close by the ditches.
 |
Swedes under Bernhard of Saxe-Weimar begin to damage
Colloredo's command but are themselves badly knocked about already |
Some toll was also being taken from the Imperialist right as well, as what little remained of Bernhard's wing continued to carry the fight to the enemy. At last overrunning a gun battery, Bernhard's own cuirassiers stormed into and cut up a regiment of harquebusiers.
 |
| The lines are looking a deal thinner that they were! |
Nine Turns having gone by, with the Swedish army pressing on the mounting tide of success, all impetus suddenly deserted them. At last they had reached the point at which their exhaustion obviated their further assaults. Actually, this had been reached a turn before, but, in all the excitement simply forgot - or may didn't feel like - calling it. The Imperialists had hurt them badly, but during the ninth turn, having lost a further 5SP for inflicting 3, they too had had enough. So the battle ended in mutual exhaustion.
But there was no question but this ought to have been counted an outstanding success for the Imperialists. With Pappenheim's cuirassiers, the armies would have been nigh-on equal in strength; without them, especially on the left flank, the difference might have been decisive.

The gallant fight of Holk's harquebusiers, and the adamant stand of Colloredo's wing, were decisive in stemming for most of the day the Swedish tide. By the time the latter began to make serious inroads, so great had been the damage to them, that they could not for long sustain it. I think we could count this one as defensive victory for the Imperialists.
Final assessment of the losses:
Imperialists lost 24 Strength Points (against an exhaustion point of 21)
The Swedish lost 34 Strength Points (against an exhaustion point of 30)
Had Graf zu Pappenheim turned up - which even having to roll a 6 each Turn was odds on sometime during the course of a 9-Turn day (roughly 80%) - this would in all likelihood have been a decisive Imperialist victory, especially as they would still have been 6SP short of their exhaustion point.
On the whole, I considered this experiment of a large scale battle (about 400 figures all up, counting gun crews and command elements) a success. I simply have to do this again. Nordlingen, I think...
In case you are wondering, what appeared on the table is not my whole 30YW 'collection'. Only about half my Foot of both sides were there, and maybe two-thirds of the Horse. The whole of my Imperialist forlorn hope garnished the ditches, and 4 guns out of 6. The Swedish fielded all 5 of my battalion guns, and 2 of 4 heavies. Of course, to field both armies at full strength, I would need a bigger table...


A rousing battle report and a defeat for the Swedes, although they gave it a good shot. Impressive looking game and to think it is not even all of your collection on the table!
ReplyDeleteDonnie -
DeleteReading back over my account, it comes across as a bit drier than I intended. I had noted and captioned the pics on paper. Probably ought to have gone with that. But the battle was tense and exciting, especially towards the end, when the Swedish army had begun to make real progress.
I have some afterthoughts on this action that I'll write up later.
Cheers,
Ion
Excellent! As usual. Seems like it was a great game, and wonderful from a visual standpoint as well. As time has gone on I have drifted to smaller, faster games with smaller armies. That said it's inspiring to see a good old fashioned traditional game from time to time. I'm looking forward to your next foray into Pike and Shotte.
ReplyDeleteMark -
DeleteI like your smaller, faster games for their accessibility - a game you can pick up at any time. I still intend to revisit my 'Byzantiad' 3x3-board campaign (slightly reworked so that it is not quite so volatile). I want to 'do' a Roman Civil War (Optimates vs Populates) some time as a series of battles (culminating in Pharsalus).
Having said that, I do have a preference for games rather larger, played on my Memoir '44 or home made boards. You'll be seeing more of those later, too.
Cheers,
Ion
Fabulous, a very exciting account and interesting to see the PW Pike and Shot rules in use for such a large battle. TYW is something I keep meaning to do more of, but rarely seem to get around to it.
ReplyDeleteMartin -
DeleteThe thing went surprisingly well, I thought. I don't reckon my narrative really does it justice. I do have some afterthought comments to make, which will be the topic of my next article. Some of them I incorporated into this battle, though the jury is out upon their effects.
Cheers,
Ion
What a battle!
ReplyDeleteDemitri -
DeleteA real ding-dong affray, especially along the Flossgraben.
Cheers,
Ion
Great stuff Ion ⚔️⚔️
ReplyDeleteCan I just suggest you speak to Bernhard before your next TYW battle? I’m pretty sure he wouldn’t want it to be Nordlingen 😉
Cheers,
Geoff
Geoff -
DeleteBernhard might not get a say in the matter. He had his chance at 'Lutzen'. Mind you, it might be as well to look at some of the earlier battles, such as White Mountain or Breitenfeld. I'll certainly be having a look at those.
Cheers,
Ion
Hi Ion, Nicely done. For reinforcements, I would go for a cut-off turn after which point a lower dice roll will bring them on … still chancy, but not as obstinate! :-)
ReplyDeleteNorm -
DeleteYes - that is an option I have used occasionally. I seem to recall the second of my 'Vales of Lyndhurst' battles used some such system for the arrival of the Royalist militia brigade. The Commonwealth reserves being immediately to hand, were, in effect, on an imaginary extension of the table to the rear of the front line.
Dunno about you, but felt that this 30YW action had a different 'feel' to the horse and musket battles, which, of course, is as it should be.
Cheers,
Ion
There's nothing like an enjoyable game to make one want to have another. Those Revel sets were a well planned release and good figures.
ReplyDeleteRoss -
DeleteThey were (are), and all. I rather regret not finishing them much earlier. I regret even more my ditching my own rule set that I had devised for them. The DBR basing probably puts an end upon it being adapted.
Looking at the figures I had painted all those years ago, I'm still rather pleased with them. They have held up well after 25 years and more.
I've looked at 3 battles that might be enacted:
White Mountain (1620)
Nordlingen (1634)
Wittstock (1636)
The Swedish army will have to be co-opted to represent the Bohemian Protestant Army.
Cheers,
Ion