 |
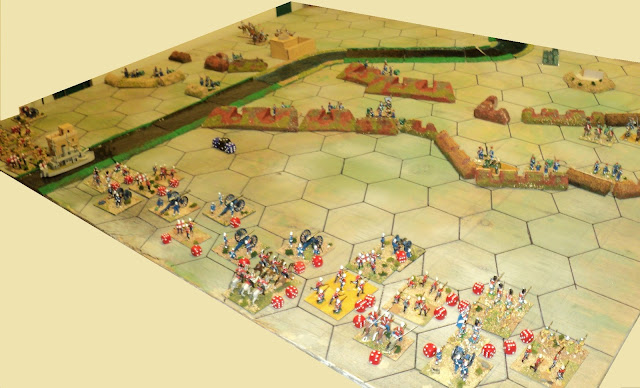
| Ruberian relief force about to assail the thin Turcowaz lines. |
Having found himself and his army immured in the desert market town of Hak al Kumara, Major-General Sir Grinmore Scarlett settled down to await rescue. His faith in the attempted rescue was not misplaced, but perhaps due consideration to the means available to his would-be rescuers ought to have given him pause.
The relief column had really but one route to reach Hak-al-Kumara , one easy to predict, and therefore easy to anticipate. Whilst retaining his besieging forces, General Nasr ed-Din Pasha ordered 35th Division (Duya ed-Din, reorganised since its battles several weeks before) to set up an entrenched blocking position at the point of the river that reverted to its southern course. Keeping the bulk of his Division on the more likely east bank of the Pardis River, he detailed one of his regiments to dig in on the right (west) bank, just south of the Sheikh Sa'ad hamlet, supported by cavalry and camelry, whilst his main body occupied a double line of entrenchments on the east bank. Behind this main position stood a redoubt between the equally impassible obstacles of the river and a salt marsh some distance to the east. Not only had the relief force to get by the defence works, but also the bottleneck partially stoppered by the redoubt; and behind this bottleneck, the local commander, Bashir ed-Din could call upon the regiments of 52nd Division.
 |
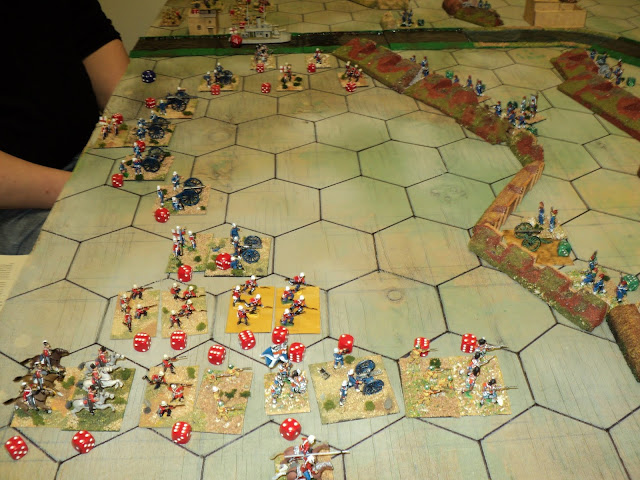
| View from behind Ruberian lines. |
Chronicles of Rajistan
Chronicles of Rajistan 2
Battle of Hak-al-Kumara
The Campaign Continues
Battle of Cpistupon
On this occasion I roped in Paul 'Jacko' Jackson, who took over the side of the Ruberian (RED) relief column, as Major-General Sir Aylmer Reddington, whilst I, in the guise of General Bashir ed-Din, commanded the covering force. The rule set we used was from the Colonial Portable Wargame (Bob Cordery), specifically, the 'Widow at Windsor' rule set. More on this later.
 |
| The 5 Turcowaz battalions look pretty thin! |
Corps Command: Bashir ed-Din ... 6SP
35th Division: Duya ed-Din ... 3SP- 103rd Regiment, 3 Bns (stands) @6SP = 18SP
- 104th Regiment, 3 Bns @6SP = 18SP
- 105th Regiment, 2 Bns @6SP = 12SP
- Mitrailleuse Company @2SP
- Artillery, 2 batteries @2SP = 4SP
Cavalry:
- 43rd, 44th Regular cavalry @4SP = 8SP
- 75th, 76th Irregular Sipahi @4SP (poor) = 8SP
- 1st, 2nd Irregular Camelry @4SP (poor) = 8SP
Reinforcements (off table):
52nd Division: Abdullah Jemal ... 3SP
- 154th Regiment, 3 Bns @6SP = 18SP
- 155th Regiment, 3 Bns @6SP = 18SP
- 156th Regiment, 3 Bns @6SP = 18SP
- Mitrailleuse Company @ 2SP
These reinforcements were scheduled to arrive on table once the first line of entrenchments had been breached.
24 units, 146SP, E.P. -49SP
24 units, 146SP, E.P. -49SP
 |
| Ruberian columns attacking on a narrow front... |
Seventh Meerut Division, Lt-Genl Sir Aylmer Reddington ... 6SP
19th Dehra Dun Brigade (Col Wm Dennys) ... 3SP
- I/ Seaforth Highlanders ...6SP (elite)
- 28th Punjinjab Infantry ...6SP
- 92nd Punjinjab Infantry ...6SP
- 125th Napier's Rifles (Skirmishers) ...4SP
- Gatling detachment ...3SP
28th Garwhal Brigade (Brig-Genl Geo. Kemball) ... 3SP
- II/ Leicestershire Infantry ...6SP
- 51st Hydansikh Infantry ...6SP
- 53rd Hydansikh Infantry ...6SP
- 56th Punjinjab Infantry ...6SP
- 62nd Punjinjab Infantry ...6SP
- Gatling Detachment ...3SP
35th Brigade (Brig-Genl G.B.H. Rice) ...3SP
- I/ 5th Buffingtonshire Infantry ...6SP
- 37th Dogra Infantry ...6SP
- 97th Deccan-Decca Infantry ...6SP
- 102nd King's Own Grenadiers ...6SP
- Gatling Detachment ...3SP
21st Barrelly Brigade (Col G Ross) ...3SP
- II/ Black Watch ...6SP (Elite)
- 6th Jat Light Infantry ...6SP
- 41st Dogra Infantry ...6SP
- 9th Bhoped Infantry ...6SP
- Gatling Detachment ...3SP
6th (Indian) Cavalry Brigade: (Brig-Genl R. Thered) ...3SP
- 14th King's Hussars ...4SP (elite)
- 4th Cavalry ...4SP
- 7th Harian Lancers ...4SP
- 33rd Queen Adelaide's Own Light Cavalry ...4SP
- 'S' Battery, RHA (Horse artillery) ...2SP
Divisional Artillery:
- IV, IX, XIII Brigades, @2SP = 6SP
Gunboat:
- HRMS Shoofly, ...8SP
 |
| Paul 'Jacko' Jackson - Sir Aylmer Reddington - surveying the action. |
As there was very little difference quantitatively and qualitatively between the two sides (the Ruberians having more artillery and machine guns), I figured that the balance would be derived from the absence of the Turcowaz 52nd Division until signalled to arrive by the Ruberians' carrying the first line of entrenchments at some point. The troops defending the east bank of the river looked woefully thin. 'Jacko' got the choice of sides, and plumped for the Ruberians. Game on...
 |
| Turcowaz cavalry waiting to counter-attack. |
Supported by the massed batteries in the centre, the Ruberians advanced in dense columns, 19th and 21st Brigades towards the desert end of the Turcowaz line, 35th Brigade up the east bank of the river, and 28th Brigade up the west bank. Right from the outset the defenders did fearful execution among the attackers - a combination of formidable dice-rolling and the Ruberians' determination to close. For their part, the Ruberian artillery proved surprisingly ineffectual, not helped by the equally woeful gunnery from HRMS Shoofly.
 |
The Ruberians' first success came upon the river bank, where a skirmishing light infantry force broke into the thinly manned part of the trench line, and forced back a battalion of 104th Infantry. That breach of the line signalled the arrival of 52nd Division, 154th Regiment on the west bank, pushing towards the Shiekh Sa'ad settlememt, the main body pouring onto the field on the east bank.
Meanwhile, the main Ruberian assault gradually weakened Turcowaz resistance. The mitrailleuse company wiped out, the two battalions of 105th Regiment were being gradually edged out of their trench lines. But General Sir Aylmer Reddington seemed reluctant to follow up, in the face of the vast numbers of Turcowaz reinforcements pouring onto the field. With no success to show on the west bank, and Turcowaz infantry reoccupying the part of the line abandoned briefly in front of 35th Brigade, the Ruberian commander acknowledged defeat and called off the attack.
Overall I was very surprised at the result. The Ruberians had taken fearful losses, many times greater than those of the Turcowaz defenders. They might well have held even without the reinforcements.

Clearly I had got the balance wrong, though for the 'purposes of history', a certain bias in favour of the Turcowaz was reasonable. The action was based upon the first attempted relief of General Townshend's Division at Kut Al Amara in 1916. There, the attack successfully carried the forward defence line, but foundered upon the blockade of the defile between the river and the marsh.

I also think I chose the wrong rule set from Bob Cordery's The Portable Colonial Wargame book. I am forced to conclude that my RED-BLUE armies are simply not set up for 'The Widow at Windsor' rule set - mainly on account of there being no good method of indicating single units (stands) in line or column - and the action would have been much better under the simpler 'The Gatling's Jammed'. This battle was supposed to have been the final in the Medifluvian Campaign series, but I think there will be just one more attempt to relieve General Scarlett's army at Hak al Kumara.


Fantastic report Archduke. I haven't tried the Colonial PW yet so your thoughts are very welcome. That was an interesting choice of battle - assaulting the defensive lines looks like a very tough prospect.
ReplyDeleteHi Maudlin -
DeleteI really did think that the attackers had the strength to carry the first line of entrenchments. I may need to conduct a few little play tests before revisiting this action!
Cheers,
Ion
Archduke Piccolo,
ReplyDeleteAnother superb battle report!
I’ve never attempted to fight such a large battle with either of the versions of my PCW rules. I think that you are right about using the simpler rules for such a large battle.
Trying to assault trench lines should be a dangerous and costly business, but it should be achievable if you don’t have to worry about casualties. In this instance, your relief force needs to be strong enough to break through and not end up weakened ... and stuck in Hak-al-Kumara with the force they were trying to relieve.
All the best,
Bob
Hi Bob -
DeleteKeeping enough strength in hand to pull off the rescue and escape is of course a consideration. Mind you, the besieged staging a sortie to tie down the besiegers can also be a consideration (as DIDN'T happen at Kut al Amara nor at Stalingrad).
The objective of the attacking force is to exit a sizeable force off the table east of the river. Next time I play out this action, I'll try and define that more clearly.
Cheers,
Ion
Hi Arxhduke,
ReplyDeleteGreat to see the old ESCI Colonial British in the fray- great scenario and one which if played again may have different results. Cheers. KEV.
Hi KEV -
DeleteThe RED Army is mostly ESCI Colonial wars British - as are the Azeitonians in my next article, and so is most of the cavalry. My BLUE Army are ESCI Foreign Legion for the most part, though there are some ACW types in there. At last I don't have to ring in the BLUE Army for the TURQUOISE, they being made up since recently of Strelets-R figures - and nice figures they are, too.
Strelets-R is also the source of my RED Highland units.
Cheers,
Ion