
 |
| Revolutionary infantry advancing; Government artillery score hits on AT portees and mortars. |
As the rebel troops closed upon the town of Maimajikwand, the plan drawn up by Colonel Peenut Buttahjars became clear: a double envelopment by the infantry; a concerted assault upon the town, with the tank and anti-tank units ready to clear, or at least neutralise, the flanks. It was much the same plan as was used at Madasaiwannabe.
 |
| BARF assaults go in: 1st and 2nd Coys on the right; 5th Coy on the left. |
To begin with, the defence seemed to Lt-Col Mugglethwaite to be holding out comfortably enough. Accurate gunfire scored hits on the 6pr Anti-tank guns and portees, and on the mortars as well. 'A' Company of 17th Choklit Ghandhi Battalion (A/CGB) faded back into the southern built-up precincts as the 5th, 6th and 7th BARF Infantry Companies, backed by the anti-tank gun portees, fetched a wide sweep with the idea of assaulting the town.
 |
| So far, 1st, 2nd, 4th, 5th and 6th Coys have all lost 1SP. Overall: Revolutionaries 8SP lost; Government, 2SP. |
Meanwhile 1st and 2nd Companies early assailed the dug-in C/CGB from north and northeast. That the attacks by the centre - 3rd and 4th Companies - were slower to develop was all part of Col Peenut Buttahjars's broad plan. First, lead off with the flanks. Then advance the centre. Once the town's garrison was closely engaged, then would be the time to throw forward his limited and precious armour.
 |
| 1st and 2nd BARF Coys bring C Coy's fortifications under close assault. All three have taken losses. |
The infantry put a brave front to the incoming Government gunfire, though it has to be said that it seemed to lose its accuracy as the Rebels advanced. Having reduced the 'open sights' modifier from +2 to +1, but adding in the 'unmoved' modifier, the 25pr guns hit on a 3-6 roll. At first the BARF infantry were prepared to accept the odd SP loss to maintain their momentum (This was a major benefit to the game's fluidity of omitting the 'pin' feature, I think: it gave the attackers the incentive - and ability - to press attacks in the face of losses). At about this point a less sanguine commander than Col Buttahjars might have felt some concern about his mounting losses. At the cost of 8SPs the Rebels had inflicted the loss of 2SP only upon the enemy.
 |
| BARF light tanks move up the north side of town. |
On the other hand, they were quickly closing in upon the south, east and northeast faces of the town. Repulsed, 5th Company were replaced by 6th, attacking the machine gun posts. A quick counterattack by the lead squadron of Shermans was beaten back by the 6pr guns. The gun battery's attempt to silence them failed; in fact, their shooting henceforth became woeful - hardly any effect whatever. Seventh BARF Infantry Company had even the temerity to face off against the Sherman tanks.
 |
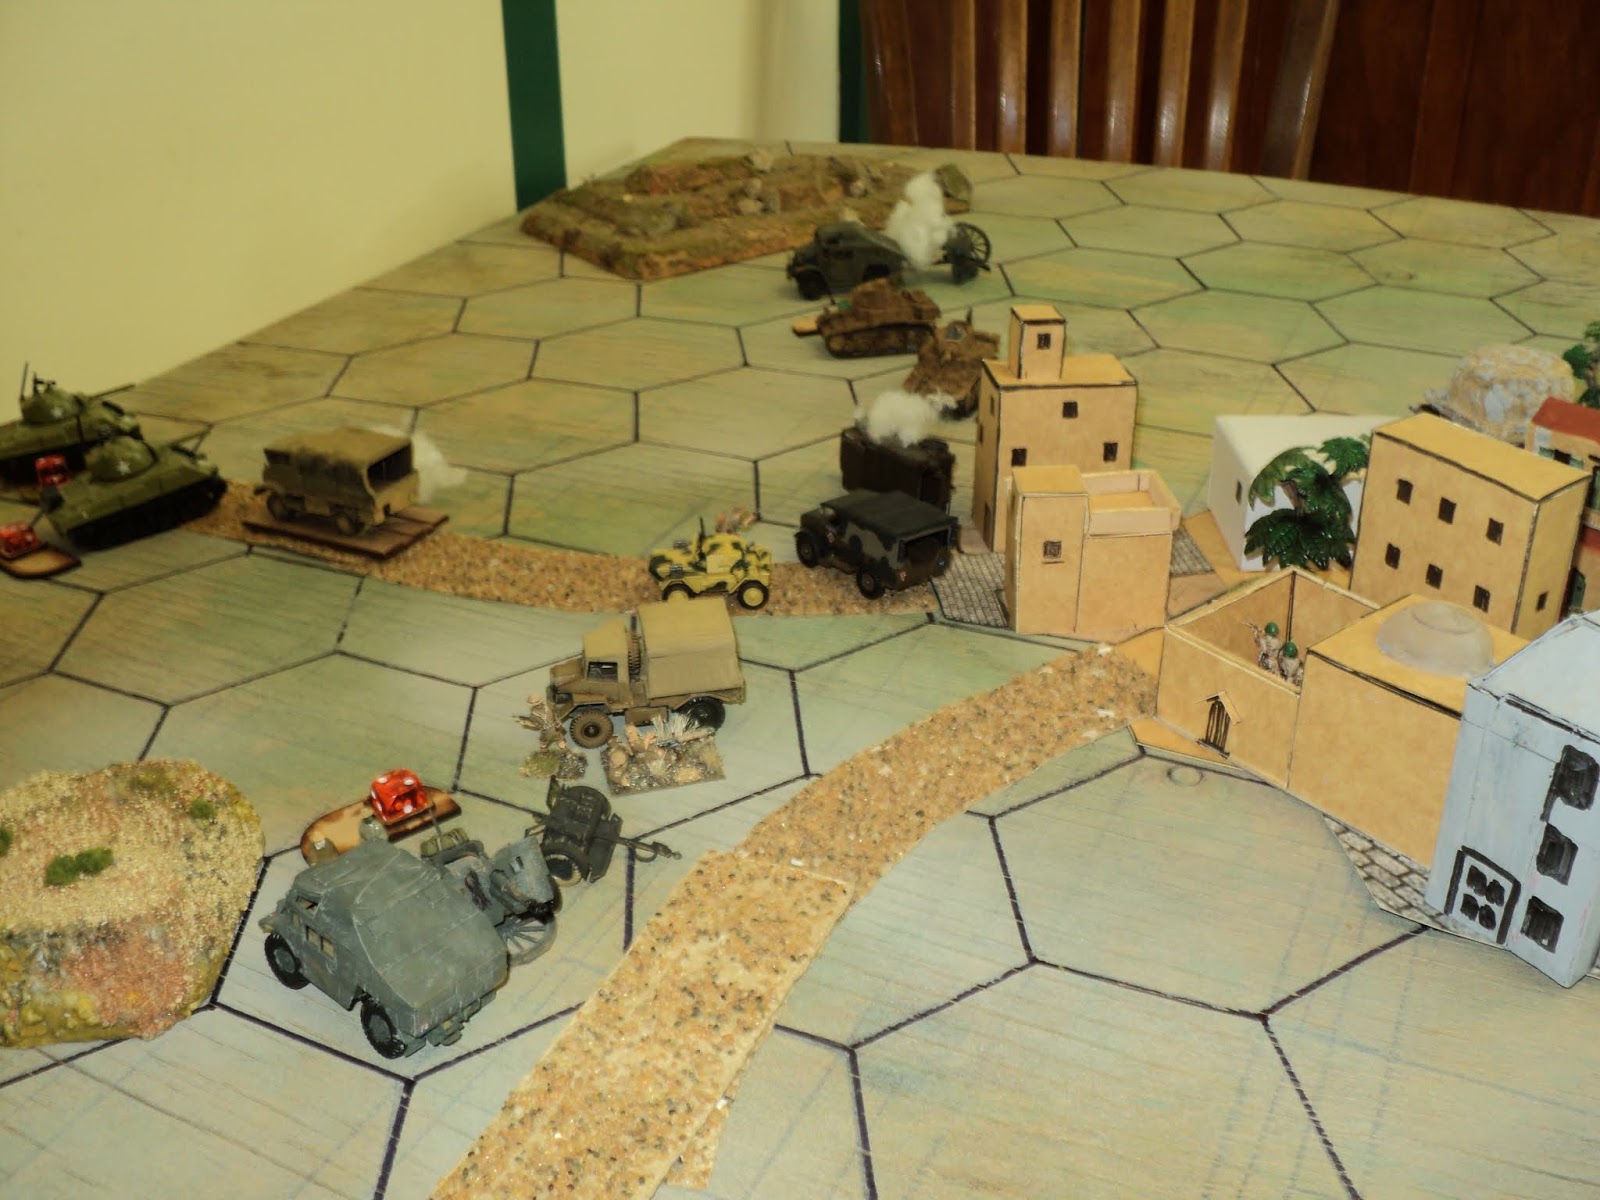
| General view, looking west. Attacks going in. |
Now, as mentioned in the previous action, I have decided that tanks and assault guns, armed as they are with machine guns, can act as MG carriers in effect, choosing to shoot with MGs at appropriate targets, such as infantry, instead of the tanks' main guns. The MG range is of course the same as the infantry weapon, and so is the rate of fire. My reason for adopting this course, is to give the tanks a more 'tankish' effect against infantry.
 |
| View looking northwest. A rather tentative armoured counter-attack achieves little so far. |
Not that it was noticeable in this battle. On more than one occasion, even unmoving (3 dice, hits with 3-6 rolls), the tanks scored not a single hit upon the enemy. Even when they did, it was a 'forceback' only and no loss. That did not prevent Nr7 Coy from reaching the town, where it came into close combat with A/CGB.
 |
| The portee mounted AT guns form a protective gun line against Imperial armour. |
 |
| Rebel tanks engaging a Government 25pr battery. |
With the fight for the town having developed more-or-less in the manner planned, Col Buttahjars threw forward his light tank squadrons towards the gun line of 'B' Battery Tchagai Artillery. These 25pr gun/howitzers, muzzle brakes fitted for anti-tank action, I counted as light anti-tank. Now, as far as I can make out, under the DPWG system artillery has the same effect on armour as it does on any other target (P71: Artillery can destroy any type of ground unit). I'm none too keen on this, especially in 'area fire' mode. I'd have to think about that some. At any rate, the guns had been supporting C/CGB's defence (not very effectively) by the time the Stuarts got close, at which point they switched their targets. For the time being, the 'arty vs tank' question could remain moot.
 |
| Battle for the town. The Revolutionaries have broken into the southwest corner. |
On the other wing, the 2pr portee battery had joined their 6pr comrades as some protection from the Shermans. At one point the Shermans drew close enough to engage the guns, got the worse of the encounter and drew back alongside the 25pr guns of 'A' Battery.
 |
| A closer view. 1st Company has at last overrun 'C' Company, leaving 'B' Company almost surrounded. |
 |
| 'A' Squadron strikes 7th Coy in flank |
Assailed by three Rebel companies supported by 3-inch mortars, 'C' Company finally collapsed, its scant survivors now prisoners of war. Now that the MG platoon had also been driven in, 'B' Company was left surrounded on 3 sides, under attack by no fewer than 4 Rebel companies (1st, 3rd, 4th, and 6th Coys). Col Buttahjars had, by this time, joined 5th Company just outside of town, ready if required to throw in this reserve.
 |
| 'B' Coy is isolated... |
The tanks' machine guns proving so ineffective, 'A' Squadron charged the flank of 7th BARF Company, hoping to over-run the importunate Rebel infantry. The Rebels' risky boldness paid off. Unable to shake the enemy's enthusiasm, the tanks, again, fell back.
 |
| Overhead view of the battle in the town. |
The town fighting grew increasingly desperate, as C/GCB was no more, and B/GCB was almost surrounded. Col Mugglethwaite had joined the MG platoon in his scout car, but as yet 'B' Company was for the time being preventing any Rebel advance further into the town. Yet it could be only a matter of time. By this stage, the account of SP losses was rather more equal than before, though still in favour of the Government forces.
 |
| Government field artillery in trouble! |

Isolated as it was in the plain northwest of the town, the light tanks caught up with the 25pr 'B' Battery. Whilst 2nd Squadron engaged the battery from in front, 1st Sqn fetched right hook into the battery's left flank. In the brisk exchange of gunfire that ensued, both sides lost heavily. The surviving guns hitched up in an attempt to make a run for it (a fair chance dependent upon the initiative rolls in the subsequent turns).
 |
| 'B' Coy tries to escape as the BARF fighters advance through the town. |
By now it was clear to Col Mugglethwaite that this battle, and the town with it, was lost. The Government forces' losses were close to, if they hadn't yet, reached their exhaustion point, as the rebels surged into the town. The Rebels were not yet so parlously placed. When the MG platoon was forced back, the Colonel was lucky to escape with his life. 'B' Company's attempt to escape from behind enemy lines seemed clearly doomed, only 'A' Company remained of his fighting infantry. But coming under heavy attack 'A' Company simply melted away like ice in the sun (some amazing dice rolling by 6th and 7th Coys!).
 |
| The Sherman tanks having failed to achieve anything against BARF infantry are driven back by the boldly handled BARF truck-mounted AT guns. |
His tanks had proved disappointingly ineffectual against the rebel anti-tank portees, and 'B' Battery had finally expired under Rebel tank gun fire. Mugglethwaite ordered the evacuation of the town.
 |
| 25-pr gun battery destroyed, the light tanks are free to run for the road west, where the Government retreat has begun. |
This would not be so easy to effect. There was nothing to prevent the Stuarts from racing up the couple of miles further to cut the highway west, apart from recalling the Sherman tanks to guard the road.
 |
| Remnants of Govt infantry clinging to the edge of the town. |
By early afternoon, what remained of the town's garrison were clinging to the northwestern edge of the place, in the face of steady rebel pressure. The MG platoon were able to reach its motorised transport betimes. But it was becoming clear that what remained of 'B' Company would after all break clear, if ever the enemy pressure eased. That determined band, resolved to cover the retreat of their defeated comrades, had effected their own.
 |
| Most of Maimajikwand is now in BARF hands, and the BARF tanks have got in amongst Government transport. |
 |
| Government troops make off, as BARF take over the town's administration. |
Soon, the road west was covered with the transports heading west. A' Battery very nearly left its move too late, and already the road was coming under fire from the Rebels' light armour. But the threat to cut the road didn't materialise. The Shermans arrived to protect the retreating column, and engaged the enemy tanks (This was possibly not quite 'per book', as the Government Army was long past its 'Exhaustion Point', but it seems to me the sort of rearguard action part a defeated army might undertake. At that I didn't advance the Shermans past the road, to engage the enemy tanks at long range). The resistance of B/CGB in the town finally persuaded the Rebels to abandon their pursuit, and the Government troops were able - such as remained - to depart more or less in peace.
The battle was over.
Well, that was fun! Quite a few little issues cropped up, but it was hard to determine their effect. They would become a little more acute in the following battle. This was mainly due to the appallingly cross-eyed shooting of the Government troops, especially the tanks and 'A' Battery. The MGs didn't cover themselves with glory, neither. Nevertheless, a couple of turns after the Government Brigade Group reached its exhaustion point (minus 13SP), they managed to tip the Rebels over theirs (minus 19SP). It was clearly a Rebel victory, but another costly one. It might equally well have gone the other way!
About to publish this, I thought the notes on the 'Butcher's Bill' - an invaluable historiographical document - had been lost to history. But lo! it was discovered behind an ancient desk in the Tchagai War Office during recent refurbishments. Here is the tale:
B Coy: -3 SP
C Coy: -4 SP *
MG Pln: -1 SP
A Sqn: -1 SP
B Sqn: -
A Bty: -
B Bty: -2 SP *
Transport: -1 SP
* = destroyed
Total: 16 SP (Exhaustion point was 13 SP)
2nd Coy: -1 SP
3rd Coy: -2 SP
4th Coy: -1 SP
5th Coy: -
6th Coy: -2 SP
7th Coy: -3 SP (The armoured counter-attack must have done some damage after all!)
6pr AT Coy: -1 (gun) -1 (portee)
2pr AT Coy: -1 (gun only)
Mortar Coy: -1 (carrier only)
1st Tank Sqn: -2 SP
2nd Tank Sqn: -1 SP
Total: 19 SP (Exhaustion point was 19)
From this list we can see that perhaps my narrative is over-critical of the fight put up by Mugglethwaite's Brigade Group!
About to publish this, I thought the notes on the 'Butcher's Bill' - an invaluable historiographical document - had been lost to history. But lo! it was discovered behind an ancient desk in the Tchagai War Office during recent refurbishments. Here is the tale:
Government's Losses:
A Coy: -4 SP *B Coy: -3 SP
C Coy: -4 SP *
MG Pln: -1 SP
A Sqn: -1 SP
B Sqn: -
A Bty: -
B Bty: -2 SP *
Transport: -1 SP
* = destroyed
Total: 16 SP (Exhaustion point was 13 SP)
Revolutionaries' Losses:
1st Coy: -3 SP2nd Coy: -1 SP
3rd Coy: -2 SP
4th Coy: -1 SP
5th Coy: -
6th Coy: -2 SP
7th Coy: -3 SP (The armoured counter-attack must have done some damage after all!)
6pr AT Coy: -1 (gun) -1 (portee)
2pr AT Coy: -1 (gun only)
Mortar Coy: -1 (carrier only)
1st Tank Sqn: -2 SP
2nd Tank Sqn: -1 SP
Total: 19 SP (Exhaustion point was 19)
From this list we can see that perhaps my narrative is over-critical of the fight put up by Mugglethwaite's Brigade Group!
To be continued: 'The Railway Station'
Fantastic report Archduke and the pictures are superb. Looking forward to more!
ReplyDeleteComing up soon...!
DeleteIon,
ReplyDeleteMy original comment seems to have been eaten by Google in signing in again. If you would like to engage in a little international arms trading I could offer a swap for those poorly performing Shermans.....As they are around 1/87 I can find work for them in several armies. Is there anything you are particularly in need of?
Neil
Thanks for the offer, Neil!
DeleteThose are die cast Shermans and are 1:76 scale. I kinda like them. They are more usually to be found in my WW2 Red Army... I suspect my memory of this battle was a little coloured by events in the next (the Railway Station). In yesterday's battle - the Sea Port, the Shermans did rather better on the whole.
So ... for now I'll stay with them...
Cheers,
Ion
Ion,
DeleteIf I'm not mistaken I think they are Zylmex 1/87 scale diecast; I have two currently in the workshop undergoing conversion to IDF M50 and M51. However if you happy with them that's OK.
Neil
DeleteNeil -
You may well be right. I've never before examined them closely, nor compared them with my Airfix M4 (1:76) and Minitanks M4A4 (1:87) tanks. I have now just done so. As it happens the Airfix M4 and the ROCO M4A4 are of a size, the latter being only a whisker smaller (well, 5mm shorter and a little narrower - enough that I don't put them in the same unit, but hardly noticeable otherwise). Having 5 of them, I placed them in my Red Army simply as a medium battalion of Shermans, unconcerned with the actual variant. They don';t look out of place beside T34s.
Turns out these die cast metal fellows - which look like M4A3s - are similar to the M4A4 in size, so I'll have to accept that they are indeed 1:87.
I don't know who or what Zylmex is. My guys are made in China. That's all that's identification on them.
Never mind. I still like them!
I've run a quick check on my inventory of Sherman tanks: 20 in all (10 Airfix, 5 ROCO, 5 diecast), plus 3 Matchbox Fireflies...
Cheers,
Ion
Cool!
ReplyDeleteRegards, Chris.
Glad you enjoyed the narrative, Chris!
DeleteTop stuff Ion! It did seem that the rebels were having it, more or less, all their own way, but it was far closer than that. Great that you played out the withdrawal, I reckon. All too often we wargames say, ah well break point/critical point (or whatever it is called in the rules system) reached, end of game.
ReplyDeleteThere is a certain momentum the BARF has built up that is proving tough to arrest, that's for sure. These have so far proved fairly close, with the rebels reaching their exhaustion point a couple of turns after the government.
DeleteA little late in my response. Playing catch up after the past couple weeks of busying myself with my dissertation. Was an interesting game. My one comment would be that the 25pdr seemed to be too ineffectual in the anti-tank role. Not for nought was that gun put on a tank itself. While a rush of light tanks would be hard to stop fully it would seem to me an incredibly risky move by the BARF and one that should run the risk of severe punishment.
ReplyDeleteNot quite sure how your rule set works, but perhaps they would be better counted as heavy anti-tank when in the anti-tank role? Not sure how to best think of it. Haven't comprehensively read through my Featherstone book yet. Although from what I have read such large batteries should be more of a threat.
However, such things can of course be explained as poor training and skill on the part of the crews, who perhaps have little to no experience. They would not have known of their guns potential to their own detriment.
Will catch up on the other posts tomorrow. Hope all is going well. Sorry I could not have responded sooner.
The 25pr was more an anti-personnel weapon, and not designed for anti-tank, though it was used in an anti-tank role in the Western Desert. Its use as such was more an extempore measure, to supply the shortage of specialist AT guns. I think 'light anti-tank' is appropriate.
DeleteI think the ineffectual Government gunnery so far has simply been due (in war games terms) to the vagaries of the dice-rolling, or (in 'real life' terms) the low level of training of the gun crews. I'd say more, but we'd probably be straying into 'spoiler alert' country...