Friday, September 26, 2014

Big Battles for Small Tables: Battle casualties and morale.

Really by way of prettying up this posting: an attacking French Army Corps
(Ist) at double (half?) the scale proposed for BB4ST: 48-figure divisions;
ground scale 1:1800; 1 turn represents 40-45 minutes.

This posting has been sitting in the draft for so long it has probably gone cold. It was inspired by another bloggers' ('Ross Mac's') observations of what Brigadier Peter Young - co-author of the classic Charge! - or How to Play War Games - had to say about the application of morale in war games. Check it out.

The Brigadier's view was that as much as possible, the moral effect of close action, the need to take quick decisions and the pressure of losses, should be held in the mind of the player.  In my experience, players do respond very differently to the pressures of war games battle.  Not only do you get the stoic, the mercurial, the rash, the deliberate, the cautious, the active... you get differences in sensitivity to battle losses, to unexpected events, and to surprise.

In reply to Ross's posting I said: YES!! Brig Young's ideas on morale rules I have shared as long as I have been a war gamer.  At that they have been confirmed from observation.  It is surprising how many war gamers will give up a fight long before there is any real call to do so.  I've even seen the battlefield quit - this in a campaign game - when the army under command was getting the better of it.  On occasions when I have been feeling a bit below par, my own stoicism in the face of losses has failed to stand the test.

Associated with this is my adherence to figure removal by way of casualties.  Many players are probably unaware of the difference that apparently primitive and unsophisticated game mechanic can make.  I know one gamer - beautiful painter of troops - who quite openly admitted to me that he couldn't stand seeing his troops physically whittled away once they got into a fight.  This was on the occasion of a refight of the Redinha rearguard action (1811), in which I handled the French.  He was making heavy weather of it, despite his skilled handling of the British attackers, bemoaning losses I would have considered fairly trivial - and he was giving as good as he was taking into the bargain. He won the game (well, it was really that kind of scenario: although driven from the field, I was happy to have inflicted as much loss to the British as I took myself, and got my people off in good order), but I formed the impression he found it a harrowing experience.
A Division in square, forming two Brigade squares.  The enemy
Attack is expected from the right of the picture...

Then I foreshadowed elaborating this in a future posting (this one).  That was seven or eight weeks ago - not a good look.  I hope what I have to say here will have been worth the wait...

In my proposed Big Battles for Small Tables rule set, I believe that something as simple as the Young and Lawford game mechanic is called for, given the organisational building block is the 24-figure Infantry Division, and 12-figure Cavalry Brigade.  This went simply: a unit that retains more than 50% of the strength with which it began the battle, may behave normally.  This system will apply to my 'unit-formations' - Divisions and Brigades. There will be other occasions in which unit-formations will slip from a commander's control.  These will be occasioned by events, and the effects of those will be temporary.  Once a unit-formation has reached 50% losses, it suffers for the remainder of the battle from loss of morale - that is to say: its effects are permanent.
A single Divisional square under heavy attack from
Austrian cavalry: dragoons and cuirassiers.

Having lost morale, such a unit:
1.  It said to have 'broken' and, to use Young and Lawford's terminology: is also 'understrength';
2.  Must retreat for at least one full move, or into cover outside musketry range of the enemy;
3.  Must then spend at least one move, stationary and disordered, rallying;
4.  Henceforth are permanently disadvantaged in all fire and close combat (The notions of 'advantage' and 'disadvantage' in combat will be elaborated upon in a future posting on combat mechanics for BB4ST);
5. May be converged with other understrength unit-formations (of the same type, of course; horse with horse, foot with foot), but the moral effects still remain with the converged unit-formation.

This loss of morale is permanent for the duration of the action for understrength units, converged or otherwise.  But there will be occasions in which loss of morale will occur to unit-formations not yet understrength, and in consequence will be temporary.  This really is more by way of an uncontrolled reaction to adverse events.  The sole 'adverse event' that will cause this in war games terms will be this: defeat in close combat.

V Army Corps: 17th Division deployed in successive lines,
skirmishers out.  How will morale and reaction apply to
The Division deployed in this way?  See next time.

Close combat in game terms will occur when the skirmishing screens have been driven in, and the unit-formations' main bodies have pressed closer than outer musketry range (tentatively 3" or 7.5cm) into close musketry range (1" - 2.5cm - or less).  I say 'less than 1 inch' as players might elect to depict the close combat by bringing the opposing forces into contact.  I'm inclined to go with Paddy Griffith on this (Napoleonic Wargames for Fun), and maintain a small gap, depicting not so much a crossing of bayonets as a frantic fire-fight at very close range, or maybe simply the action of both forces, the one by edging closer, the other by standing its ground, in attempting to intimidate the enemy.

Having been defeated, a unit 'breaks' and retires at least one full move rearward, where it must spend a whole further move rallying (I have yet to decide whether this takes place in the same or the following turn.  I'm leaning towards the latter at present).  The victorious unit-formation may then occupy the ground won, possibly even exploit onto targets further on, or even rally back.  Until it has spent a move stationary, that unit remains disordered.  Disorder places a unit at a disadvantage in combat until the unit-formation has been rallied....
IV Army Corps: 11th Division.  The pictures in this article foreshadow
 the topic of the next in this series: Division deployments and
how morale and reaction effects will apply to them.

Acknowledgement: 
May I extend my welcome to Follower #110: Vasiliy Levashov.  Thanks for joining.


Monday, September 22, 2014

Age of Eagles: Rearguard Action at Chyornoi.

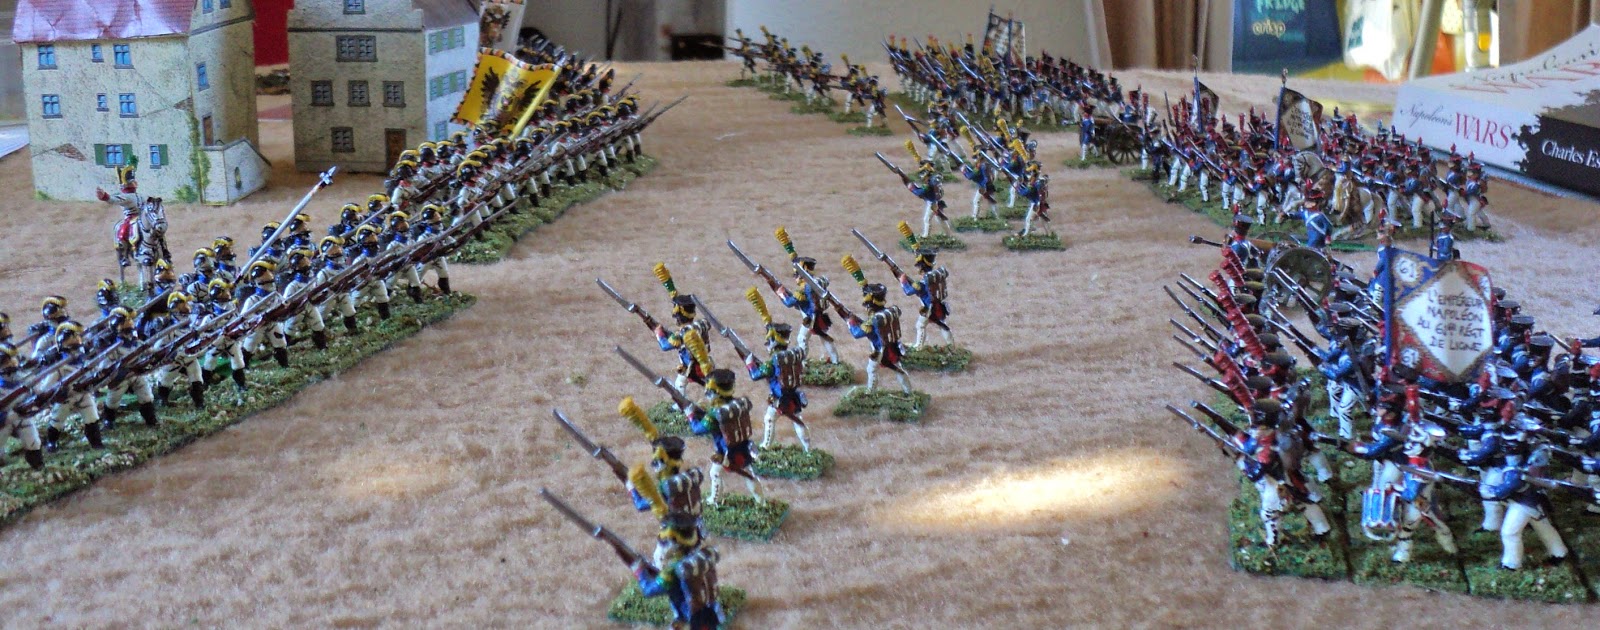
Rearguard action at Chyornoi - overall picture at the outset
of the battle.  All the following pictures are taken from
the Russian point of view - probably not the fairest
photographic coverage...
Last weekend (Sunday afternoon), Geoff and I had a second outing of the Age of Eagles game system for Napoleonic Battles, and, with a more careful reading of them, attained a much more satisfying game, with plenty of action.  Not bad in maybe 5 hours play!  In the following narrative I will pause here and there to comment on the play and game mechanics.
Sketch map of the action.  North is to the right, the Chyornoi
town, at the top of the map lies on the east-west road; Sinoi
village close by the bend in the river of the same name.  The Russians
are approaching from the east. 
We set up a quick scenario based (very loosely) upon the Krasnoi action of 17 November, 1812.  A glance at the pictures will indicate this action did not take place in the Russian winter, but at some other place and/or time.  In pursuit of the French Army, the leading Russian Corps of Miloradovitch caught up Marshal Davout's rearguard Division (Morand) close by Chyornoi town.  There the Marshal had paused to round up stragglers and send them off westward.  Before departing the scene himself, the Emperor had placed under Davout's orders a Division of the Imperial Guard, commanded by Marshal Mortier himself.  To guard the nearby Sinoi River crossings, a small brigade from Davout's Corps stood close by the stone river bridge east of the town, whilst a further small brigade of the Imperial Guard held the nearby Sinoi village, on the opposite bank where the river trended westwards.

I decided that this was going to be an asymmetric set up in order to get as broad an experience of the rule set early as we could obtain in an afternoon.  To get into action quickly, it doesn't do to have both sides deploy on their respective table edges.  We did that last time and only barely got into action (see here).  The small outlying brigades would bring the Russians (mostly) early into the fight.  In large measure this was to offset the French advantage in leadership.

The forces were as follows:

French:

G-o-C Marshal Davout (+2)

Morand's Division (I Corps): G-o-D Morand (0)
Bridge guard: R4/3/2 (Regular fresh/worn/spent).  This Brigade had to begin the game with at least one stand physically touching the bridge (there was no other restriction on its placing or subsequent movements).
3 Brigades: R7/5/4
Artillery: Heavy foot battery attached to bridge guard
Heavy foot battery close by Chyornoi;

Mortier's Command: Marshal Mortier (0):
Garrison at Sinoi guarding ford: E4/3/2 (Elite fresh/worn/spent) This brigade garrisoned the Sinoi village, from which it could effectively defend the crossing.
2 Brigades: E7/5/4
Artillery: 1 heavy foot battery;

Beaumont's Cavalry Command (0):
Cuirassier Brigade R4/3/2;
Dragoon Brigade R4/3/2
Light Horse Brigade: R4/3/2

Army Troops:
Reserve heavy foot battery to be assigned as 'Davout' chose (it was attached to Mortier's command).

Overall, this represented a considerable force of over 17,500 horse and foot with about 32 guns in four gun batteries.

Russian:

G-o-C: Count Miloradovitch (-1)

Tukmakov's Division (-1):
1st Brigade: R5/4/3
2nd and 3rd brigades each: R7/5/4
Battery heavy foot artillery;
Podgaets's Division (-1):
4th and 5th Brigades, each R7/5/4
Battery heavy foot artillery
Razuvaev's Division (-1):
6th, 7th and 8th Brigades, each R7/5/4
Battery heavy foot artillery
Karpov's Cavalry Division (-1):
Cuirassier Brigade, R5/4/3
Dragoon Brigade, R5/4/3
Battery light horse artillery;
Kuzmin's Cavalry Division (-1):
Dragoon Brigade, R5/4/3
Cossack Brigade, Irregular Light Horse: C5/4/3 ('Conscript' fresh/worn/spent)

The whole represents a force of over 23,000 troops, also with 4 gun batteries, but these comprise a total of possibly 48 guns.

Looking across the Russian Right, and Tukmakov's and Karpov's commands.
The French bridge guard can be discerned just beyond the trees, and the rest of
Davout's command and Beaumont's cavalry close by Chyornoi town.
For this action, the Russians enjoyed the advantage of numbers overall, and a 'qualitative' edge in artillery.  Probably their biggest advantage in the event might have been that, owing to the advance positions of two isolated enemy brigades, nearly the whole force began in the 'tactical zone'.  Against this, the French enjoyed an overall qualitative superiority of its infantry.  Not only was a high proportion of it 'elite', but, as 'Impulse Infantry' as defined by the rules had stand-for-stand double the fire power of the 'Columnar' Russians.  All the French foot were capable of skirmishing as well, unlike any Russian infantry in this scenario.
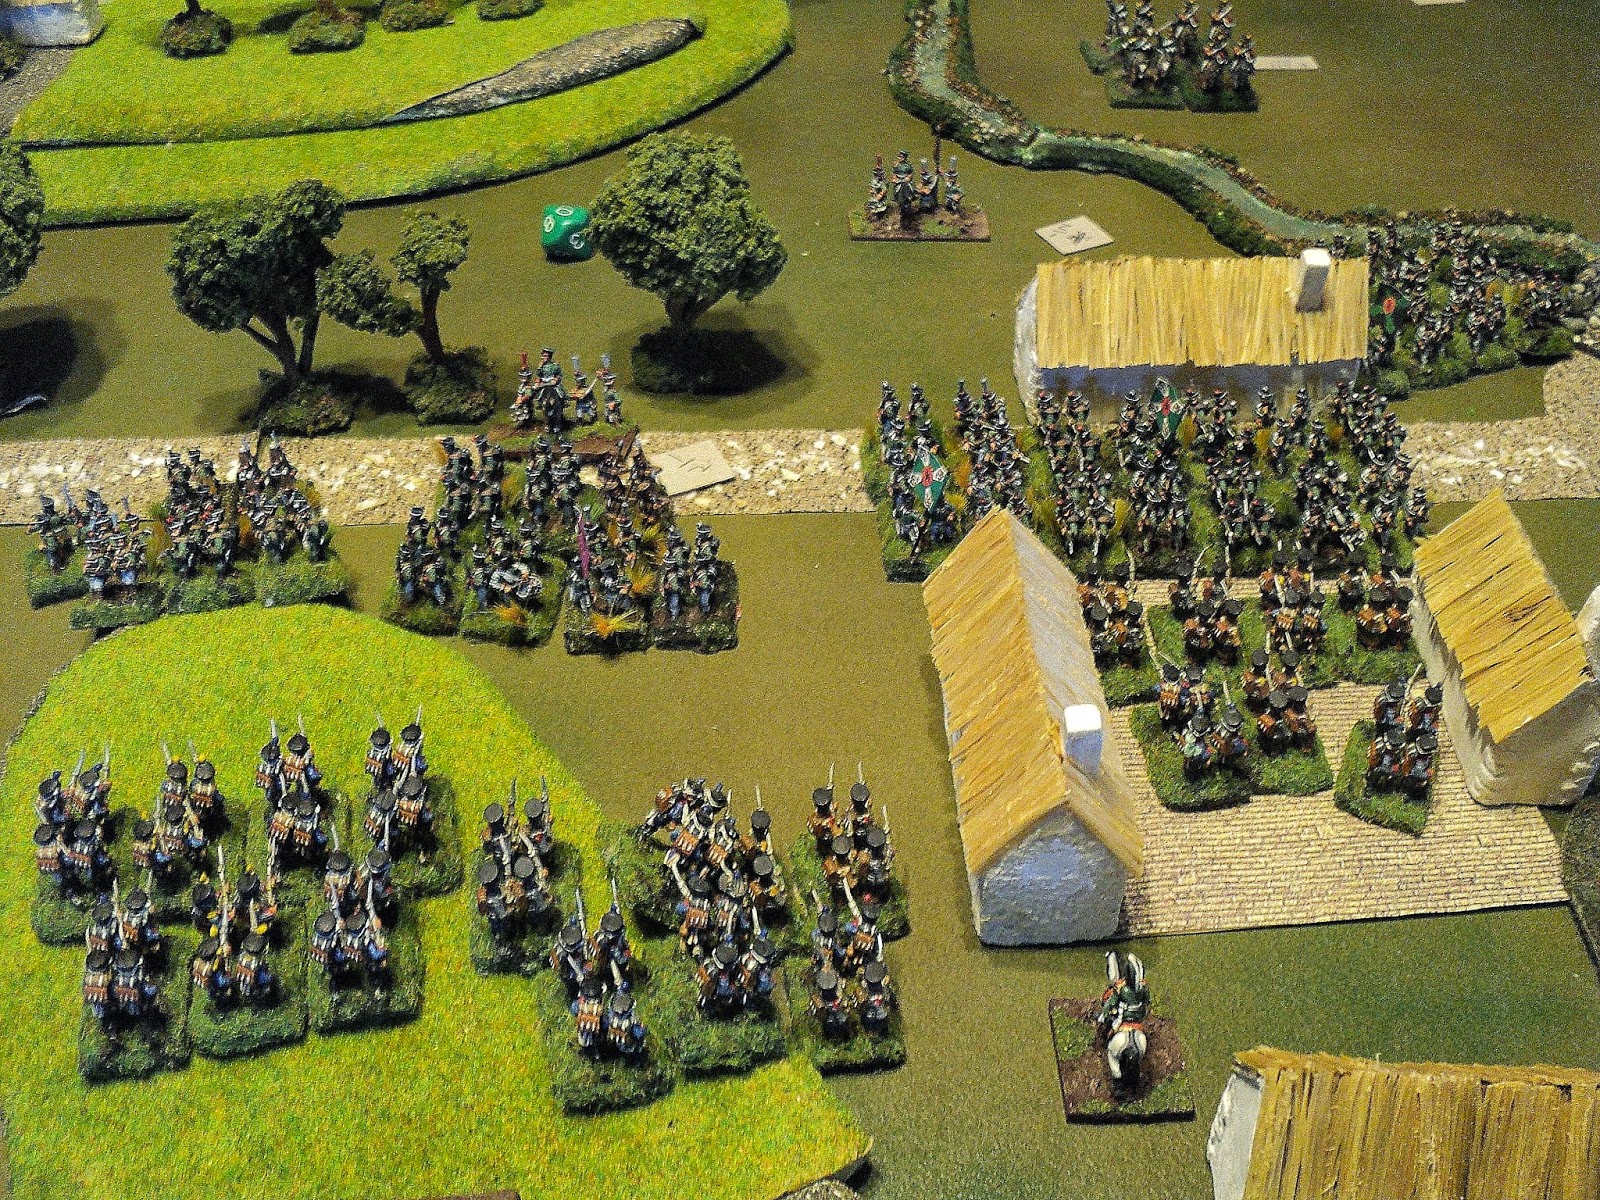
Looking south from behind Russian lines.  Between the wooded
areas, Podgaets's Division; and approaching Sinoi village,
 Razuvaev's Foot and guns, and Kuzmin's Horse.  The village garrison
is elite, but outnumbered more than five to one.
Finally, though the superior French leadership was to some extent cancelled out by the Russians beginning with only two or three units in the reserve zone (compared with most of the French), Davout's +2 modifier gave them a big advantage in the Initiative Rolls at the beginning of each turn. Miloradovitch's (as all the Russian generals) modifier was -1 - a +3 French edge to determine in any given turn which side went first. In the event, I believe Miloradovitch 'won' the initiative just the once - but did he choose a decisive moment!

Razuvaev's Brigades storming Sinoi.
 The isolated garrison hadn't a prayer, and
its broken remnants hastily quit the place as the triumphant
Russians surged through the streets.
Given the situation: a rearguard action by the French, the onus was on the Russians to attack. This being congenial to me, I took a very aggressive line throughout.  For the most part it paid off, but not everything was to go the Russians' way.

Tukmakov's Division advanced briskly, each Brigade in successive lines (supported line in game terms) towards the stone bridge, though 1st Brigade began somewhat hesitantly and was to remain in echelon back for the rest of the day. Covering Tukmakov on the right flank, Karpov's dragoons and artillery advanced forthrightly enough, but it took a sharp order from the General himself before the Cuirassiers lurched into motion (In 'reserve', this unit failed its march roll in Turn 1, but got going a move later.  It often happens that a unit that fails its 'reserve movement' roll will remain move bound for quite while afterward. I was a bit lucky there...). 


For all the interest along the main road to Chyornoi, the first real action was occurring around the Sinoi village on the opposite flank.  A little hesitation led Razuvaev to consider bring up infantry and guns to shoot the garrison out of village.  But as the artillery was taking some time to come up, and as the early exchanges were ineffectual on both sides, the moment 6th Brigade caught up with its companions, Razuvaev ordered the charge.   It was never quite clear why the garrison commander decided to defend, rather than evacuate the place (Geoff did think about it), but with Kuzmin's Cossacks sweeping into its rear, evacuation was rapidly becoming a problematic option.  Things might have been different had the 2nd Brigade Imperial Guard had marched to their aid, but, for reasons never properly established in the Court Marshal Enquiry subsequent to the campaign,  this powerful formation remained, in march column, completely immobile on the road (This unit I think twice failed its Reserve Movement roll, which was pretty bad luck, and even when the Cossacks approached within maybe a mile (18", assuming the ground scale is roughly 1 inch to 100 yards), moved rather hesitantly.

Outnumbered five to one, assailed from two sides, the gallant but isolated garrison's resistance quickly collapsed.  Soon the triumphant Russians had entered the village and surged through the streets looking for fresh foes, whilst the spent remnants of the defending guardsmen scattered along the river bank.  That was the end of them.

On the Chyornoi front, as 3rd Brigade closed the range, it came under fire from the bridge guard's skirmishers backed by artillery (Skirmishers aren't physically depicted under these rules, but the capacity for skirmishing permits a Brigade to extend its musketry range, at half effect, from 2 to 4 inches).  Lacking skirmishers, the Russians could not reply until they could close the range, and/or its own Divisional artillery could come up.  Even then, Russian musketry and gunnery were to remain ineffectual throughout the entire day.
Podgaets Division storming the ridge line.  This was to prove a
protracted and very bloody battle...

What was happening meanwhile in the centre?
With commendable elan, the  Division of Podgaets advanced between the woods south of the Chyornoi Road, splashed across the stream, and began their climb up the ridge beyond.  So rapid was their advance that the Divisional artillery was left rather behind.  A Brigade (3rd) of the French Imperial Guard had already seized the feature betimes and formed a line to receive the attack. Two gun batteries were hastening up to bolster the defence.  One had indeed almost reached a fine battery position on Guardsmen's right, but had yet to unlimber when General Podgaets unleashed his assault.

With no help to be had from the artillery, the Guardsmen's volleys were sufficient to disorder the oncoming Russians, but not enough to stop their drive.  Still, the Frenchmen presented a solid and staunch front.  The close combat degenerated into a close quarter scrimmage in which losses mounted on both sides, with the outcome long in doubt.  But it gradually became apparent that the scales were tipping in favour of the assailants.  The outnumbered 
The pressure mounts upon Davout's bridge guard.
Help was a long time coming...
guardsmen finally broke, shattered, and were swept down the hill.  Exploiting on, Podgaets's troops overran and captured the artillery as well: a signal victory for the Russians.

Note: This really was a protracted struggle. At that, it was made possible owing to 'Davout's' choosing this precise moment to lose the Initiative Roll. 'Podgaets' was not going to let slip this golden chance!  Fortunately the Tactical Movement rolls were favourable, too. Incoming fire disordered both Russian Brigades as they closed.  In the ensuing combat, the Guardsmen's elite quality and good order went to offset the numbers against them (14 stands to 7: 2 to 1).  'Locked in battle' after the first round (the modified die rolls were even), both sides lost a stand.  A die roll determined that on the Russian side, 4th Brigade took the hit. 


Both sides were disordered by the combat, but as the Russians were so affected already, this simply went against the French.  Now the odds were definitely on the Russians' side, but the second roll - the fight continues in the same turn until a result is determined - also left the combatants 'locked in battle.'  I took the stand lost from the 5th Brigade, and now 12 Russian stands faced 5 Guard.  The Russians were still 'fresh', but the Guardsmen now 'worn' from losses.  With something like a plus-3 differential on the dice roll for the third round, the odds were now heavily in the Russian favour.  The D10s were rolled and the Russians scored much higher - enough to 'drive back' the French down the hill.


Given the opportunity to exploit on and overrun the French artillery (voluntary with this outcome), Podgaets seized it with both hands, and half Davout's artillery went into the Russian bag.

As 3rd and 2nd Brigades close up to the bridge, with artillery support,
in the distance, the Russian brigade of dragoons chances
 its arm against their French equivalents.  
Victories achieved on the southern flank and centre left Marshal Mortier with just the single brigade of the Imperial Guard south of Chyornoi to oppose five Russian plus horse and guns.  But on the northern flank, things were not going the Russians' way.  This was not to be wondered at: as Morand and Beaumont outnumbered the Tukmakov and Karpov except in artillery.

Karpov's brigade of dragoons swept up the gentle slopes of the north ridge, but, emphatically met by a determined enemy, were swept back down the slope and across the river, having lost 40% of its strength (2 stands out of 5 - the extra stand had been no help in the combat).

Apparently galvanised by their dragoons' success, Beaumont's Cuirassiers closed upon the Russian. The French light horse also weighed in.  Outnumbered by more than 3 to 2 (8 stands to 5) the odds of victory were rather against the Russians, but I figured that a victory here would leave the French northern flank very badly placed.  To be sure, the more likely defeat would place the French in more or less and equivalent position, but Miloradovitch felt he whole the risk worth the taking.   He stood to gain more than he was risking.

Karpov's defeated cavalry having fallen back to and over the
river, were subsequently to recover their elan,
and turn once more to face the enemy horse.
The outcome could have been worse: the Russians were given the right about, but only enough to compel a withdrawal.  They fell back to the riverbank.

Note: We messed this up a bit.  It turns out my guys should have withdrawn just 2" (about 200 yards) rather than all the way back to the river. I simply misread the perfectly clear 'Withdrawal' effects.  We did wonder how two-brigades-to-one combats were supposed to be adjudicated, given the twin brigades being of different types (Armoured Heavy Cavalry and Hussars vs Armoured Heavy Cavalry). Nothing seemed to indicate anything but that is was classed as a single combat, one roll determined the outcome, and the the presence of the Heavy Brigade at all gave the French the same modifier as the Russians received.  OK: made sense, and had the virtue of simplicity at least.  How more complex combats are adjudicated will be left for another day!

The actions on the flanks having been resolved, the situation about the Chyornoi road bridge was developing slowly.  The Russian third Brigade, supported by a battery to its right rear was engaging the bridge guard in a musketry and gunnery duel that was rather livelier on the French side (Russian shooting, such as there was, was pretty dismal desultory all day - they seemed keener on the bayonet!) .  It wasn't too long before 2rd Brigade (Russian) were looming up on the right flank of their comrades.  But Mortier had formed up one brigade on the north ridge, and was bringing another to fill the gap between them and the bridge guard.  He had found it difficult to put his troops into motion early on - Marshal Davout had himself to direct forward the brigade in the town.  But at last the french were forming a coherent line.

Panaramic view of the scene south of the Chyornoi road.
Razuvaev has carried the Nisoi village; and Podgaets the ridge.
Marshal Mortier has turned his remaining Imperial Guards
Brigade towards the town.  But those Russians on the ridge - what of them?

The Russians carry the bridge crossing,
 and fling back the defenders 
The Russian 3rd and 2nd Brigades take the position held by the
defenders.  Two of the latter's 4 stands have been removed
(routed) and the gun should have been as well (captured).
As it transpired, the Tukmakov got in his bridge assault before Morand could intervene effectively.  Disordered in the charge by enemy musketry as much as by the river crossing, and having taken heavy losses already  - the Russians could still count double the enemy (in the earlier fire fights, 2nd and 3rd Brigades lost a stand each, and 2nd Brigade was to lose two more in the charge. That was a serious matter, as it left them with a -2 modifier for the subsequent close combat, and 2nd brigade was now spent.  Fortunately 3rd Brigade still counted as 'fresh', and having in consequence more stands in action than the 2nd, could count a +2 modifier to cancel the losses. Overall the French modifiers added up to +1; the Russians' to +2).

To French dismay, the Russians swept into and over the gallant bridge defenders, and captured the supporting battery.  The 'shattered' remnants of the bridge guard fell back and scattered, presumably to join the stragglers in the long retreat.  
Note:  The Russians enjoyed phenomenal luck in the close combats overall.  In the  pictures to the right, you will see the French supporting battery retreating (silenced) with the surviving infantry, but in fact it ought to have been captured given the 'shattered' outcome.  The Russians were also to have been compelled to make a compulsory half move charge towards the closest enemy.  All that did, on account of terrain effects was to bring the Russians clear of the stream.

Kuzmin's Cavalry has rallied - the Cuirassiers with elan, too.
A fine recovery from their defeat.
The Russian right flank remains secure
As night began to draw in (literally: it was just about time for me to go home for dinner) the situation was this:
1. Karpov's cavalry had rallied, the Cuirassiers with elan, and were ready to try conclusions once more with the enemy horse.  
2. Having stormed the bridge, 2nd and 3rd Russian Brigades, yet to rally, were now facing the prospect of a heavy French counter-attack that in all likelihood would recover the lost river crossing.  
An annoyingly fuzzy picture, only partially remedied by the
monchrome effect.  Razuvaev and Kuzmin making slow progress
against nil opposition, but Podgaets's infantry, leaving their artillery
far behind, seems about to fall on the flank of the column
comprising the remaining Brigade of the Imperial Guard 

3. General Podgaets's infantry had also rallied betimes with elan, and, sweeping rapidly down the hill seemed about to pounce upon the march column of the Imperial Guard crossing their front. 
4. Finally, the Divisions of Razuvaev and Kuzmin were advancing rather slowly (problems of Reserve Movement and terrain) to exploit their earlier success.

On the whole we gave the Russians the victory. We did do a quick, I suspect not very accurate, Victory Point count, which came down in Russian favour (9-5, from memory), but it still looked as though the Russian hold on the stone bridge could not survive a brisk counterattack.  Against that, the last remaining Guards Brigade looked to be in deadly peril.  We did try an initiative roll (won by 'Davout') which indicated that the French would at least make a partial recovery, recapturing the stone bridge, and possibly the Guard either making its escape, or even turning at bay and facing off the pursuing Division of Podgaets.  

This was an enjoyable game pretty much from my point of view, and I think Geoff got some satisfaction from it.  We are still somewhere along the learning curve of grasping the rules (and reading the quick-play sheet), but at least this time we were able to get into action quickly, and with plenty of action.  If the Russian shooting was abysmal all day, they performed wonders in the close combats, and rallied admirably late in the day from the disorders of combat.  The French had some trouble getting their Brigades into action, which left the village garrison and bridge defenders unsupported for too long.  I know Geoff did consider pulling these out - the scenario did not forbid him doing that - and had he done so we would have had an entirely different sort of battle.

Tuesday, September 16, 2014

Book Barn

South from Christchurch about 70 or so kilometres or so along State Highway 1, the road traveller arrives at the small settlement of Chertsey.  Population maybe 2000, you hardly notice the place, the State Highway bypassing it close by to the west.  But easily visible from there is the subject of this posting: a bally great tin shed, run down and rusty and with a sign announcing its present occupation: 'Book Barn'.
How to find the book barn

If you check out this link, the barn-sized shed stands in splendid isolation twixt highway and rail line. Check out this map (link below).  If you use the street level option, you will see the shed in question, from before it began to used to house second hand books, games, toys and vinyl...


Well, I've twice visited the place, now.  Some five or six weeks ago Karen and I dropped in upon our return journey from visiting the Sharplin Falls, near Stavely (off map to the west).  We didn't stay long - just time for me to pick up three books and Karen to find what she was looking for.
First haul.  We weren't staying long...

Hitler's Generals I had read before, some twenty or thirty years ago, and as I recalled, found it an interesting read.  The others  were completely new to me.  

White Death is an account of the Winter War of 1939-40 in Finland, of which I had read only one other account before.  This one is a bit less 'seen from the Finnish' side than the earlier book, and deals a lot with the behind-the-scenes diplomatic wrangling that formed the background to the military operations.  The author is not altogether unsympathetic to the Russian soldiery that bore the brunt of Stalin's ambition, at that.

A zillion years ago I read Charles Fair's book From the Jaws of Victory, which was an entertaining (and occasionally gruesome) read if you like, casting its net widely, and highly critical of U.S. command in Viet Nam.  Dixon's volume one is quite different.  It focuses more exclusively on British generalship, for one thing.  In two parts, the first gives accounts of the shambolic situations created, for any number of psychological reasons, by generals who, by and large, aren't exactly stupid.  You know, I have often thought Maj-Gen Ambrose Burnside has been treated rather harshly by history (and by Pres. Lincoln's deathless remark from which Mr Fair took his book title).  Burnside was a professional, organisationally pretty sound.  It was his idea - a manoeuvre sur les derrieres - that was later adopted by Joe Hooker and led to the Chancellorsville disaster.   Burnside was simply a bad luck magnet I sometimes feel.  At any rate, the second part (which I haven't yet read) goes more into the generals' make-up that leads them into poor and costly decision making.   
Second haul.  Plenty of bedtime reading to he had here!
A second, more prolonged visit last weekend yielded several more volumes for which I have to discover storage space for.  I've almost finished Caporetto 1917, and a rattling good read it is. Unusually for historiography of this type, the author treats both sides with sympathy and respect.  If this or that commander or leader comes in for criticism, it often balanced somewhere or other by more positive observations.  

By contrast, Peter Hofschroer's Waterloo Campaign: The German Victory has a clear thesis: the Duke of Wellington stole most of the glory of Napoleon's final defeat at the expense of the more deserving Prussian Army and Prinz Blucher.  I discovered once I got the thing home, that there is a companion volume that deals with the campaign up to the great battle.  I didn't spot that one.  The one I bought deals with the battle and the remaining campaign through to the fall of Paris.  I dare say that Hofschroer's account will be interesting, but I find overtly partisan historiography sometimes a hard read.

Bonaparte in Egypt was written for a Book Club (apparently) - and not for general publication; Battlegrounds deals with how the topography of terrain affects battles, and, as I don't actually have a volume on the Alamein battle in general, I picked up this one.  The caption of the frontispiece photo alludes to the Duke of Wellington's prognosis of the upcoming Waterloo battle.  Pointing nearby to a rather scruffy specimen of British soldiery, he observed: 'It all depends on that article'.

And, finally, Robert Fisk.  I'll tell you why I respect this guy and his writing.  He knows about what he writes, he writes with authority, and he ain't beholden to mainstream media and the likes of Rupert Murdock.  What's more, where he hasn't lived it himself, he gets it from people who have.  Often such people have no other voice.  Robert Fisk has heart and brain - and the balls, guts and backbone to go with them.  Pretty much dated by now I dare say - a hell of a lot of sand has drifted under the culvert since War for Civilisation (sic) was published in 2006 - yet I feel the need to steep myself in the back history of this desperately unhappy region of the world.

Meanwhile, my apologies for the slow progress of the BB4ST series.  I have in draft a piece on morale, and some promising ideas in my head for fire and close combat... So there is more to come. This coming Sunday, though, Geoff and I will be trying out Age of Eagles once more...

Thursday, September 4, 2014

Age Of Eagles - Play Test and First Impressions.

Initial set up, somewhere in Russia, 1812.  The figures and most of
the terrain pieces are Geoff's: just the hills, roads. fields and
forest floors were mine.  I was much taken with Geoff's home
 constructed village buildings.
 Although I have been a member of the Age of Eagles Yahoo group for a number of years now, I had, except for a half game (Waterloo, defending the Hougoumont and the Allied right wing) a zillion years ago (pre-earthquake, I think), I hadn't really looked at the rule set, let alone played a game.  A few weeks ago, an occasional war games buddy, Geoff Mahan,  having bought a copy of the rules, suggested we get together for a bit of a game.  As I don't do 15mm myself, we used Geoff's own French and Russian armies.
Map of an 1812 encounter battle between the Corps of
Prince Eugene Beauharnais, and Prince Bagratsyan.
For the purposes of this game I did not want the thing to be altogether symmetrical, but wanted a balanced sort of game with forces approximately well matched.  Choosing 1812 as the year, the Grande Armee having crossed the Nieman, Geoff and I agreed that we would each represent reasonably capable commanders, Princes Eugene de Beauharnais (me) and Prince Bagratsyan (Geoff).  Our subordinate Division commanders would be pretty much the default, adding -1 (i.e. subtracting 1) from the die roll for Reserve Movement (whereas we, if taking over from a Div Cdr would have no such penalty effect).  At this time, both armies are classed as 'columnar' which gives them good manoeuvrability, but rather indifferent fire power.  At a different time period, or taking Davout's Corps in 1812, the French could have been classed as impulse infantry (3 ranks), which would have doubled their musketry effectiveness.

Russian lines, looking southward.
Having added a battle map (I find they add meaning and orientation to photographed pictures), I'll add the orders of battle.  As an encounter battle between semi-independent Army Corps seeking to seize control of a road nexus at the small towns Malenkovo and Bol'shevo, it seemed a reasonably interesting scenario.

French IV Army Corps:  General Prince Eugene:

(Yes: these should have been Italians, then.  I forgot. Geoff doesn't have Italians anyhow)
Heavy Division (attached):
1 Brigade Carabiniers-a-Cheval E 3/2/-
2 Brigades Cuirassiers E 4/3/2
Light Division:
1 Brigade Dragoons R 5/4/3
1 Brigade Lancers R 4/3/2
1 Brigade Chasseurs-a-Cheval R/3/-/2
(Attached to Division) 1 Battery Horse guns
1st Infantry Division:
3 Brigades, each  R 7/5/4 Sk
2nd Infantry Division:
3 Brigades, each R 7/5/4 Sk
Artillery Reserve:
3 Foot Batteries. (We made a bit of a mess of these.  They should have been assigned to divisions, with the French (having fewer divisions as such) retaining a Corps Reserve.)
This force represented a whisker over 20,000 troops: a little over 15,000 foot and 4,000 horse, with 30-32 cannon.

Russian: General Prince Bagratsyan

(I don't like the spelling 'Bagration', which in my view works only if you pronounce it as a Frenchman would).
Heavy Cavalry Division (attached):
2 Brigades Cuirassiers E 4/3/2
1 Brigade Lancers E 4/3/2
Light Division:
2 Brigades Light Horse, each R 4/3/2
1 Battery (attached) Horse Artillery;
1st Infantry Division:
3 brigades each R 7/5/4
2nd Infantry Division:
2 Brigades each R 7/5/4
3rd Infantry Division:
2 brigades each R 7/5/4
Artillery reserve:
3 Foot Batteries.
This force, at about 22,000 was slightly larger than the French: stronger in infantry (over 17.500)  and artillery (maybe 40 guns - although the number of batteries was the same, the Russians are slightly more effective under these rules), but weaker in cavalry (3,600).

The numerical disparity in Russia's favour - not to mention its superior artillery - was thought to be partially offset by the French infantry's skirmish capability.
Overall battlefield, looking northward.

Even in organising the armies, we failed to appreciate some of the niceties, in particular where the artillery fitted into the order of battle.
Russians deploying, their commander seeing to their alignment...
Then we gradually got the hang of distinguishing between Reserve and Tactical Movement, and which columns in the March table we were supposed to be looking at when dicing for reaction to orders - oh, and which column of modifiers....
French light cavalry on the move.  They
were mostly to remain pretty inert for ther
duration.
But right from the start I found my formations being broken up by several brigades simply failing to get under way, and once a brigade stalls, it takes a while to get it moving again.  Unfortunately our misunderstanding of the rule set exacerbated that annoyance as we had inferred that the artillery batteries were subject to the same rules for movement.  Towards the end of the day, I discovered our error.  The guns' relative freedom of movement would have made it possible to form a reasonable advanced gun line to amuse the enemy and provide cover for our own advances.
Russian early moves.
The overall effect of this was to scramble every attempt at coordinating a Division's activities.   How can you plan a Divisional attack if you have to count on a proportion of its strength being unavailable on account of a dilatory commander, I ask you?  I some respects I'd rather the whole Division stalled or advanced as one - and maybe a 'Divisional Order' rule is worth thinking about.
View of the Russian right flank.  The large ridge southeast
of Bol'shevo was classed as rough going over its entire surface.
It might be argued this affects both sides equally, but I'm not so sure about that - even in an encounter battle like this one.  The large ridge east of the villages, as an obstacle to Russian movement, had one beneficial effect, as did the stream.  Slowing the movement rate down reduced the effects somewhat of tardy brigades (though I rather formed the impression that Geoff was overall luckier in his brigades' celerity of movement).  Unless I am quite wrong in my early impression, I reckon an aggressively minded player will be somewhat disadvantaged over one more circumspect.
Russian centre
So, with the Russians delayed somewhat by the terrain, and the French by obtuse and insubordinate brigade commanders (except for the Heavy Cavalry brigade which, after an early hiccup, manoeuvred right well throughout the day), it took most of the day for both sides to get into action (and this with a table no more than 4 foot wide!).
Russian left wing, approaching the Malenkovo village.
So...
French light cavalry steadfastly maintaining its ground.... much to
'Eugene's' disgust.
...gradually - I have always found that, unless there is a lot of player interaction, IGoUGo game systems tend to be slow moving - ...
So much for a coordinated advance: one brigade out of three
out of the 2nd Division obeyed orders to advance upon Malenkovo.
'Er, uhm... yes, well... aren't there Russians in that village?'
'Sacre nom de dix-mille chiens! There soon bally will be, Cochon,
  if you don't move! Allez-vous en!'
... the armies...

A rather washed out picture of 1st Division
 doing its bit to avoid confrontations with the enemy.
.. drew closer...

An even more washed out pic of the one formation that performed well all day:
the heavy cavalry Division.
... together...

Looking east toward Malenkovo.
I had hoped to seize the both villages before the Russians could effectively intervene, and then abide the attacks that would no doubt be 'Bagratsyan's' response.  This attempt proved successful at Bol'shevo, as 1st Brigade marched on the place with scarcely a falter.  But, upon almost reaching the outskirts of Malenkovo, 6th Brigade, possibly apprehending a Russian presence already in the place, and maybe concerned about the lack of support from 4th and 5th Brigades, suddenly halted.  From there, it could scarcely be moved again before the Russian 3rd Division did indeed begin entering the place from the east side.
Prince Eugene supervising the advance of 1st Division,
and the race for Bol'shevo.
The advance of 1st Divison was equally uncoordinated, mainly owing to the dilatoriness of the artillery (entirely due, as I said earlier, to our misunderstanding of the rules).  At that, I still find the thing counter-intuitive: that cavalry and infantry brigades are subject to the vagaries of fortune how they behave, but gun batteries simply do as they are bid.
The dilatoriness of the French 2nd Division has meant that it
will have to fight to take Malenkovo - if indeed it can!
The oblique order in the above picture - the 4th Brigade is just out of picture to the left rear - was entirely adventitious, and not at all an outcome I desired.
From behind French lines looking up at Bagratsyan's Ridge.
Meanwhile 3rd Brigade advanced close under the big ridge - dubbed by the French 'Bagration's Ridge' - where it came under the undivided attention of two Russian batteries and two Brigades. Now here, I simply forgot that it was permissible to refuse a flank and so bring the whole line into action. Not that it would have mattered a whole lot: 3rd Brigade hung on in its isolated position for a couple of moves before being driven back by a 'telling fire' (loss of one stand out of 7, and disordered as well).  They drew back to form a line with 2nd Brigade.
Why has the French artillery been so dilatory?  'Cos we didn't
read the rules properly, is why.  Third Brigade, isolated as it is,
 is unhappily eyeing the hosts arrayed against them...
A close action at last developed between the French 2nd Division and the Russian 2nd and 3rd Divisions.  Sixth Brigade held its own momentarily against the whole of the enemy 3rd Division before being forced to relinquish its hold upon the western half of the village.  However, this reverse was requited by the success of 4th Brigade, with artillery support from a flank, driving off their counterparts in a brief fire fight.
The French 2nd Division at last forming a coherent array,
but its three brigades are facing four Russian.  At least some help is coming
from artillery out of picture to the left.

First Brigade completes its occupation of Bol'shevo, but 3rd Brigade
has been forced back with some loss and in some disorder.  Second Brigade
with a battery attached, is coming up (slowly) in support.
But the most spectacular action of the day, which earned the 1st Cuirassier Brigade, and its commander, a Mention in Despatches, was its defeat of two Russian cavalry brigades in quick succession.  Seeing an enemy heavy cuirassier formation a short distance east of Bol'shevo, General Etienne Cointreau thought to chance the arms of his troopers, and ordered the charge.  This naturally drew the attention of enemy artillery on the ridge, whose fire was enough to disorder the Frenchmen in their career.  Nothing loth, they swept into the countercharging enemy horse, and in a trice drove them back (the respective rolls were France 9 - Russia 1 - a +8 differential reduced to +6 owing to French disorder, and a 'Driven Back!' result).
The charge of 1st Cuirassier Brigade.  Despite a lively flanking artillery fire
during its initial charge, the Cuirassiers swept away the leading Russian heavy cavalry
thundered on and threw back the supporting Uhlans as well.
 Then, they stood their ground unflinching under a heavy close range bombardment...
Glorious!
'Onward!' bellowed the French commander, 'En avant!'  For close behind the enemy first line stood another - a brigade of uhlans that he mistook for a second line of cuirassiers (actually Geoff and I both forgot they were actually uhlans - the other cuirassier brigade was the one standing on the northern ridge observing the entertainment below).  Wonder of wonders, once again the French horse were spectacularly successful, and more Russian horse deemed it meet to take the road east (amazingly enough, the die rolls were again respectively 9-1 - Geoff was certainly as unlucky with his combat dice as I had been with my 'March' rolls). Now I'm pretty sure that this result did not permit mes chevaliers to charge on against a third close target (something to check out), so there they remained, on the ground so well won.  And there they came under close range artillery fire that was enough to leave cuirassiers shaken, but not enough to compel a withdrawal.  But that left the cuirassiers completely immobile: sitting ducks.  Surely they would simply have bugged out, whether compelled to do so by force majeure, or under orders, one way or the other?

Heavy fighting about Malenkovo at the close of the action.  Sixth
French) Brigade was forced out of the village, but 4th Brigade,
 helped by supporting flanking artillery, caused some loss
 and disorder in the enemy ranks.

Considering the amount of time trying to decipher the game mechanics and the slowness of movement (ironic given that I chose columnar for speed of movement!), we didn't really get much action in.  But I believe we did learn something about how the game is supposed to go.  

Personally, I found the vagaries of Reserve Movement particularly exasperating.  This would only partially have been mitigated by knowing that the artillery were not meant to be subject to such vicissitudes.  It seems to me - only further play tests will confirm this or otherwise - that a Divisional attack must be problematic if you can not count on brigades acting in concert.  Defence is less problematical in this regard, there being more time available to repair irregularities in the line. Before leaving this, let me say that my impressions are in terms of a two-player game.  At the same time, I am inclined to look at the solo-play potential, and in the regard, the sort of thing that in my view  is likely to detract from a two-player/multi-player game, may well be very desirable features of a solo game.

Moving on, possibly the oddest thing about Age of Eagles and its companion Fire and Fury is the astonishing number of guns you seem to need.  Of the three battle scenarios offered (Austerlitz, Dresden and Quatre Bras), the last is the smallest and handiest, playable on a 3.5ft x 4ft playing surface.  This calls for:
French: 
200 infantry figures (50 stands), 72 cavalry figures (36 stands) and 6 guns - not an unreasonable ratio of guns to figures, but;
Anglo-Dutch (sic):
376 infantry figures (94 stands), 26 horse (13 stands) and 11 guns.  Eleven cannon!
In the Dresden battle the Allies require 66 model cannon.  

Sheesh!  Too rich for my blood.  My French army at present comprises 568 foot (not counting 8 sappers), 148 horse and 8 or maybe 9 cannon.  A couple more cannon might well be called for, but I don't think I'd want to go for the ratios we are looking at here.


Wednesday, September 3, 2014

Game Mechanics

  1. This posting has been a long time coming, not so much as I have thought a heck of a lot about the things I want to talk about, but I wanted to get my French III Army Corps pretty much in 'finished' condition before posting.  In this I will be responding to a couple of interesting comments to my last posting, which raised points well worth thinking about in game design.
  2. French III Army Corps on parade. 
    Sun of YorkJuly 31, 2014 at 4:01 AM
    What you are describing reminds me of Napoleon's Battles, but at double the scale (i.e. NB uses one figure represents 120 infantry). Reading your descriptions seems to be in line with what those rules came up with (namely one turn was 30 minutes).

    I haven't considered it any further than that, but the real challenge seems to be the depth units occupy on the table top. A Formation in march column can take up an awful lot of road (or it should). Getting that right for the scale you are considering is key I think.

    I am keen on coming up with a system that allows substantial games (i.e. were I'm commanding at least a corps) to be played on a decent table (4x6) in three hours (time available at the club less set up and pack up time - which needs to be short). In the same games I would like to see some operational maneuvering. The immediate scenario I have to mind is the Prussian march to Waterloo.
    ReplyDelete

    Replies


    1. You make some good points that I think I will discuss in my next posting.
    2. To begin with, what does a war games Army Corps look like on a road march?  I thought I would check it out with the following pictures of III Army Corps marching along a road.


    3. III Army Corps on route march.
      It occupies nearly 80 inches (200cm)
      of roadway.
      The dining table in the pictures in 5 foot long.  The column, comprising a Light Horse Division, 4 infantry Divisions (VII through to X), the Corps Artillery train and a logistics element, plus the Marshal and his staff, occupies rather more road than this.  Let us allow 10 inches for each of the infantry and cavalry Divisions (actually 24cm), and 10 inches each also for the artillery train and the logistics train.  Add a further 2 inches for the staff, and, say 1 inch for the intervals between each Division and train, we arrive at a total of 7x10" + 2" + 7x1" = 79".
      'The snake must be very thin somewhere,' quoth Pres. Lincoln
      in respect of Genl Lee's marching army in June 1863.  Well, here
      it is in 1805...
      Now, the ground scale I have in mind equates 21 inches on the table as about a mile, or 13 inches close to a kilometre.  Our column, then, occupies some 3.75 miles, or 6 Kilometres. That seems like a fair bit, but this Army Corps represents a force of  22,000+ - surely they must occupy more than 3-4 miles of roadway!
      Overhead view of a 22,000+ strong Army Corps on
      the march
       This is where time scale comes in.  At a rate of 3 kilometres an hour - not what you'd call a fast pace - a scale road march in our time scale of 1 bound to 1 hour, would clear this road in two war game turns.  Tenth division, bringing up the rear of the column in the above picture would be well clear of the woods in one turn, and off the table in the next.  Three kilometres to scale is 39 inches; 6 kilometres 78 inches - you'd just be in time to see the tail end of 10th Division disappearing beyond the village.  An Army Corps of 3 Infantry Divisions (as most of mine are) would have quite vanished in two moves.
      Here is added a tape measure to show the scale
      The table is 5 foot long, the column about 19 inches
      longer than that.
      I don't want this rate of movement, as all other movement scaled to some reasonable proportion of the road march would be zapping around the table in a most un-Napoleonic fashion.   Rather than look to extending the road column to single file, obtaining a 6-7 mile length of roadway occupied by the marching column, let's look instead at the time factor.  My reason is that I like the look of the road column as shown in the pictures. How can we make this look work for us?   What I suggest is a rate of march that tells us the time taken to pass a single point, given our chosen time scale of 1 bound represents 1 hour.
      Third Corps logistics element: a caisson by HaT -
       under-scale compared with the metal figures of the rest of the Corps.
       As it happens I have lit upon 30cm (near on 12" - 10" route march, plus 2" bonus on a roadway) as my rate of road march.  At that rate, it would take III Corps 7 war game (table top) moves to pass by a single point - 7 moves before its tail cleared the road pictured and disappeared off table.  This Corps occupies a length of roadway the equivalent of slightly less than 7 hours march (6 hours and 35 minutes if you want to be precise) - and remember how road distances were often expressed in terms of time - marches, stages and what have you: i.e. how long it should take you to get from A to B.  The question remains whether 7 hours is after all too long, and the road march ought to be extended to reduce this time.
      Logistics elements may be represented by a caisson, cart,
      wagon or ambulance.  At 10" (750m)  of roadway they occupy
       much less than they would in reality... 
      This brings me to the closely related comment below, which addresses the problem in a more general way.
  3. Just to fit the scale to my head, without checking any maps the bulk of Waterloo would fit on a 8ftx6ft table ( or 2.6ish meters x close to 2)?

    I'm afraid your approach to time and movement will lead you astray if you play an historical refight. It might work if a corps were formed in a block and just moving with no enemy in sight instead of bring various components moving in fits and starts.

    My preference would be to sit down with a dozen historical engagements, divide the historical tine from start to finish into periods of the appropriate length and then look at the corps, divisions and brigades and see how far they moved in thst equivalent and whether or not attacks were resolved in 1 turn or 2 or more and keep an eye on that when doing your combat rules.

    To me the key question is "is it possible for units to accomplish what they did historically in the same time period"
    ReplyDelete

    Replies


    1. A similar question has crossed my mind, though mainly in the context of the process of deployment off the march prior to a battle. For example, my I Army Corps, with 3 Infantry Divisions, 1 cavalry Brigade and its artillery will take 5 turns to pass a given point of a road - 5 hours in scaled time. Bearing in mind that that is not including any logistical elements integral to the Corps. Call it half a day, then. That seems to me ample - but I believe the matter interesting enough to discuss it more at large in my next posting.
      Delete
    2. Third army Corps on parade.
      The idea of trying out a known battle with a (fairly) well known timetable struck me as a good one, and what better than to begin perhaps with something like Waterloo.  At which I bethought myself to the classic old SPI board game Napoleon at Waterloo.  As the basic game uses Divisions and Army Corps artillery as its tactical pieces, it would just about be ideal for this kind of treatment.  Researches are ongoing to determine whether these cardboard counters might be translatable into the sort of table game I'm after.   I believe the 'Sun of York' might be as interested in this notion.
      The SPI game from long ago: Napoleon at Waterloo: basic version.
      Does anyone still play this?
      Third Corps on parade.
      Otherwise, it seemed to me that the approach I have been taking does indeed address Ross Mac's concerns, by making the critical scale that of time, rather than of distance (ground).  I have a feeling that I am more likely to err on the side of allowing for too little than too much activity per turn owing to the approach I have taken.  No doubt as play testing proceeds, we will find out one way or the other.
      Work in progress: 11th and 12th divisions of IV Army Corps
      The latter is under establishment (only 20 figures), but as it is represented by a
      light infantry unit (15th), will have double the standard skirmish capability.
      Naturally there will be fudge factors built in, but I want to test the limits of what needs to be fudged.  A case in point - a topic of a posting currently in draft - is the manner in which the Fire and Fury system (in its Napoleonic incarnation Age of Eagles) fudges its brigade formations. A brigade in the AoE system formed up into a line of battalions in line, is totally indistinguishable in appearance from a brigade forming a line of battalions in column.  At that, the effect is to give both formations a linear appearance.  Although this effect is somewhat mitigated by the facility in which linear or columnar or 'impulse' formations move and shoot, I find it hard to go past the physical appearance.  A supported line might represent a brigade formed up in two successive lines; or two lines of battalion columns. Because intervals are maintained between columns the brigade frontage is the same. But the whole thing simply looks like a brigade column - not at all what the formation is supposed to represent.   By the way, skirmishers are never depicted as such.  Their effect is achieved by extending the range at which a unit may fire.  Another fudge.  All this doesn't detract from the overall aesthetic appearance of the game, but I wonder if it isn't just a little bit misleading?
      Work in progress: 13th and 14th Divisions of IV Army Corps.
      This Corps comprises quite an eclectic mix of several manufactures,
      many of a provenance completely unknown to me.
      Several were picked up as odd handfuls at past swap meets.
      But that will affect my rule set as well.  In the scale I am looking at, may I depict a cloud of skirmishers after all?  How about formations internal to the Division?   At what rate should Divisions be allowed to change their formation - to deploy or 'reploy' - to form line or dual lines. What, in the latter case, would be the effect, say, of the first line sustaining a reverse?  I may yet be forced into an AoE-like fudge, but there's no harm in - and possibly a lot to be said in favour of - testing how far we can go in depicting what goes on inside a Division.
      Work in progress: IV Army Corps less its Light Cavalry
      (I have a lancer unit in mind for this), its artillery and
      it logistics element.


  4. My thanks to Sun of York and Ross Mac for providing me with something to talk about in [this] posting!