Wednesday, November 30, 2022

Kavkaz Campaign - resumed...

Following the defeat at Khashuri, the Kavkaz column of Izumrud-Zeleniya withdrew, and began a rather leisurely retreat northwest towards Kutaisi, a town on the north bank of the river Rioni. Perhaps the withdrawal was a little too dawdling, for Abdul Abulbul Ameer's column ran them to earth within a couple of days. For a few days, the two forces stood whilst the Ameer ordered a reconnaissance of the Zeleniyan positions.  


After the combat at Khashuri - night, 21 May 1875

The reconnaissance and further attempts to develop the Zeleniyan position proved a failure (the Turcowaz rolled a '2'), whereat the latter were able to break contact on 27th May and resume their retreat to Kutaisi, arriving there the following day. Meanwhile, the Trebizond Command, marching up the road from Poti, had arrived opposite Zugdidi, whence they began a reconnaissance of the Rioni river line and the Zeleniyan defences along the northern bank. Forming a rough idea of the enemy strength - the '5' on the  ♥Q card in the picture infra - the reconnaissance also discovered one or two fords along the stream in front of the town.  The forces nearly equal in strength, both settled down to formulate their plans.
Developments from 22-26 May 1875


Just a break in the narrative here to remind readers of the meaning - given the month-long break in this series - of the card system of movement. The actual mechanics may be found in Bob Cordery's book The Portable Colonial Wargame. But here are a few small tweaks for the purposes of this campaign.  Instead of the simple BLACK/RED suit split, I have assigned a suit to the four commands:
  • Heart: Turcowaz Trebizond Command (Suleiman Husnu Pasha) including supply transport by sea, and the protected cruiser Hamidiye*.
  • Diamond: Turcowaz Kars Column (Abdul Abulbul Ameer)
  • Club: Izumrud-Zeleniya Coastal Command (Generalleytenant Malachi Malodorovitch Kutizedoff) including the naval convoy* and the Guards Legion under Count Ivan Skavinsky-Skavar.
  • Spade: Izumrud-Zeleniya Kavkaz Column (Count Ignatiev).


    'Graf Ivan Skavinskii-Skavar'
As this is a solo campaign, rolling for reconnaissance would have limited meaning or value unless one placed more meaning to the results. I have already suggested that a roll of '1' - signifying an attack without a preliminary recon - suggests some kind of ambush. At the other end of the scale, a '6' would indicate a surprise attack. We'll come to this. So what about the results in between?  

As the situation at Zugdidi now stands, the contending forces, very nearly equal in strength, are standing on opposite sides of the river. The Turcowaz just arriving, had the initiative, and rolled a '5' on their compulsory recon dice. So they know that the force opposite is a match for them, but also know something - but perhaps not everything - about bridge and possibly ford river crossings. The attack and defence might have to be programmed ... somewhat.

However, in subsequent moves, I gave priority to the naval elements, which implies that the initiative might well pass to the Zeleniyans at Zugdidi. But they in turn would have to conduct a reconnaissance of the Turcowaz opposite, and the river crossings as well. The Izumrud-Zeleniyan convoy began its slow journey down the coast from Sakhumi on 26th May. A week later, having delivered a supply transport at Trebizond, the Turcowaz protected cruiser Hamidiye set a course due north. Its mission: to seek and sink any Izumrud-Zeleniyan vessels upon the high sea.

* One issue that does concern me, is that naval movements seem to me a little too sluggish. After all, they could get about a deal faster than any land transport could. I propose henceforth to allow then to move:
  • according as the card colour comes up - not just the suit, and 
  • in addition to whichever land force is being activated. 

    I think this will bring on a rather brisker chain of events!  

Situation, dawn, 27th May

On 30th May, Abdul's command caught up with the Kavkaz column, who, having reached the Kataisi town, decided to offer battle from behind the river line. This time, the reconnaissance ordered by the Ameer was successful and thorough (the die roll was a '6'!). Not only were the Zeleniyan defence lines comprehensively mapped out, the river crossings were as well.  

Developments 27-31 May

The stage was set for a second encounter between the commands of Abdul Abulbul Ameer and the Count Nikolai Nikolaivitch Ignatiev. On 5th June, 1875, the Turcowaz launched their attack...
 
Developments 1-3 June.  

To be continued... assault on Kutaisi.

Tuesday, November 22, 2022

Hundred Days Campaign...

I've been doing some (further) prep work for a Portable Wargame Hundred Days' Campaign. In possession of a very fine campaign map from Columbia Games Napoleon, methought it would form a fine basis for a campaign map were it contained in a field of hexes. Now, I could have scanned a hex-field I have on file onto a transparency, then scanned the map with the transparency covering it.  I might do that yet. But in the meantime, I created this cartographical masterpiece:


My hand drawn map on a hex-field.  The thing is printed on a 
single A4 sheet. As someone suggested, I may be forced to create
game counters for this thing. 

The original seemed to have two classes of road, so I have outlined the 'better' class with black. I think this will work in the same way as my Kavkaz Campaign, that is to say, using the Portable Wargame campaign system outlined in the Portable Colonial Wargame.  

Having looked at the Hundred Days carried out by others (notably Murdock's Marauders and Blunders on the Danube blogs) the problem I run into is that it is hard to improve upon Emperor's opening strategy of the 'central position'! However, if I use Bob Cordery's card driven system, and the opening dispositions of the respective armies the thing might take some unexpected courses.

What I propose there is that if we assign the Allies the RED suits and the French the BLACK, we can further split the Allied suits:
♠ - French Moves - may be split between Right (Grouchy) and Left (Ney) wings
♥ - Prussian Moves
♦ - Anglo-Dutch Moves

My map with starting positions... just to show 
the concentration of the French Armee du Nord
against the dispersed Anglo-Prussian armies.


As there are quite a lot of formations involved - we might have to be a bit more generous with what may be activated per turn. 

The French (Napoleon) have the Imperial Guard - horse, foot and guns; five Army Corps, and four Cavalry Corps(unless the four are retained collectively under Marshal Grouchy);
The Prussians (Blucher) have four Army Corps;
The Anglo-Dutch (Wellington) have three Army Corps (one of these under Wellington's own hand), and one Cavalry Corps.  


Same pic - different angle.  Shows where the 
army commanders are (more or less)


We might have to take into account the possibility of detaching/re-attaching Division-sized formations from their parent Corps, although the form of the map seems to indicate that a Divisional level of formation is probably not appropriate.  
The Columbia Games Map with starting positions.
It's a really nice map.

Before closing, I will admit to placing this article here because this thing is what I've been thinking about lately. And that might well be due to my recent finishing off my Plastic Prussian army. A couple of mumfs back I bought a couple of Prussian-looking metal 12 figure cavalry units, thinking that my army was deficient in this arm. Turns out I was mistaken - discovering a whole bunch of unpainted plastic figures I didn't know I had. These were the horrible Italieri chappies, but, biting the bullet of  fear and loathing, I finally painted them up to an OK-ish standard, and now have SEVEN units - far more than this army needs. But, of course, no more than this army can use! I'm betting that, just to show me, these fellows will fight like demons...

I don't know when this campaign will get started. The Kavkaz Campaign must (of course) take priority.  And there's the vexed matter of the suspended Byzantiad saga to consider.

To be continued... some time.

Tuesday, November 15, 2022

Portable Ligny - Debrief

Ligny battle from the French POV.

As foreshadowed, this is a brief posting upon some issues that cropped up during the Ligny Battle I recently played through, using the Portable Napoleonic Wargame (Bob Cordery) system, specifically the 'Big Battle' rules. These I have modified very slightly for armies comprising more than one army and/or cavalry corps.  


  1. The Army is commanded by an army commander @ 6 Strength Points (SP); Corps by corps commanders @ 3SP, all depicted by a command figure or vignette.
  2. Divisions comprise a command (usually depicted by a flag, or an officer figure of some kind), plus 1 to 4 regiment or brigade stands.
  3. The order system was 'per book' except that as the game was played solo, there was no need for chits.  Whether or not a unit could move (shooting not requiring activation) depended upon its distance from the Corps commander - not the Army commander.  In the late battle, right at the first turn THREE of Vandamme's front line units rolled a '1'- which stalled the entire III Corps for a whole turn.
  4. You will find from the pictures I used 4-figure foot and 3-figure horse stands (instead of 3 and 2 respectively).  This was simply a matter of convenience, as my Prussians in particular don't break up into 3-figure foot units very easily.
  5. Infantry stands were brigades (French) or regiments (Prussian) with strength points equal to the number of battalions
  6. Cavalry stands were brigades, the SPs representing regiments.  


    Ligny Battle from Prussian POV.

This seemed to work quite well but a particular issue that had previously escaped my attention became quite problematic in this battle. It was this:

  •     Each French infantry Division comprised 2 brigades, that is to say, 2 stands, the strength of which varied from 2SP to 6SP.
  •     Each Prussian Division-strength Brigade comprised 3 regiments, almost all of which stood at 3SP (there were a handful of 2SP regiments). For the purposes of simplicity I ignored or subsumed single regiments, companies and batteries. Henceforth I'll call the Prussian Brigade formations 'Divisions', as, to all intents and purposes they were.
In terms of SPs and 'units per' the Prussians were pretty consistent. The French SPs per stand varied widely. But that wasn't the problem. It was the number of stands per Division.  

Now imagine a 2-stand French Division, each stand of which comprised 6SP. Match it up against a 3-stand Prussian formation, each element of which comprised 3SP.  12SP vs 9SP. Put your money on the French.  

No. 


French III Corps.  Note the 2-stand infantry
formations.  10th Division (in the rear) is a 
very strong formation.


The extra stand confers upon the Prussians a decided  advantage. In a stand-up fight, the Prussians add 2 to their die roll (support stands), subtracting 1 for the single enemy support stand, for a net modifier of +1. They will take a hit if they roll a 1.

The French add 1 to their die roll, but subtract 2 (as I believe the rules currently stand). They will take a hit on a die roll of 3. Even with my own slight change in which one's support stands go only to cancelling enemy support stand pluses, rather than taking one from the overall enemy die roll, they will still take a hit on a die roll of 2. Even that difference might be enough to cancel out the French numerical advantage.  And not many French Divisions were so strong.  


Prussian II Corps moving up.  Note the 3-stand 
infantry formations.  The blue SP dice signify regulars
the green are landwehr.


That situation existed in my earlier battles, but for some reason or other, never became sufficiently apparent to draw attention to itself.  

After spending a bit of time thinking of modifications to the rule set, I concluded that that was not where the problem lay. It would be far simpler to reduce the Prussian Brigades to 2 stands, one regular and one landwehr where appropriate, and the SPs allocated according.  Most of the Prussian formations, then, would comprise 1 stand of 'regulars' @6SP (average) and 1 of 'landwehr' @3SP (poor).  

I'll have to try the system again.  Montereau maybe...


Friday, November 11, 2022

Harking Back: Forcing a Defile.


Having just read a posting from Battlefields and Warriors: Wargaming in Small Spaces on scenario generation, I was reminded of a long past action from a campaign set in the Peninsular War.  This particular situation cropped up when the Duke of Abrantes (General Andoche Junot), marching towards Badajoz from the north, found himself having to cross a river crossable only by a stone bridge.  Waiting for him on the other side, was a force of Spaniards in none too compliant a mood.

Having been reminded, I thought I'd look up my own account of the action.  It was not to be found in this blogspot! Fortunately, I recalled the possibility I might have posted elsewhere, and I discover that, though inactive for some years, that blog spot is still extant.  In a fit of nostalgia, I thought I'd post the account here.  Paul Jackson, by the way, commanded the Spanish. 


Thursday, December 23, 2010

Action at the Guardiana Bridge.

This, the first action of the Armee du Nord in the current Peninsular War Campaign going on in Christchurch, was no light ordeal by fire for the men of General Junot's Corps. For the six weeks since the campaign opened in March 1810, le Duc d'Abrantes has been gathering in his troops for an advance into the desolate badlands of Estremadura - central Spain.

It had been a lonely march. Just once did the French glimpse the enemy, a troop of light horse, far to the south, on the far bank of the Guardiana River. In the second week of April, the main body of Junot's troops, now at the end of a slender line of communication, were approaching the stone bridge that represented the sole crossing along this road of that broad stream. Awaiting them upon the far bank lay a Spanish Brigade reinforced by a battery of light guns.

001


The veterans of 3rd Hussars led off in line to cover the deployment of the rest of the army. As they swept over the ridge to the west, the column of II/15th Line were greeted by a deadly salvo from half the Spanish battery firing at long range.

Discreetly, the battalion withdrew behind the crest to await developments. In the meantime, the laborious process of bringing up and deploying into line the big guns of 3rd Company went on.

With the disappearance of the infantry, the Spanish guns turned their attention to the hussars fronting the bridge. On this day the Iberian artillerists were plying their pieces with a will and with skill. Within too short a space of time, the Hussars were reduced to half their original numbers, and betook themselves to the rear.

More in hope than expectation, Junot ordered his Cavalry commander, General Curto, to take the guns. Joining the King Joseph Guard, he flung the dragoons across the river, straight into the teeth of the deadly canister fire. The gunners stood with the aplomb of veterans against the sight of several hundred horsemen thundering down upon them.

Having lost 40% of their strength by the time the reached the gun line, the troopers were already wavering, but retained sufficient resolve to cut down several gunners. The latter responded with trailspike and rammer eking out their few pistols.

At last, the troopers fell back exhausted. Shaken by the losses thay had taken (60%), they fell back to the riverbank under the shelter of their own artillery on the north bank.

At least they had silenced a section of the guns, and put the rest of the battery out of action for a space, but the job was yet to do. It was up to the infantry.

As the infantry lined the river bank, Junot had already been directing columns to ready themselves to attempt the crossing. The battalion immediately available turned out to be the 500 conscripts of II Battalion, 86th Line Infantry - not Junot's ideal tool for the task in hand. Nevertheless, any rearrangement would likely do more harm than good: across the bridge they went. Reaching the other side, they began to trundle forward towards the guns.

But the Spanish commander had seen it all coming - as who could not? - and had brought up a 700-strong column of Volunteers de Laen to intercept the attack. In a costly and tough close-quarter fight, Spanish numbers told, and although losing heavily themselves flung the enemy unceremoniously back whence they came.

All would have been well and satisfactory so far as the Spanish commander was concerned had not the Volunteers de Jaen allowed the excitement of their victory overcome their fear of the enemy. Though easily distanced by the scampering Frenchmen, the Volunteers reached the middle of the bridge where they were met by a devastating volley of canister, and II/65th coming the other way.

Under cover of the cavalry and infantry assaults, Junot had brought his guns much closer to the bridge, ready to crush the lighter Spanish ordnance beneath the weight of his counterbattery fire. There they were, in good time to provide for the Volunteers de Jaen a lively exposition of French gunnery at short range.

The lesson was well taught. Mowed down in windrows by canister, the disordered survivors were crushed by the French infantry onslaught as well. The scant survivors, 100 out of the original 700, fled the field.

There was little now to stop the French crossing. The artillery had drawn back a piece, and their shelling, though galling enough, was insufficient alone to slow the French down much. No infantry counterattack materialised, though Junot would probably have welcomed one.

Instead, declining further action, the Spanish drew off. They had drawn blood, and had no wish to augment the French vengeance by further acts of rashness.

So Junot had his bridge, but at considerable cost. Early estimates put Spanish losses at somewhat short of 700; the French very close to 1000. But the crossing was secure, and Junot had not yet revealed his entire hand...

Tuesday, November 8, 2022

Portable Ligny - The Battle


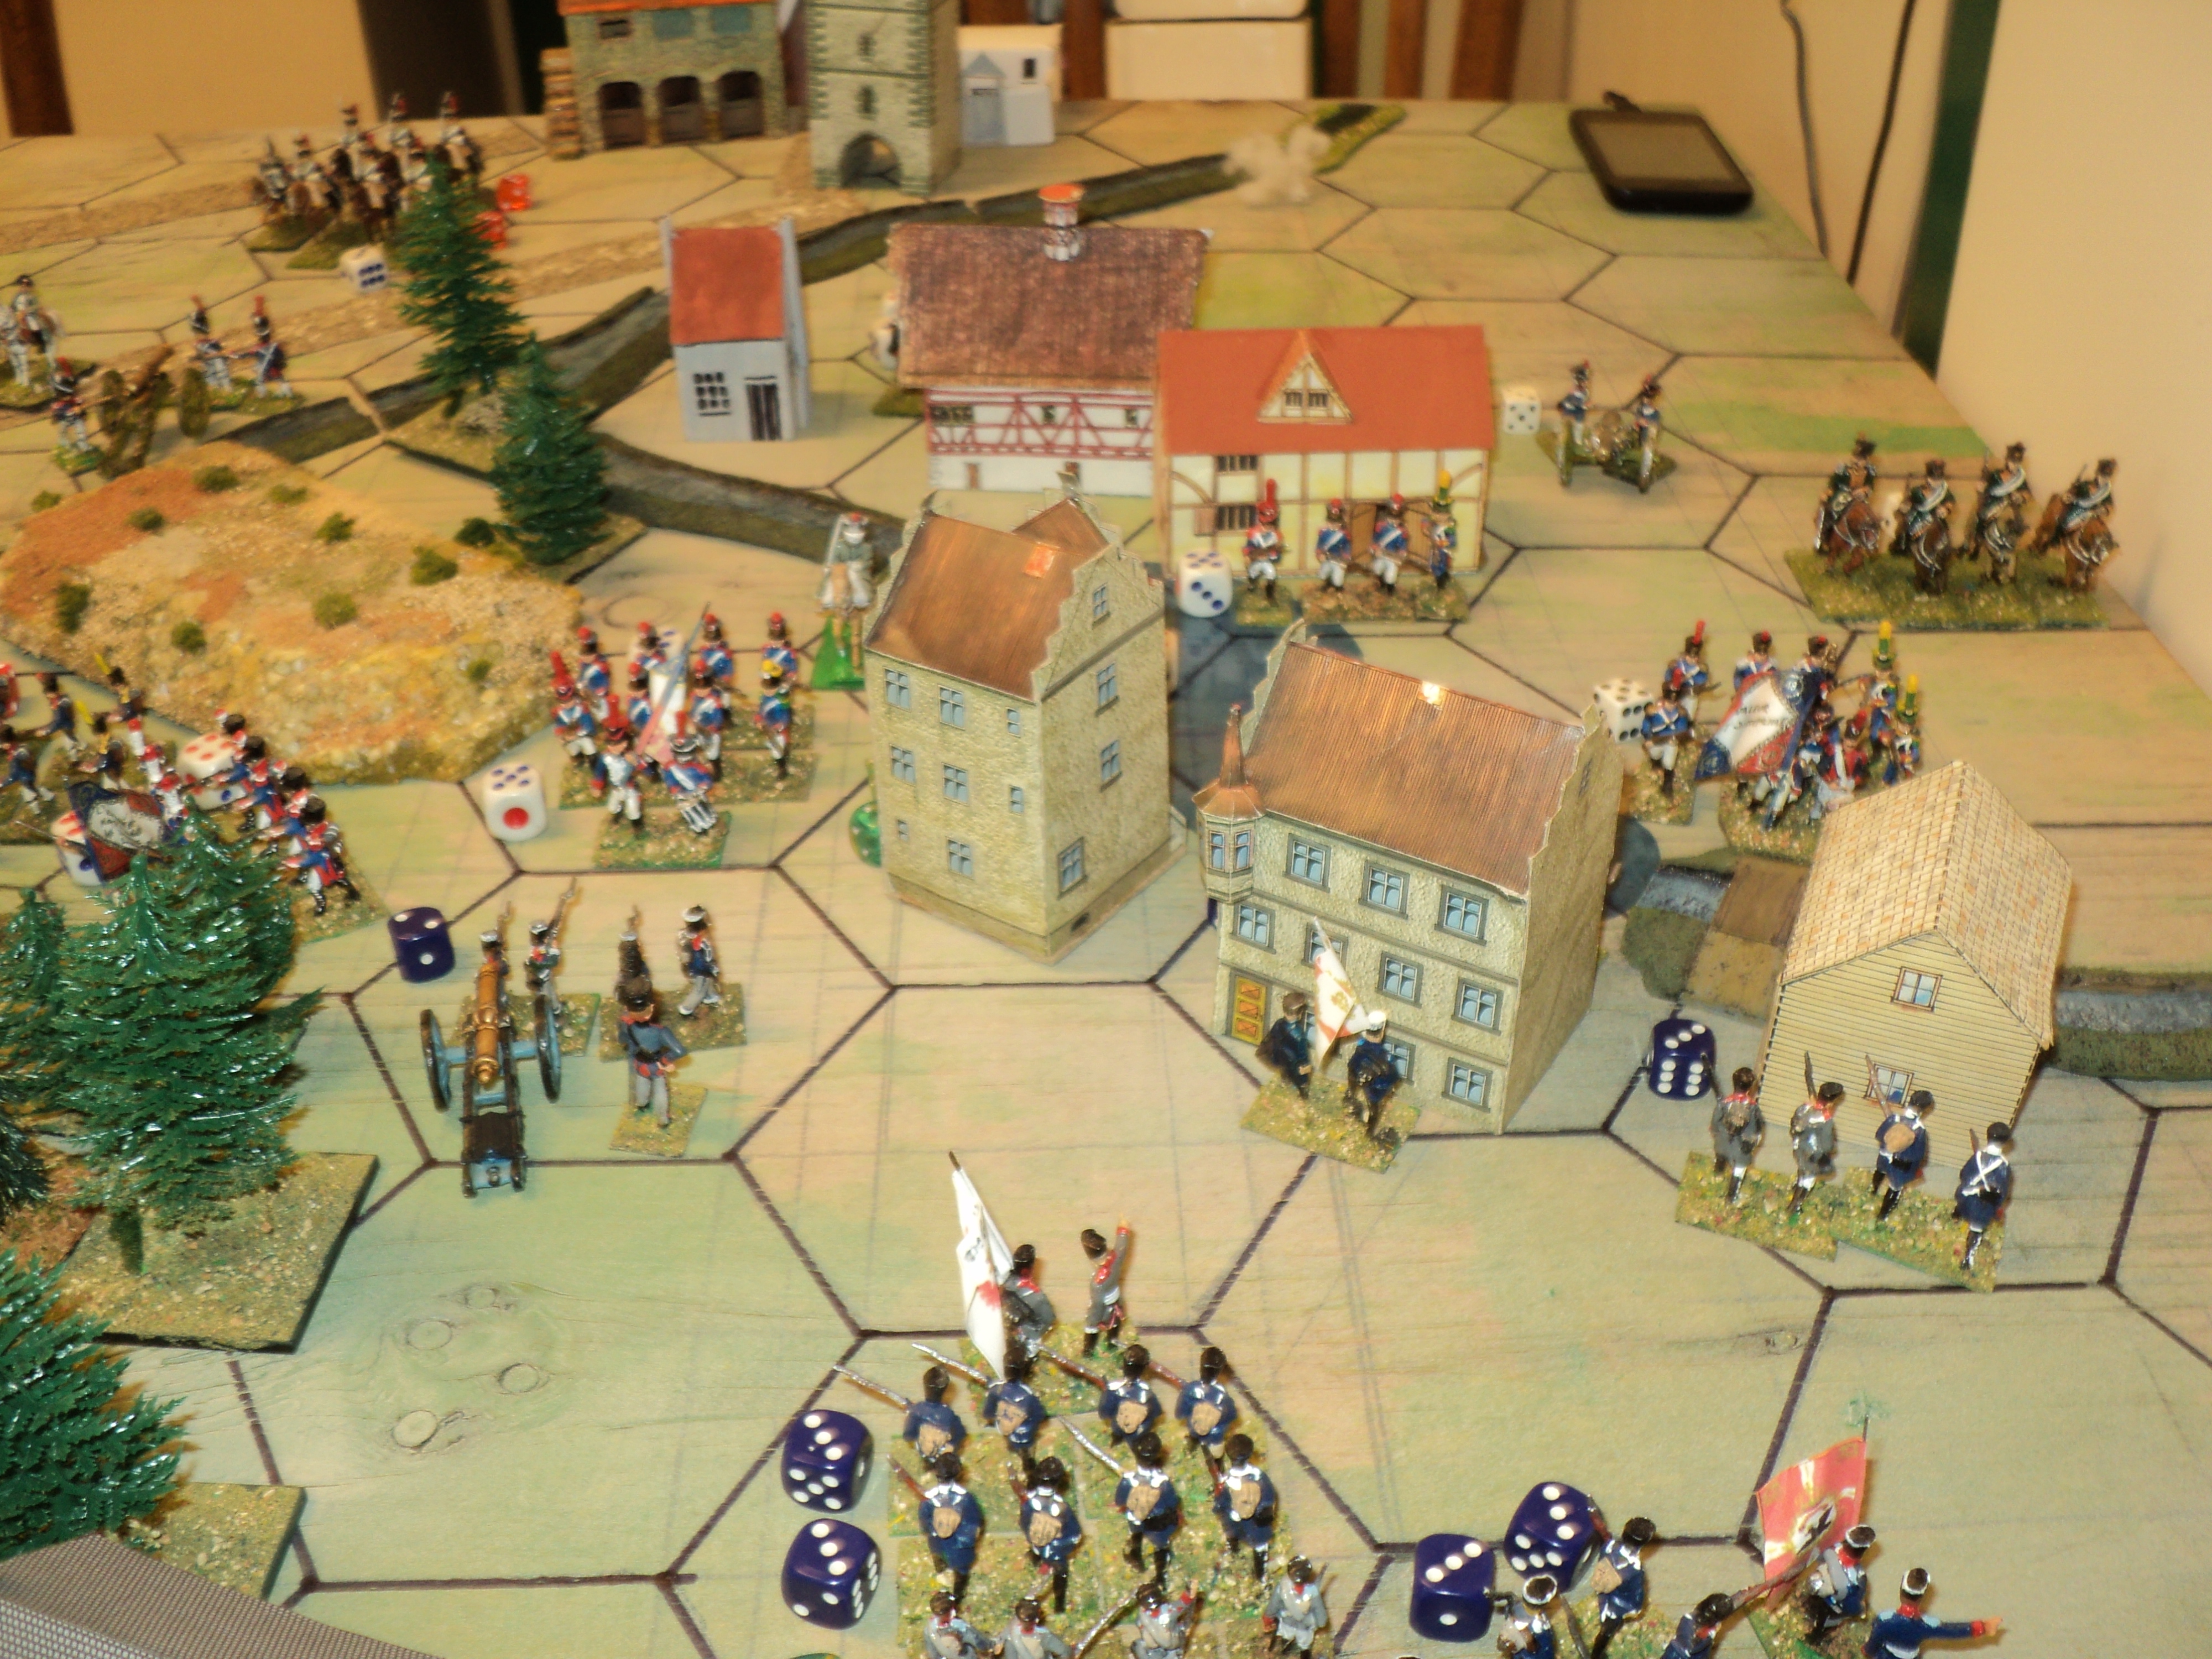
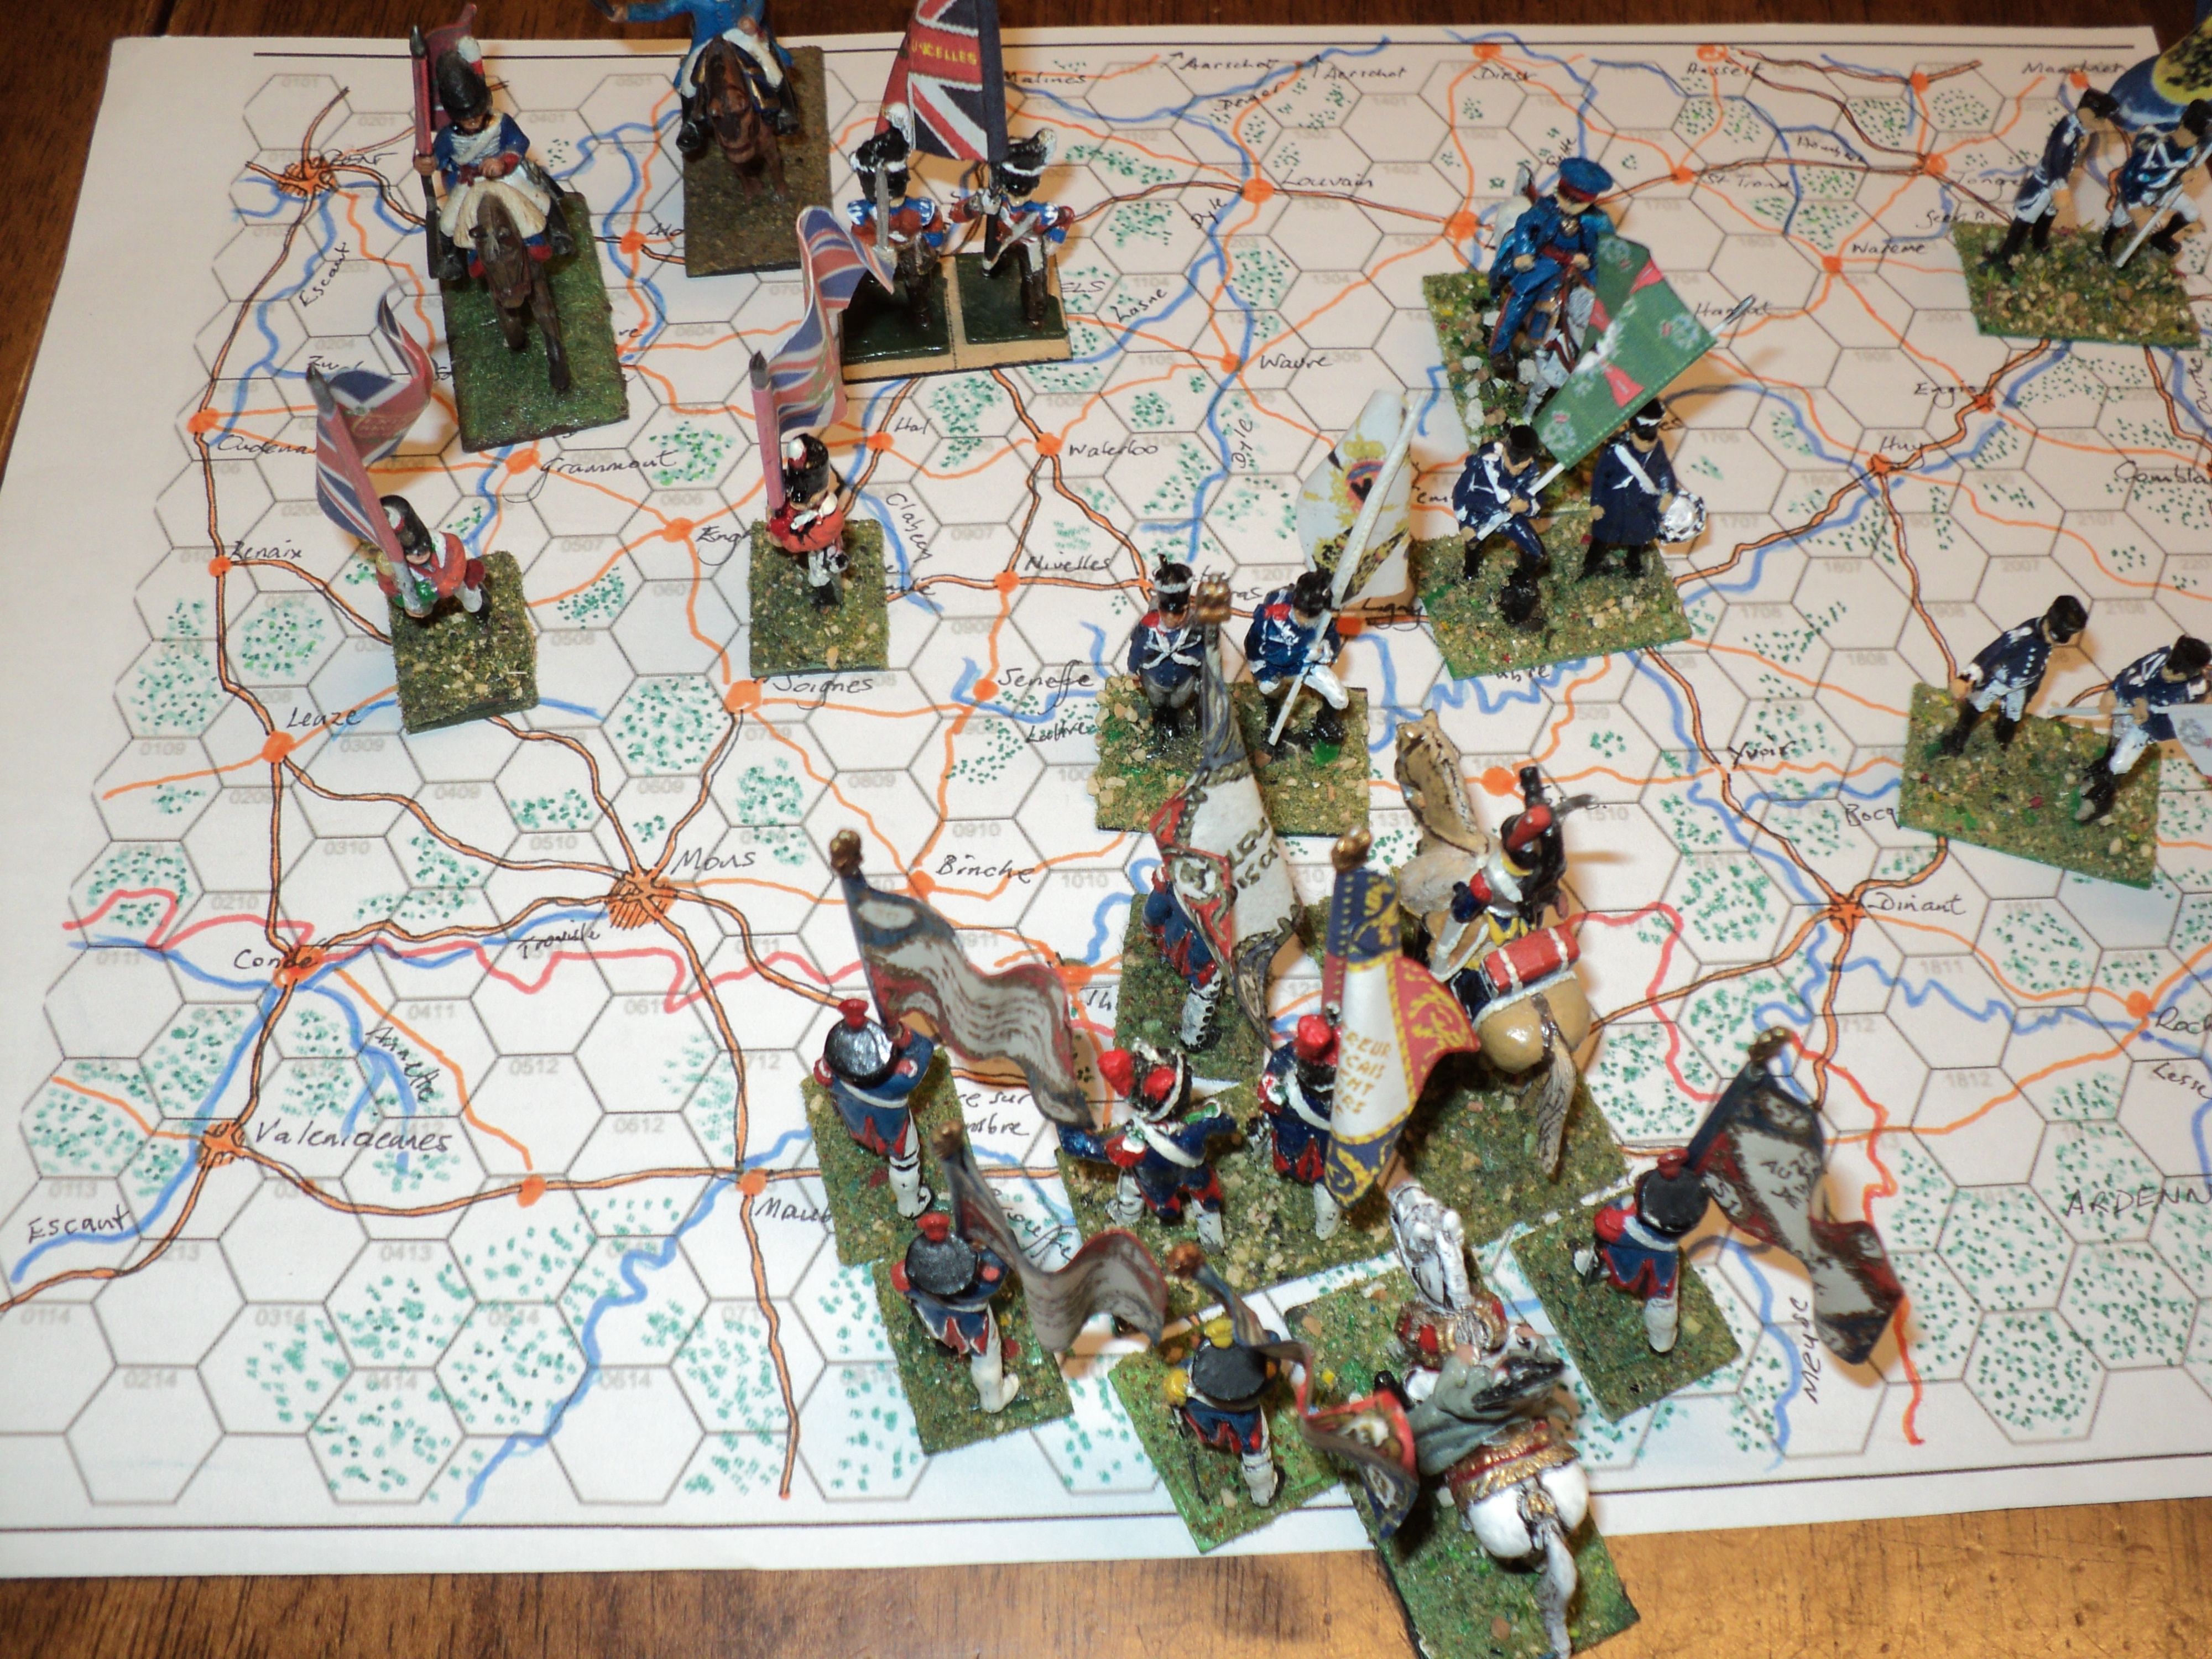
A just observation of the battle narrative so far has been that it has been hard to follow the action, switching as it is from one sector to another, and I daresay the multiple angles from which the pictures were taken probably are not much help. I may go back an label some of the elements in some of the pictures as an aid to orientation. We left the action as depicted in the general view above of the battlefield, and the map below. Perhaps even then some explanation is indicated.

The Prussians are light blue. I Corps (Ziethen) are still defending from Wagnelee throughh to Ligny, the unlabelled small rectangles for the most part individual regiments. II Corps (Pirch: 5th-8th Brigades plus cavalry on the Sombreffe road) are moving up - not very rapidly - in support of I Corps. III Corps (Thielmann: 9th - 12th Brigades, plus Hobe's cavalry at Balatre) are counter-attacking east of Ligny.

The French are dark blue edged with red (a scheme I'll not use again; it looks horrible). Vandamme's III Corps (8th, 10th and 11th Divisions, with 7th attached from II Corps), having carried Saint Amand, are now attempting to storm the villages beyond: St Amand la Haye and Wagnelee. Alongside them to the right, the Young Guard is also gradually forcing back the Prussian line. Gerard's IV Corps (12th-14th Divisions) is attacking around Ligny. The 12th has become by now much depleted; General Gerard himself has been hit, but remains in command. Fourteenth Division was prevented from occupying part of Ligny from which they forced the defenders out, by the intervention of the Prussian 9th Brigade.  Coming up behind IV Corps is the Imperial Guard, horse and foot. A private battle has developed on the farthest eastern flank, between two French Cavalry Corps, and the Prussian 11th Brigade and Hobe's light horse. Count Lobau's VI Corps is approaching...


I thought henceforth that the thing might be more comprehensible if I divided the action into 4 battlefield sectors, and approached the narrative sector by sector. Narrating the action has shown me just how complicated the action was, something I didn't particularly notice at the time. As it was, the sectors had no distinct boundary lines, each impacting and being impacted upon by those adjacent.

Assault on Wagnelee and St Amand la Haye 


Probably the hardest fighting was taking place on the French left, where the attackers had a whole series of built-up areas to try and force. Saint Amand having fallen, the Divisions of Vandamme's Corps had to storm across the slight stream between that village and those of Saint Amand la Haye (henceforth I'll call it 'la Haye') and Wagnelee.

Fortunately there was enough in the way of clear fields on the far side of the stream from which attacks might be prepared. Time was getting short, too, as elements of Pirch's II Corps were looming nigh. Very briefly the landwehr garrison fell back from la Haye, but not before driving back the attackers themselves. For a brief moment, la Haye might have fallen into French hands, but they were unable at once to exploit. 


Soon the Landwehr regiment - 1st Westfalen - were back in residence, and in no mood to be evicted a second time. They received considerable assistance from the last remaining regiment of 3rd Brigade, which, with the support of the I Corps Artillery were keeping 8th Division occupied close by la Haye.  However, outnumbered as they were, they were soon driven all the way back to Brye.


The French following up rather isolated  the garrison of la Haye, which became even further marooned when 7th Division successfully stormed the eastern end of Wagnelee.  

Meanwhile, IV Corps, assisted by the Young Guard, were continuing their attacks between Ligny and Brye Woods, which feature tended to form a boundary between those operations and Vandamme's battle.


By now Pirch's II Corps was near enough to make a difference to that battle. Intercepting the French advance upon Brye, 6th Brigade forced 8th Division back alongside la Haye. Seventh Brigade was not far behindhand and was clearly preparing themselves for an assault upon the French-held sector of Wagnelee. Fifth Brigade had formed up west of Wagnelee as a flank guard against a possible envelopment there by French cavalry.


Suddenly Vandamme was faced with a considerable Prussian counter-offensive. Following up, 6th Brigade was starting to inflict losses upon 8th Division, and the garrison of la Haye threw back 10th Division across the river into Saint Amand. Far from isolating the defenders of la Haye, 7th Division now found itself isolated and under heavy attack from the 12th Prussian Infantry Regiment as well as 7th Brigade of II Corps. The defence didn't last long before the French were also flung back across the stream. The Prussians had retaken Wagnelee.


General Vandamme, fire-eater as he was, urged forward his 8th Division once more, and 6th Brigade suddenly found itself going backwards. Recovering from their repulse, 10th Division once more essayed the storm of la Haye.
Driving back 6th Brigade made room for 11th Division to join the 10th in its renewed assault upon la Haye. Nothing loth, 7th Division splashed back across the stream to attack Wagnelee.


The assaults were still going in, yet to yield positive results as night began to draw in...
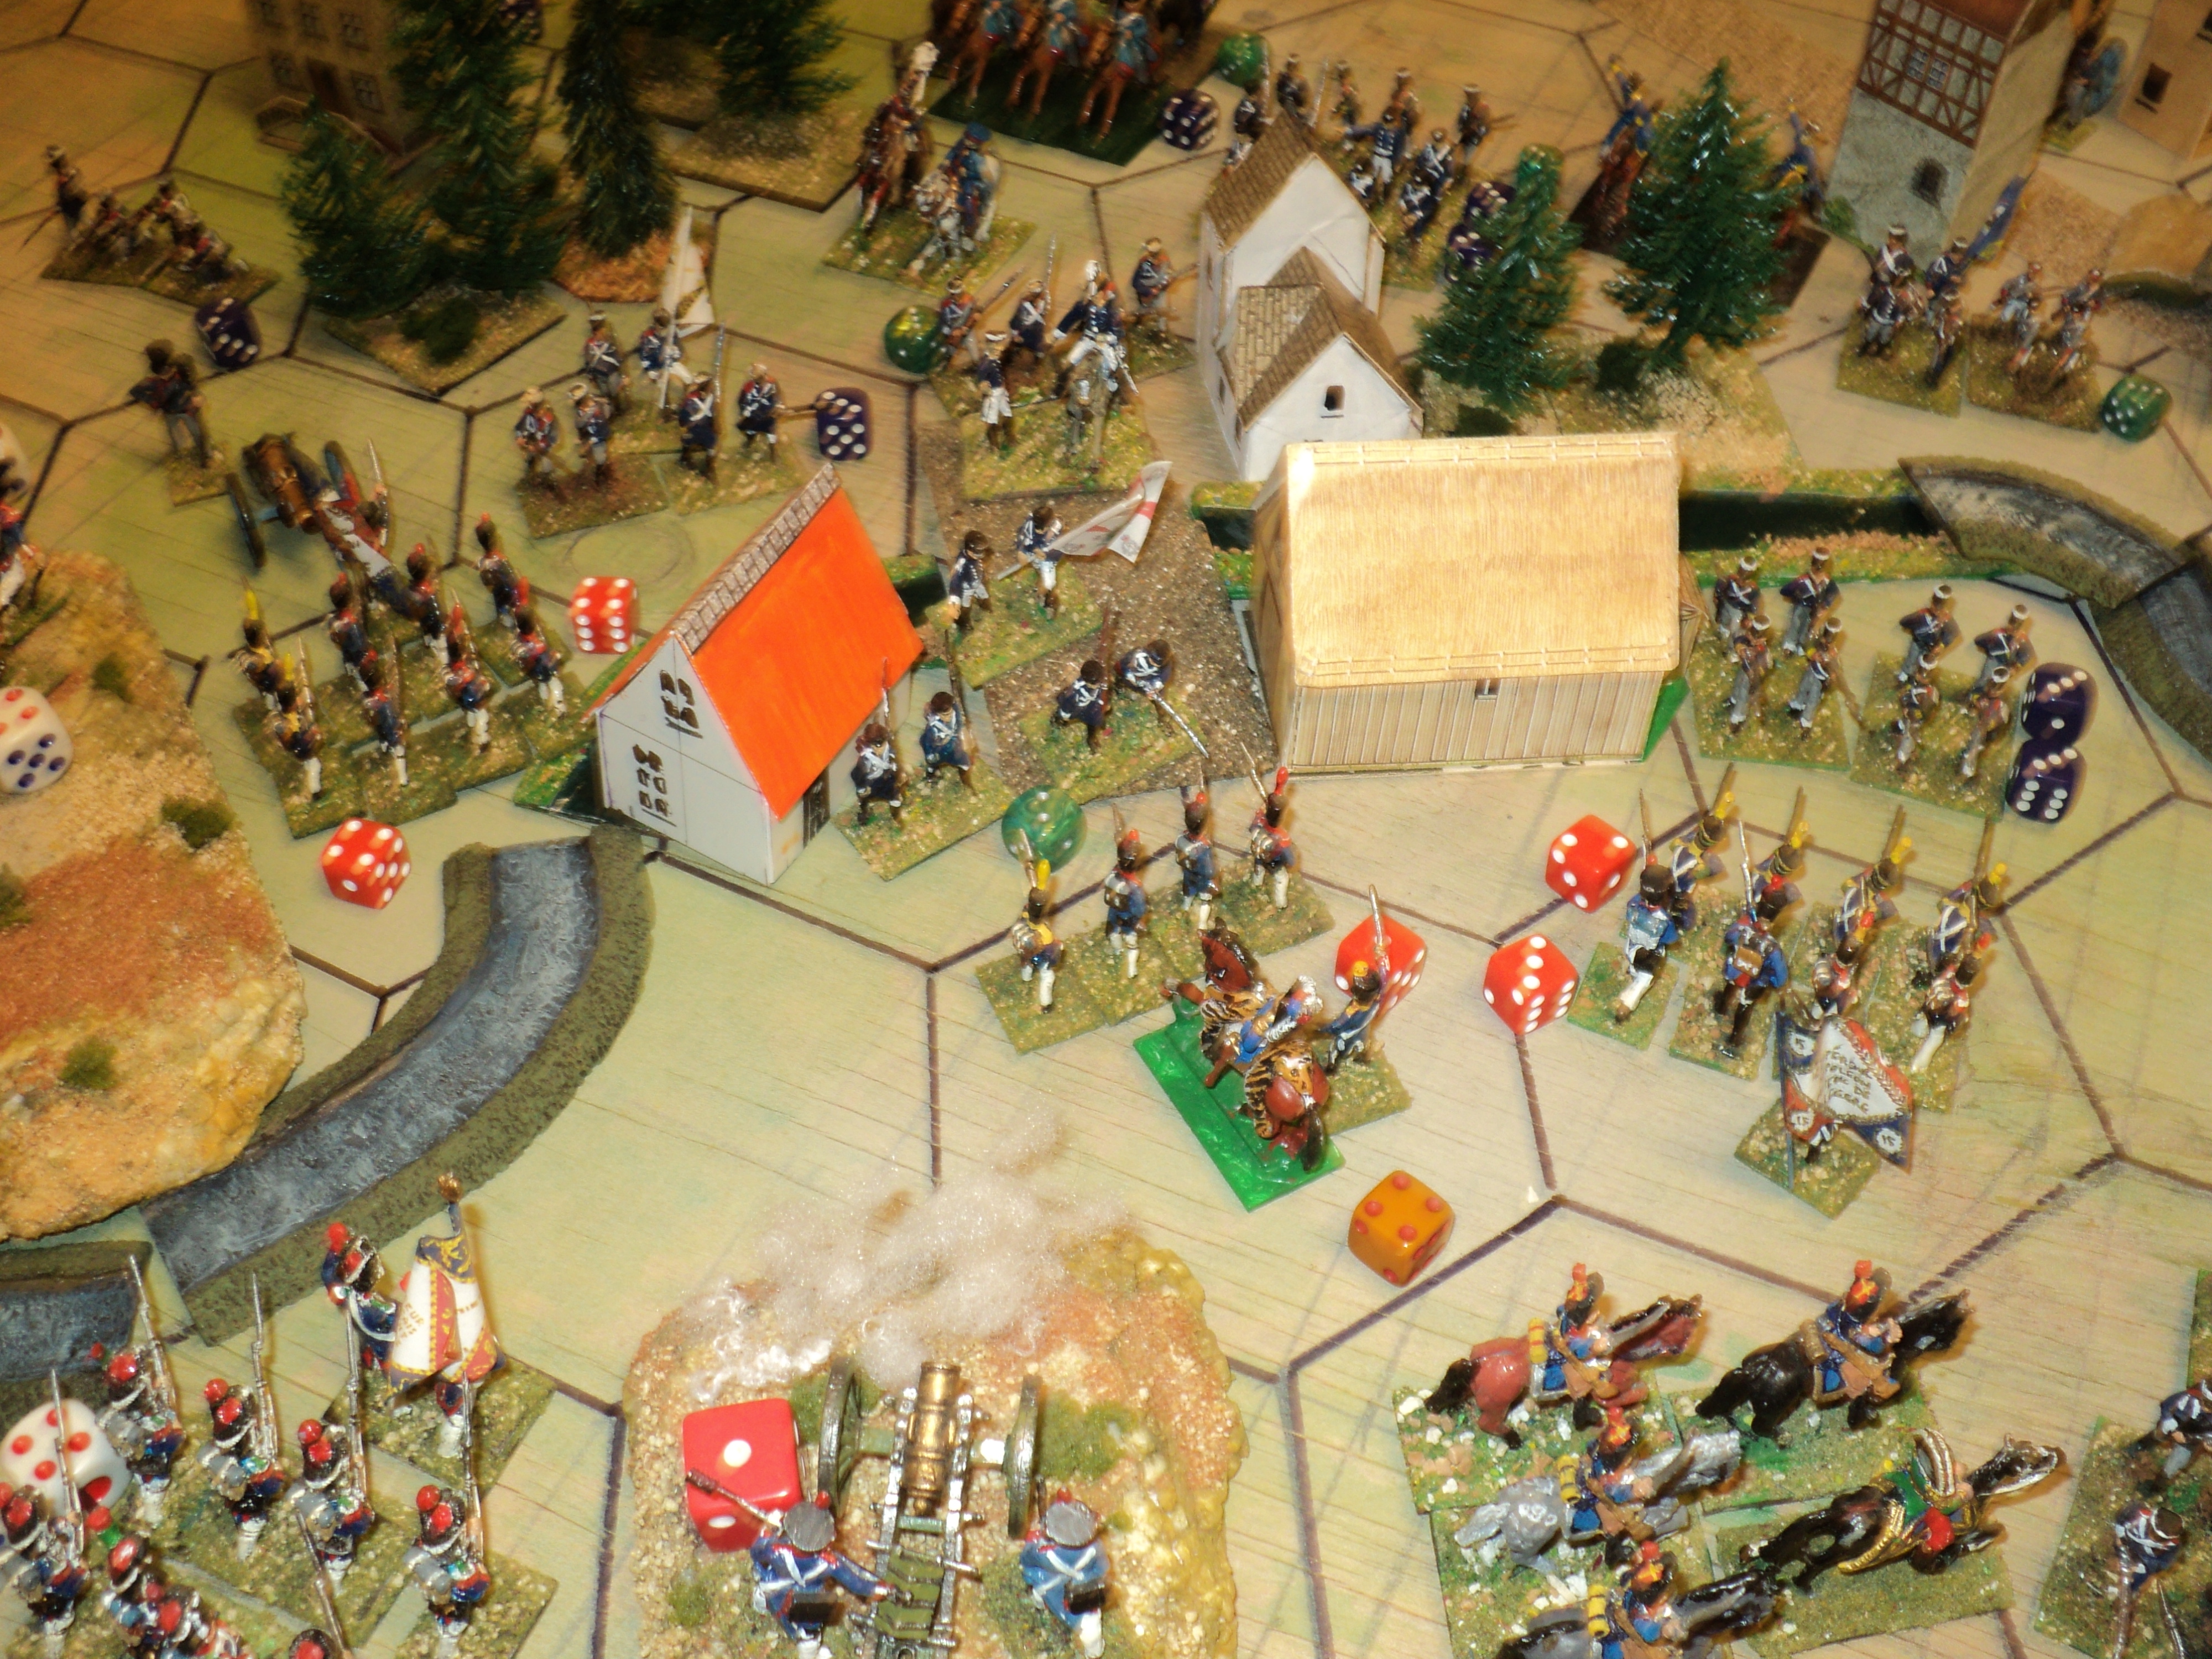
Assault upon Ligny


All this while, complicated events were unfolding around Ligny. General Gerard's IV corps, especially 12th and 14th Divisions, had been depleted during their assaults upon Ligny, though the latter Division had momentarily driven 19th Infantry from the northern sector of the village. The sudden irruption of the Prussian 9th Brigade from III Corps onto the 14th's right wing prevented exploitation. 

The vacated sector quickly reoccupied, the pressure upon the town was eased by the complete and final repulse of 12th Division, and 9th Brigade's successfully driving 14th Division well away from Ligny itself. But such relief that brought didn't last long. Led by General Drouot himself, the Old Guard took up the assault upon the important village, whilst the remaining IV Corps Division enveloped the southern outskirts and, together with the Young Guard on their left, began engaging elements of the Prussian 2nd Brigade behind the place.


The situation was becoming rather awkward for the Prussian around Ligny, as, although there were supports in plenty - and Feldmarschall Prince Blucher himself was close by lending the light of his countenance to proceedings - the field was hereabout too congested for the easy disengaging of the embattled troops for their relief, and re-engaging with fresh reinforcements (I have an idea such was the case historically, as well).  


There was no denying, however, that for the moment, the III Corps counterattacks across the Ligny stream east of the village had gone a long way to compromise French chances of victory. Now reduced to a mere rump of its original strength, the depleted 14th Division could not last much longer (the 8 SPs with which it began was now reduced to 1SP).


On the other hand, matters were looking for the moment far more promising for the French west of Ligny, as their advances threatened a rupture in the Prussian line on both sides of the Brye woods.

But that threat was quickly closed down, at least temporarily, by the intervention of Pirch's II Corps, and the recapture of Wagnelee. But the Vandamme's Corps, with the aid of two Divisions of the Guard, still had the strength in hand to recover the initiative in this half of the field.


It was much the same in the other half. Although what was left of 14th Division finally broke up and fled the field, 19th Division of VI Corps and the Middle Guard infantry were by now ready to take up the quarrel.  


As night drew in, Napoleon's Armee du Nord was once again in the ascendancy and pressing for the breakthrough.


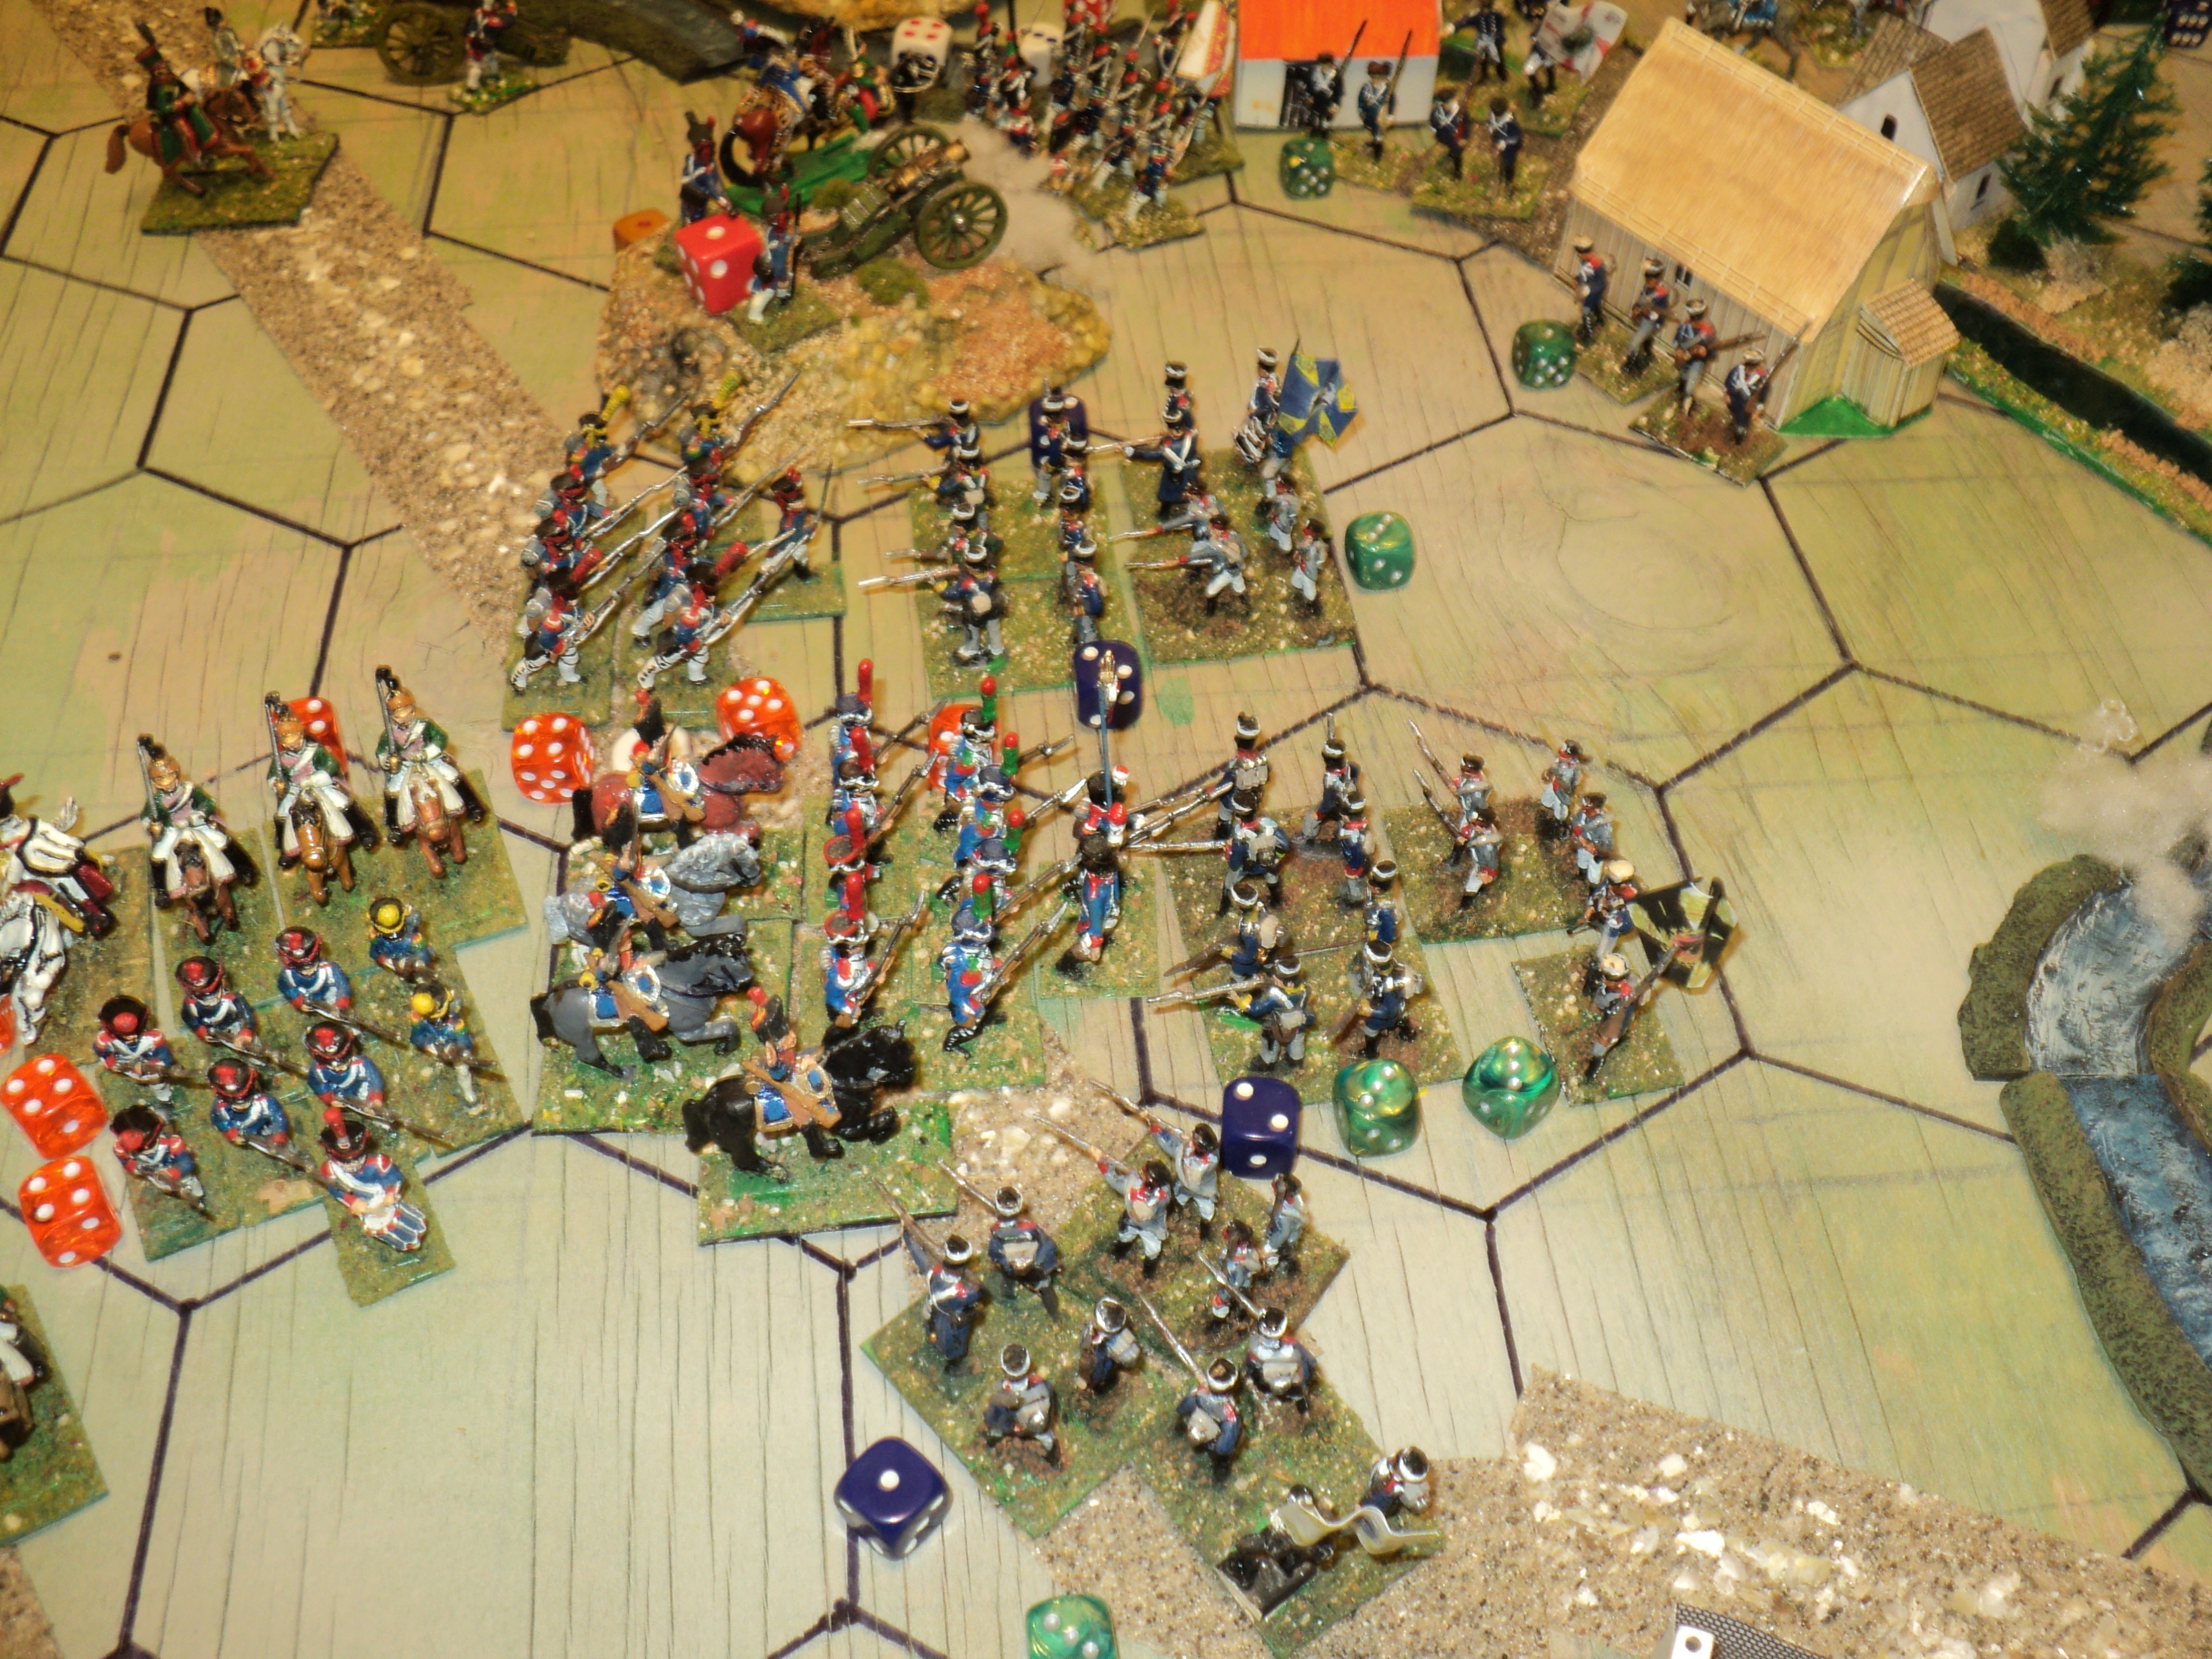
Clashes East of Ligny


For much of the action east of Ligny, between that village and bridge at Tongrinelle (see pic immediately above), the French seemed likely to reach the Ligny Stream opposed only by the Prussian 10th Brigade. For a good long while that Brigade, wholly unsupported, saw off the attacks by 7th Cavalry, but then had to endure further attacks from the Imperial Guard.
Ligny was about to fall, when  9th  and 12th Brigades, either side of the III Corps artillery, drew up along the river bank.  At once the artillery opened fire in support of 10th Brigade, isolated on the far side of the river (see pic below).  On the French side, 14th Division felt compelled to desist from exploiting its newly won victory at Ligny, and turn to face the menace to its flank.  Later historians were rather inclined to criticise the commander's caution on the grounds that seizing that part of the built-up area conquered would very likely have compromised the whole Prussian defence behind it.


Be that as it might have been, I Corps soon recovered the lost houses and enclosures, and the 14th were driven with loss well away from the village. Sustained with heavy loss for a considerable while, their retreat finally broke up into the rout of scattered fugitives. To balance this, the Prussian 10th Brigade were themselves forced back by the combined arms of horse and foot.


In the hope of at once crushing the 10th, the Guard heavies launched a charge - and were stopped cold.  Back they went, behind the Middle Guard, perhaps to await a more propitious moment. 


By mid- to late afternoon, a considerable battle was now raging between Ligny and Tongrinelle, 3 Division-sized Brigades on the Prussian side - though the 10th were badly depleted; and two infantry plus the Guard heavy horse on the French. But fortunes were to favour the French. 10th Brigade's eventual collapse was hardly compensated by the arrival of the 11th, driven back under intense French pressure all the way from Boignee to the line of Tongrinelle and the left flank of 12th Brigade. 

During its retreat, 11th Brigade had distanced itself from its pursuers, but they were only minutes behind. Soon 21st Division drew up alongside the Guard - though they, much to the chagrin of the whole Armee du Nord as well as the emperor himself - were driven back by 12th Brigade's vehement defence.

That setback was soon made good: the guardsmen's mettle was put once more to the test, and their counter-charge, along with the simultaneous push by the two VI Corps Divisions on either side, drove the whole Prussian III Corps infantry all the way back to the river's edge. So matters stood as the battle drew to a close.

The Fight for Balatre


The fight around Boignee and Balatre continued more or less as it began - a fair bit of swirling and milling about of the cavalry, followed eventually by the intervention of 21st Division of VI Corps. Held up more than once by traffic jams, the small 20th Division, together with the artillery, were still some distance off when finally the 21st clashed with Prussian infantry south of Tongrinelle.  

They were at once successful, driving the enemy in a running battle all the way to Tongrinelle and, on the Fleurus road, alongside 12th Brigade. At the end of the day, only remnants remained with the colours to sustain their end of the III Corps line.

Meanwhile, at Balatre itself, Hobe's light cavalry had finally been forced onto the Prussian side of the river, where, even in the fading light of the late afternoon, they set at defiance all attempts by the French cavalry to effect a crossing.


Decisive Victory!

So matters stood at the end of the day, with the French applying an unremitting pressure all along the line.  But obvious signs of Prussian exhaustion were setting in. No longer were French advances being overset by Prussian counter-attacks. Ligny fell to the Old Guard. The Young Guard, pushing up behind the village, would have obviated its recapture anyway, but the counter-action to achieve that was not forthcoming.   


I had begun monitoring the SP values some time before this, and it seemed for a while that the French were getting rather the better of the action. Events late in the action went towards the French advancing amid a battle of attrition. In that battle, the Prussians restored some parity, but the looked for result eventually arrived.

The Prussians losses finally reached their exhaustion point. Things weren't looking so very rosy for the French either, but they had still come capacity for offensive action. I called the battle at this point, although it could have gone on for a move or two longer. However it was a clear victory for the French, however hard and close fought.


The strength-point loss was about the same on both sides, about 55. This was well in excess of the Prussian exhaustion point of 48, and still a little short of the French 57. On the Prussian side, hardly anything was left of I Corps; and II Corps was barely scratched. III Corps has lost 10th Division outright, and the 11th was barely able to keep its place in the line; but 9th and 12th Divisions were still full of fight.

On the French side, IV corps bore the brunt: nothing remained of 12th, 14th Infantry and 7th Cavalry Divisions, though the remaining 13th was still going strong. The cavalry Corps of Pajol and Exelmans also had several knocks to show; Vandamme's III Corps also knew it had been in a fight.

So endeth the narrative. I mentioned earlier that one or two issues emerged in the course of this battle, which I hope to address in a day or two - tomorrow, perhaps, if my dental appointment doesn't raise any concerns... 


To be concluded.