Friday, March 31, 2017

Stonewall in the Valley 13 - Bartonsville.

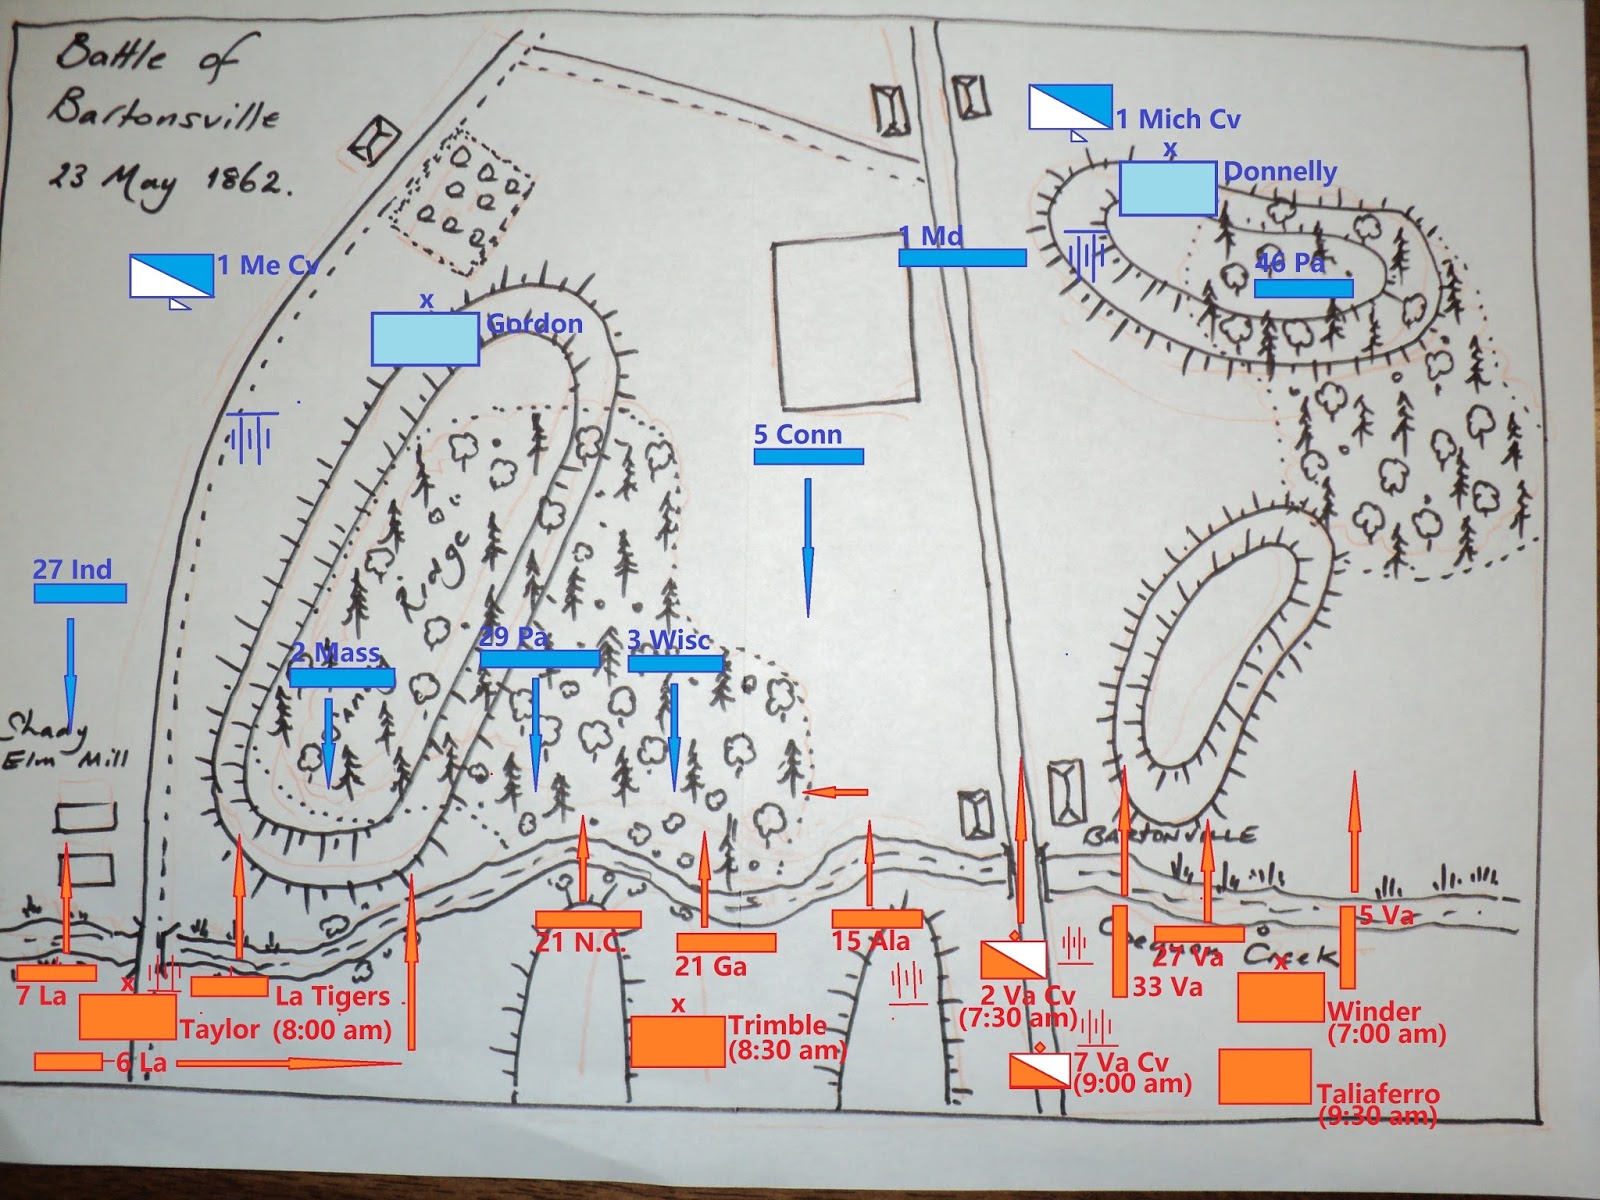
Map of the early action: Gordon's attack, and Confederate arrival times.

Moving off at the crack of dawn - if 'crack' can be said of the soggy dawning of 23 May 1862 - the Army of the Valley set off northward after the battered corps of General Banks. Outnumbered though he knew his troops to be, nevertheless, making up in pugnacity what he lacked in military expertise, Banks determined to take the fight to his opponent. As General T.J. Jackson's army approached the line of the Opequon Creek at Bartonsville, he found Union forces coming forward to meet him.

The Union army prepares to advance to meet the foe/

Crossing the swampy Opequon (I've supposed it to be so for the sake of this campaign) was not going to be a simple matter in the face of the enemy, given that it would take half the morning for his whole army to come up. Should he wait? No: that would allow the Union Army to scuttle clear.  
Stonewall Brigade crossing Opequon Creek.
First to arrive was the Stonewall Brigade itself, somewhat to the east of Bartonsville. The crossing here was easy enough, as despite the drizzle, the creek was not in spate. Nor was it opposed, as Banks had decided to refuse that wing, keeping Donnelly's battered Brigade in a fairly strong position some distance behind the creek. As the stream proved impassible to vehicles, the artillery accompanying the brigade headed for the Bartonsville bridge. Ashby's 7th Cavalry arrived a half-hour later, but splashed across the creek to provide cover behind which Cutshaw's battery could deploy.
8 a.m. Taylor's Brigade arrives up the 'Middle Road'
Meanwhile, Brig-Gen R. Taylor's Louisiana Brigade had been marching up the minor road running parallel to and west of the all-weather Valley Pike. They had made good time to arrive a mere hour later than the Stonewall Brigade. It was on this wing that the Federals were to make their attack. The Louisianans were to find their celerity of marching would have to be matched by their toughness in a fight.
Confederate right.
Hopes by a body of Union cavalry to catch part of the Stonewall Brigade whilst crossing the creek were dashed when the latter were able to clear the obstacle and form line before the horse could mount a charge. Their numbers too few to entertain thoughts of a rifle and carbine duel, the Federals made off back to their infantry line.
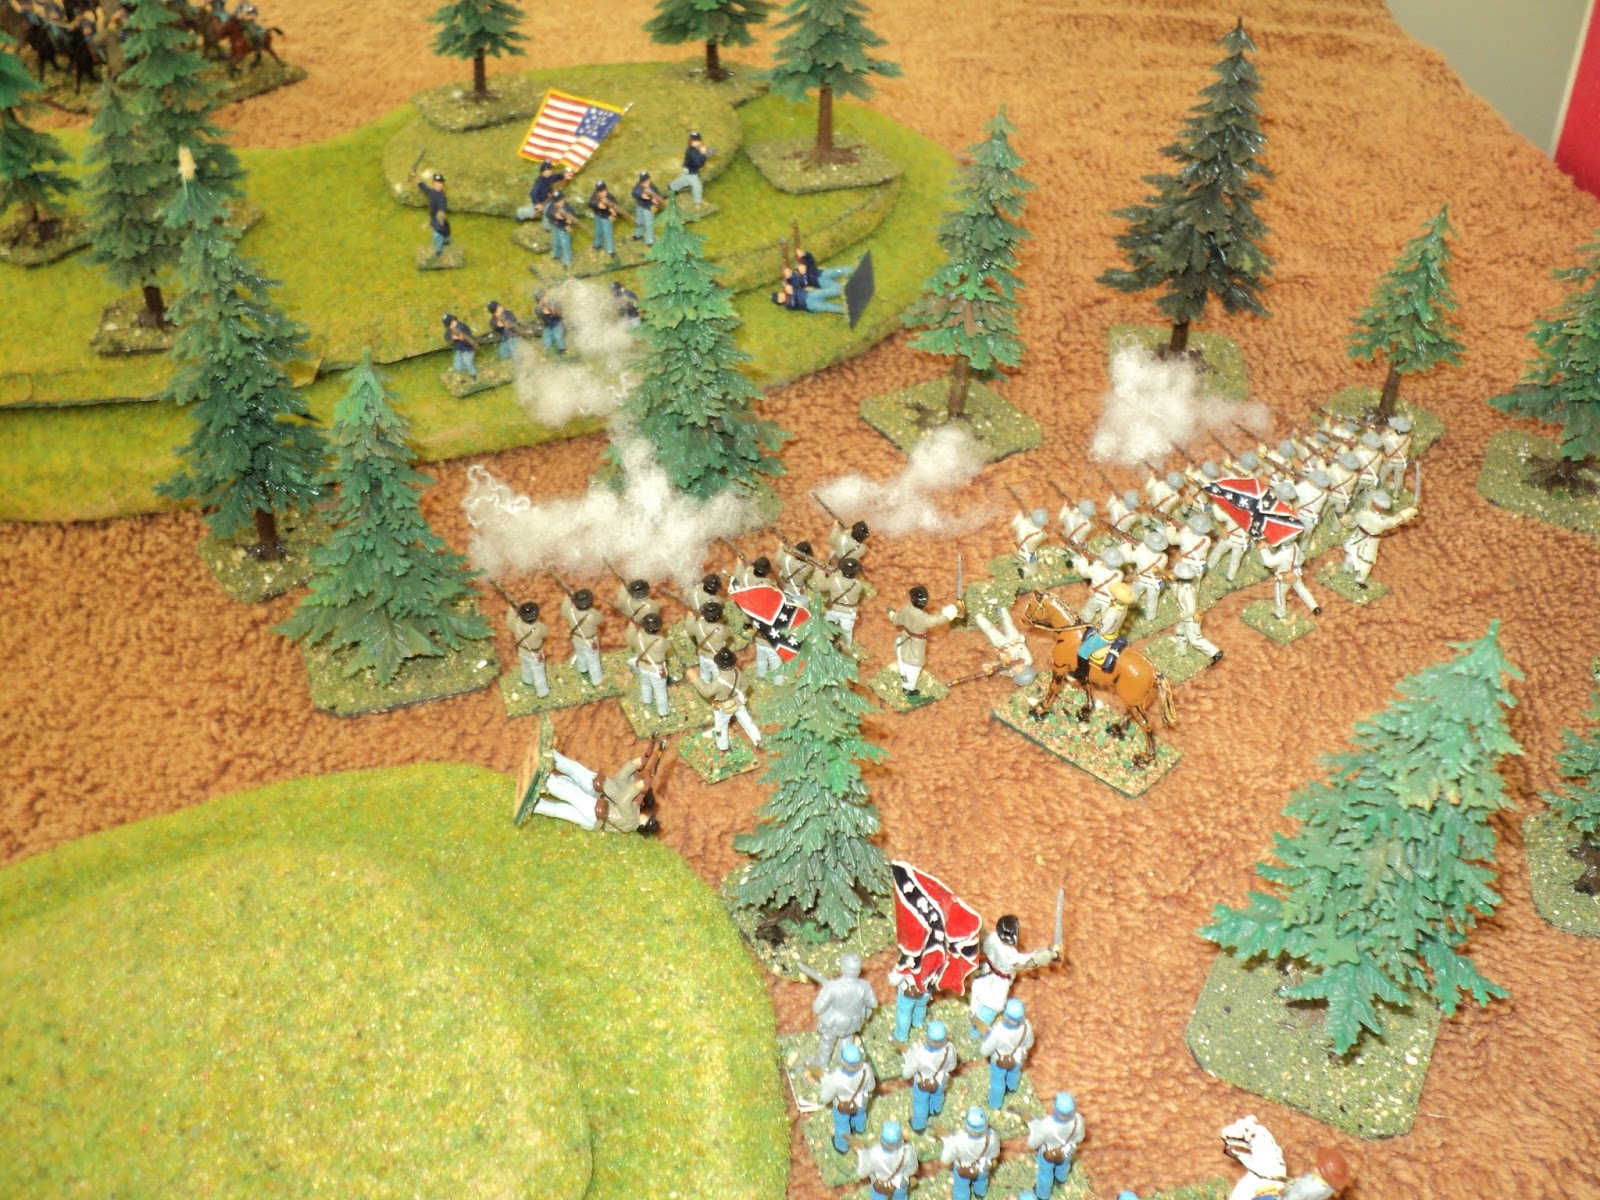
Louisiana Tigers encounters Union infantry upon the
wooded ridge.
The real action opened on Taylor's front. Crossing the bridge, 7th Louisiana swarmed into a timber mill and yard hard by the stream, where they were soon engaged in a fire fight with 27th Indiana. The Tigers crossed to the right of the bridge, scaled the slopes of the ridge beyond, and plunged into the crowning woods. They were almost at once assailed by slightly superior numbers of 2nd Massachusetts advancing to meet them. A half hour later, the right wing of 29th Pennsylvania added to the numbers against the Tigers. For a further hour, the Tigers clung tenaciously to their foothold on the ridge (having to pass two morale checks the while. Both rolls were sixes - the Tigers sure love a fight!). Eventually, having nothing to do waiting behind 7th Louisiana, the 6th moved eastwards, then crossed the stream to the right of the Tigers. This relieved the pressure before the Tigers could be evicted from the woods.
Developing action on the Confederate right.  
By this time, the General Winder's Stonewall Brigade had made contact with elements of Donnelly's Brigade. Hoping to tie down the artillery and centre of Donnelly's line, 33rd Virginia advanced boldly into a frontal attack. In the woods 5th Virginia still had some distance to advance before engaging Donnelly's flanking regiment (46th Pennsylvania) and the 27th Virginia was even further off. This ill-coordinated assault was to have endure some rough moments before it could gain any success, but it was the chance that had to be taken in the interests of time.
Trimble's Brigade arriving.  In the foreground, Ashby's
cavalry take shelter behind Bartonsville.
Ashby's cavalry could not help much.  It's covering role to protect the Confederate artillery crossing the bridge and debouching from the Bartonsville hamlet had proved more costly than their colonel found comfortable. Reduced by more than 25% of their strength, the Rebel horse fell back behind the stream. This was to have implications later.
Early action between 2 Massachusetts and the
Louisiana Tigers
As its right wing struggled to edge the Louisianans back across Opequon Creek, the remainder of Gordon's Brigade - 3rd Wisconsin - continued its sylvan sweep below the ridge, hoping to reach its banks. Too late-- just too late. Trimble's Mixed State Brigade had arrived betimes and were beginning themselves to cross the stream. Under fire, this was a costly and dangerous business, but Trimble had hopes that superior numbers would force their way across.
Looking along Donnelly's line.
The bold attack by 33rd Virginia seemed momentarily to be yielding dividends. Great chunks were being torn out of the opposing infantry, 1st Maryland, but, supported as they were by artillery, the latter were damaging the Virginians at least as much. It was the Virginians who finally gave way, and fled back over the the Bartonsville Hill.
Arrival of Taliaferro's infantry and Munford's cavalry.
By this time, the morning was well advanced. Just about the whole of the Army of the Valley was up and ready for action. Whilst the artillery massed about the only convenient crossing, the Bartonsville bridge,  Munford's cavalry crossed the stream to the right of the settlement.
General view of the Confederate right
As late as 10a.m. the main action was still on and about the Sandy Ridge forest and the Shady Elm woodlot. Despite the casual cover offered by the latter, the Confederates occupying it began to get the worse of the firefight. Lusk's battery, deployed south of the river could offer no direct help to the infantry, and engaged in a long range counter-batter duel instead with Union guns deployed further up the road. In this at least, the Confederates enjoyed some success, as losses eventually forced the Union guns to pull back out of range, lest the guns be silenced for good.
General view looking eastwards


Despite that encouragement, 7th Louisiana had soon to give up its position in the timber yard, and scrambled back across the creek. For a brief time the Indiana Regiment occupied the ground just won, but very soon gave it up. In this they were discouraged by the Napoleon guns of Lusk's battery and the 7th Louisiana men were soon rallied along the river bank as well. Something of a deadlock descended upon this part of the field for the rest of the action.
The action becomes more general.
Having failed to force the Tigers off the end off the ridge, 2nd Massachusetts and 29th Pennsylvania found themselves in a deadly duel with 6th Louisiana as well. True, the Tigers had got the worse of the earlier exchanges and it looked at least a couple of times that they might break down the hill (the two morale rolls, both for receiving 10% losses in one turn). Once the powerful 6th Louisiana joined the fight, the Union impetus was brought to a halt. But it was not enough to force them back. Third Wisconsin was still unengaged. That unit might have descended upon the flank of the Louisianans, but for the arrival of 21st North Carolina from Trimble's Brigade.

Confederates forcing a passage across the Opequon |
Creek in the face of enemy fire.
True, the North Carolinians had to make the crossing under fire (unable to fire back whilst still in the stream under my rule set), but having forced their way across, were able to hand in a few licks of their own. A short distance to the right, 15th Alabama was swinging around to enfilade the Wisconsins' flank. Twenty-first Georgia, still crossing the stream, acted as a reserve.
Pressure builds against the Union left.

As the fight escalated in the Union right, it was on their left that the more ominous signs of defeat were beginning to loom. One Confederate regiment had been thrown back, but by now the isolated 46th Pennsylvania were being assailed by double their numbers of Virginians. Worse still, the whole of Taliaferro's Brigade were marching up behind Winder's men. Long odds for Donnelly to face.  
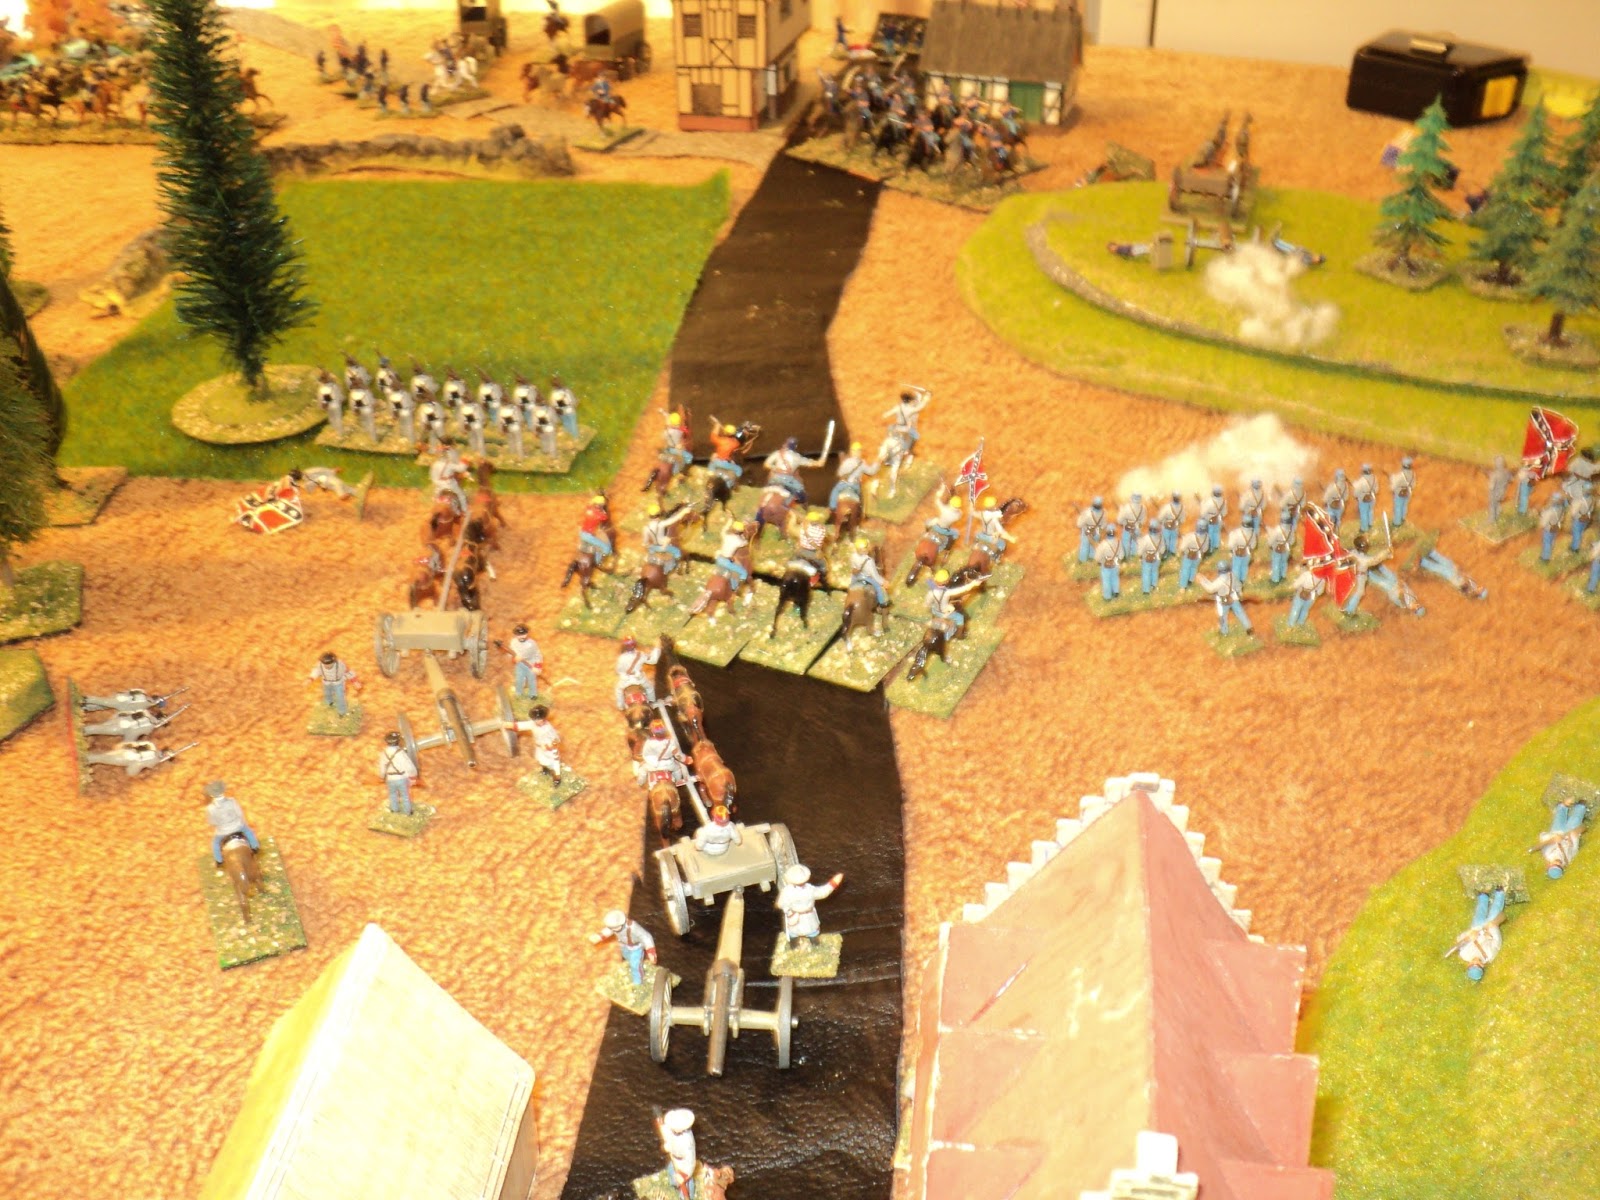
Munford's cavalry charge.  The result was a costly
tactical draw, but the Union infantry that had to face it
we pretty much wrecked as a unit.
Eyeing the weakened state of the Union infantry in the road, supported solely by a gun battery, Colonel Munford thought the time propitious to chance his arm in a charge.  Surging off the ridge, in the teeth of shot, shell and canister from the Union Napoleon guns, and rifle fire from the Marylanders, the Confederate horsemen rode in with shotgun and pistol.

(An aside, here. I prefer to allow cavalry charges in my ACW rule set, as I know of at least a half dozen occasions in which cavalry charges were attempted. At least two, possibly three, of those were at least partially successful. The failed charges (at Gaines's Mill, Cedar Mountain, and Hunt Morgan's at Shiloh, were each made by fewer than 200 men). Bear in mind, too, that at least until 1 July 1863, at least the possibility of cavalry charges were borne in mind by infantry. Witness two CSA regiments forming square at Gettysburg, when Buford's cavalry mounted and drew off to a flank. That does not make such charges winning propositions, as you will see.)
7th Louisiana abandons the timber yard and retreat behind the creek.

The Union victory at the Shady Elm timber yard proved to be barren of real fruits. Seventh Virginia rallied quickly enough along the riverbank, whence, supported by Capt. Lusk's Napoleons, they were not to be shifted. Nor could the cherished hope of falling upon the flank of the Confederates on the ridge be fulfilled, as that would have presented a flank to be enfiladed by gunfire. Shortly after occupying it, the Federals abandoned the timber yard, and eventually fell back northward.
Firefight in the forest.
That left the three other regiments of Gordon's Brigade having to face off against five Confederate. That 21st North Carolina had within the hour to fall back exhausted across the stream hardly seemed to reduce the pressure. Nor could the selfless attempt by 5th Connecticut to draw off the attention of 15th Arkansas, which had been threatening to roll up 3rd Wisconsin's flank. Twenty-first Georgia weighed in, the Alabamans changed front to engage the Connecticut men from cover, and the Union troops found the pressure just as strong as ever.
twenty-first North Carolina about to driven back
across the stream.
The action of 5th Connecticut to relieve some of the burden of the fight from Gordon's Brigade provided just the situation Colonel Munford decided would give his troopers the chance to pull off his charge. Had he reckoned upon the effectiveness of the enemy musketry and gunnery, he might have taken a different view, but the decision was made, he had to abide the outcome. Undeterred by their losses the Confederate raged in among the hapless Marylanders, pistols and shotguns proving more effective at close range than long rifled muskets. All the same, neither side could claim the ascendancy. As the Confederate horse made off after their charge, the remnants of the Marylanders could be seen retreating rapidly up the road towards their home State.

(Aside:  this was a pretty bloody affair on both sides, the Union losing 8 figures and the CS Cavalry losing 7 in the change and the hand to hand fight. Reduced to less than 50% of their strength, the Marylanders fell back in rout. Less badly off, the Confederates still had to withdraw, though they maintained a good order).
Munford's cavalry lose heavily, but the 1st Maryland even more so.
This disaster was followed shortly afterward by the sudden collapse of the resistance by 46th Pennsylvania. Having held on for most of the morning against the gradual buildup of Confederates to their front, the odds, combined with a mounting threat to their open left flank forced them off their ridge and, they too, began their exodus from the field.
Even within the cover offered by woodlands, two to
one odds are too much to overcome.

27th Indiana begins it long retreat.

With the defeat of all three his three regiments - 15th Alabama having flung back 5th Connecticut's counter attack - Brigadier-General Donnelly had almost nothing in hand to stem the general advance on the Confederate right. General Banks could see the writing on the wall and ordered a general withdrawal, but now the problem lay in extricating Gordon from the battle raging on Sandy Ridge. He still had 1st Michigan Cavalry, 5th Connecticut was still in hand, and his battery was still in action. But what were they against 5 Reb regiments and three batteries?
Munford's cavalry are out of the battle, but Taliaferro's infantry
is about to join in.
Urged forward by an impatient Major-General Jackson, the infantry surged forward, hoping to sweep Donnelly's exiguous command from the field, then to swing behind Gordon to cut him off. Seeing the danger, Banks ordered 1st Maine Cavalry across from the right. As the Michigan cavalry emerged to cover the retreat of the fleeing infantry, Colonel Ashby began to entertain thoughts of a glorious charge...
CSA pressure against Donnelly's exiguous line.
In receipt of orders to withdraw, Brig-Gen. Gordon began a gradual and well-ordered retreat. Back he had to go, but he would not be hustled - not by Banks's urgency, not by Reb musketry, not by the parlous situation. For their part, neither Taylor not Trimble saw any benefit in too precipitate a pursuit. Both Brigade commanders opted for steady pressure and to follow up just closely enough to keep the Union infantry under fire.
It has taken all morning but now the Confederates
begin their advance in the woods.

Confederate right wing.
Seeing a chance for glory, and before any other Union troops could intervene, Col Ashby led his 7th Virginia Cavalry in a charge against 1st Michigan. It was a disaster. Getting slightly the worse of the exchange of pistol shots as they closed, the Virginians had no answer for sabres wielded by a desperate and angry enemy. Taking three times the losses they delivered, the surviving Virginian horse were glad to break clear to retire behind their gun line. Barely a third of their early morning strength remained with the colours. Yet, for all that, Ashby's troopers remained in good spirits - perhaps more exasperated than defeated by their discomfiture (7th Virginia, having lost more than 50% on the day, have to retreat,  But a 6 rolled for morale - another one! - meant they remained in hand, and not routing all over the countryside).

Ashby's charge.  A slight edge in numbers did not help.
There is little left of the action to narrate. Morning had some time ago passed into early afternoon, and time was becoming of concern to the Confederate commander, as much as it was to the Union. A disquieting rumour had come to General Jackson from the direction of Strasburg. It appeared that if that town were not yet occupied by forces from Fremont's command, the place soon would be.
Gordon's step-by-step withdrawal.

A look along the Union line.
Yet at the same time, Jackson wanted Banks out of the picture for a long time to come, if not for good and all.

Ashby's cavalry take heavy losses.
Had Ashby's charge been as much a success as it was a failure, he might have achieved just that. But as it was, his cavalry were left out of the action. The infantry had to take up the pursuit.
The pursuit continues without cavalry.
As the day advanced it was becoming plain that the Union troops would get off with just about all that was left off their strength. Once clear of the woods, Gordon's people would soon make off, and the rest were already well on the road north but for a few ragged remnants prepared to hold back the Confederate pursuit.  
One the retreat has begun, it can not be stopped...
At about 3 o'clock Jackson called off the action. The damage to Banks's command he judged to be sufficient. Now to see what, if anything, was to be done about Fremont. By this time the rumour was confirmed, Fremont's Mountain Corps would be entering Strasburg, almost a half-day's march in his left rear. If this rain kept up, it might well take longer than a half day to reach the place.
Close of the action
Defeated though he had been - once again - Major-Genl Banks was disinclined to take a pessimistic view of the situation. True, it would take some time to refurbish his command. Donnelly's Brigade in particular had borne the brunt of the fighting over the last four days, and had been destroyed, pretty much, as a fighting formation. Yet there was no doubt about it: his men had given a very good account of themselves against overwhelming numbers. Both Confederate cavalry regiments had been fought to a standstill, if not routed altogether. The same could be said of at least three rebel infantry regiments. Riding northward among the remnants of his command, General Banks was inclined to think the afternoon a deal less dark and grey than it looked.
The remnants of Donnelly's Brigade.  Four days ago it comprised
108 figures.  Here there are but 29 remaining.


Friday, March 24, 2017

Stonewall in the valley 12 - Banks at Bay at Bartonsville.


After all the marching and counter-marching of the day before, it was clear in Banks's corps, from the General Officer Commanding himself to the lowliest volunteer; it was clear as the Thursday 23rd dawned drizzly and miserable, that they would be coming very soon under heavy attack. A spot of rain was not going to stop Jackson's 'foot cavalry'. Between them, the Major-General and his two Brigade commanders bethought themselves that passive defence would be simply asking for a defeat. They resolved to strike.

I had to make some kind of change to a straightforward Attacker-Defender action with forces of disparate strengths. It was high time for something more along the lines of Cedar Mountain (9 August, 1862) or Sabine Crossroads (8 April, 1864) (ironically enough, Banks featured in both those actions... h'mmm...).

First of all, the forces were sorted out, both sides having lost something like 80 figures (2000 men) in the previous actions.
Union army drawn up ready for desperate battle.


Union: Major-General N. P. Banks

Donnelly's Brigade:
     5 Connecticut        20 figures*
     1 Maryland            20 figures*
     46 Pennsylvania    18 figures

* 26 New York had been so reduced by losses, that it had to be disbanded and its remnants redistributed, 3 figures each to Connecticut and Maryland.  As 46 Pa had been detached, that unit received none.

Gordon's Brigade:
     27 Indiana              26 figures
     2 Massachusetts     23 figures
     29 Pennsylvania     24 figures
     3 Wisconsin           22 figures

Cavalry: 
     1 Maine                  10 figures
     1 Michigan             12 figures

Artillery:
     New York Artillery  4 figures; rifled Parrotts
     Ohio Artillery          4 figures; smoothbore Napoleons.

Total: 183 figures and 2 guns.

Confederate: Major-General T.J. Jackson

Division Jackson:
Winder's (Stonewall) Brigade:

     5 Virginia                  19 figures
     27 Virginia                22 figures
     33 Virginia                21 figures
     Poague's Artillery       3 figures - smoothbores.

Taliaferro's Brigade:
     10 Virginia                 22 figures
     23 Virginia                 18 figures
     37 Virginia                 22 figures
     Cutshaw's Artillery      4 figures, - rifles

Division Ewell:
Trimble's Brigade:

     15 Alabama                22 figures
     21 Georgia                  22 figures
     21 North Carolina       20 figures
     Raines's artillery           3 figures - rifles

Taylor's Brigade:
     1 La Special Battalion 18 figures (Tigers)
     6 Louisiana                  24 figures
     7 Louisiana                  17 figires
     Lusk's Artillery              4 figures - smoothbores

Cavalry:
     2 Virginia Cavalry        21 figures (Munford)
     7 Virginia Cavalry        18 figures (Ashby)
     Chew's  Artillery            4 figures - rifles.

Total: 308 figures and 5* guns.
For some reason Chew's flying artillery got left out of the battle; that is to say, I simply forgot about it!)
Map of the battlefield, with Union dispositions and battle plan.  


From the map you may discern how I was going to conduct this action. Having determined upon 'Strike! before being struck', I fixed upon the Union plan, with the Confederate approach being programmed. Whilst Donnelly held a defensive position on the east flank, Gordon's whole brigade would make a thrust against the Confederates as they crossed Opequon Creek through the woods upon Sandy Ridge, and the open valley towards the Shady Elm timber yards. 

If any Rebs tried to cross near Sandy Ridge, they would find the going tough, but if not, they would find their open flanks being assailed from cover.

Divided up into Infantry Brigades and Cavalry regiments, with cannon rolled separately, the Confederates would arrive at any time from Game Turn 1 through to Game Turn 6. Whenever a battery arrives coincidentally with a brigade, it would be held that that was the battery belonging to it. It would take half a morning (3 hours, from 7 to 10 a.m.) for the Confederates all to arrive on the field. As the first hour of the day will have been spent marching into contact, it would be 10 a.m. before all units would be up. The Union forces had that time to strike with equal or superior numbers.

As to the point of arrival, the field was divided into rough quarters, with the following additional die rolls:
1. Arrive at the Shady Elm Mill Bridge;
2. Arrive at the Shady Elm Mill Bridge;
3. Arrive in front of the Sandy ridge wooded area;
4. Arrive up the Valley Turnpike towards Bartonsville;
5. Arrive up the Valley Turnpike towards Bartonsville;
6. Arrive east of Bartonsville.

The dice were rolled, with the following results:

Game Turn 1:  Stonewall Brigade plus artillery arrives east of Bartonsville;
Game Turn 2:  Ashby's Cavalry arrives up the Valley Turnpike;
Game Turn 3;  Taylor's Brigade - minus artillery - arrives at the Shady Elm Mill Bridge;
Game Turn 4:  a) Trimble's Brigade arrives in front of the forest, on and between the two spurs south of the creek:
Game Turn 4:  b): Lusk's battery arrives at the Shady Elm Mill Bridge;
Game Turn 5:  Munford's Cavalry arrives up the Valley Turnpike;
Game Turn 6:  Taliaferro's Brigade arrives east of Bartonsville. 


Mid-morning - with action about to be joined between Gordon's Union
Brigade and elements of Taylor's and Trimble's CSA Brigades 

Saturday, March 11, 2017

Stonewall In The Valley 11 - Hard Marching.


If Wednesday 21 May 1862 in the Shenandoah Valley was characterised by hard fighting (see here), the following day was one of hard marching - especially for the Army of the Shenandoah.  After the morning's action of the day before, the Union Division of General Nathaniel P. Banks had fallen back upon Middleton, whereat General Jackson turned his attention to developments behind him.  His successful action to clear his lines of communication resulted in the demise of Major-General Shields, and his Division's headlong retreat towards Front Royal.  There, Colonel Knipe separated his own small force from Shields's - now Colonel Erastus B. Tyler's - Division in order to rejoin Banks's command.  All this while, Major-General Fremont was making his best speed towards Strasburg.

Dawn, Thursday, 22 May 1862.  Union moves
and Confederate options.  
So matters stood as as the smoke of battle cleared and Tuesday's sun sank behind the West Virginia mountains.  Now Major-General T.J. Jackson was faced with having to decide what next to do.

This proved an interesting exercise, as I could think of four reasonable options:
1.  Meet Fremont's column somewhere west of Strasburg.
2. March through Strasburg, then switch north to attack Banks at Middletown from the south.
3. March east through Front Royal in pursuit of Tyler and Knipe, the switch north and west to attack  Banks at Middletown from the east.
4.  Pursue Tyler's command through the Manassas Gap.

Of the four, the first and third seemed to me the most likely, but events were to take a rather unexpected turn. 


As Col Knipe led his column through Cedarville, the rumour of the Confederate pursuit drew ever closer.  He was still three hours' march east of Middletown when  action seemed imminent.  The good Colonel refused, however, to be drawn, and chivvied his men onward.  As it transpired no further action developed.

Of course, this was the result of a die roll.  Upon facing the prospect of action, you may recall, before determining whether the Confederates approaching were real or rumour, the Union commander rolled to decide whether to accept or decline action.  That gave him an extra half-day's march, after which, supposing the pursuit was real, he would than be forced to accept action.  In this case, Knipe would successfully have rejoined Banks, though there would have been no prospect of either avoiding action then had Jackson really been pursuing.  But see what happens later in the day.

Moves up to 10 a.m.  The Confederates strike towards
Fremont's Division


As it transpired, the Stonewall had chosen Fremont as his target (also decided by a die roll, after the Knipe decision).  Shortly after midmorning the two columns met on the road west of Strasburg. Hitherto resolute in marching to action, Fremont's boldness suddenly failed him.  At once he ordered a retreat, back towards Watsontown.

(Again determined by die roll.  The eastern Confederate march being rumour, the west march was the real.  But the roll to determine whether the Union commander would accept or decline action once again fell in favour of ... discretion.  Quite a contrast this was to the bellicose behaviour exhibited hitherto!)
Fremont having recoiled hastily, Jackson switches across
towards Middletown where Banks has been rejoined
by Col Knipe's column.

What then for General Jackson? Pursue Fremont and bring on an action near Watsontown? Or switch back through Strasburg and thrust towards Middleton after all? Out comes the die once more and...
Fremont is allowed to escape,  General Banks is the target after all. At 2 p.m. The Union scouts see the Confederates rapidly approaching.  Feeling isolated, with Shields (Tyler) reported to have disappeared beyond the Blue Ridge Mountains, and no word from Fremont, General Banks orders a retreat (determined - you guessed it - by another die roll). 

For the third time that day, the dice rolled against accepting action.  By this time Col Knipe had at last reunited with Banks's command.  Earlier in the day he had 'declined' an action that seemed imminent, but this second approach was a whole new circumstance, requiring a whole new decision. Fortunately Knipe still had enough movement allowed to accompany Banks's retreat to Newtown. The Confederates following up would have caught up with Banks's Division at dusk, but the latter were permitted to drop back an extra short distance (one hex) overnight (the early part of the evening).   

Nightfall: General Banks beats a hasty retreat
 past Newtown, but Jackson is in hot pursuit.   The other
Union columns are distant at least a whole day's march.
Nightfall of 22nd May finds the Union columns, owing to their reluctance to try conclusions with the Army of the Valley, widely scattered. The central column, General Banks's battered Division, is about to be forced once more into an unlooked for battle.

Such has been the remarkable and unexpected outcome of the series of 50-50 propositions, with no combat resulting that day.  The morrow will offer something different.  In contact with Banks. there is no question of splitting the Rebel force into 'rumour' and 'reality'.  General N.P. 'Commissary' Banks will have once more to face the reality.

Wednesday, March 8, 2017

Prototype 'Offset Oblong' Campaign Map

Draft campaign map of the Crusader operation, 1941, on a
single sheet of A4.  Note the oblong cells.
In my last posting I spoke of a campaign map I started to make for a game based upon the Crusader Battles in the Western Desert in November-December 1941.  The two pictures here show how far I got with the thing - including the mistakes and additional notes - even an idea I had at the time of transforming (by eye alone) the oblong cells into hexagons.   

Same map with a 'desert' special effect.  This map was
redrawn, double-sized onto 2 A4 sheets.


The campaign was to be 'bathtubbed' - based on the Command Decision rule set, but further scaled down.  The inspiration for this was the campaign game Barbarossa 25, in which the whole Operation Barbarossa was scaled down by a factor of 25.  This included time and ground scale.  Now, Command Decision already involves a scaling down of 1:5 in vehicles, with a two-figure infantry stand representing roughly 50 men,   So Barbarossa 25 implied a scaling down of 1:125 in vehicles, and each infantry stand represented roughly 1250 men.

This was achieved not by a method that would have looked like Not Quite Mechanised or Megablitz; but by having 1 war games Division standing for 25.  On a hex map of Russia, each cell represented an area 1 km across instead of 25.  The time scale was harder to design, so the designer (Frank Chadwick) settled on 2 days  representing 1 month.  I think I would have made a different time scale, but that's by the by.

My idea I called Crusader 5 - scaling down by a further factor of 5 from the Command Decision rule set. 1 tank would therefore have represented 25, and one rifle stand about 250 men Here are a couple of samples of my projected ORBAT:

15th Panzer Division (General Neumann-Silkow)
      Panzer Regiment  8:
          HQ: 1 cmd (command) PzIVF1, 1 recon (reconnaissance) PzII
          2 Companies each with: 1 cmd PzIIIH, 1 PzIIIH
      Infantry Regiment 15:
          HQ: 1 cmd stand, 1 kubelwagen, 1 staff radio truck, 1 recon m/c (motorcycle) MG stand,                           1x50mm AT (Anti-tank) gun with towing vehicle,
                1x7.5cm infantry gun with kettenkrad tow.
           1 Company, with 1 cmd stand, 3 rifle stands, 1 MMG (Vickers) stand, 1xSdKfz251/10
                3xSdKfz251/1 half tracks.
           1 Company, with 1 cmd stand, 3 rifle stands, 1 MMG stand, 4 trucks
           1 m/c Company, with  1 cmd stand, 1 kubelwagen, 3 m/c stands, 1 MMG m/c stand.
      Artillery Regiment 33:
           HQ: 1 cmd stand, 1 FO (Forward Observer), 1 radio truck, 1 kubelwagen:
           Battery: 1x15cm howitzer, gun crew, 1xSdKfz7 tractor.
           Battery: 1x10.5cm howitzer, gun crew (ds - double sized stand), 1xSdKfz11 tractor.
           2 AT Batteries, each with :  1x50mm PaK38 AT gun, 1 gun crew (self command), 1 truck or                    halftrack
           1 AA Battery with: 1x8.8cm  FlaK, 1 gun crew, 1 SdKfz7 tractor:
           1 AA Battery with: 1xSP 20mm Quad or 37mm AA.
      Aufklaerungs Abteilung (Recon Unit) 33:
           1 cmd SdKfz250/1, 1xSdKfz222 a/c (armoured car), 1xSdKfz231 a/c, 1 m/c stand,
           1 recon infantry stand, 1 SdKfz 250, 1 37mm or 50mm AT gun.
      Engineer Company 33:
           1 cmd engr (engineer stand), 2 engr stands, 3 light trucks.

          
2nd New Zealand Division (Major-general Freyberg)
       HQ: 1 cmd stand, 1 light truck, 1x2pr p/m (portee mount)(31Bty), 1 Bofors AA ('X'Bty):
       4 and 6 Battalions, with:
            HQ Coy: 1 cmd stand, 1 car, 1 recon bren carrier (carrier), 1 3-inch mortar stand, 1 carrier,
                1 engineer stand, 1 MMG, 1x 2pr portee mount (32/34 Bty), 1 Bofors AA (41 Bty)
            3 Rifle Coys, each with 1 cmd stand, 3 rifle stands.
     5 Battalion, with:  
             HQ Coy: 1 cmd stand, 1 car, 1 recon bren carrier (carrier), 1 3-inch martar stand, 1 carrier,
                1 engineer stand, 2 MMG, 1x 2pr portee mount (33 Bty), 1 Bofors AA (42 Bty)
            4 Rifle Coys, each with 1 cmd stand, 4 rifle stands.
      Field Regiment:
             HQ: 1 cmd stand, 1 FO stand, 2 cars, 1 staff radio truck, 1 survey troop stand.
             3 batteries (4th, 5th and 6th), each with 1x25pr gun/howitzer, 1 Quad tractor, 1 limber, 1 gun                   crew (ds) 
      7 AT Regiment: (31-34 Bty, attached as above).
      14 Light AA Regiment (attached, as above)
      Engineer Company: 1 cmd stand, 3 engr stands, 1 car, 3 light trucks
      Divisional Cavalry:  1xcmd MkVIB light tank, 1 recon MkVIB, 2 recon carriers.
This 'Division' had a transport pool rather than unit-organic transport.  Whether this transport pool was large enough to uplift the whole Division, I'm not sure.  I'd be inclined to limit the pool to something like 20-30 vehicles - enough to carry two of the three rifle battalions, say.

I was going to include an Italian formation in this rather self-indulgent article (probably Ariete Division), but my Italian ORBATS seem to have disappeared.

Unfortunately, at the time this was too ambitious a project for the resources I had available, or was likely to obtain in any reasonable time.  Too bad...


Monday, March 6, 2017

Portable Wargames and Drawing Hexes...

A One-Hour Wargames scenario '#15:Fortified Defence', using
my vaguely late 19th century Imaginations armies.  Because I |
wanted to use one of my Gatling guns, I went for the 'Machine Age' rule set.

After many vicissitudes, my hardback copy of Bob Cordery's Portable Wargames finally landed on my porch - on my birthday too!  I wonder how they arranged that!  Could not have been timed better. You'd think I would have tried out at least one of the games by now - but we'll come to that in another posting.  At any rate, I have been busy buffing up my armies of Ruberia (RED) and Azuria (BLUE), though the latter may well supply the soldiery for another nation - the Settee Empire of Turkowaz (TURQUOISE).  Ruberia at least now has its guns and gatlings painted and based...  Of these, more another time.
Ruberian infantry advance to the attack against heavily
fortified Turkowaz troops.
Discussing grid systems just lately, Mr Cordery has been puzzling over why a field of offset squares 'did not feel right' as a compromise between a field if hexagons (hexes) and a field of squares. Here's link to the article on Wargames Miscellany.

This led to my exercising my own mind about this. I recalled that, way back in 1991, in preparation for a 'Bathtub' 1941 campaign based on Operation 'Crusader', I wanted to make a campaign map. A field of hexes being 'too hard' to make (a chore I had tried once before) I came up with the 'offset square' idea. The project never did get off the ground, though I had made the map and drawn up the ORBAT lists. The thing has lain more than half forgotten somewhere among all my war games jottings ever since.

But one thing I had forgotten and recalled to mind just this morning. I did not 'invent' the field of squares.  Mine was a field of rectangles, with an 'aspect ratio' of about 10:8.66 (or, if you prefer, 11.55:10, or 30:26). There was a reason for this.  I wanted this field to approximate as closely as possible a hex field, such that the physical (as distinct from the notional) distance between the centres of the cells were the same along the 'horizontal line' as along the angled 'lines'.  

I have a feeling that the slight distortion of distances in a field of squares might be the source of Bob's unease. Maybe.

All through last week I was also off and on thinking that the field of offset squares could be transformed into a field of hexes. Well, actually, no. But is took a while for me to figure this out, and the why. It was not until I recalled to mind my oblongs that I worked out how it could be dome. I wish I had figured this out 30 years ago. No doubt there will be readers who know this method of creating hex fields...

 1.  Draw up your field of oblong cells. For the purposes of this article I have made them 50mm by 43mm.
If you are making 100mm wide cells, then the other dimension should also be 'doubled' to 87mm.

I have done this solely with a ball pen and an ancient, badly battered, wooden foot rule. No other tools are required. I also allowed an 7mm margin at the top of the page. The reason for this will be apparent in the next paragraph.
The 'offset rectangles' field.  The red triangle shows how
I wanted this field to work. On a field of squares, the
'angled'  lines would be close to 170mm to the 'horizontal
line's 150mm.
2.  Draw in additional horizontal lines above and below those already laid down at a distance of 7mm either side.  The side of a hexagon that is 50mm between the faces is 29mm to the nearest mm. Subtracting 7mm from the top and from the bottom of 43mm gives us our 29mm hex-side.
The additional horizontal lines drawn in.  You can see now,
possibly, why the top 7mm margin has been left!
I could have drawn in the hexes at once,
but hallucinated a need to mark
intermediate points that I was never
going to use.
 3.  Now you can start drawing in the hexagons as shown in the diagrams below. You will see here that I added in at this point some additional markings. This was simply to confuse myself: they were entirely redundant, unnecessary and a waste of time. Through this cause I managed to get mixed up a couple of times...


4, Having drawn up the hexagons, they can then be inked in. Being lazy, I inked then in freehand, following the lines. Normally, one would have drawn the oblong field and additional lines in pencil that could be erased. But you can see from these pictures there is scarcely any distortion, even on this pretty roughly drawn field.

I took the last two pictures to show how little distortion there is, even viewing the 'angled' lines of hexes.  Something over thirty years ago, for a naval war games project ,I build up a hex field using triangles.  What a chore that was!  I filled two sheets with hexes (you will see them here), and then tossed in the sponge.  A few weeks ago, inspired by the idea of Portable Wargames naval, I finished of 5 further sheets using the 'pin' method of reproducing the hex field.
 But I wish 30 years ago I had figured out the method I have described here!

I'm sorry the ACW 'Stonewall in the Valley' Campaign has stalled.  Too many distractions.  It has not been forgotten, and will resume soon.