Tuesday, October 26, 2021

Woodscrew Armies Campaign - Second Sino-Union War...


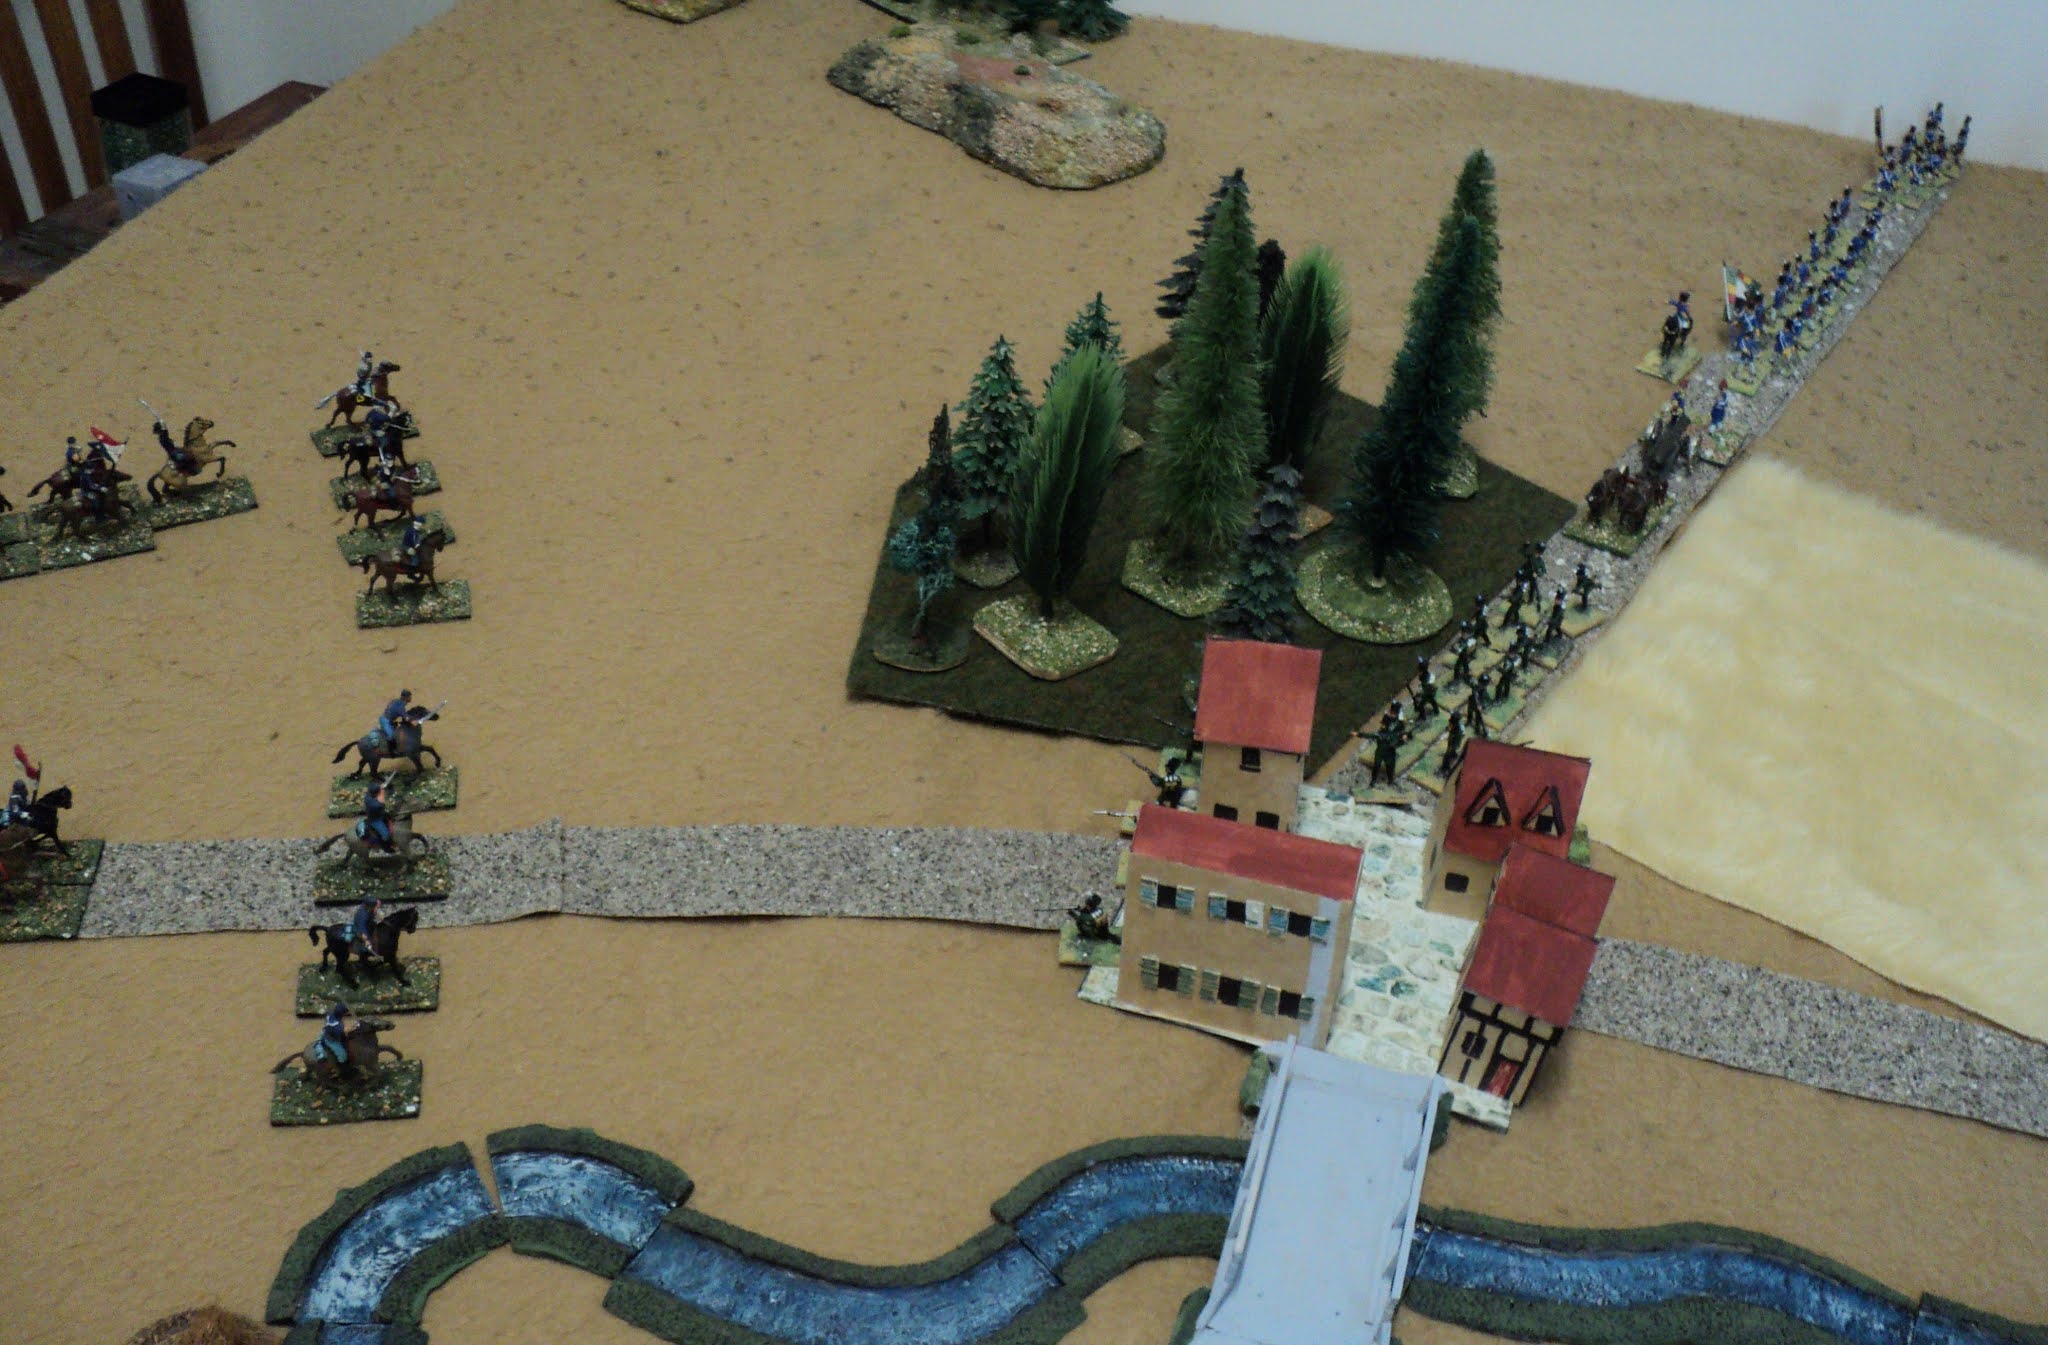
10th Cavalry approach the village...

Up a dusty road that ran through a dingy, dusty rolling East China plain, blue clad mounted soldiery approached a small settlement nestled between a tract of woodland, and a bend in a rocky stream. From a distance the place looked sleepy and peaceful enough; a closer approach revealed its half-abandoned state of disrepair; drawing nearer still revealed that right now the place was not altogether uninhabited.  

A volley rang out at a range that surprised the horsemen, and emptied many a saddle. The pickets hastily withdrew to make way for the main body of the column, and a brisk firefight developed between two cavalry battalions and whoever was in the town.  The Chinese Army had arrived there, devil a doubt, and these fellows were armed with breech-loading rifles.  Further, it appeared that from the west and north, columns of Chinese infantry were converging upon the place.  The stage was set for a meeting battle, and the Chinese had the early numbers.
10th Cav split into 2 columns of 2 regiment each
covered by piquets of the remaining two.

Such was the beginning of a campaign inspired by the Woodscrew Miniature Army blog by Tony Adams.  The link I've given here provides a generating circumstance for the campaign in which I shall be fighting the battles using my ACW Union figures, with such add-ons and proxies as I can cobble together. Note that I actually have no Chinese army. Before going into the details of the opposing forces, permit me to summarise the overall situation.  I hope Tony will forgive some gratuitously added detail to the yarn.  Check the link for the original.

A copy of Tony Adams's imaginary world, Tian

The First Sino-Union War of 1870 had led to the loss of China's southern territories, since when, of course, the Chinese Government sought to recover them. Strangely, rather than take over administering those vast territories, which stretched for some two hundred miles west of the border, the Union demanded its depopulation. This was effected over a twelve-month period, but in the two decades since, a certain amount of unofficial repopulation had occurred, mostly from China, but with here and there a few strays from the Union itself. The regular Union cavalry patrols through the vast region could not have hoped to arrest the influx, and, in general, were evaded easily enough by the thin population. Even so, by 1889, settlements were few and far between, the roads overgrown, fences and walls rotted and crumbled, the whole region mostly decrepit from semi-abandonment. For such denizens dwelling there, the livings were poor. 

In his desire to recover lost territories, the Emperor of China ordered the reformation and reform of the Army, and selected his favourite courtier, T'ai Kun Wu to the task. This was not easy. For one thing, modern arms were hard to come by. Of the usual sources, the Germans and Russians discovered their own shortages to supply, and the French and British had no desire to rearm China. A few renegade gun runners from the Union itself, as well as from the British Island in particular  (being paid for richly in powdered opium) brought in a few breech-loading rifles - enough to equip perhaps eight light battalions - but for the rest, the regular army had to rely on the older muzzle-loading rifles. The other arms, horse and guns, were in even more deplorable a state. T'ai Kun Wu managed, apart from a single battery of muzzle-loading rifled guns, to scrape together a few smooth-bore cannon - 20 years obsolete.  For the cavalry he gathered a few thousand of the less scrubby ponies capable of carrying lightly equipped horsemen. Most of the horses were just barely suitable as draught and pack animals, heavily supplemented by oxen. At least the cavalry might be capable of scouting and maybe a raid behind the lines.  For screening, much less upon the battlefield, scarcely trained horsemen armed with scimitars, lances and the rare musketoon were simply not to be relied upon.

For all its shortcomings, such a force, given the training, would have been fairly compact and effective twenty or thirty years before. But an army of fewer than 40,000 men could scarcely be thrown into the balance against what the Union could field, especially equipped, foot and horse, with modern magazine rifles, and the artillery with breechloading rifled ordnance. To supplement the regulars, the Government inaugurated a recruitment drive, the few volunteers - usually beggars seeking a possible move up in the world  - being augmented by the harvest of the press gangs - usually beggars less eager for change in their quality of life.  The arsenal of rifled small arms having been exhausted, this rag tag near-rabble had to make do with smoothbore muskets.  At least such weapons were fairly robust - they needed to be - and the rudiments of their battlefield use fairly easily acquired, even by the half-starved retrievals from the gutters. By such means the size of the army was doubled.

The Union's dire war against Russia and Germany in 1888 seemed to offer China the opportunity for an unanswerable blow - a fait accompli reoccupation of Imperial lands. The rearmament and training programme was stepped up, the command, commissariat and transport systems organised, and and the whole force set in motion. The railroad had been extended beyond the great city of Harbin some hundreds of miles, though its railhead was still well short of the depopulated, disputed territories. The movement was slow, and, penetrating the debatable lands, the problem of supply, replenishment and revictualling was becoming serious, if not altogether acute. To obviate some of the difficulties of foraging - not easy in a wild, depopulated country, however abundant the wild game - T'ai Kun Wu divided his army into four columns, all named for the cardinal points of the compass.  

Tony's sketch map of the theatre.  Yangzigu is the 
site of the first action.

North, East and South were to sweep eastwards though the region in line abreast, about a day's march - not more than two - apart. West Column was the 'reserve' corps, better equipped than the others, and more numerous. Retained under T'ai Kun Wu's own hand, it followed about a day behind the East Column. The whole army was organised thus:

Army of China: 

Overall Command: T'ai Kun Wu

North column: Commander: Prince Zeng Seng-Bao
     5th Regular Infantry (armed with M/L rifles)
     17th, 18th, 19th Conscript Infantry (armed with S/B muskets)
     1st Cavalry (armed with edged and pointy weapons only)
     2nd Artillery (smooth bore [S/B] cannon)
     Train
(roughly 17,000 strong, with 8 guns)

East Column:
Commander: Li Kuan-Yu
     6th Regular Infantry (M/L rifles)
     13th, 15th, 16th Conscript Infantry (S/B muskets)
     9th 'Green Tigers' Light Infantry  (armed with single shot B/L rifles)
     3rd Artillery (S/B cannon)
     Train
(about 18,000, with 8 guns)

South Column: Commander: Prince Hung T'u Sun
     7th Regular Infantry (M/L rifles)
     20th, 21st, 22nd Conscript Infantry (S/B muskets)
     2nd Cavalry (blades and lances)
     5th Artillery (S/B cannon)
     Train 
(17,000, with 8 guns)

West Column: Commander: Li Xiucheng (vice T'ai Kun Wu)
     1st, 2nd, 3rd Regular Infantry (M/L rifles)
     10th, 11th, 12th Conscript Infantry (S/B muskets)
     8th 'Blue Leopards' Light Infantry (single shot B/L rifles) 
     1st Artillery (M/L rifled cannon)
     Train
(over 27,000, with 8 rifled guns)

Grand total: approximately 80,000 men (excluding train troops) with 32 guns.  

News of the Chinese armed reoccupation of the debatable lands was met by considerable alarm in the Union halls of power. Of course, over the months that ended 1888 and in the first half of 1889, intelligence reports on top of rumour seemed to indicate something afoot in that inscrutable land, but as there was little that could be done about it, little was done. Even with the closing down of the wars with Russia and Germany, the armies were exhausted. Were they capable at once of entering at once a new war, they were in any case quite at the wrong ends of the country.

The only army anywhere near to region was the Tenth, stationed around Denver, commanded by one Major-General Thomas J. Jackson, known to be as eccentric as his paternal forebear. At that, tenth Army was without one of its brigades, the 40th, on detached service in Mexico. The rest had not been involved in the war, the Union Executive taking the view that at least some portion of the national army remain uninvolved against unexpected events arising along the more quiescent frontiers.

Gravely concerned, the Chief of Staff of the Union Army, taking his cue from the Presidential Executive, ordered Jackson to take his Army by rail from around Denver and Fort Knox to the railhead 500 miles to the southwest, from thence to march the twenty miles to the frontier, cross it, and seek out the Chinese army. The Tenth Army's brief  was containment until reinforcements might arrive.  Given that his army could muster fewer than 22,000 officers and men, however well equipped with modern weapons, it was not expected that he could defeat the Chinese army in a toe to toe fight - not outnumbered nearly four to one. No: a war of manouevre, of wearing down, of hit and run, of harassment - that was what they had in mind. They hoped, perhaps with fingers crossed, that General Jackson understood this.

General Jackson had under command:

Tenth Union Army

Union Tenth Army: Commander: Major-General Thos J. Jackson Jr

     Chief of staff: Lt-Col James T. Tilden
     37th Brigade: Brig-Genl Isaac J. Bidwell
     38th Brigade: Brig-Genl Lemar L. McKittrick
     39th Brigade: Brig-Genl Lyle B. Atkinson
     10th Cavalry Brigade: Brig-Genl Remington E.B. Klamath
     110th Heavy Artillery Battalion
     210th Pioneer Battalion
     Train 

Overall strength: 21,667 men with 48 artillery pieces and 24 machine guns.

The infantry Brigades each comprised 6 rifle battalions, 1 light (field) battery (8 breech-loading rifled pieces) and 1 machine-gun battery (8 Gardiner guns).
The cavalry brigade comprised 6 cavalry regiments and 1 flying (horse) battery (8 breech-loading rifled pieces.
The heavy artillery comprised 2 batteries of 8 heavy breech-loading pieces each.

Notes:
1.  Under MY organisation for this campaign, rifle battalions and cavalry regiments comprise 4 figures. The US and Chinese regular formations comprise 6 rifle battalions; the Chinese conscript and elite light infantry comprise 4 battalions each. But I have no formal subdivisions into battalions of the brigade sized formations of either army. Of infantry alone, the Union army embarks with 18 battalions; the Chinese have 92.

2.  Having no Chinese figures, and very few even looking Asian, I have recruited a couple of Napoleonic looking armies as campaign proxies. Given this is Imagi-Nations country, I don't reckon anyone will object.  Much? 


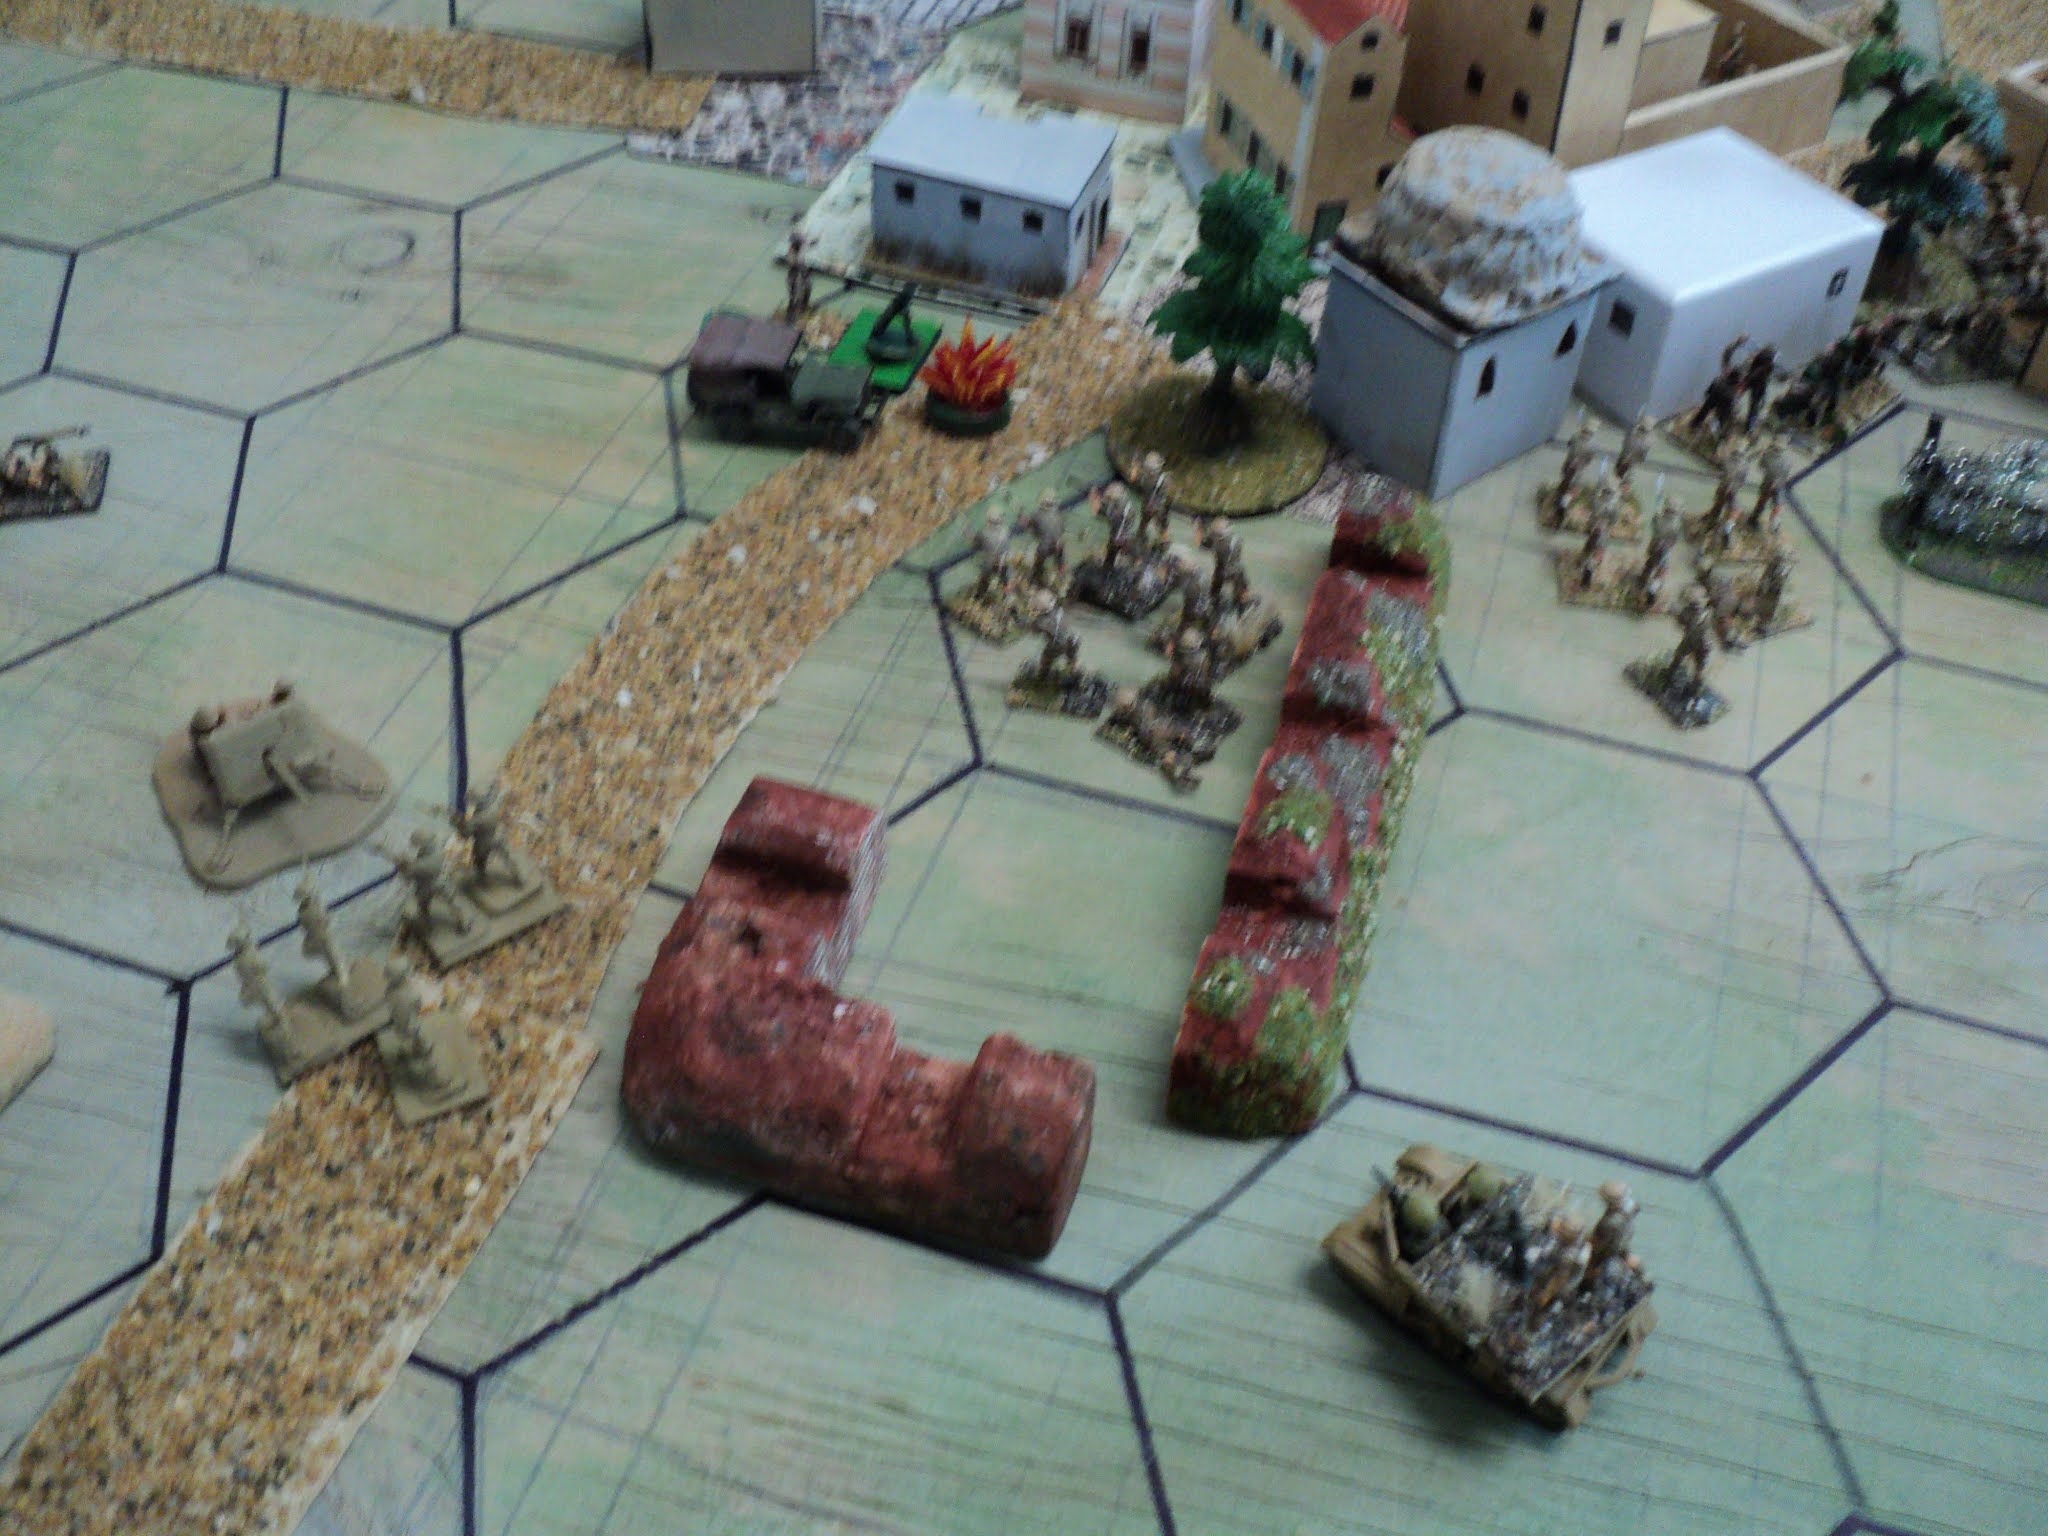
East Column advancing from the west.  'Green 
Tigers' in the foreground, about to enter the woods
and the village;
Artillery and 13th and 15th Conscripts arriving.


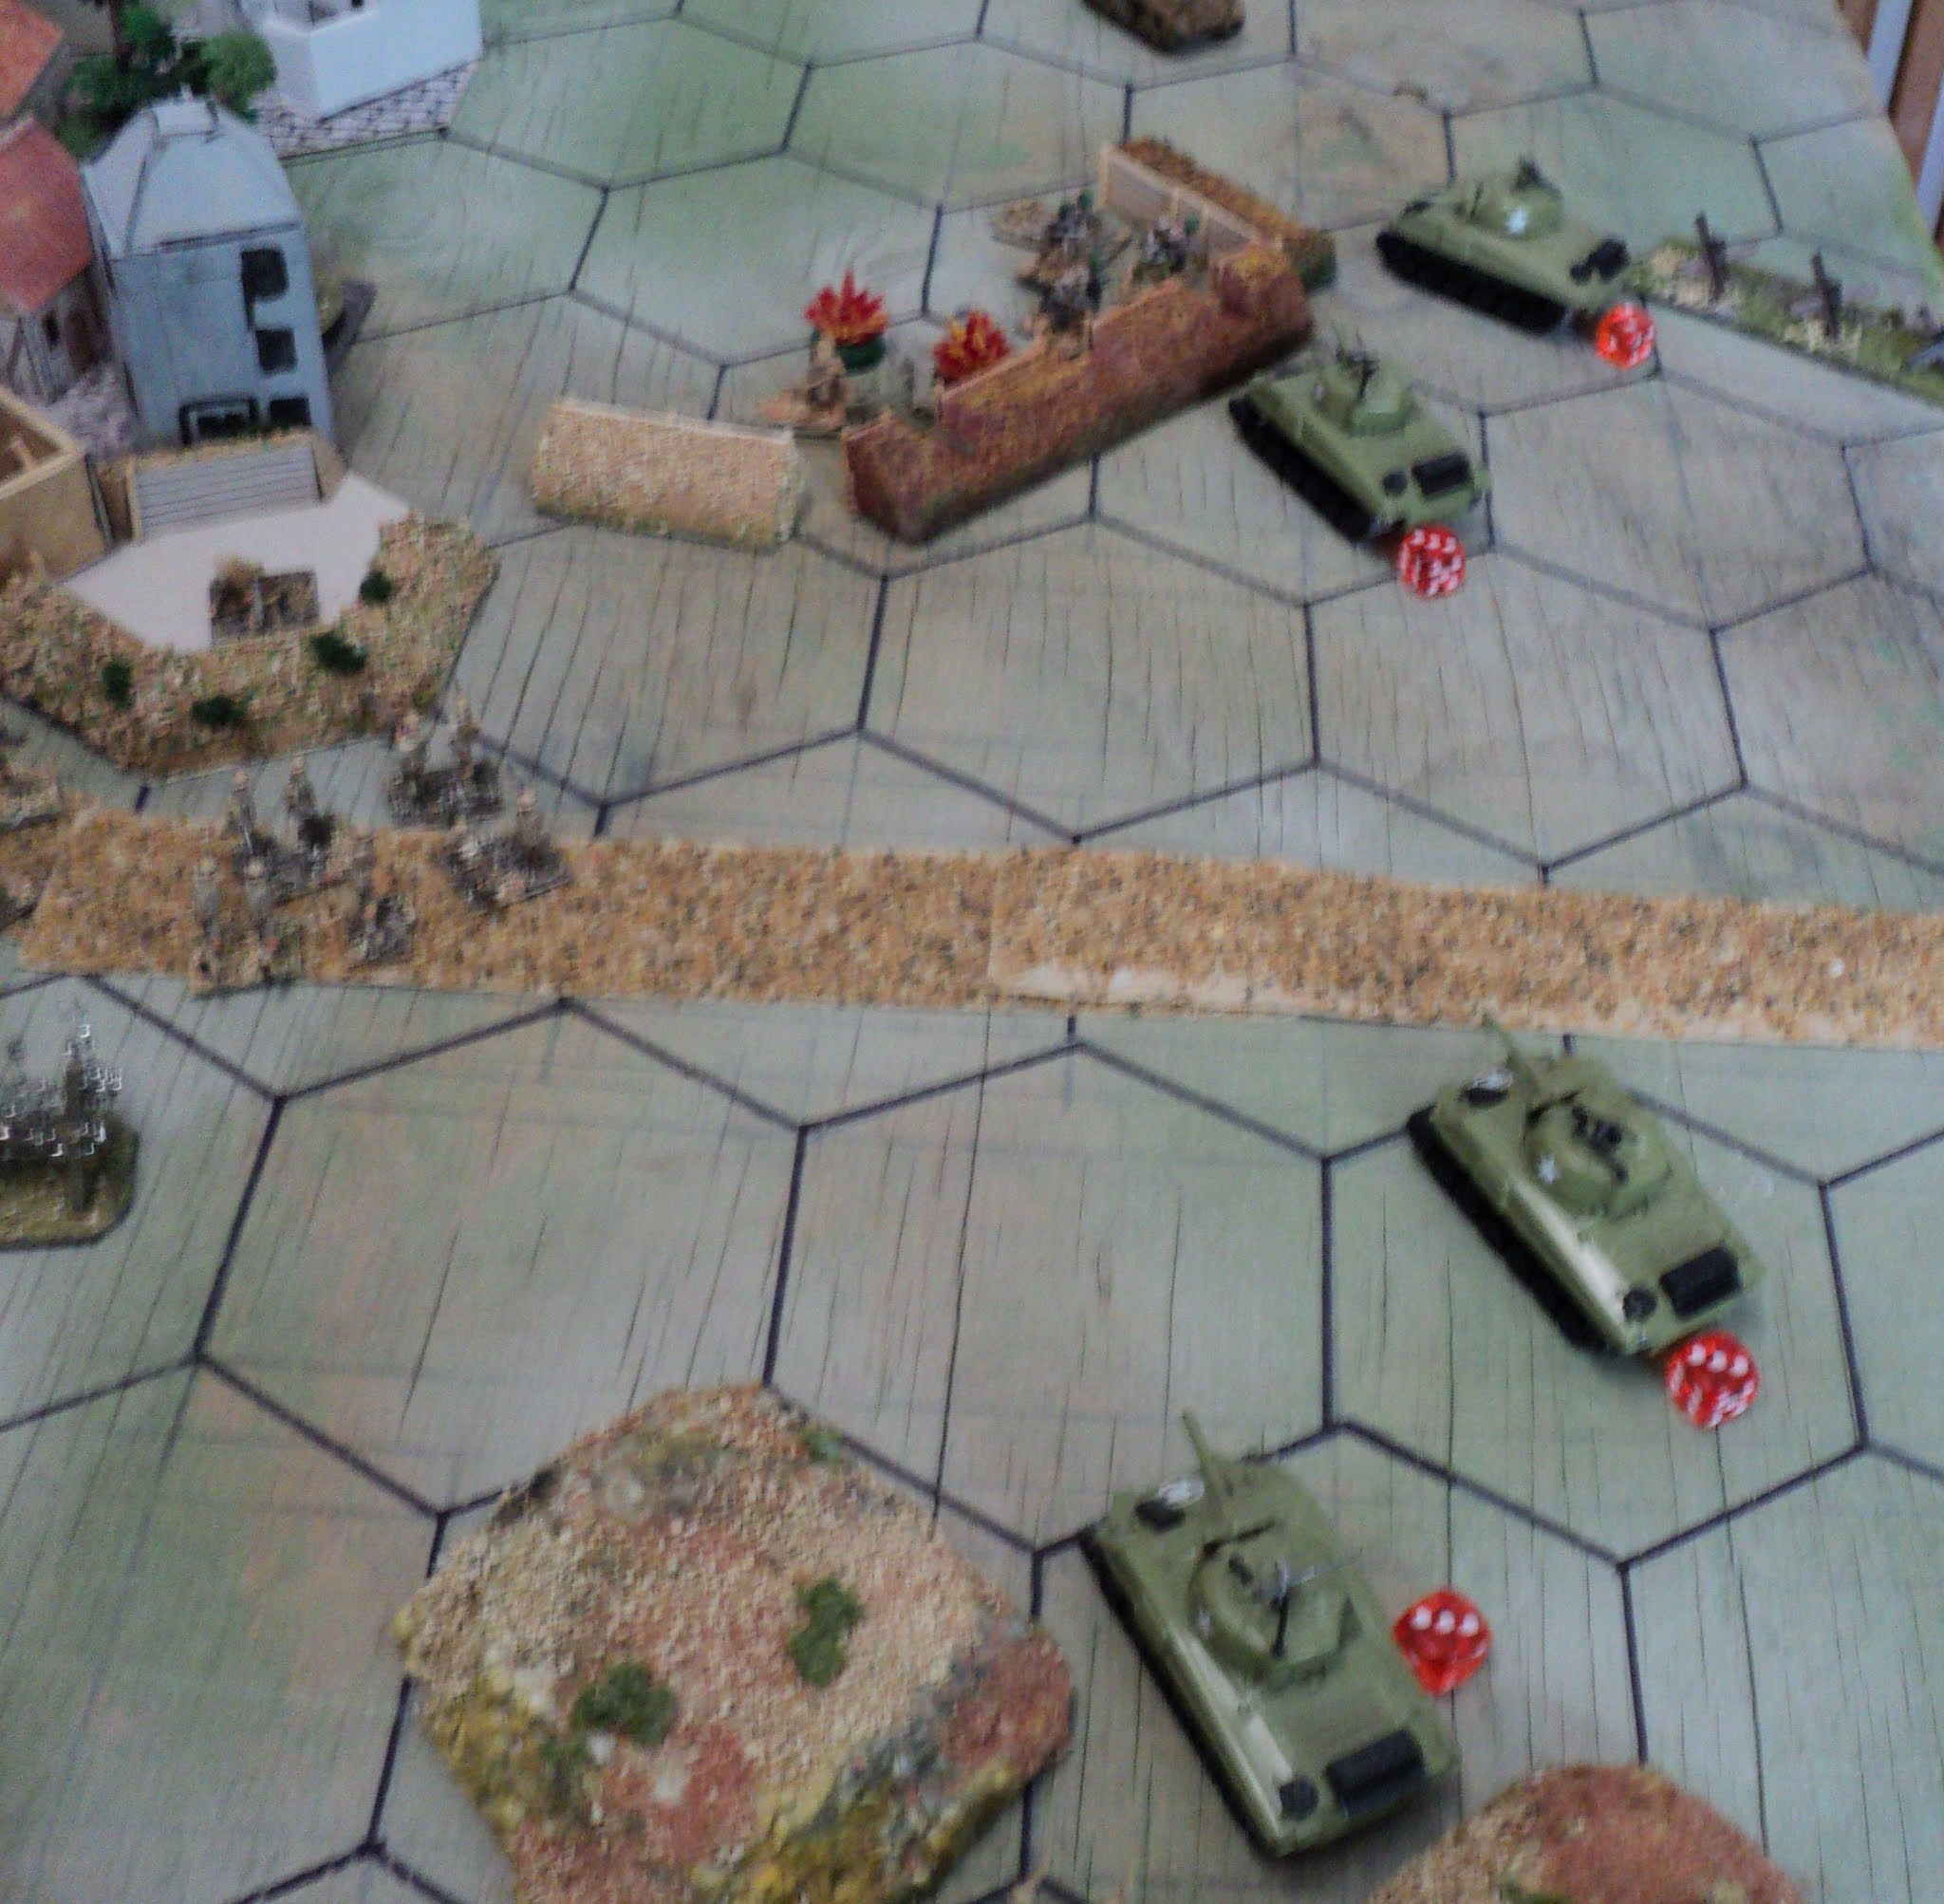
The developing action: 37th Brigade marching 
up the southeast road.
The Chinese army had been advancing steadily eastwards for well over a week before Tenth Army crossed the frontier on Wednesday, July 10, 1889. The Tenth Army's starting point well to the southeast placed the two forces approaching each other at a considerable angle. Given the Chinese 'T' shaped alignment of columns, one might have expected that  the South Column would have encountered the Union army first. 

But after several days, the alignment of the four columns had become somewhat askew, forming an echelon back from north to south. Unbeknownst to either army, the Tenth passed across the front of the South Column by at least a day's march distance, to run into the East Column as indicated at the beginning of this posting. Not that the Union command was as yet aware of this. All they knew was that the enemy - or some of him - had been found.  

[This was decided by a die roll.  Figuring that it was just possible that the Union army would miss the South Column and fetch up running into the East Column instead. So it proved.  Although I weighted the roll in favour of running into the South Column (1-4), I rolled a '6'.  Thinking about it now, I wonder that I didn't add in the tiny possibility that Tenth Army would have fetched up right in the middle of the Chinese army.]

To be continued... The Battle of Yangzigu.


Sunday, October 24, 2021

The Battle of Kantsi Strait - A 'Mighty Armadas' Action.

First salvoes of the battle - Ra'esharn quickly gets the range.

The disastrous battle of Omez Strait, which saw the destruction of half Kiivar's battle fleet, brought home the problem of how to deal with the Ra'esharn fleet of Cacadaemon Class monster battleships. In that battle, four of Kiivar's Leviathan class battle wagons were sunk by just three Cacadaemons - for the loss of just one of the latter. True, at the outset of the war, another, RNS Kitsune, had been sent to the bottom by a hunter group comprising a Leviathan Class and a couple of much lighter battlecruisers, in the action off the River Salver.  But that success, it seemed, flattered to deceive.  
After several months of waiting, suddenly an opportunity presented itself. A squadron of Ra'esharn battleships had been found lying up in a southern Omez seaport, undergoing minor refit and revictual. A large scale bombing raid had failed to register a single hit upon the warships, but had pretty much put the port facilities out of commission for a long time to come. The Ra'esharn Squadron Commander, Runosuke Suzuzuki requested and was granted orders to quit the sea port, and sail home for a destination on the east coast of Ra'esharn Island itself. But to get there, the battle squadron had to pass through the Kantsi Strait - no very narrow a  passage between Ra'esharn's east coast and the main island of Saabia, but dangerous if an enemy were to be encountered there.
Woeful gunnery from Kiivar ships!
Sure enough, an enemy was. Unbeknownst to the Ra'esharn Naval High Command, a large squadron of warships, en route from the Kiivar to the Saabian archipelago, about to pass through the strait at the same time. This squadron comprised four Leviathan class vessels that had been joined by a pair of Saabian warships. So the enemy squadrons, unaware, were approaching on slightly converging routes that remained unchanged when they sighted each other.  

The following action used my 'Ultra-simple Naval Games' rules.  The scenario was designed to pit two reasonably matched fleets together.

The Combined Squadron comprised:
Kiivar 'Division': Admiral Shang Wong
KNS Cerberus
KNS Leviathan
(Flag)
KNS Behemoth
KNS Tarasque
Saabia 'Division': Rear Admiral Sachusetts
SNS Nyurung (Flag)
SNS Pijar

Stats for:
Kiivar Leviathan Class: Strike value = 8  Protection = 11
Saabia Nyurung Class: Strike value = 10 Protection = 9

The Ra'esharn Squadron had:
Admiral Runosuke Suzuzuki
IRS Krampus
IRS Dantalion
(Flag)
IRS Rakshasa
IRS Bushyada

Stats:
Ra'esharn Cacadaemon Class: Strike value = 12 Protection = 16

The two forces seemed to be evenly matched, the outcome chancy.  The combined strike power was in favour of the allies (52-48); the protection marginally in favour of the monster Cacadaemons (64-62).

One rule I added to my earlier 'Ultra-simple' set.  When a ship's Protection' (Floating Points, if you will) had been reduced to one quarter (rounded) of its original, it had, if it could, to withdraw from the action. It could still fire any guns in range and able to be brought to bear.
The dice showing '1' means no hits at all from their
shooting. KNS Cerberus at last finds the 
range effectively
As the courses converged, it became early apparent that the head of the Allied column was rather further forward than the Ra'esharn. At once Admiral Shang Wong ordered a slight change of course, to try and 'cross the T'  of the enemy line; a move promptly answered by the same change. At that moment, the lead Ra'esharn ship, IRS Krampus found the third Kiivar ship, KNS Behemoth just in range of its guns. In the brief exchange of gunfire that followed, Krampus found the range and put two 18-inch shells aboard Behemoth. The latter's salvos were altogether ineffectual.

The change of course took the two vessels out of range of each other, and a duel developed between Krampus and the lead Kiivar vessel, KNS Cerberus. Again, the superb gunnery aboard Krampus at once straddled the Kiivar vessel, knocking large holes and starting serious fires as no fewer than 4 shells struck.  Three Kiivar vessels - Cerberus, Leviathan and Behemoth failed totally to find the range, possibly confused by each others' shell splashes - not a single shell found its way aboard Krampus.

The ship behind, IRS Dantalion, was less lucky.  IKS Tarasque landed two 15-inch shells onto the Ra'esharn flagship for just the one 18-inch received.  
The Saabia ships attempt to close the range...
As yet the Saabian ships were not yet in range, at which Rear-Admiral ordered a parallel course change to bring his two vessels more quickly into the action. That brought all battleships into the fight, but two of the Kiivar vessels - Leviathan and Behemoth - seemed still unable to find the range. On the other hand Cerberus got some revenge for the damage taken, though still taking some knocks still. At the rear of the columns, Tarasque scored another hit on the Ra'esharn flag, whilst the Saabian ships found themselves each in a duel with one of the Ra'esharn ships. Less protected than the other vessels, they had to hope that the Kiivar ships could put the lead two enemy ships out of action before they went under.
... and that proves costly!
It became soon plain that there was no question of the Ra'esharn ships' superior gunnery, or that their two lead ships could be soon knocked out of the action.  Krampus scored yet another direct hit upon Cerberus.  Although she and Leviathan scored two strikes back, that was the end of the battle for Cerberus.  Smoking heavily from several raging fires, she dropped out of the line.  

Meanwhile IRS Dantalion slammed four shells into Behemoth. Badly damaged, that vessel was barely able for the moment to keep its station, and that not for much longer. At the rear of the line, the ships had shortened the range, with consequently far more damaging salvoes from both sides. Five hits on each brought both Saabia vessels close to a sinking condition, but they were handing out several damaging licks of their own.  
You have to admire Ra'esharn gunnery!


Hardly a half-hour into the action, and only Leviathan and Tarasque - the latter hardly having received any gunfire at all - continued able to stay in the battle line. As they turned away, the others could bring only their rearward guns to bear, whilst the Ra'esharn gunnery continued their mercilessly accurate battering. Before they could escape beyond the enemy gun range, both Saabian vessels received more damaging hits than they could possibly survive. Within minutes of each other, both went down, flaming wreckage from end to end until the closing seas put out the fires. For their part, they managed to concentrate their salvos onto IRS Rakshasa. Reduced to a near sinking condition, that ship also pulled out of the battle line.  
With the sinking of the two Saabian battleships, the action came to an end, as the Kiivar ships, which had never got closer than long range, made off, away from the punishing Ra'esharn gunfire.   

There was no questioning this Ra'esharn naval victory: two Allied battleships sunk and three reduced to a wreck for just one Ra'esharn battleship seriously crippled.  Here follows the tally:

Kiivar: 
Cerberus - 8/11 hits, withdrew from the battle line Turn 5
Leviathan - 6/11 hits
Behemoth - 10/11 hits, withdrew almost sinking from battle line, Turn 6
Tarasque - 9/11 hits, forced out of the battle line Turn 8

Saabia:
Nyurung - 10/9 hits, attempted to withdraw from battle line, Turn 6, sunk, Turn 7
Pijar - 9/9 hits, also sunk, Turn 7, attempting to withdraw from the battle

Ra'esharn:
Krampus - 8/16 hits
Dandalion - 9/16 hits
Rakshasa - 15/16 hits, withdrew from the battle line, Turn 7
Bushyada - 7/16 hits

Poring over the battle reports, naval analysts on both sides remarked upon the inexorably devastating gunfire of the Cacadaemon class monster ships.  For every three hits scored by the Allied guns, the Ra'esharn handed out four.  At that rate, there was but one way this battle could have gone.  For a long while to come, Ra'esharn had established a hegemony of the seas... 


Friday, October 22, 2021

Die Hard the Revolution (2)


Concentric attack by infantry and armour against 
a fortified machinegun post.
The early successes and gains of the government forces against the BARFist revolutionaries holed up in Maimajikwand seemed to suggest an imminent collapse of defence, and even the Revolutionary movement as a whole. Half the infantry in the town - a whole company, withal - had dispersed under a concentrated barrage from the Government's field artillery, and the whole line was under intense, unrelenting assault.
Beleaguered BARFist infantry at the south end of 
of the trench line.

The cornerstone of the town's defence, the fortified machine gun nest, came under concentric attacks from two infantry companies, supported by a squadron of medium tanks (D/6th Armoured). The six-pounders destroyed and the Stuarts driven out, a whole line of entrenchments were left abandoned, 'D' company of the BARFist infantry left isolated at the end of the line. C/6th pushed into the fieldworks, then drove along the line to take this lone company in flank, just as 'A' and 'B' Squadrons continued their close assaults. The lighter rebel armour took the opportunity to take the Government tanks in flank. What with the infantry hand-held anti-tank weapons in the field works and the incoming gunfire from the right flank, very soon a good two-thirds of 'A' Squadron's strength lay abandoned and burning close by the minefield.
18th Siliputti Battalion - still scarcely engaged 
apart from 'D' Coy assault on the trenches.

For their part, the Siliputti Battalion was having an easier time of it, only slowly and in piecemeal fashion coming into action. Only 'D' Company was in close action, 'B' Company engaging the remaining BARFists in the town with a long range small arms fire. In rear of this part of the line, the platoon of BARFist machineguns left the shelter of the oasis and pushed up towards the fieldworks to bring their fire to bear. At once the Silliputti commander, Major Inzamam Laghari, ordered up artillery support against the menace.

The second time the government gunners 
demonstrate their skill...!


Dead on target...
Once again, the gunners demonstrated their skilled practice. The shells rained down upon the machine gunners.... but with surprisingly few casualties, they simply scuttled a few hundred yards to their rear where they set up a new gun line. As this happened to be out of range of the 25 pounders, they were able safely to bring the immediate front of the whole trench line under fire from the rear position. This was to cost the Silliputti Battalion dear.

... and the machine gunners bug out to a new 
position out of artillery range.

At end of the line the remnants of the BARFist 'A' Company continued to hold out, even as  C/18th (Siliputti)  joined their companion 'D' company in the assault. As both sides' 'B' Companies fought it out in the town, 'A' Company pushed up through the gap. The BARFists in the town were coming under pressure now from three Government companies: 'A' and 'B' Siliputti Rifles, and 'D' Choklit Ghandhi. Surely the BARFist resistance must soon collapse?


Siliputti Battalion closing in. 'D' and, especially 'C'
Coys have taken heavy losses...

No such thing.  The whole assault upon the BARFist defences had as it were hit a stone wall, though for the time being at least they were able to keep up the pressure.  
The Government assault seems to have stalled 
on the south flank...

Suddenly, the BARFist line gave - at little.  The resistance from the machine gun nest collapsed, whereat C/17th Choklit Ghandhi forced their way further into the town, into the left rear of the BARFist 'B' Company.  'D' Squadron ran through the earthworks into the rear of the BARFist 'D' Company, where they engaged the rebel armour in flank.  

The MG nest cleared, 'D' Squadron pushes 
into the rear of the trench line.

This was too late for 'A' Squadron, its tanks left smoking wreckage in the plain, and 'B' Squadron was also left depleted. Yet, for all their stout resistance, the BARFists on the south flank were now in parlous case, the infantry, reduced to 75% surrounded by enemy armour and soon to come under infantry attack.


At last overrunning the whole of the trench line north of the town, the Siliputti Rifles pushed on to bring the anti-tank gun platoon and the mortars under attack.  The anti-tank gunners proved more than happy to accept a close quarter fight, where they were to give at least as good as they received.  But the mortars, despite the encouraging presence of their Revolutionary leader, failed in the crisis.  The crews cut down, Colonel Peenut Buttahjars barely escaped the Government clutches - speeding away in his jeep, neither waiting upon the order of his going, nor the kind invitations for him to remain. (As the command element was with the mortar unit destroyed by gunfire, then close assault, I rolled a die for his fate: 2xD6, 12 = KIA, 11 = WIA, 10 = MIA/POW.  The roll was nowhere near indicating such a fate...).
Northern trenches overrun
The demise or capture of the Colonel might have ended the Revolution then and there. The action was quite lost, the Revolutionary fighters exhausted, and the Government troops triumphant - but the fighting was not yet finished. From their rearward position, the machine gunners mowed down in windrows the onrushing companies of the Siliputti Battalion. The surrounded BARFist 'B' Company refused to budge from the northwest sector of town it occupied, even when Government armour could distantly be heard in the eastern suburbs.
What happened to the Siliputti Battalion?!


However, the southern defences had been quite overrun, and what was left of the BARFist 'D' Company - about platoon strength - after driving off the Government armour, was all that escaped to join the light tank squadron in the rear. The foreign press sympathetic to the Revolution were to laud the heroic lost-cause resistance of 'B' Company; the more hostile news outlets - notably the Daily Post of Londontown - deplored the fatalistic fanaticism of a people no better than anarchists...
Southern trenchline finally overrun.
Only a pathetic remnant of his fine army accompanied Col Buttahjars's retreat to Madasaiwannabe, the little regional town at the head of the Maimajikwand valley: apart from a few stragglers, the squadron of light tanks (for a wonder having lost none), a single rifle platoon and a Vickers platoon.  Lacking the means to shift them, the 2-pounder anti-tank guns remained on the field.  Surrounded, with no hope of escape, 'B' Company was finally forced to surrender. 
Government armour enters the eastern suburbs
of Maimajikwand
Though decisive, the Government's victory was not yet complete. It had been costly, too, especially to the Siliputti Battalion late in the the action. Eighteen Strength Points was the Government's 'butcher's bill' - nearly two-thirds of them from the Siliputti Battalion alone. But it was short of the exhaustion point.  The BARFist battle losses were the same: 18SP, well beyond its exhaustion point.  If I had a '50% Rule', perhaps it would have been enough to occasion a collapse or surrender. On top of the 18SP lost, a further 5SP were left as the remaining 12SP departed the field.  

'We will fight on,' quoth Colonel Buttahjars to any news correspondents who were brave (or foolhardy) enough to venture into the fastnesses of the upper Maimajikwand valley.  

I admit to being very tempted to end the whole campaign here, with the collapse of the Revolutionary movement.  Had the revolting Colonel been captured or killed, that certainly would have been the end.  But no - there is still one more battle to fight. A last stand - or a resurgence?  Who knows?

To be continued...


Tuesday, October 19, 2021

Die Hard the Revolution

Government forces (18th Battalion) advancing on the left 
(northern) flank and ('D' and 'C'/17th up the road.
At last we draw near a turning point, or possibly the conclusion of the campaign in Tchagai, a revolt against the Nawab, and against the ruling Ruberian imperialism. This posting follows on from the second Battle of Khandibar, a decisive victory by the government forces that deprived the BARFist Revolution of its only seaport, and the vital Izumrud-Zeleniyan military equipment that they hoped to import. For the background story, please refer to the following: Long Live the Revolution: The War Against the Raj, and following posts.  

(Eventually I will post the Table of Contents in a panel beside this main column)
Machine gun platoon, anti-tank gun and
mortar positions - north flank.
If the defeat at Nawabisbad - just when the Revolution seemed on the brink of successfully taking over the country - was a source of exasperation for the Baluchistan Armed Revolutionary Front (BARF), the subsequent loss of the vital rail junction at Maibad, and the sea port of Khandibar proved depressing to the martial enthusiasm of their movement. Their ardour for freedom and change dampened, the scale of recruitment was diminishing as fast as the rates of desertion were growing. Colonel Peenut Buttahjars ordered a retreat to Maimajikwand, the capital of the provincial valley that was the cradle of Revolt.
'A' Company, 1st BARFist Volunteers.  'B' Coy
in the town
For his part, General Lord Redmond entrusted the hitherto unfortunate Lt-Col Mugglethwaite with the pursuit into the Maimajikwand Valley. Mugglethwaite had with him: 17th Choklit Ghandi and 18th Siliputti Infantry, 6th Bananarahmaputra Hussars (armoured regiment), and two batteries of 1st Tchagai Field Regiment. Reaching Maimajikwand a few days ahead of the pursuing forces, the BARFists turned at bay. Those few days' respite allowed time to prepare defences against the attack to come.
Rebel centre covered by barbed wire

This action, as for the whole 'Long Live the Revolution' campaign, was fought using Bob Cordery's Developing the Portable Wargame rule set, and the conventions, modified to 'fit' my 'hex' table, of his mini-campaign example of the same name. One of those conventions involved rolling for each force's Strength Points (SP), adding the dice score to a basic minimum. As my table is rather larger than Bob's standard one, I added 50% to the starting minima and added dice rolls with the results you will now see.
 
Rebel southern wing. The minefield and anti-tank
obstacles will force any eenemy right up against
the end of the BARFist line.
Revolutionaries, Defending:
Number of SPs: (16+2D6) + 50% = 24 + 3D6 = 24 + 11 (OK roll - about average) = 35SP 

Government, Attacking:
Number of SPs: (20+4D6) + 50% = 30 + 6D6 = 30 + 30 (what a roll!!) = 60SP(!)

That was a huge roll for the Government, and I think the first time anything of the sort happened so far in this whole affair.  As had become my habit in this campaign, I permitted the defending side half the difference in SPs 'worth' of defence works: field works and barbed wire to cover one hex at 1SP each, and minefields and fortifications at 2SP.  
A very effective salvo from the Government artillery!

Baluchistan (Brotherhood) Armed Revolutionary Front:
Commander: Col Buttahjars, staffs etc = 6SP
1st 'Volunteers of the Revolution' Brigade 
     4 Rifle Companies @ 4SP

     2 MG Platoons @ 2SP
     1 Mortar Platoon @ 2SP = 22SP
'Tulwars of the Revolution' Armoured Group
     1 Squadron Light Tanks (1xM3 Stuart) = 3SP
Fixed Anti-tank gun positions:
     1 6pr medium AT gun troop = 2SP

     1 2pr light AT gun troop = 2SP

Totals:
11 units, activation mean = 6
35 SP, exhaustion point = -12SP

This garrison was augmented by 4 stretches of barbed wire covering the approaches to the town from the west, 5 field works extending north and south outwards from the town, one fortified machinegun post, and a set of mined antitank obstacles far out from the south flank placed to draw any enemy trying to skirt around the place closer to the entrenchments.
... and the end of the BARFist 'C' Company, its 
remaining strength destroyed


Rajistan Government:

Commander: Lieutenant-Colonel E. Mugglethwaite = 6SP
17th Choklit Ghandhi Infantry 
     4 Rifle Companies (A-D) @ 4SP
     HQ Company, 1 Vickers Machine Gun @ 2SP = 18SP
18th Siliputti Infantry
     4 Rifle Companies (A-D) @ 4SP
     HQ Company, 1 x 3-inch Mortar (2SP) plus carrier (2SP) = 20SP
6th Bananarahmaputra Hussars 
     4 Squadrons (A-D) Sherman medium tanks @3SP = 12SP
1st Tchagai Artillery Regiment 
     2 Batteries, 25pr field guns @ 2SP = 4SP

Totals:
17 Units, activation mean = 9
60SP; exhaustion point = -20SP
18th Battalion taking a while to move up ...
Already the pictures will have conveyed something of the narrative. Mugglethwaite massed his armour on his extreme right (the southern flank), with the intention of sweeping around or over the field works there, into the rear of the town. The tanks were to be supported and joined by A, B, and HQ Companies of 17th Battalion. The remaining two rifle companies were to approach the town directly up the road, clear way some of the wire, then storm the eastern suburbs. For this attack, they were given the immediate support of the 25pr artillery.
'D' and 'C'/17th Bn about to clear away the wire...

This left the whole of 18th Battalion to attack the entrenchments north of the town.  

Though action developed rather more swiftly on the southern flank. the first contacts came in the centre.  There the town's precincts formed a salient - a species of bastion against attack - covered by barbed wire entanglements. As the 25pr artillery bombarded the defenders of this section of the line - 'C' Company of 1st Volunteers, 'C' and 'D' companies of 17th Choklit Ghandhi Battalion drew up to the wire.  they might have found the clearing of the wire difficult under fire, but the artillery support proved overwhelmingly effective (see the 'double sixes' in the pic earlier). The pounding proved too much, and the whole defending company dissolved and vanished from the line. 'C' Company was able to clear the wire unimpeded, and 'D' Company had to endure only a minor nuisance.

The wire cleared, they were able to penetrate the western suburbs where 'D' Company made contact with the rebel 'B' Company, and 'C' was able to bring under fire the rebel machine gun nest in the southwestern corner.

'D' and 'C' having cleared the wire find little 
to oppose their entry into the town

On the southern flank, the entrenched defenders came under fire from the machine guns of the whole of the 6th Armoured Regiment. The infantry - 'A' and 'B' Companies and the machineguns of 'HQ' company  - were rather slower moving up. A long-distance tank and anti-tank duel opened up, with the sole rebel tank squadron engaging the heavier Shermans with their popgun 37mms.  As the more dangeous weapon, the Shermans were inclined to concentrate their fire upon the 6pr AT guns, which, without the means to withdraw, were eventually destroyed.
6th Armoured rolling forward...

... and running up against strong defences.
With the focus of action in the south, the assault on the northern front developed in a more piecemeal fashion. After its success against the town's defenders, the artillery joined 18th Battalion's mortar fire against the entrenched position of 'A' Company 1st BARF Volunteers. Under cover of this barrage, 'D' Company of the 18th brought the enemy position - its defenders already somewhat depleted - under a close assault. 
Under cover of mortar fire 'D'/18th attempt s to
storm the BARFist entrenchments

'B'/17th moving up to aid 'C' Coy.
The close assault by 'C' Company against the fortified rebel machine guns allowed 'B' Company to come up and join the action, bypassing the remaining barbed wire. Meanwhile, the gunnery duel was going rather the Government's way, despite the rebel entrenchments. 
Tank vs anti-tank... At the moment the 
Rebel light tanks don't have the range!
The light tanks driven from the line, and the anti-tank guns overwhelmed, 'A' and 'B' squadrons tried to force the gap between the manned field works at the end of the rebel line, and the minefield a short distance south from it. This was precisely why Colonel Buttuhjars had ordered it placed there - to force the armour up close against his own 'D' Company. After all the early successes by the Government forces, they were to find what remained of the Revolution were not going to go out easy.
The 6pr guns overwhelmed, despite their protective 
fieldworks.
Just about all along the rebel line, now, the defenders were closely engaged: 'A' company - much reduced - under mortar fire as well as a close assault; 'B' Company in a duel with equal numbers in the town; the machine-gun nest under assault by two Government companies, and 'D' Company in a short-ranged duel with Government armour.  
Fighting at the edge of town.  Three companies 
of the Choklit Ghandhi Battalion held up

Could the Revolution yet hold out against such a seemingly overwhelming assault?

To be continued...