|
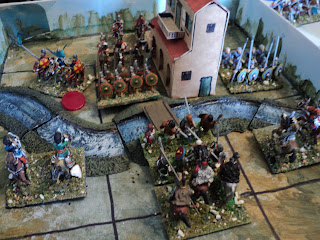
| Starting set-up - Bulgars nearest the viewer. |

Michael Psellophanes, Byzantiad

Bulgar Raiders:
- Command, Tarkhan Tiercel
- 1 x Heavy Horse Archers, javelins, bow, (elite)
- 1 x Heavy Horse Archers, javelins, bow, (average)
- 2 x Light Horse Archers, javelins, bow, (average)
- 2 x Spearmen, spears (average)
Six units, two each of heavy horse, light horse and spearmen, @2SP; 12 SP.
Byzantine Defenders:
- Command, Turmarch Yannis Zimiskes,
- 2 x Heavy Horse, 1/2 lance, 1/2 bow, (average)
- 1 x Light horse, 1/2 lance, 1/2 bow, (average)
- 1 x Heavy infantry, 1/2 spear/pike, 1/2 bow, (average)
- 1 x loose-order Medium infantry, spear, javelins, (poor)
Five units @2SP; 10 SP.

After the first action, in which the Bulgars opened the ball, in subsequent battles the sides rolled for the initiative. As seemed to be a consistent feature of this whole campaign so far, the Bulgars (green dice in the pictures) emphatically seized the initiative and went boldly into the attack. Part of he heavy horse, backed up by lights, went in on the left against the massed Byzantine heavy cavalry. Spearmen undertook the attack in the centre, with the Tarkhan urging on the charge.
 |
| Bulgars win the initiative... |

... and attack
The lines holding firm on the Bulgar left, the situation was more mixed in the centre. The garrison repulsed the Bulgar spearmen, but, a panic setting in led them to abandon the village themselves. For a brief moment it seemed that the Bulgars might have secured another quick and easy victory, but he Turmarch, rallying his peltastoi, reoccupied the place. Just in time, for the Bulgars were soon back.
 |
| Bulgars have thrown back by the garrison, who then evacuate the town. |
 |
 |
| Bulgars driven back from the town. |

 |
| Bulgars put in an extra effort to stem the Byzantine advance. |
 |
| Bulgars take terrible losses, and the Tarkhan meets his demise. |
Michael Psellophanes, Byzantiad
 |
| The end of the Tarkhan... |
It was certain that the Romans failed to capitalise on their successes, for Edsel seized the initiative and renewed the close assault upon the defenders' lines.
 |
| Bulgars don't give up easily - not when there is loot. Here, they again win the initiative! |


 |
| The Bulgar heavy horse charging... |

Hastily bringing across his prokoursatores light horse to defend the town, the Turmarch successfully intercepted the Bulgar, just barely betimes.
Here I decided that the Built Up Area, though the major feature of its grid square, did not occupy all of it, or even most of it. There is no doubt that troops that could make best tactical use of the feature would certainly do so, but those that could not would defend the place in front of the town, in the open.
In the ensuing fight, both sides incurred heavy losses. Then it was the Bulgar turn to suffer a unit collapse. By now the Byzantines had lost 5SP, the Bulgars 8 plus their commander. The mention of the Boyar has a narrative purpose only - to keep the Bulgars in the fight, but he is represented by no command figure. Without that command support, the early Bulgar advantage had probably by now been reduced to less than evens. The issue was still in doubt!
Here I decided that the Built Up Area, though the major feature of its grid square, did not occupy all of it, or even most of it. There is no doubt that troops that could make best tactical use of the feature would certainly do so, but those that could not would defend the place in front of the town, in the open.
In the ensuing fight, both sides incurred heavy losses. Then it was the Bulgar turn to suffer a unit collapse. By now the Byzantines had lost 5SP, the Bulgars 8 plus their commander. The mention of the Boyar has a narrative purpose only - to keep the Bulgars in the fight, but he is represented by no command figure. Without that command support, the early Bulgar advantage had probably by now been reduced to less than evens. The issue was still in doubt!

Now was the time for Yannis Zimiskes to take the fight to the enemy. The Bulgar centre having collapsed altogether it remained only for him to complete the breakthrough into the enemy rear. At the same time, the skoutatoi on the left had driven back the enemy spearmen. Following up, they caught the Bulgar horse archers and flung them back onto the spears.


It was plain at this point that the raid was a complete failure, despite the two earlier Bulgar victories. Eleven Strength Points the Bulgars lost in this battle; to just five Byzantine. Yet, twice, this battle could have ended in a Bulgar victory, but for the timely recovery of a unit apparently beaten, or the intervention of an unengaged unit. Though it didn't 'go the distance', or yield the raiders much in the way of loot, it might very easily have done.
For the Fast-Play 3x3 Portable Wargame (FP3x3PW), I am thinking of making certain slight modifications to the core rules the better to reflect the 'troop types' that were available to the various peoples in and around Asia Minor at around the end of the First Millenium. There is plenty of variety - from the almost all mounted light horse of the Pechenegs and Seljuk Turks, to the almost all foot of the Rus, to the charging cavalry ('knights') of the Normans and the more balanced army of the Abasgians.
This is an interesting period, full of intrigue, double dealing, treachery and dire battles for survival. Ruled by strong emperors, the Byzantine Empire was going though a phase of expansion. Yet it was beset not only by so many adversaries, but menaced - as the Roman Empire ever had been - by an enemy within. I've begun work on a campaign game, working title Byzantiad, with the idea of building in some of the multiple perils and hazards the empire had to face.
For the Fast-Play 3x3 Portable Wargame (FP3x3PW), I am thinking of making certain slight modifications to the core rules the better to reflect the 'troop types' that were available to the various peoples in and around Asia Minor at around the end of the First Millenium. There is plenty of variety - from the almost all mounted light horse of the Pechenegs and Seljuk Turks, to the almost all foot of the Rus, to the charging cavalry ('knights') of the Normans and the more balanced army of the Abasgians.
This is an interesting period, full of intrigue, double dealing, treachery and dire battles for survival. Ruled by strong emperors, the Byzantine Empire was going though a phase of expansion. Yet it was beset not only by so many adversaries, but menaced - as the Roman Empire ever had been - by an enemy within. I've begun work on a campaign game, working title Byzantiad, with the idea of building in some of the multiple perils and hazards the empire had to face.