Thursday, February 29, 2024

Thirty Years War - a Brainwave...?

It was whilst responding to a comment in my previous posting that an idea occurred to me that I simply had to follow up. Martin Rapier had a good word to say about my 2-hex tercio for the Portable Pike & Shot Wargame.  The thing looks good, but for the idiosyncratic pike to shot ratio: 8 figures to 12. It were better reversed.  I wasn't that chuffed about my battalia, either, with their 8 pike figures to 6 shot.  

All very wrong, whatever the 'look'. (At least that was what I was thinking when I typed this.  I'm now not quite so certain of that, at least for the tercio.)

But the thought suddenly flashed across my mind: what about a three-hex tercio? It would mean changes to how units are meant to be oriented...  So I had a look...


A late type of tercio formation: 12 shot, 16 pike.

... and here it is. One tercio. I seem to recall that later tercios dropped the rear musket 'sleeves', leaving a vaguely Y-shaped formation a bit like this.  Here the pike to shot ratio is 16 to 12, which seems to me 'about right'. And then I go and Wikipedia the topic.  Lo and behold - a tercio with 1200 pikes; surrounded by a 'corselet' of 1400 muskets, plus a further 500 muskets divided equally among the four 'sleeves'. A 12:19 pike to shot ratio.  So maybe my 2-hex tercio ain't so 'wrong' after all. Oh, well: to continue...  


A 'battalia' - or 'brigade'. 12 shot, 8 pike.
How would a 'battalia' unit look, then? Just the way I originally designed it: 12 'shot' figures to 8 pikes. If however, I decided that the 2-hex tercio is after all OK, then the battalia might have to be modified to 2 shot elements in line, with a single pike element to their rear.  That would still fit inside one hex, and the pike: shot ratio would be 4:6. 

Of course, this sort of thing - the 3-hex tercio and the 2-hex battalia (or brigade) would require a major rethink about the rule set and the conduct of manoeuvre and combat. For example, both musket wings/ sleeves, could concentrate their fire upon the centre hex in front, but only one could shoot into the respective hexes alongside. Nor would there be any question of facing a hex side, either. 

How would the horsed formations work? I'll leave that question for another time. The thing will simply have to be tried out.

To be examined anew... 

Wednesday, February 28, 2024

Thirty Years War - Yet Another project

Imperialist Foot and Horse


Feeling a little jaded, and rather inclined to procrastinate upon the narrative of my latest Sengoku action (the pics have been uploaded, and even the notes noted, but finger to keyboard is the sticking point) I suddenly bethought myself to the unfinished portion of my Thirty Years' War (30YW) armies (Sweden/Severeia vs Imperialist/Austereia).  The Imperialists are about done, apart from the artillery, but the Swedes have a long way to go.

Imperialist Horse

Swedish foot - designed for DBR 

The semi- and unfinished bits

H'mmm - rather more to get done than I imagined. When I began, I had a particular organisation in mind, with my own rule set, and bought all I needed to realise the project. This was near-on 30 years ago.  Most of the finished stuff you see here, has been that way all this time. But having a clear-cut end point, the thing ought to have been finished long ago.

Then came De Bellis RenationisDBR. It seemed to achieve a considerable popularity in this town, so, after a long thought (and much hesitation), I decided to go with it. BIG mistake. It was like magic: the moment I made the decision and reorganised the armies, the bottom fell out of local interest in DBR. I just knew that would happen! There were two reasons for this, I think: one reasonable, one not so much. The reasonable reason was that DBR was (and remains) in my view wanting in development.  The unreasonable: the whole game system will ill geared towards the 'competition' mindset that chooses to attach itself to the DB* game systems.
Some Imperialist 'commanded shot'...
So I was stuck with a half finished project and a game system that didn't fill me with enthusiasm, and which anyway ill-accorded with my inventory of figures. And I couldn't really go back! At any rate, here we are, having to sort through the whole thing and build up for either Portable Wargames or Free Table action.
Artillery

The artillery is Revell, but I have added a number of battalion guns for the Swedish army.  These are simply Airfix Napoleonic French gun carriages mounting ESCI Napoleonic RHA gun barrels. I reckon they make fine battalion guns.  

Some lighter horse which probably will go into the Swedish Army

More...

We finish with a picture of the one Portable Pike and Shot game I've tried out. The thing was played out last year. This experimented especially with tercio and battalia formations on my hex-board. As the original rule set seem to be designed for square grid cells, I propose at some point to outline my own modifications for my own hex-grid playing surface. The gimlet-eyed reader will observe considerable differences from the earlier formations.
A 30YW action reported in May last year...


C.f.: This picture taken many years ago...


To be continued...

Saturday, February 24, 2024

Armies in Boxes - Napoleonic Austrians

Whilst the Sengoku narrative is in the pipeline, and having done most of the 'finishing work' (flocking bases mainly) for my Napoleonic Austrians, methought it meet that (a) I house the troops properly and in a more accessible fashion, (b) take some pictures, and (c) fill the 'blank air' space with this posting. This is my Austrian Army for my projected - I was going to say 'planned', but that would be an exaggeration - War of the Nations.

In the following the figures and artillery are Minifigs except where otherwise stated. 

Minifigs: Horse, Foot and Guns.

I Army Corps:

  • Corps Commander with 1 figure
  • Staff/ Aide-de-camp with 1 figure
  • 3 Fusilier Divisions @ 24 figures = 72 figures (14,400)
  • 1 Jager Formation with 24 figures (4800)
  • 1 Light Horse (Uhlan) Brigade with 12 figures (2400)
  • Artillery Park of 2 pieces (64 cannon) and 8 figures (1600)
Total strength 118 figures (including command), 2 cannon (23,200 men and 64 cannon)


Hinchliffe Grenadiers (I think) but can't 
place the line infantry. The rest are Minifigs.
The extra guns (with limbers) belong to IV and V Corps
II (Hungarian) Army Corps:
  • Corps Commander with 1 figure
  • Staff/ Aide-de-camp with 1 figure
  • 1 Grenadier Division with 24 figures (4800) (Hinchliffe)
  • 2 Fusilier Divisions @ 24 figures = 48 figures (9600) (Provenance unknown)
  • 1 Semi-Regular Freikorps Formation with 18 figures (3600) (Minifigs)
  • 1 Light Horse (Hussar) Brigade with 12 figures (2400) (Minifigs)
  • Artillery Park of 2 pieces (64 cannon) and 8 figures (1600) (Minifigs)
Total strength 112 figures (including command), 2 cannon (22,000 men and 64 cannon)

All Minifigs

III Army Corps:
  • Corps Commander with 1 figure
  • Staff/ Aide-de-camp with 1 figure
  • 3 Fusilier Divisions @ 24 figures = 72 figures (14,400)
  • 1 Grenze Formation with 24 figures (4800)
  • 1 Light Horse (Hussar) Brigade with 16 figures (2400)
  • Artillery Park of 2 pieces (64 cannon) and 8 figures (1600)
Total strength 122 figures (including command), 2 cannon (24,000 men and 64 cannon)

IV and V Army Corps: 
As smaller formations, these have been accommodated in one tray, minus their cannon. All these were obtained long ago when one could eke out Minifigs figures reasonably cheaply with figures of other manufacture. I don't know all of these.

An eclectic collection of Warrior and (I think)
Hinton-Hunt knock-offs, and Italieri and HaT 
plastics. I don't know what manufacture is the 
line of metal chevauxlegers on the right
IV Army Corps:
  • Corps commander with 1 figure (Plastic - Italieri, I think)
  • Aide de camp/ Staff with 1 figure (Ditto)
  • 1 Grenadier Formation with 16 figures (3200) (Warrior)
  • 1 Fusilier Formation with 18 figures (3600) (Warrior)
  • 1 Fusilier Formation with 20 figures (4000) (Warrior)
  • 1 Grenzer Formation with 24 figures (4800) (HaT plastics)
  • 1 Chevauleger Brigade with 8 figures (1600) (Unknown, metals)
  • 1 Artillery Park with 1 piece (32 cannon) and 4 figures (800) (Minifigs)
Total strength: 92 figures including command, 1 cannon (18,000 men and 32 cannon)

The Warrior figures don't really 'go' with the Minifigs, being smaller, and stylistically different in appearance. But they do make a fine formation of their own. One problem with them, though, is that their muskets are very fragile.
V Army Corps:
  • Corps Commander with 1 figure (Plastic, probably Italieri)
  • Aide-de-camp/ Staff with 1 figure (Ditto)
  • 2 Fusilier Divisions @ 24 figures = 48 figures (9600) (Hinton-Hunt - mostly very badly pirated, bought cheap, but some work actually made them into vaguely presentable figures)
  • 1 Grenzer Formation with 24 figures (4800) (HaT plastics)
  • 1 Hussar Brigade with 16 figures (3200) (Italieri plastic)
  • Artillery Park with 1 piece (32 cannon) and 4 figures (800) (Minifigs)
Total Strength: 94 figures including command, 1 cannon (18,400 men and 32 cannon)

I admit to planning to retire the plastic Hessen-Homburg Hussars, replacing them with metal Hessen-Homberg Hussars, but, come the sticking point, didn't have the heart. There is no real point, I have decided, to replace the plastics with metals, as they are fairly compatible in appearance with the metal figures - 'Hinton Hunts' especially. So the metal Hussars were painted as other units. The same could be said of the plastic grenzers. As this box is pretty crowded, the IV and V Corps artillery parks are in the II Corps box.

I Reserve Corps:
  • Corps Commander with 1 figure
  • Aide-de-camp with 1 figure
  • 2 Grenadier Divisions @ 24 figures = 48 figures (9600)
  • 2 Cuirassier Brigades @ 12 figures = 24 figures (4800)
  • 1 Dragoon Brigade (attached) with 12 figures (2400)
  • 1 Chevauxleger Brigade (attached) with 12 figures (2400)
  • Artillery Park of 2 heavy pieces (64 cannon) and 8 figures (1600)
Total Strength: 106 figures including command, 2 cannon (20,800 men with 64 cannon)


The Dragoons and Chevauxlegers are not organic to this formation, but are liable to be attached to other Corps where they might have need for extra horsed troops. The grenadiers and cuirassiers are, as you can imagine, elite formations. In this box the Army Commander in Chief, Archduke Charles might be discernable on the left behind the guns. The guns themselves are scratch-builds, as I wanted a couple of 12pr pieces, which Minifigs don't do for Austrians. The guns themselves are metal, as are the wheels on one of the guns. The gun carriage itself is balsa wood, with a skewer or matchstick axle tree; the balance achieved by gluing a steel nut under the end of the trial to offset the weight of the metal gun.


Army totals: 
  • 14 Command and staffs
  • 112 Horse (22,400)
  • 480 Foot (96,000)
  • 40 Gunners (8000) with 10 guns (320 cannon)
  • 646 Total (126,400 with 320 cannon)
The cavalry are rather over-represented in this army, and the artillery rather under-represented. But I'm not too fussed. The cavalry are over-represented in my French and Prussian armies as well. I find that with some rule sets, the armies are rather dominated by artillery, if not in practical strength on the table, at least in numbers. If I have a quibble about the Age of Eagles rule set, it is in that regard. I prefer the artillery to have a powerful presence in themselves, but not in numbers such as to dominate the entire battlefield.  I have seen that happen! 

Saturday, February 10, 2024

Sengoku: the Project that Wasn't.

A 30YW action with Revell figures.

Way back in January 2021 I bought a copy of Bob Cordery (and Co) book The Portable Pike & Shot Wargame (2020). My primary interest in purchasing this little volume, of course, lay in the title. I had a pair of 30YW armies sitting idle: Imperialist/ Austeria and Swedish/ Severia. Incentive to do something with them.

Guess what.

Once past Bob's introductory chapter we run into this: 'The Portable Wargame: A Sengoku Variant' by one Antoine Bourguilleau - historian, journalist, translator and, it seems, a teacher at the University of Pantheon-Sorbonne.  That was serendipity if you like. Interest piqued, methought to embark upon this newfound topic of interest. But I didn't want to commit to a whole new project for which I didn't have the space to accommodate.


Shogun board set up for action. Some readjustments have
already been made.  The Orange faction looks too scattered...


Casting my mind to the playing pieces for the boardgame I knew as Shogun, but which has been renamed over the years as Samurai Swords, and later as Ikusa, methought: plenty there: 5 factions with 9 figures each of Samurai archers and swordsmen, and Ashigaru arquebusiers; and 36 figures of Ashigaru spearmen. Plus 3 Diamyo, though on foot, representing the small cavalry elements, plus 3 flag bearers identifying the 3 armies available to each faction.

The first Sengoku action: the defence of a castle against 
Ikko-Ikki attack.  Clan Oda, Red; Ikko-Ikki, every
colour but Red.


So I had the foot: what was wanting was the cavalry arm. OK, that keeps things within bounds: I bought 3 boxes of Zvezda mounted Samurai.  And a command box as well. Enough for 3x 3-figure units for each army, plus mounted commands for three more.

I got quite a lot of mileage out of those armies...

Early action: Clan Oda attempts to recover a castle 
lost to the Ikko-Ikki

More action among the warring clans

So I had all I wanted from this project and more. 

And then some Vogon places 3 boxes of Zvezda Foot Samurai for sale at $5 the box at last year's Bring-and-Buy. Resistance was, obviously, impossible, especially given the high quality of the Zvezda figures. 44 Figures the box, I reckoned on allocating them among the 5 factions. That has proved rather intractable, so I bought a fourth box (Mini-Kiwiland online retailer) at the usual retail price - nearly half as much again as the three B&B boxes.  I am now on the lookout for a fifth.
Yellow (Orange) and Dark Blue (Purple) armies. Some surplus 
Ashigaru Yari from the Shogun game have been recruited 
into both armies

These I have subjected to my own minimalist paint work: black undercoat, white drybrush, single main colour. I have, however, gone a little further, placing a simple uniform pattern on the nobari flags, metal weapon blades, and the odd extra detail. Added to these armies are a number of spare Ashigaru Yari figures from the Shogun game - enough for eight stands altogether.

Red Army

The figures are no longer deployed individually, but mounted on stands. I began by having as many figures as the strength points for each element. This really didn't work for these figures, so I have gone for stands of threes and twos. To some extent, the number has been dictated by the figures available. There being three standing Samurai arquebusiers per box, it seemed reasonable to place them all on a stand. Their Strength Point (SP) value will be according.
Green Army. I might have to do something about the colour
of the stands.

Now, having played through the original Antoine Bourguilleau rule set, though impressed by some aspects of the way it played (e.g. that a defeated army could successfully disengage in a plausible manner - not something many rule sets achieve), on the whole I found the activation system, especially with a single general, just a little too ... bitty. I was a little dissatisfied with the resulting game. Whilst there is some indication that historical Samurai Army commanders found their followers a little 'sticky', I wanted a little more action. Although not exactly contrary to the Bourguilleau rule set, I have adopted a convention of assigning, apart for the Army Commander,  one 'general' per 6 units, or stands.


Fortified castle. The buildings are detachable...


A point worth observing, too, is that I consider the expression 'rounding down' to mean 'rounding to the nearest integer, with exact halves being rounded to the nearest integer below'. Context of these rules indicates that the author really means truncating, that is to say, dropping the remainder of any division. To illustrate the difference:

Suppose you have 11 units, with 1 general: 
'Rounding Down' as I interpret it:
11/6 => 2 + 1 General, gives 3 activation dice. We roll (2+3+6)/2 => 6 units activated
'Truncating'
11/6 => 1 + 1 General, gives 2 activation dice. We roll (3+4)/2 => 3 units activated.
The difference of 2 out of 11 available units seems to me significant.


... and the detached buildings form a village or town


Very well, but on the whole I have preferred to stay with the 'truncating' the division of the number of units by 6, but adding for more than one general. Here's why.

The Sengoku Wars seem to have been well chronicled, and are replete with outstanding personalities. I notice that this is reflected in the Richard Borg game system in Samurai Battles. (See link for an account). Lots of generals/ personalities. I probably wouldn't be quite so generous. The conventions I came up with for my games are:
1. 1 activation die for each whole multiple of 6 units (divide by 6 and truncate the quotient);
2. 1 activation die for the Army Commander;
3A. 1 sub-general for each whole multiple of 6 units;  
3B. 1 activation die for each sub-general.

The effect of this is a fair measure of control in the early stages - enough for brisk action yet retaining some chance effects - but gradually degrading as losses mount. Attached 'permanently' to particular units, these commanders share the fate of their units. The loss of a general's unit might well cost an army two activation dice come their next turn.


Command tent, marquee or pavilion.  I tend to think
of it as a pavilion.


Going back to our 11-unit army, we would be allowed 
1 activation die for the 11 units (just one 'whole multiple' of 6);
1 activation die for the Army commander;
1 activation die for the one sub-general permitted.

The above picture is of a small command pavilion/ tent/ marquee, which seems to have been a feature of many Samurai army high command. I'll probably make one more, but more oblong and more open in front. These will count as static units, unable to initiate combat, but able to defend themselves.  I suggest it be given 1 SP only, but elite status. The 'General with' addition to the combat dice will ensure it dies hard...

As the Zvezda figures offer a greater variety of figures, the Bourguilleau simplified TO&E will have to be amended - for my games at any rate.


Notes:
  • E = Elite
  • A = Average
  • P = Poor
  • Artillery ranges are short (1 grid area) and long (2-3 grid areas).
  • Pavises count as cover for incoming shot or bow fire.
  • Command pavilion (tent, marquee) can not move, nor shoot nor initiate combat. However, in combat it counts as an elite unit.
Here seems a good place to pause.  To come: Siege of Osaka: Battle among the Tombs, 1615


Siege of Osaka: the Heights of Komatsuyama


Wednesday, February 7, 2024

Hyderabad - a project out of the blue

 A recent article in Bob Cordery's blog is the inspiration for this posting - something to which 24 hours ago I had given hardly any thought. The particular topic that caught my eye was 'Operation Polo' - the annexation by the newly independent India of the State of Hyderabad. There were probably good reasons for such aggression: that Hyderabad was entirely bounded by India itself; the State was landlocked (despite some effort in obtaining a seaport, even under lease); and the ruling Prince was having a deal of trouble curbing the insurrectionary elements within his borders.

Was this a possible topic for one of my 'Map Games'? First of all, the map:

'Map games' for 'Operation Polo' 

 Yep: that's to go on my table. I've arranged the map to include the Portuguese territory of Goa, which city, it was hoped, might serve as landlocked Hyderabad's entrepot. If Hyderabad can not come to some arrangement with Goa authorities and Portugal, perhaps more persuasive methods might be examined...

If this proves impractical, an alternate set-up suggests itself. Hyderabad is conveniently divided up into twelve what we might call provinces.  The following map shows that they are grouped into four 'Divisions', but I don't really imagine that for our purposes, the Divisions have much importance. The idea here is that the provinces can be the the determinants of 'area movement'. Battles might be resolved as was done in my 'Blacklands War' of three years back, or the map might be drawn on a reasonably sized card surface, and the campaign played out like my 'Marnon War'  .


'Area Movement' Map of Hyderabad

Operation Polo - the 'police action' - carried out by India involved limited numbers of troops - according to Wikipedia, some 35,000 Indian, against 22,000 Hyderabad State Forces, and anything up to 200,000 Razakar irregulars. Considering that Bob Cordery mentions 1500 of these Razakar, one is somewhat disinclined to accept that 200,000 were ever deployed for action.

Considering the size of the State - some 300 miles (say, 480km) square - the limited forces available to both sides indicates (to me at any rate) a considerable strategic scope. That India completely surrounds Hyderabad does permit them to attack from anywhere, against which the Prince could probably mount only a problematical defence.

Now, for a tentative TO&E for both sides, based on Bob's posting.  So:

Hyderabad forces:

2 horsed cavalry regiments @ 3 stands 
2 light armoured regiments @ 2 x Humber, 1 x Daimler (I have no Staghounds)
2 infantry regiments @ 4 stands (3 rifle, 1MMG)
1 artillery battery (1x 25pr gun/howitzer)
4 Razakar irregular infantry units @ 4 stands (4 rifle)

11 units.  These forces will presumably have wire and land mines available, and to be capable of creating dug-in positions, and demolitions if deemed appropriate.

Indian (Sangrian) forces:

10 infantry regiments @ 4 stands (3 rifle, 1MMG)
1 motor regiment @ 3 stands (2 rifle, 1MMG) , 1 medium or 2 light trucks
1 light armoured regiment @ 3 x M3 Stuart
1 medium armoured regiment @ 3 x M4 Sherman
1 cavalry regiment @ 3 stands
1 artillery regiment @ 3-4 x 25pr gun, howitzer
1 field engineer company with 1 stand, 1 bren carrier 
2 ground attack squadrons @ 1 a/craft (probably a Spitfire, as I have no other aircraft)

16 units + 2 air squadrons.

Now, though I have listed multi-stand units, such a TO&E might not be practical for a single table top game of this operation. Rather, each unit might have to be represented by a single stand or vehicle. The one exception there might well be the Indian artillery, split up into 3 or 4 batteries, one with each column.


However, if playing the thing out as the invading columns progress province by province, then the forces for each Indian column may be drawn from 'expanded' TO&E. The Hyderabad forces would have to be divided such as to offer some kind of resistance to each of the four invading columns, yet retaining enough force capable of concentrating upon and defeating at least one of them.

The invading columns each attack one of the four 'Divisions': at Aurangabad, Adilabad, Nalgonda and Gulbarga. The first actions will take place in each of those provinces, depending upon what forces have been allocated to the respective columns, and, from the Hyderabad point of view, which of the four 'fronts'.

Well, that is as far as I have got with this project, but I think I have the beginnings of two very different games depicting the same operation.

To be examined further...


Monday, February 5, 2024

Portable Montereau, February 1814 (3)


Turn Six (and Seven): The Allies seize the initiative:
In doing so, they repulse Marshal Victor's assaults upon Surville and St Martin once and for all. Very little remains of the Line Divisions, or of the Paris Reserve. Now, were Victor alne in this fight, his corps would have routed long ago - and many rule sets would have prescribed precisely that.  In my view, although such a rule in fine for the overall army command, it is 'double jeopardy' for the army's constituent formations.  Victor has just 6 Strength Points remaining.  Very well: what has happened to the other 12? There is your rout. Apart from killed, wounded and captured, thousands of stragglers are milling about the battlefield. A tiny group of brave men remain with the colours, and remain in the fight. That the other formations are still taking it to the enemy is also keeping Victor's command in being.

Well, that's my rationale, anyhow. 

But fortunes elsewhere on the battlefield are at best mixed. Kirsch's Austrians and the Wurttemberg Light Infantry are pushing Milhaud's tired cavalry back towards Luat, but a cavalry battle raging close by Surville is holding up the river crossing by Bianchi's Corps.

What happened to the Bavarian breakout? Somehow their fate escaped the attention of the battlefield artist. Although driving off Pajol's hussars, they drew the attention of the powerful brigades of the National Guard. Heavily outmatched, the Bavarians did not long survive the encounter. The victorious National Guard continued marching on towards Villerton.


In the meantime, the long column of Bianchi's I Corps remained held up along the road, unable to move until the Surville garrison clear the streets of the town.

The dragoons reinforcing Pajol's chasseurs, the long drawn out running battle with Walsleben's cavalry came to a sudden end with the latter's collapse. Suddenly Kirsch's artillery line was threatened from a flank... 

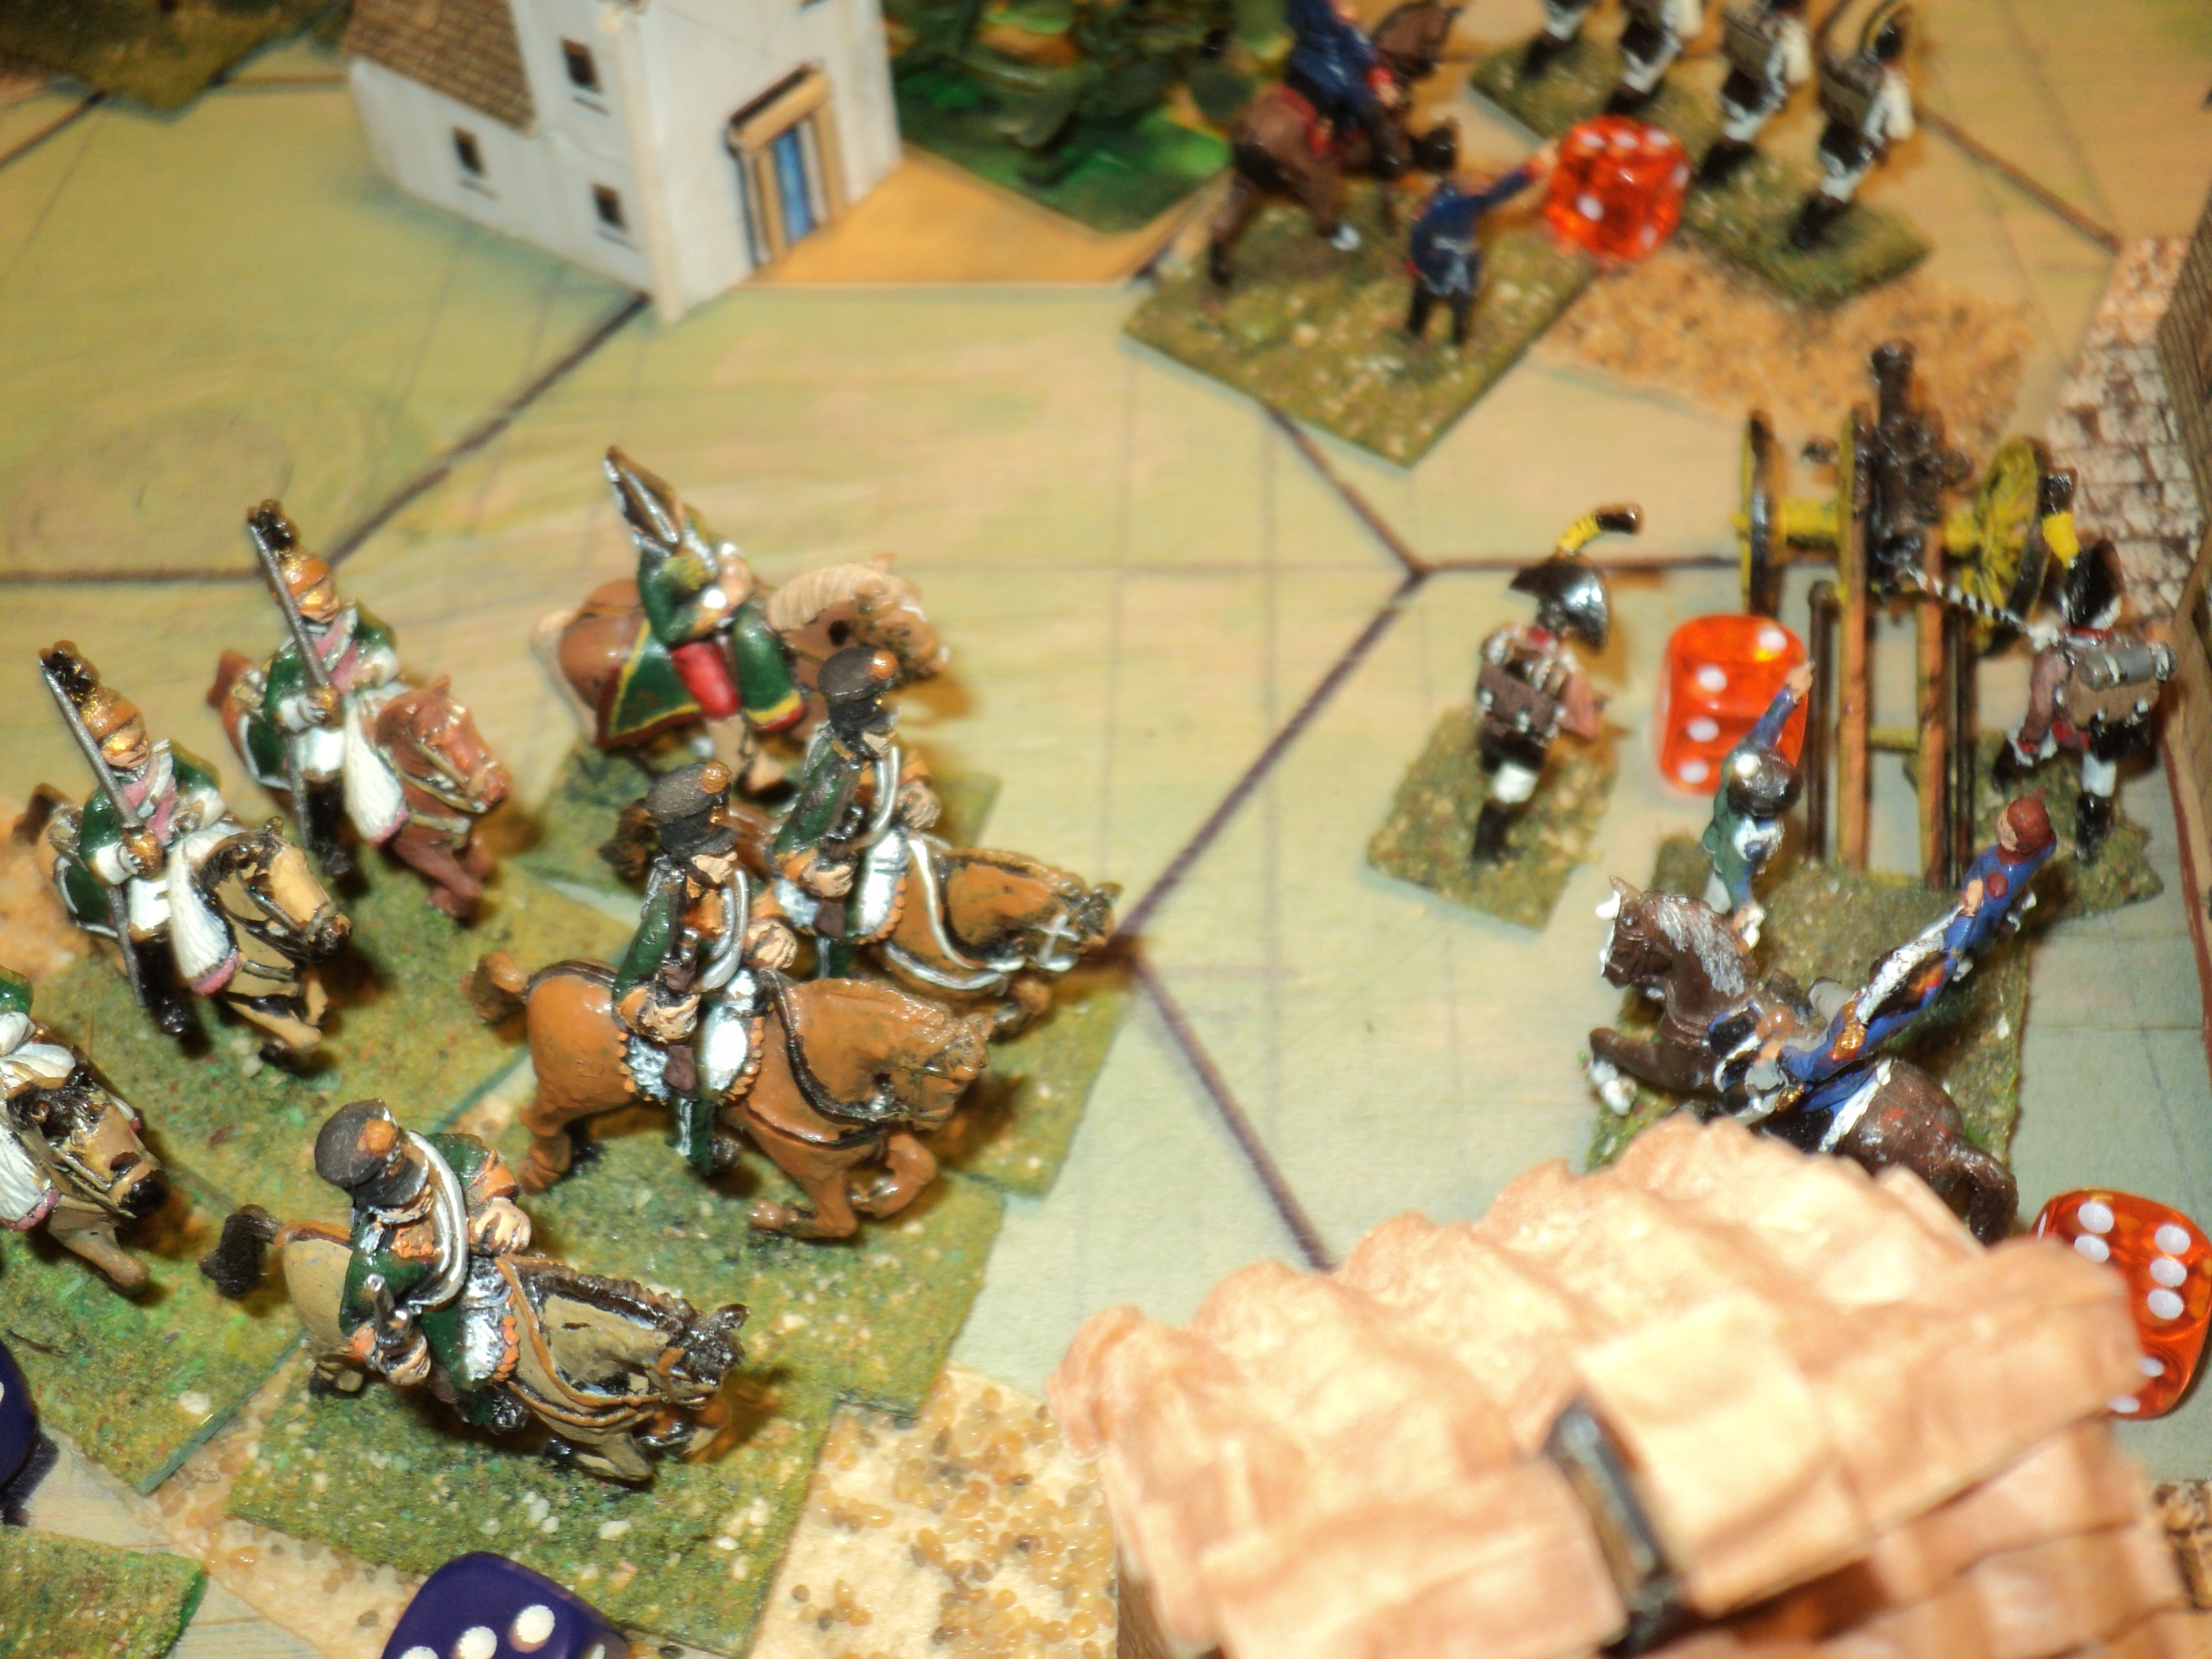
... and it was now that the portentous dark cloud began to blanket the fields to the north: the Emperor napoleon, and the Imperial Guard. Exelmans's light horse and Delort's heavies, led by Nansouty (wearing a chasseur uniform in this day), advanced across the fields, whilst Friant's Old guard took the road through Forges to Luat.


As Milhaud and victor pull back from St Martin towards Luat, Schafer and Doring's brigades follow up. By so doing they clear the road for Bianchi's delayed troops to cross the river into Surville. 


Led by General Koch himself, Austrians and Wurttembergers drive the formed remnants of Duhesme's Division upon the equally depleted Paris Reserve. Marshal Victor rallies what is left of his infantry in a new line.


Turn Eight: The Allies keep the initiative.
The quick-witted and observant reader will wonder what happened to Turn 7, and so do I. I think I simply forgot around this time to take enough pictures, and thereby omitted the move marker. However the previous two pictures seem sufficient to me to indicate two turns had gone by, as Koch drove back Victor's Corps well away from the riverside towns.


The streets of Surville now unencumbered, Bianchi's column begins to pour across the bridges. Then comes another hold-up. Barely emerging from the western outskirts of Surville, Raigecourt's cavalry run into Milhaud's chasseurs.  This is doubly bad news, for the chasseurs shortly before have overrun  Austrian artillery that had formed a battery line between St Martin and Villeron. Bianchi's column seems to be facing more delays.


However, Raigecourt does receive some support from some of Bianchi's artillery detached and in battery in a loop of the river, firing into the flank of Pajol's horse. On the other hand French pressure has been so determined, that the Wurttemberg advance guard infantry have now been cut off in Villeron and are under heavy assault from Pacthod's National Guardsmen.

All this while, the Imperial Guard continues to pour into the battlefield.  The leading elements of the Old Guard are marching through Luat, where they are greeted by Milhaud's dragoons.  The Guard cavalry remain north of the Luat-Piat Buisson road.

However depleted Victor's command, supported by Milhaud's horse artillery, continue to stand against the Allied counter-attacks. The artillery repulse a brigade sized Austrian attack, and drive the assailants back into St Martin.  


It is becoming apparent that the Imperial Guard can reinforce the French attacks far more quickly than can Bianchi the beleaguered bridgehead.  Unable to break out into the open, Raigecourt's cavalry are clogging the streets of Surville.  It is only the stout resistance of the green-coats in Villeron that has delayed Pacthod's advance upon the riverside town.


The situation indicating that there was no real prospect now of expanding the bridgehead, let alone saving the garrison of Villeron, Prince Eugene of Wurttemberg sounds the retreat. Darkness drawing in upon a late winter afternoon, the Allies are able, less the Villeron garrison, to pull back across the river overnight. With no escape, Stockmeyer's Wurttemberg advance guard surrender themselves after dark. Otherwise, there was no pursuit.

Undoubted French victory though reported in the Bulletin, there was no question that the Grand Armee had received a severe knock. Marshal Victor's Army Corps had lost over half the total French losses, and they fell just barely short of the Army's exhaustion point. For their part, the Allies had lost just 26SP not counting a divisional commander (Walsleben) and also not counting what remained to surrender of Stockmeyer's light infantry.