Sunday, December 27, 2020

First Blacklands War: The War at Sea - Battle of Tekke Koyu (1)


Turcowaz Battle Squadron exiting the Dardanelles

On the last day of October, the Turcowaz fleet set forth once more through the Dardanelles Strait to face the Hellenic Navy. On the previous occasion, they had got the better of the encounter, and broken the blockade. Yet, owing to the narrowness of the point of egress into the Mesogesean Sea, the maritime strategic situation remained unfavourable to the Turcowaz Navy. To be sure, there was the whole of the Turcowaz Orientalis littoral to be considered, but large seaports and anchorages were wanting - the narrow bays at Smyrna and Marmaris being equally susceptible to blockade.  

To wipe out the Hellenic fleet reckoned as beyond the capacity of the Turcowaz Navy, nevertheless, the Admiralty at Ionople were pleased so far with the results obtained.  They were resolved as soon as may be that a powerful, well trained and fast vessel break out, past the Hellenic watchers over the Dardanelles, and into the open sea. However unlikely that the enemy heavy cruiser HNS Georgios Averof would yet have been fully repaired, it could only be a matter of weeks or months. If the light cruiser TNS Hamidiye should induce Georgios Averof away from the northern Thrakean Sea, so much would be to the advantage of Turcowaz. To get past the Hellenic watch upon the Dardanelles, Hamidiye would need the protection of a powerful squadron. Two battleships and a couple of destroyers were available:

Turcowaz Battle Squadron:  Admiral Basmati Reis

Hayreddin Barbarossa - Pre-dreadnought Battleship, Admiral's Flagship
Muhtesem - Ironclad Coastal Battleship
S167 Numune - Destroyer/ Torpedo Boat
S168 Gayret - Destroyer/ Torpedo Boat
Temporarily under command:-
Hamidiye - Protected (Light) Cruiser

Hellenic Inshore 'Squadron': Ironclad battleship
Spetsai, and destroyer Leon.

Embarking in the early hours of 31 October, the Battle Squadron, led by Muhtesem with Hamidiye bringing up the rear, and flanked by the destroyers to port, began to exit the Straits into the open sea. At once the whole force altered course to due west, the plan being, once well clear of the Gelibolu Peninsula, to turn nor'west by north, and escort Hamidiye through the strait between Gokceada Island and the Gelibolu shore. Once the cruiser was through and well on its way, the main body would return to the Dardanelles, and thence to their Sea of Marmara anchorage. Of course, it was unlikely that this could be achieved without a fight, but the Admiralty's attitude, shared by the Turcowaz crews, was that a fight would be so much the better.

Fleets approaching, still well out of gunnery range.

Following the setback of the Battle of Imbros, the Hellenic Navy kept more a watch over, than a blockade, of the Dardanelles. HNS Hydra under extensive repair, and HNS Psara sunk, Rear Admiral Pavlos Poliomyelitis appeared inclined to favour that class of vessel for maintaining an inshore watch. On this occasion, the coastal battleship HNS Spetsai had a single destroyer, HNS Leon, in attendance. So exiguous had Hellenic naval resources become, that the offshore watch comprised just the lone battleship HNS Lemnos, also accompanied by just the one destroyer, HNS Aetos. The orders to Spetsai were to engage at once any enemy force they came down the Dardanelles. The Offshore Watch squadron would come up the moment they heard the guns.

Opening salvos, the far greater Turcowaz firepower
scores but one hit - and that critical!

For the following battle I incorporated the ideas I suggested in my Naval Chromium posting. I wish I had taken the trouble of re-reading it, because I clean forgot my suggestions for the torpedoes, and treated its results the same as for gunfire critical hits. But I played it that torpedoes (patterns of 3 each salvo) hit only on a '6', but were always treated as critical hits. We'll see how that worked as the battle unfolded. Strangely enough, the torpedo boats of both sides played a major role in the unfolding events.
Spetsai loses its forward 10.8-inch gun.

As the Turcowaz Battle squadron nosed out from the mouth of the Dardanelles strait, lookouts aboard Muhtesem at once espied the smoke of the Hellenic Inshore 'squadron', far to the sou'west by south.  Turning briefly westward, then upon the more northerly course, the Turcowaz ships were more than happy to see HNS Spetsai close the range.  Although the Hellenic ironclad was able to bring its more powerful forward batteries into action against Hayreddin Barbarossa, they were far outmatched by the combined salvoes of the pre-Dreadnought and the ironclad Muhtesem.  For all that, Turcowaz gunnery was to prove woeful for most of the action.  Just one 11-inch shell struck its target - but proved critical.  Striking upon the starboard upper hull it started a fire close to Spetsai's forward magazine. Quick thinking by the guns crew flooded the magazine (card, 6S), but that meant that after the next salvo, starboard main gun would be out of action. 

 
First salvos

In the following, I switched to using white dice for Hellenic Navy gunnery; green for the Turcowaz, and red for both sides' torpedoes. Larger dice represented primary armament; smaller dice the secondary. Instead of placing the card for a critical hit beside the critical hit die (as in the above picture), I placed it beside the vessel affected.

Further exchanges as Hellenic vessels steer towards
Turcowaz fleet
Turcowaz course alterations rather reduced the number of main guns that could be brought to bear upon the Hellenic ironclad, but another lucky hit knocked out the latter's after turret. From now on, only the larboard 10.8-inch gun remained in action of Spetsai's main armament. For its part, a 5.9-inch shell struck Hayreddin Barbarossa close to the waterline. The battleship began to take on water.
The arrival of the Hellenic 'off-shore watch'.
The battleship Muhtesem about to cross the 'T' of the Hellenic ships, the lookouts became aware of the approach from the nor'west of two more Hellenic vessels: the powerful battleship Lemnos, and its destroyer consort. About to engage Spetsai, Sea-Captain Abdul Hamid ordered the forward main turret to engage Lemnos instead. The rear turret unable to traverse yet to engage the pre-dreadnought, continued firing at Spetsai.  

Note: The rules state that no ship may fire its primary armament at more than one target per turn. I felt that in the circumstance in which two targets were available, but one could not be engaged by both turrets, there was a case for splitting the fire. In this instance, both turrets could have engaged Spetsai, and maybe that's the way I ought to have played it. Yet I also felt that, Lemnos being such a powerful unit, it was in Mehtesem's interest to engage early, even with limited available firepower.  There seemed to be no reason to lift altogether the primary gunfire against Spetsai, if that were available. Now, I accept that if both turrets could fire at Lemnos and at Spetsai, then it's an 'one or the other' thing. I'm still not sure whether or not I was right to take the line I did.
'Engage the enemy more closely!'

Leon's torpedoes all miss.
The results of these exchanges were 'honours even', but proved rather less fortunate for the Hellenic fleet. The secondary salvo from Spetsai scored three hits upon Hayreddin Barbarossa, for two in reply, but the destroyer Leon also took a couple of hits.  The first salvo from Lemnos scored a hit upon Muhtesem, but the latter got the better of the encounter - a lucky shot knocking out a gun from the Lemnos forward turret. Having got itself, still afloat, within torpedo range Leon fired off its starboard tubes.  The whole 'pattern' missed their target!

Once the Lemnos and Aetos had arrived, the sea battle descended fairly rapidly into a wild melee.  So far, the Turcowaz destroyers, along with the light cruiser, Hamidiye, had kept out of the action.  Whilst it was not in the interests of Turcowaz that Hamidiye get itself too involved in the battle, there was nothing - apart, perhaps, from enemy fire - to stop the destroyers joining the fun!

HNS Lemnos loses a primary gun!

We'll see what happened next time...
To be continued.


Saturday, December 26, 2020

An Indulgence...

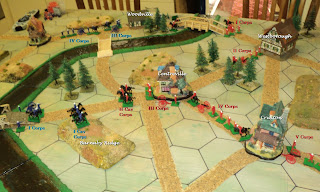
The 'map' table, view looking north.
Taking a little break from the Blacklands War - a naval action has been fought and the AAR (there will be two postings) in train - I felt the urge to try out something I've occasionally dabbled in in the past. It is, in effect, a 'map game', similar to those reported on in the Blunders of the Danube and Murdoch's Marauders blog spots. There have some interesting essays of this kind in the Facebook group Shambattle and OMOG Toy Soldier Games, as well. The most recent has been a version of the Shambattle 'campaign' set in the eastern theatre of the American Civil War.  Here is a picture of the basic Shambattle map (see the Shambattle site for rule set etc). If you check out the images after Googling 'Shambattle', you see several examples.
The Shambattle map.

However, having my hex-table up (having fought out a Blacklands War naval action shortly before) I thought I'd try out something a little more elaborate. The land to be fought over purported to be a region subject to a border dispute between Ruberia (RED) and Azuria (BLUE). Negotiations broke down over the dissatisfaction of both with the Sluggard River being the 'natural' frontier separating the two countries. To make up this territory, I scattered about some rarely used buildings especially the ceramic ones picked up several years ago from a 2-dollar shop. There followed an extensive road network, a large river crossable at four points, and several forests and points of high ground. One, Barnaby Ridge, earned its name by having a considerable battle fought over it.

Looking west, as the columns march into Lazia.
The armies comprised the figures from the Age of Imperialism board game, gifted to me by Brian O'Sullivan (A Fist Full of Plastic blog).  The armies were identical, organised as follows:

I - V Army Corps, each with

- 3 infantry figures,

- 1 cavalry figure

- 1 gun with explorer or surveyor figure as gun crew;

I - II Cavalry Corps, each with

- 3 mounted figures.

I could have used the Shambattle rule set, and probably ought to have done, but I wanted to revisit some ideas I was exploring several years ago along these lines.  

1. Movement IGoUGo but each turn, dice for who goes first.
2. Army Corps move a maximum of 2 hexes, except when marching along a road, when they move 3 hexes.  Cavalry Corps move a maximum of 3 hexes, except when marching along a road, when they can move 4 hexes.  (Note that an Army Corps strung out along a road will occupy 2 road hexes).
3. Guns may fire up to 2 hexes range, rolling a single die.
4. Combat is joined by opposing forces in adjacent hexes.
5. Each side rolls one die per figure, plus one for each arm represented.  

    Examples:
(i) A standard army corps rolls 8 dice: 1 for each of the 5 figures, plus 3 for the 3 separate arms represented.  See also at the end of this article.
(ii) A standard cavalry corps of 3 mounted figures rolls 4 dice: 1 for each of the mounted figures, plus 1 for the cavalry arm represented.

5A. An army still in column of march, attempting to force a defile (e.g. a bridge), or attacking a town
halves the standard number of combat dice.

6.
A roll of '1' = enemy artillery hit
A roll of '2' = enemy cavalry hit
A roll of '3' = enemy cavalry hit
A roll of '4' = enemy infantry hit
A roll of '5' = enemy Infantry hit
A roll of '6' = no effect.

Having rolled the dice, each die score is cancelled by a same score by the other, until only the unmatched scores remain.  The remaining hits then result in figures being removed.

8 (Recommended). 
At the end of each move, or perhaps a fixed number of moves (IGoUGo pairs), the losses are totted up on both sides, and each receives back, for each arm, the lesser of of the respective sides' losses.  These are distributed among the units as the player sees fit.  There ought to be some maximum that a unit can not exceed.  I suggest 4 infantry, 2 cavalry and 2 guns for an 'Army Corps', and 5 cavalry for a 'Cavalry Corps'.  (I didn't actually use this rule, but it might serve to reduce the attritional effects.  See also the end of this posting).

8.  Units that receive more losses than they inflict in terms of numbers of units, must retreat one grid area. 


Early clash: I Cavalry Corps face off against 
III Army Corps

The war opened with the Azurian Army marching into Lazia, the disputed border territory in the Sluggard River valley. From east and west, two roads entered the region. On each side, the right-hand columns comprised I Cavalry and I, and II Army Corps; the left hand II Cavalry and III and IV Army Corps. The V Army Corps of both sides (decided by die roll for both) entered by the Centreville road.
The first clash was a cavalry skirmish just east of the Woodville bridge, in which the Ruberian horse were driven back across the river. The Ruberian I Corps forced their way across, driving off the Azurian cavalry, but were stopped by the Azurian III Corps coming up from Woodville.  In the ensuing Battle of Woodville Bridge, the III Corps were victorious, and drove the Ruberians, across the the river and back into Westborough.


Opening battle for Barnaby
Ridge
A more considerable battle developed as the Azurians attempted to force a bridgehead on the west bank of the Sluggard River, near Waterton. I Cavalry Corps seized the heights of Barnaby Ridge, where, before the Army Corps could come up, they came under attack from III and IV Ruberian Corps - the II Cavalry having swung off onto the Centreville-Woodville road to cover the bridge crossing there. The result was heavy losses to III Corps, but the Azurian cavalry was left much depleted.

The next few pictures show more of the developments described so far...
I Army Corps forcing the 
Bridge west of Woodville


General view


IV Corps attempting to 
cross east of Woodville

The Battle of Barnaby Ridge, conclusion.
At about this point I omitted for  a whole turn to take pictures of the Battle of Barnaby Ridge. This was something of an Azurian victory, with Ruberian III Corps being left badly mauled. They fell back to the outskirts of Centreville, where, along with the newly arrived V Corps, they formed a new line along the Centreville-Bridgeport road. II Army Corps lay behind Centreville itself, whence it was later to replace the depleted III Corps when the latter was withdrawn from the battle line.  


V Corps on the march

Meanwhile, the Azurian V Corps had swung off upon the Bridgeport road east of the river. The plan was a species of double envelopment, with this corps crossing the river at Bridgeport to fall upon the Ruberian left flank, whilst IV Corps, crossing the bridge east of Woodville, approached the main Ruberian Army from the south. Probably unfortunately, the main Azurian Army (I Cav, I, II Army Corps) attacked prematurely.  
The Azurian IV Corps soon enough forced the river crossing against the enemy II Cavalry Corps, which fell back to the heights immediately south of Centreville, covering the flank of the main army. V Corps were even more distant when the Azurian central corps launched their attack. The initial result seemed promising. Azuria's II Corps routed and destroyed the remains of Ruberia's III Corps;  and V Corps were being held by the exiguous remnants of I Cavalry Corps. The fighting between I Corps and IV Corps remained inconclusive after a day's fighting (one IGoUGo turn).  
At about this point, the Azurian run of successes came to an end. The fresh Ruberian II Corps suddenly attacked out of Centreville against a somewhat worn down II Corps, IV Corps presented an implacable front against all enemy attacks, and V Corps freed themselves from the toils of the enemy cavalry.  South of Centreville, II Cavalry Corps fended off Azurian attempts to force the heights. The battle between the respective II Corps ended with heavy losses to both sides, but the Ruberians kept its hold upon the town.
With no more to be apprehended from what remained of Azuria's I and II Corps, V Corps marched off to oppose the Azurians crossing the river at Bridgeport. Catching the enemy Corps astride the river, the Ruberians smashed the Azurians on the near bank.  
Battle of Bridgeport - a Ruberian victory.

The check at Centreville and the defeat at Bridgeport was enough to bring the Azurians to the negotiating table. Their early victories at Woodford Bridge and Barnaby Ridge had been largely neutralised.

Losses had been heavy on both sides:

Azuria - 6 infantry, 9 cavalry, 3 artillery
Ruberia - 11 infantry, 7 cavalry, 3 artillery.

Had reinforcements been brought in at this point, the armies would have comprised 

Azuria: - 9+6=15 infantry, 2+7=9 cavalry, 2+3=5 artillery
Ruberia: - 4+6=10 infantry, 4+7=11 cavalry, 2+3=5 artillery

The reconstituted armies might have comprised:

Azuria:
I - V Army Corps: 3 Infantry, 1 Cavalry, 1 Artillery (Firepower 8 each)
Cavalry Corps: 4 Cavalry (Firepower 5)

Ruberia: 
I, IV Army Corps: 3 Infantry, 2 Cavalry, 1 Artillery (Firepower 9 each)
V Army Corps: 4 Infantry, 1 Cavalry, 1 Artillery (Firepower 9)
II, III Army Corps: disbanded
I, II Cavalry Corps: 3 Cavalry, 1 Artillery (Firepower 6 each)

It might have made for an interesting continuation of the war!


Sunday, December 20, 2020

Rams and Ironclads - ACW Riverine Naval

  • The following is a rule set I adapted from another set published some 25-30 years ago in some magazine or other, designed for a much smaller scale.  These are designed for an 'open' (non-gridded) table. The vessels I use (still have) are roughly 1:300 scale, but would work probably better at 1:500-700 scale.

Rams and Ironclads

American Civil War River Operations

1. Equipment

Rulers, tape measures, six-sided dice (D6), models or ship 'profiles' in scale from 1:300 to 1:700, protractor with 30, 45 and 60degrees marked, ship stat sheets, movement markers.

Movement markers are square chits with a number on them.  The number signifies nominal speed, which may be modified by the current, or if the ship is reversing.  Placed immediately behind the vessel going forward, the chit is placed at an angle to indicate intention to turn.  Placed in front of the vessel indicates movement astern.  (Note, an arrow on the chit probably makes the intention clearer).
US 'City' Class ironclad gunboats, and monitor

2. Scales:

Ships approximately 1mm to 1 foot (1:300) up to 1mm to 70cm (1:700).
'Ground' scale: 1mm to 1 yard (1:900)
Time scale: 1 move to 1 minute (actual); in game terms 1 turn represents about half an hour. 

USS Lafayette and mortar barges under tow 
by an armed tugboat.


3.Movement:
  • Ships move at a rate of 3cm to 1 knot
  • River current is 2 knots.  Add 6cm to ship's move if travelling within 45 deg (degrees) of directly downstream; subtract 6cm from ship's move if travelling within 45deg of directly upstream. (Note that there is no effect upon ships travelling across the current, it being supposed the course steered by the helmsman is taking it into account ).
  • Change of speed: up to 2 knots per turn, unless otherwise stated.
  • Turning: 
    - Riverboats, up to 60deg per turn;
    - Monitors, up to 45deg;
    - Casemate Ironclads up to 30deg;
    - Tugboats and small tenders, up to 90deg.
  • To turn, pivot vessel around the centre of its stern.
  • To reverse, 1/3 'nominal' speed.
    A couple of generic riverboat steamers.  May be used for 
    rams or transports by either side.

4. Order of Play
  • Lay out Movement Markers (See 5).  Note that moves are considered simultaneous, so in intricate situations, they may have to be split further to determine events.  Experience indicated that this was rarely necessary.
  • Make half move straight ahead (see 3) adding or subtracting 1 knot for current.
  • Make the turn, if any ordered.  Dice for yawing if moving at less that the speed of the current , or adrift (tied up, anchored or aground vessels do not dice.  (This makes a turning move look like an angle, rather than a turning circle.  It seems to work!)
  • If appropriate, dice for grounding, putting out fires, repairs, etc
  • Any light guns, musketry, shore batteries, and other guns on vessels not turning, may fire.
  • Resolve ramming.
  • Complete move, if capable
  • Dice for grounding etc.
  • Any light guns, musketry and other guns that did not fire this turn, may fire.
  • Resolve ramming.
    Somewhat 'cartooned style' CSA ram
    steamers.  I call them 'cotton clads', though
    they are wanting their cladding!

5. Move Markers
  • Square counters with numbers to indicate vessel's nominal speed, and an arrow to indicate intention to move straight ahead, or to turn.  
  • These counters are placed upon the playing surface immediately behind the moving vessel, touching its stern.  When moving the vessel, leave the counter in place for the purposes of measurement, until the half-move is complete, and then bring it up to the vessel.  Note that the intention to turn is signalled at the start of the turn, not at the half-way point.
  • Adjustments to speed for current, reversing etc are made to this number on the counter.  Do not allow for current etc before selecting the speed number.
  • Absent an arrow; the top of the number indicates direction of move.  Placed at an angle indicates intention to move, and direction.

    USS Cairo moving full speed, with the river current:

    Place chit at stern = moving ahead.
    8 knots is the maximum speed of this vessel

    Half move: 12cm + 3cm for current

    Full move: 24cm + 6cm for current

    USS Cairo moving full speed, against the river current:

    Place chit

    Half move: 12cm - 3cm for current


    Full move: 24cm - 6cm for current

    USS Cairo, moving downstream, turning to starboard:

  • Chit placed at angle to indicate 
    turn, and direction of turn.
    Half move: 12cm + 3cm for current.

  • Half move: pivot by centre of the stern 
    45deg maximum for this vessel 


    Complete turn: 12 cm + 3cm (current, as still within
    45deg of directly downstream). 

6. Gunnery
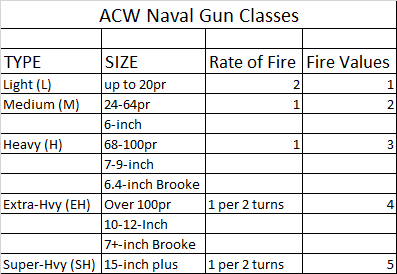
  • Gun classes:


    Ranges:
  • - Musketry (shipboard sharpshooters)      Up to 20cm
    - Grapeshot/ canister                                 Up to 20cm
    - Point Black Cannon                                Smoothbore (S/B) up to 20cm; Rifles up to 30cm
    - Effective Cannon                                    S/B over 20cm to 50cm; Rifles, over 30cm to 75cm
    - Long Range Cannon                               S/B over 50cm to 100cm; Rifles, over 75cm to 150cm

  • Arcs of fire:
    - Casemate guns - 30deg arc (within 15deg from straight ahead) (Note: a bit generous, but chosen for simplicity).
    - Barbette, deck-mounted guns and shore batteries - 60deg arc. 
    - Pivot guns, for and aft mounted may fire 120deg from centre line.
    - Pivot guns in casemate may fire in a 30deg arc from any one available gunport.
    - Guns mounted in revolving turrets may fire in any sensible direction (i.e. anything that wouldn't damage their own vessel).
    - Guns mounted in fixed turrets count as being in casemates.
    - Shipboard sharpshooters, any direction, at one target only.

  • Armour Classes
    Separate armour classes are assigned to the front, sides, rear and turrets (if any)
    - Monitor Turret ................................11
    - Ironclad over 5"-7" protection .......10
    - Shore battery in casemates ..............9
    - Ironclad over 3"-5" protection..........9
    - Shore Battery in Barbette ................8
    - Ironclad over 1" -3" protection ........8
    - Shore battery unprtected...................8
    - 'Tinclad' or Partial Ironclad ..............7
    - Cotton or wood protection ...............6
    - Unprotected.......................................5

  • Scoring Hits
    For each gun firing at a given target, roll 1 x D6 die, add the Fire Value to the score, and adjust the total as follows:

    +1 - Range Point Blank
    +1 - Target moving at 3 knots or less except shore battery (take current into account)
    +1 - Firer moving at 3 knots or less except shore battery (take current into account)
    -1 - Firing at Long Range
    -1 - New Target this turn, i.e. gun has not so far fired at all, or fired at some other target last time
    -1 - Target bow or stern on to the firer (within 30deg)
    -1 - Firer in flames or filled with steam
    -1 - Under fore from enemy shipboard sharpshooters, or from grapeshot.
    -1 - Mortar firing at stationary vessel (Note, mortars can not affect moving vessels)

    * A HIT is scored if the modified score exceeds the armour value of the target

  •  Effect of Hits
    For each hit on a vessel, roll 1xD6

    6 = Critical Hit (see below)
    5 = Lose 1 knot from top speed
    4 = Lose 1 knot from top speed
    3 = Lose 1 gun, if available, else lose 1/2 knot from top speed
    2 = Lose 1 gun, if available, else lose 1/2 knot from top speed
    1 = Lose 1/2 knot from top speed.


  • More river steamers/ ramming gunboats.  Their 
    armaments are fairly light.


Critical Hits
Roll 2xd6 and add the scores Critical damage is caused according to the following scores.

2 = Freak shot penetrate magazine; vessel blows up and sinks immediately.
3 = Helmsman, Pilot or Ship Captain killed; vessel continues on present course, with no turning (even if ordered) for one whole move (Note - if this happens in the second half of a turning move, then the vessel carries on its new course).
4 = Vessel holed below the waterline and takes on a list or goes down by the bows or stern depending upon the direction of the incoming. 

Lose 1xD6 knots

If listing, opposite side guns can not fire; if down by the bows or stern, the other end guns may not fire.  Monitors can not fire towards the 'up' side or end.

A second such critical hit does not alter the direction of tilt, but does add to loss of speed
5 = Paddlewheel or screw jammed with debris.  Vessel slows to a halt (at 4 knots per turn deceleration).  Roll 1xD6 for number of turns to clear it.  If a 1 is rolled, then the debris is cleared at the end of the turn the damage was received.
6 = Smokestack damaged - lose 2 knots from top speed.  Ship suffers -1 on further gunnery rolls (smoke everywhere!).  Further such hits reduce speed by -2 knots, but can not reduce ship's speed to below 3 knots.
7 = Single casemate gunport damaged and won't open, and gun is left out of action.  1xD6 moves to free it; the gun remaining out of action for that time.  Foe barbette or unprotected guns, lose one, reducing gunnery by one gun.
8 = Steam pipes damaged, loss of pressure.  Acceleration and deceleration reduced to 1 knot per turn.
9 = Same as 4.
10 = Steering damaged - vessel continues on same heading until repairs effected after 1xD6 moves.
11 = FIRE! - Roll 1xD6 to determine number of attempts to put it out.  One attempt is allowed per turn, a score of 6 required if afloat; 5 or 6 if aground or beached.  If the vessel is still on fire after the allowed number of attempts to extinguish, the crew abandon ship, which is left to drift and burn out.  Upon a second such critical hit whilst on fire, the crew will abandon ship immediately.
12 = Boiler holed, vessel fills with steam, and drifts to a halt (at 4 knots the turn).  Crew abandons ship on a D6 roll of 1 or 2.  Otherwise the vessel acts as a floating battery with -1 on gunnery rolls. 

Musketry and Grapeshot
  • Sharpshooters may be carried on riverboat, cottonclads, etc, but not on ironclads.  
  • Any gun may fire grapeshot or canister instead of its normal ammunition.
  • There are two possible effects:
    - Reduces enemy gunnery effectiveness;
    - Roll 2xD6 if a vessel is under musketry or (per gun) grapeshot fire.  Only a score of 3 (see critical Hits) will have any effect.

Firing on Shore battery:
  • If a hit is scored, roll 1xD6.  A 6 knocks out one gun.
    A steam ram, probably in the service of the US 
    navy.  Something like the 'Ellet' rams.

7. Ramming
  • If one vessel rams another, or a collision occurs, the ramming vessel rolls 1xD6.
  • If the collision is bow-to-bow (within a 45deg angle of straight ahead) both sides are considered to be ramming.  In this case ignore penalties to the rammer on scores of 4+.
  • The bonus for having a ram bow is allowed only if the rammer's stem is in contact with the target vessel
  • If a collision occurs with neither bow in contact, both sides roll 1xD6 without adjustment.
  • To the dice rolls, make the following adjustments:
    +1 - Target stationary (drifting, at anchor, or tied up)
    +1 - For every 2 knots over 6 actual speed  ramming vessel travelling (i.e. allow for current)
    +1 - Target side on to rammer within 45deg of perpendicular
    +1 - Rammer equipped with a ram bow
    -1 - Rammer's bow not reinforced
    -1 - Each knot under 4 actual speed rammer is moving
    -1 - bow to bow collision within 45deg of straight ahead

  • Effect of scores:
    6+ = Target loses 2xD6 knots. Vessel slows to this speed if the way forward is clear, else is halted (See 9.  Endurance).  Rammer is halted (for the moment), and loses 1 knot from its top speed.
    4-5 = Target loses 1xD6 knots from top speed; Rammer loses one knot.
    2-3 = No effect
    1 = Rammer loses 1xD6 knots.

8. Torpedoes (Mines)

  • Subsurface torpedoes may be arranged in singles, in 'minefields' or be set adrift
  • In any action, the first occasion that the effect of a particular torpedo or minefield needs to be known, roll 1xD6.  Call the resulting number 'T'.
  • For this and subsequent occasions this torpedo of field is crossed, roll 2xD6.  If the resulting score is less than or equal to 'T' the torpedo explodes, with the following dire consequences:
    5-6 = Vessel loses 3xD6 knots, 1 critical hit (See 9.  Endurance)
    3-4 = Vessel loses 2xD6 knots, 1 critical hit
    1-2 = Vessel loses 1xD6 knots.
  • Single torpedoes, having exploded, have no further effect.  (Note that if 'T' = 1, the torpedo or minefield, is a complete dud.)

  • Spar Torpedoes 
    - A boat or vessel armed with spar torpedoes can not ram and set off its torpedo in the same move.
    -  When a spar torpedo is applied, roll 1xD6
    4-6 = Torpedo explodes under target vessel.  Roll 1xD6 for effect as above
    2-3 = Torpedo fails to explode
    1 = Torpedo gets caught under its own vessel and explodes.  Roll 1xD6 for effect, as above.
    CSS Tennessee - I see there is still work
    needed on this one.

9. Endurance
  • Any vessel whose top speed is reduced to 0 as a result of enemy action, slows to a halt at 4 knots per turn, and drifts with the current.  Each turn, dice for yawing (1,2 = to port; 5,6 = to starboard)
  • Yawing counts as a maximum turn for the type of vessel under consideration
  • If the vessel's top speed drops below 0, the vessel is sinking.   A sinking vessel goes down in 5 + 1xD6 moves.
  • A vessel's top speed may be reduced to 0 or less, but because deceleration when not under power is 4 knots per turn, it may still have sufficient way on to beach itself if close enough to the shore.
  • Instead, a dead in the water of sinking vessel may be taken in tow, to prevent sinking by towing towards the shore, say.
  • A beached or grounded vessel that has 'sunk' is salvageable.
  • A sinking vessel may be hastened on its way to the bottom by further reduction in 'speed' by sinking 1 move early for each further knot in speed lost.  It can therefore go under halfway through a move.
10.  Grounding
  • Except where defined, rivers shoal towards their banks, islands and sandbanks.  Other shoal water may be defined, as required.
  • Whenever any part of a vessel passes closer to the riverbank than its draught expressed in centimeters, it is in danger of running aground.  Roll 1xD6.  If the score is less than or equal to the difference between the vessel's draught and its distance in cm from the shore, the vessel runs aground.  This roll is made as and when it is necessary at the half-way or end point of a move.
  • On subsequent moves, efforts may be made to free the vessel, with a score greater than the draught and distance being required, except that a '6' always frees a vessel.  This roll is made in the middle of a move.
  • Once freed from grounding, the vessel has half a move to get get clear, else it must dice again.  A freeing move may include a turn.
  • A vessel actually touching the riverbank must be towed off unless it is in a recognised anchorage.

    Towing... 

11. Towing
  • It takes one move for a vessel to take one other in tow. To signify being in tow, the bow (or stern) of the towed vessel must be in contact with the stern (or possibly bow) of the towing vessel. Note that towed vessels may be towed stern first, and towing vessels my tow in reverse.
  • To pass a towing line between vessels, the appropriate ends of the vessels must be less than 3cm apart.  
  • Towing reduces the nominal speed of a vessel by 1 knot per 5cm or part thereof in length of the towed vessel (and 1 further knot for every vessel more than one being towed {e.g. a string of mortar barges}).
  • Tugs are specialists in towing or pushing.  They may bush one vessel, or tow up to three (reductions in speed permitting).
  • Tugs' top speed is 11 knots, and they may reverse at half nominal speed.
  • Tugs have reinforced bows, are otherwise unprotected, and may mount up to 1 light gun.
12. Ship Stats (Sample)


CSS Tennessee.


Copyright, Archduke Piccolo (Ion A. Dowman)