Sunday, April 28, 2024

This Will Never Work - Portable 30YW Action

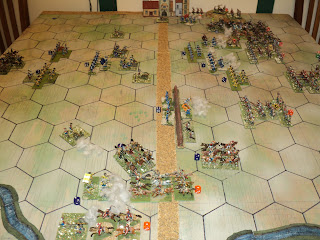
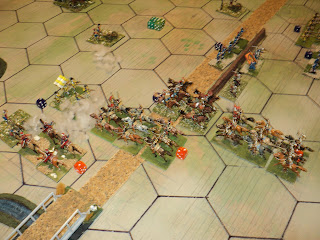
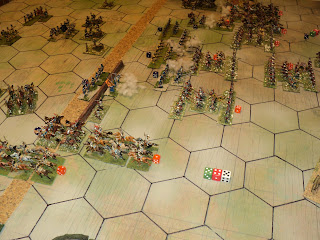
Massive activation roll for the Swedes moving first!

Following on from the previous but one posting, here begins an account of the Battle of Lutzen, 1632, as fought out on my table. The leading picture was taken upon the completion of the Swedish first turn. The Swedes begin 'with the initiative', that is to say, they went first in the first 'turn' of the IGoUGo action. How many units may be activated to move or shoot is determined by the number of whole multiples of 6 units there are, plus the number of 'generals', including their army commander. There being 30 units plus 4 generals, the 'Swedes' threw 9 dice, for the massive score you see in that leading picture: 39. This result is halved (dropping the odd half) allowing an action by 19 units out of the 30. The two gun batteries having fired, seventeen units lurched into motion.
Swedish left. led by their King, cross the 
Lutzen road
The Swedish army began its operations on the wings, King Gustavus Adolphus sweeping past the flank of the forlorn hope lining the road, whilst part of the right wing cavalry, commanded musketeers, accompanied by the flanking infantry 'brigade' attempted to storm the forlorn hope itself. The wall lining the road, by the way, really represents the roadside ditch that formed a species of entrenchment. I deemed it to be cover, which, despite the thin line having just 1SP per element, proved a serious obstacle to the Swedish attack.
The Imperialist forlorn hope at once engaged.
Surely they will be quickly overrun...

In their turn, the Imperialists at once counter-attacked on their left wing. Almost immediately the whole stretch of front from the Flossgraben stream to the Lutzen end of the forlorn hope line became the scene of a vicious fight that lasted the whole duration of the battle. Two harquebusier regiments and the Croats ganged up on the right-most Swedish horse, which, considering the advantage of the latter (+1 on the dice roll, and they got to roll for all three combats) went rather in favour of the Imperialists. The addition of the commanded musketeers and battalion guns might have come to the aid of the embattled horse.  We'll see anon with what effect. Thereafter, however, the harquebusiers relied upon their firepower, leaving it to the Swedes to bring on the close assaults.
Piccolomini's horse carry the fight to the Swedish right.


For the rest, the Imperialist army stood off to await the Swedish assault. There was no choice. In contrast to their opponents' terrific activation roll, 'Wallenstein's' was truly dismal.  There were but 6 dice to roll anyhow: three 'generals' on the table, and 20 units - just 3 whole multiples of 6. The roll: 16; halved = 8. The four gun batteries having fired in the artillery phase, just 4 units could be activated. Those four were the four horsed units on the left flank.
Imperialist first activation roll. Miserable.

Imperialist left fully engaged; the rest of the army waits
Nevertheless, there was plenty of excitement to be had on this wing. Winning the initiative for the second turn, the Swedes' roll was rather closer to the statistical expectation 31 or 32. The wings  absorbed most of the 15 'points worth' of attention, especially as the Imperialist left flank horse were putting up a tremendous fight. Already, Gustavus Adolphus had to survive one survivability test. But the Swedes were handing out a few licks of their own. 
Both sides carving each other up.
From the picture below, the Imperialists have lost at least 2SPs, possibly 4, but the Swedes have lost 6SP already, four of them inflicted by that forlorn hope line!
Swedish tight gradually forcing back the Imperialists
On the other wing, the leading Swedish cavalry, including a unit of cuirassiers, clashed with the Imperialist gun line. Once again, the Imperialists put up the kind of fight that exasperated their opponents, who were to spend much of the rest of the day entangled with the artillery, whilst the Imperialist harquebusiers waited for the chance to counter attack. Enveloping the Swedish left, the guns and commanded musketeers around 'Windmill' Hill poured hot lead and hot shot into the enemy flank.
Swedish left strikes the Imperialist gun line...

The Imperialists' second activation roll outdid the first for utter wretchedness: just 10 - eleven short of a roll that would be merely average. There's the statistical mean - and then there's really mean. So, with just 5 units that could be activated, and some of those had been taken up by the guns, that left even the embattled left wing cavalry short of options. The rest of the army continued, perforce, to wait.
10 on 3xD6 - a truly woeful Turn 2 activation roll!
And then! ... and then came karma, or the reward for patience. Or something. The Imperialists wrested the initiative from their opponents for Turn Three - and on top of that rolled a huge activation roll: 31 on just the six dice! 
On top of winning the initiative, the Imperialists
roll this huge activation roll!
Able to activate 15 units, less the two gun batteries that had fired this turn, the Imperialists were able not only to take the fight to the enemy on the flanks, but had enough movement to spare to loosen up the crowded centre. This led to the lozenge arrangement of tercios in the picture below. In case you're wondering, this was not at all motivated by the arrangement pictured in the engravings reproduced in the previous posting. But those engravings did go a long way to induce a feeling that it was 'right' when I noticed where this regrouping had led.  This arrangement was a lot easier to move about on the table - not that they did much moving.
The wings hard at it, especially in the foreground
The fight on the east wing carried on unabated, though the Imperialists were feeling the want of reserves in this part of the field. So far Graf zu Pappenheim still hadn't arrived (requiring a D6 roll of 6 to do so), and losses were mounting. But they were mounting on both sides. Although pushed back to their own side of the road for the moment, the harquebusiers were giving as good as they were taking.
The King's Own unit is looking shaky despite the 
presence of their monarch.

The following couple of pictures show the much improved arrangement of the tercios, and the Swedish centre, yet to move, covered by their guns. One of their battalion guns has begun to pepper the lead tercio unit.
This tercio arrangement looks far better articulated 
than that in which they began. that does leave 
the lead tercio a little vulnerable, though

Close by Lutzen, the Imperialists limited their operations to fire action. They were leaving it to the Swedes to get up close and personal.

The one real counter attack came from a harquebusier regiment trying to ease the pressure on one of the gun batteries.
Near Lutzen, the Swedish horse just can not catch a break

The battle continued to rage on the Swedish right with no breakthrough in sight, although all four Imperialist units had taken losses. So had the unit King Gustavus was leading, and they were looking rather shaken. Yet it seemed worth the risk to charge the enemy pistoleers in front of him: a 'three' good enough to hit, with the enemy requiring a 'five'. So of course, the Swedes roll a 'one' and the imperialists a 'six'; the unit dies; and the king is left isolated and alone.
The fierce bloodletting continues on this flank.
The King's charge is decisively repulsed and his
horsemen abandon him in their flight


Fortunately, this time, the King himself survived the action, but I wondered whether the harquebusiers ought to follow up. I decided not, as it was the King himself who brought on the close combat. If the rules do not imply that only the bringer on of a close combat can follow up a success, one feels inclined to make that explicit. The harquebusiers, by the way, are not so inclined, being designed for fire action, rather than the close quarter stuff.
A second Swedish cavalry unit is also thrown back


Meanwhile, the cavalry unit to his left was also driven back. Those damned cowardly harquebusiers were proving stubbornly resistant to persuasion that they quit the field.
The first Swedish assault on the right almost completely 
repulsed, but Imperialist losses have been almost as 
heavy.


One more we draw back to survey the field. Whilst the flanks remain bloodily, though indecisively, engaged, the Swedish battalia in the centre are approaching close enough to engage the centre tercio in a fire action.  The action is becoming general across the whole front. Though the Swedes are carrying the fight to their opponents, they are also on the whole taking the worse of the losses. After 4 Turns, the Imperials have lost 8 SPs, the Swedes - 20! 


All this while, the forlorn hope continues to hold out, the Swedish attacks getting nowhere, except where the brigade crossed the road, whence they engage the nearest tercio in a musketry duel. 


The Imperialist right continues comfortably to hold on against the ineffectual Swedish attacks. It is not the want of effort by the Swedes. Their losses on this wing have been heavy enough. One cuirassier unit has been destroyed - minus 4SPs right there - to no loss to the Imperialist wing, apart from the 1 SP from the leftmost battery... 


Here we will suspend the narrative, quite in the style of Henry Fielding, as being quite long enough for this posting. Will the Swedes overcome their misfortunes so far? Will the bellicose Swedish King survive to see victory?  And whatever has happened to Graf zu Pappenheim and his cuirassiers?

To be continued...


Friday, April 26, 2024

Shapes of Things to Come...

Battle of Lutzen: action joined on the wings

 As it will be a day or two or three before I get my battle narratives done, methought to offer here by way of a preview. There remains, of course, the 30YW action foreshadowed a few days ago.

Cavalry battle near the Flossgraben stream.
King Gustavus Adolphus in the thick of the action.


But I also got around to my hex-board Shambattle, which, as seems often the case with my battles, led to a surprising outcome.

Bluvian forces...


Redinians...


But finally, I have also revisited another project from a while back...


Byzantines versus Bulgars, c1000CE, Mythopedion, somewhere in the Balkans. The Byzantine army intercepting a raid - or perhaps mounting a punitive expedition - who knows? The Byzantines (green die) wins the initiative at the outset, and battle is joined. 

Mythopedion: situation at the end of the second 'bound'.

This goes back to Bob Cordery's Developing the Portable Wargame, but with units filling out the hex-grid areas. Strength point losses generally marked by removing bases. 

More of this action, anon...
To be, like everything else, continued...

Tuesday, April 23, 2024

This will never work...

My 30YW armies nearing completion, methought to try out my ideas for the Battle of Lutzen (1632) pitting probably the two greatest commanders of the conflict: King Gustavus Adolphus of Sweden against Count Albrecht Eusabius von Wallenstein, in one of its bloodiest battles, considering the fairly modest size of the armies - fewer than 20,000 on each side.

The armies drawn up for battle: Swedish on the left, Imperialists
facing them
.
It is remarkable sometimes, how the reality (for a giver value of 'reality') differs from the way one imagines a thing will look. For a start, I wanted to try out the 2-hex tercios on the side of the Imperialists. I accept that a modern view seems to indicate that the Imperialist formations were probably more like extra-deep battalia rather than tercios as such, but the tercio scheme seemed to me intriguing.
The Imperialist position. The hex grid, together with the 
limited size of the table, does distort the line of 
tercios, somewhat!
Much less tractable were the Swedish Brigades, for which I substituted 'battalia' type formations comprising 2 shot and 1 pike element. There eight of these, forming two lines of four. Both centres comprised 80 foot figures (32 pike, 48shot). The Imperialists also had a thin like of musketeers - a 'forlorn hope' lining the ditches (represented here by a wall) along the roadside. Six figures (3 elements) of these, plus 12 (2 units of 6) commanded musketeers made up the 98 Imperialist infantry figures. 
Behind Swedish lines. King Gustavus Adolphus
commands on the right wing.


Having settled upon a roughly 1 figure to 100 men representation, the cavalry, especially the Swedish and their interspersed commanded shot and battalion guns were always going to be a problem. What I have here is the best I could manage with the DBR-style elements, reducing to two 2-stand units on either flank, between three 2-stand units of horse. Two units of horse formed a second line, without the musketeers. Overall this gave the Army of Gustaf Adolph just 104 infantry figures - rather under-representing the c.12,000 history seems to indicate. Ought I add within the second line of horse units a commanded shot unit on each flank, bring the numbers up to 116? 
The Swedish right wing: cavalry interspersed with
commanded shot and battalion guns.
The centre battalions comprising 3 elements, I placed the pikes in front (a) to represent the brigades visually, and (b - more compellingly) for convenience. They also got one of the five battalion guns I placed in the table. These I made by combining an ESCI Napoleonic British light gun with the Airfix French artillery carriage. I placed these on slightly smaller bases, with just two of a crew. The two heavy artillery fronting the left end of the centre lines are the Revell pieces with 4 gunners per stand.
Swedish centre - 8 foot units and a reserve 
of 1 cavalry unit in line of elements.
As might be seen from the following photo, the 4 other battalion guns stand in front of the commanded musketeers, two on the left flank (pictured) and two on the right. Now we run into the Portable Wargames Pike and Shot rule set. I shall have to work some changes to them to get this action to be a goer. At the moment, I am considering making them 1 Strength Point each (1SP, although it has crossed my mind to make them 0SP, for reasons and with effects I may discuss another time).

The battalion guns can move 1 hex the time and shoot. The heavy guns I don't allow to move without a horsed team. One may be brought onto the table with suitable activation. Owing to the size of the table, I've doubled the range of the heavy guns: short range to 2 hexes, long out to 6.  The current 1 and 3 hex ranges I have retained for the battalion guns. The line of fire comprises the immediate hex in front, and thereafter the same line and the hexes alongside.
Bernhard's wing 

Overall the Swedish army comprises 104 (or possibly 116) infantry, 66 cavalry, 2 heavy and 5 battalion artillery (18 gunners). There also 4 commanders: the King himself on the right, Brahe and Kniphausen in the centre, (with Ohm's small cavalry reserve 'under' Kniphausen); and Bernhard of Saxe-Weimar (he with the vaguely Saxonic black-green-yellow flag) on the left.

Swedish OOB:
  • 8 'Brigades' each with 4 pike and 6 shot @ 4SP = 32SP
  • 4 'Commanded shot' units each with 6 shot @ 3SP = 12SP
  • 9 'Swedish' (i.e. charging) cavalry each with 6 troopers @ 3SP = 27SP
  • 2 Allied cuirassier units each with 6 troopers @ 4SP = 8SP
  • 2 Heavy artillery each with 4 crew @ 2SP = 4SP
  • 5 Battalion Guns each with 2 crew @ 1SP = 5SP
  • 1 Army commander and 3 wing commanders
Totals: 104 foot, 66 horse, 7 cannon
Strength Points: 88. Exhaustion Point: minus 30SP; Rout Point: minus 44SP.

Imperialist left - looking a bit thin on the ground

On the Imperialist left, the horse looks awfully thin on the ground. Three units of harquebusiers, and, on the other side of the Flossgraben stream, a 2-stand unit of Croat light cavalry. OK, special rules required for the Croats - 2SP, close combat only, average. The Imperialists favouring the deep columns, I have arranged them in units of 3 stands. At the moment this is for the 'look' of the thing, but I should like really to add something in the rules in their favour for their columnar depth, bearing in mind the 'cost' of the extra stand. In this army, the harquebusiers should count no better than 'average'. Something to work on, here.

Imperialist centre: the tercios in 'line'

My, the Imperialist centre do look crowded, don't it just? For come reason, I didn't imagine just how solidly packed these tercios would be. Having deployed them in a species of line, I note that some early depictions (both, notably, from the Imperialist perspective) arrange the tercios in a lozenge arrangement. We'll see more about that in due course. 
The first of two depictions of Lutzen from behind Imperialist
lines. Note the arrangement of the Imperialist 
tercios

This animated depiction conveys, I think, some notion of the ferocity 
of the fighting. Check out the deep cavalry columns on the 
Imperialist left. On the right, Lutzen is on fire.


The Imperialist right comprised a mix of harquebusiers, with commanded shot and artillery on the rising ground - 'Windmill Hill', without the windmills. Overall on the field the Imperialists comprised:

Imperialist OOB:
  • 4 tercios each with 8 pike and 12 shot @ 6SP = 24SP
  • 2 commanded shot units each with 6 shot @ 3SP = 6SP
  • 3 'forlorn hope' elements each with 2 shot @ 1SP = 3SP
  • 6 harquebusier mounted units each with 9 pistoleers @ 3SP = 18SP
  • 1 Croat unit with 4 light horse @2SP = 2SP
  • 4 heavy guns each with 4 crew @ 2SP = 8SP
  • 1 Army commander and 3 wing commanders
Totals: 98 foot, 58 horse, 4 cannon
Strength Points: 61. Exhaustion Point: minus 21SP; Rout Point: minus 31SP.


Imperialist right. The rising ground is 'Windmill
Hill' - without its windmills
Now comes the kicker: a force of cuirassiers under the command of the renowned cavalryman Gottfried Heinrich Graf zu Pappenheim. Now, these cuirassiers are formed into 2 units of 12 figures, but each unit is subdivided into 2 tactical units of 6 figures each. So is the small force of cuirassiers in the Swedish army. These begin off the table, hurrying thither at Wallenstein's urgent summons.
Pappenheim's reinforcements, hurrying towards 
Lutzen
 So we add these to the Imperialist OOB:
  • 4 cuirassier units each with 6 figures @ 4SP = 24SP
  • 1 wing commander (Pappenheim)
This brings the totals up (if and when he arrives) to:
Totals: 98 foot, 82 horse, 4 cannon
Strength Points: 85. Exhaustion Point: minus 29SP; Rout Point: minus 43SP.
Of course, these values will depend upon what losses the Imperialists might have taken before Pappenheim's arrival on the field.

A final comment I should make upon the composition of the cavalry forces I have chosen both sides. Frankly it was less a guess than a decision based upon what units I had available, and their sizes. So really they were all fudged. The 'Saxon' cuirassiers I placed with Bernhard of  Saxe-Weimar's wing.

The battle was fought a week ago. I'll leave the post-action narrative until next time:
To be continued...


Sunday, April 21, 2024

Down at the Club - Revisiting Wavre

Mark, of Chasseur renown, has a way of putting on big games. I missed the Leipzig blockbuster a couple of weeks back, but the Wavre project on Saturday (20 April) was massive enough. Mark was generous to invite me along, but all the figures and materiel were supplied by others. I merely supplied the light of my countenance. 

I took the defence of Wavre itself, whilst Paul (Painting Little Soldiers) defended the river line west of there as far as, and including, Bierge. Meanwhile, far off at Limal, stood a very lonely looking battalion, gazing at the far bank of the River Dyle; empty of foes now, but later to be as filled with more French soldiery than they would have wished for.

This of course, would have been the massed flanking blow handled by Andy. Meanwhile, Chris (Vandamme) and Andrew (Gerard?) undertook the frontal assaults at Wavre and Bierge. The three bridges being the only river crossings, this was going to be a tough ordeal for the attackers. At one time or another they did succeed in carrying the barricades, but each time a counterattack recovered them for the Prussians. The bridge into Wavre itself was the last to be stormed, late in the afternoon, whereat the attackers seized an undefended part of the town. The Prussians reoccupied the barricade, cutting off the French in the town, but how long they could have maintained that hold would have been problematical had the action continued much longer.

Meanwhile, the massive flanking blow gradually developed in the teeth of Prussian efforts to hold them back. A series of costly counterattacks kept the French some distance southwest of Bierge, whilst a more solid line was being formed. However, how long we could have remained in and around Wavre and Bierge had the action continued much longer would have been anyone's guess.

The action ended rather inconclusively, I think. From my point of view, I thought it a respectable rearguard/ delaying action by our Prussians, but it was pretty clear that sooner or later the Prussians (Thieleman's III Corps) would have been overwhelmed.

This game was scheduled to continue through to the Sunday, if the state of the action seemed sufficiently 'in the balance'.  I think it was agreed that the outcome, such as it was in this refight, indicated that the action would not have continued into the second day. 

For Mark's movie, check out the Chasseur link above. I've also linked to Paul's blog spot for additional pictures.


Bierge


Bierge - Wavre in the distance

Wavre


The Prussians brace for the French flanking attack

Late in the day, the French have taken part of Wavre,
but the Prussians have reoccupied the bridge barricade.