Friday, August 30, 2024

Revisiting Byzantium - A Play Test

Earlier in the week, knocked together a 'pickup' solo game to play test some of the ideas I had expressed in a blog posting just over a week ago. I had it mind to try out the 'half-hex' idea I had discussed earlier, but I rather think it were better suited to a smaller set-up than my usual hex table.

The Bulgar left.
The action purported to be yet another clash between the rival empires of Byzantium and Bulgaria, fought somewhere in the Balkans. The terrain I set up using Bob Cordery's method, but even though I 'thinned out' my usual adaptation for this table, ended up with a rather more cluttered battlefield than one usually finds with the 'Ancients' genre of war gaming. I decided the country was hilly, so plenty of hill, not too thickly populated, a few tracts of wooded country dotted about, and a creek running through the area.  I think another time, though, I will examine ways to thin out the battlefield a little more, but with larger tracts of interestingness.

The Byzantine left. Lacking light troops, they have left 
the flank 'unguarded'. See below on 'deployment'.
Now, the question was, who was the invader? That role was assigned by that capricious Muse, Hexahedra, to the Bulgarians, led by the Kavkhan Attaboi. How was the table to be oriented? I rather figured on the action being 'against the grain' of the hexagons, with the invaders having to cross the creek, or the defenders lining it. However, I decided the direction from which the invaders came by once more invoking the the Goddess of the Dotted Dice, assigning the rolls:
1, 2 from the wall end (i.e. west);
3 from the north side;
4,5 from the outer end;
6 from the south side. 

The roll of '3' meant we could look northwards towards the tell-tale smoke of burning villages for the imminent arrival of the bellicose Bulgars. 
Part of the Bulgar army marching by the small
villages. On the far right flank, two light horse archer 
units advance...

Bulgar Army:

Commander Kavkhan Attaboi with personal retainers: Heavy Cavalry = 1SP. 
3 units Heavy Cavalry @ 2SP = 6SP
4 units Light Horse archers @2SP = 8SP
4 units Spearmen @ 4SP = 16SP
1 unit Light Infantry javelins = 2SP

12 units: activation range 4-8 units per turn.
33 Strength Points: Exhausted at minus 11SP; Rout at minus 17SP
Byzantine deployment, split by the creek.

To face the barbarous Bulgar horde, the Count Demetrios Psychopathes brought with him:

Byzantine Army:

Commander Demetrios Psychopathes: Heavy Cavalry = 1SP
1 unit kataphraktoi Cataphracts = 4SP
5 units kavallarioi Heavy cavalry @2SP = 10SP
1 unit prokoursatores Light Horse @ 2SP
4 units skoutatoi Protected Bowmen @4SP = 16SP
1 unit akontistai light infantry javelins = 2SP

12 units: activation range 4-8 units per turn.
35 Strength Points: Exhausted at minus 12SP; Rout at minus 18SP.

Notes:

1. Each unit's stand counts as a Strength Point, to be removed as SPs are lost. The double stands of the skoutatoi and kataphraktoi have to be marked, and are removed only when 2 or 4 SPs are lost.

2. The commander's single stand is the type upon which he his mounted. It does not count as a unit as such, but may be combined with other units, adding 1 (temporary) SP and 1 extra die to the combat dice. 

3. Combined with another unit, the commander's single stand may move with it at no extra cost to the movement allocation.

4. On its own, the commander's stand requires an activation point drawn from the activation point roll.

5. The commander's stand on its own counts as 1SP only (see list).

6. Omitting the 'standard' 6SP for the commander seemed at the time a reasonable thing to do, as his loss (if lost) deprived his army of his support in crucial combats.
 
7. The activation allocation at each turn is determined by a die roll with this result:
  1. = median - 2 units (4 units)
  2. = median -1 units (5 units)
  3. = median units (6 units)
  4. = median units (6 units) 
  5. = median + 1 units (7 units)
  6. = median + 2 units (8 units)
This system seemed to work OK, leading to a fairly volatile sort of action, but nothing to complain of. The Byzantine (moving second) threw miserable activation dice in the first two turns, but then 'won' the initiative at Turn Three, with a huge activation roll into the bargain!

8. I was working to a 'standard' army size of 12 units plus commander - quite an arbitrary decision, but one suggested by the size of the table. Possibly the army sizes could be greater with this size (in grid terms)  of table, but I don't reckon to go past 15.

9. I almost forgot: in deployment, the flanking two hexes on either may hold only light infantry or light horse. As oriented, that meant the heavy troops could deploy only in the 11 'centre' hexes. The Byzantines had one each of light horse and foot that might have been deployed in the flanking 'zones'. The Bulgarians in this respect could deploy more flexibly, having 1 foot but 4 light horse that could so deploy. I think some such convention would 'fit' the smaller table, even down to the 6x6 squares, with heavy units restricted at deployment to the centre 4 squares. Note that no such restriction need apply to a 'reserve' zone behind the main battlefield.

An account of the action follows... 
 

Saturday, August 24, 2024

Revisiting Byzantiad - ideas for a rule set.

Some recent ideas from the ever fertile region of Mark Cordone, has, along with some of my own have bethought me to reexamining a rule set I proposed about 6 years ago, but in another context. The earlier rule set I added to a few articles I wrote concerning the Vales of Lyndhurst Chronicles authored by the late Barry Taylor. Some of the ideas I used there I incorporated into the 'Map Games' I began exploring about 18 months ago.

The 'new' skoutatos unit. Just 6 men in the rear rank
(spears and bows on double depth stands) gives a 
14-figure unit - more in keeping with the 700 of close order troops 
of the unit as a whole


The new context is Mediaeval, specifically, but not exclusively, concerning events within and surrounding the Byzantine Empire c.1000AD/CE. I have put together a rule set for a FP3x3PW Byzantiad, some ideas of which appear in Bob Cordery's 'Green Compendium'. In this posting I will lay out some ideas for a 6x6 or larger grid war game. 
Most of my Byzantine horse are 'Tin Soldier',
as are the archers here. Of the provenance of the 
lancers I have no idea, or even why I have them.
Two stands  (the red shields) have had their shields
 repainted to form a new 2-stand unit


The occasion for this was that about a fortnight back, I was hunting through some boxes of stuff, and lit upon a weighty chocolate box of obscure provenance that, when opened contained a surprising surprise. Years ago, I sent off a consignment of surplus Byzantine figures to a fellow blogger in Australia (which, unasked, he reciprocated very generously). Now, among those figures were 5 klibanophoros figures. There ought to have been a sixth, but for the life of me, I couldn't find him. 

Well - there he was, in this box, with a whole bunch of works in progress. So much so, that I have been able to create a seventh unit of skoutatoi, and add a double-stand to two 3-stand units to form 4 2-stand units. I even found some armoured archers that I hadn't seen for at least 20 years!

I still have more than I ... erm ... need, but, having recruited many of these extra figures into my Byzantine Army, what is left over are oddments - like my orphaned klibanophoros dude. I do have a small number of trapezetai and heavy cavalry archers I'm not sure what to do with...

Scattered additional foot figures and 
trapezetai light horse. Four of the foot will become 
menaulion, the rest might fetch up as 
Armenians or something.

This led me to rethinking how my armies are organised. Central to the project, my Byzantines will be the benchmark, and cleave as closely as may be to the Praecepta Militaria of Nikephoros II Phokas. Although the older units and stands remain unchanged, I've placed just 3 archers in the rear rank of the new heavy infantry stands. The 14-figure 2-double-stand units represents the 700-strong close order body of a unit of troops. At 1 figure to 50 men, the skirmishing troops - slingers and javelin men - from each unit would be represented by a single 2-figure stand. These will however be brigaded together as 2 (or possibly 3) stand units.

The tricky ones are the menavlioi - a peculiar troop type capable of skirmishing, or standing in the front rank of the main body. At 4 figures the stand, they would represent 100 from each of 2 units. I have 2 such stands, and the figures to make a third. I could make a fourth, but I prefer to leave them slightly under represented. 

A 'general's' stand. Added to a 2-stand unit, it will 
add a SP. Integral to a 2-stand unit, it will add a 
SP to combat only. 


My Byzantine army won't include any of the more arcane specialist types. I'm none too clear what their artillery looked like (being unconvinced of the wagon mounted affairs), and I doubt if anyone makes fire syphoners, and I don't imagine them easy to employ on an open battlefield. Attacking or defending strong places, sound like their métier.

What about the enemies? I find I have enough Pechenegs for a DBA game, except that it is wanting a couple of War Wagons. I shall have to do something about that. Best represented are my Bulgars, but even that army is woefully dwarfed by my Byzantines. I might I think be forced to purchase a consignment of Barbaric types - Lombards, horse and foot, Bulgar heavy horse, Rus axemen, ... nothing too extreme, you understand... Many of the types can stand in for other armies, e.g. the Georgian and possibly Seljuk Turks.

For the rule set, let's start with a
Table of Troop Types:

The observant reader will at once notice that all the mounted units have been given TWO strength points (SP) only. For one thing, each stand represents 1 SP, each double-stand represents 2. The Byzantine heavy cavalry units comprised 300 men (theoretically, of course) - 180 lances and 120 archers arranged in 5 ranks. At 1 figure to 50 men, that gives us a 6-figure, 2-stand unit.  The exception is the unit of kataphraktoi (klibanophoroi, according to most sources, but I prefer the nomenclature of Nikephoros II). This unit formed a trapezoid something over 500 strong. Rounded, this allows us a 4SP unit. At the Battle of Silistria, the Emperor John Tzimiskes fielded two units of such kataphraktoi (as distinct from the heavy kavallarioi), but they were each only about 380-odd strong. I daresay I could split my unit into two separate wedges of 2SP each!

The battle reported earlier this month features 4-stand cavalry units, which look good, but I want to examine the smaller 2-stand units. 

Now, this list fits in with the rule set I have in mind. This could be played on a field 6x6 or larger of squares, or a field of hexagons instead. Note that in the above list, distance is determined in 'squares', but hexagons is implied if played on a hex field.

This will be a kind of hybrid Portable Wargames/ Command & Colours set, using my system of combat resolution. We'll start with this. In combat, roll as many dice per unit as its Strength Points. The results to be:

1 = hit on artillery, vehicles, war wagons fortifications or camp.
2 = hit on cavalry (optional retreat or SP loss)
3 = hit on cavalry
4 = hit on infantry (optional retreat or SP loss)
5 = hit on infantry
6 = hit on infantry

Now, though theoretically the Byzantines at least fielded artillery, they don't actually feature in my armies. However, my Pechenegs will have at least one war wagon, probably two for a DBA-sized game (12 units a side). 
  • Each unit rolls 1D6 per SP for all shooting and close combat. 
  • A general with a separate stand accompanying the unit adds 1SP for combat, and 1SP for the unit.
  • A general integral to the unit adds 1SP for combat only.
  • The number of combat dice might be added to or subtracted according to target or circumstance.
There are still one or two gaps and areas to play test.

1.  The menavlatoi. This really is a peculiar troop type, and might well be disregarded. DBM/DBA treats them as 'Blades (Exception)' Bd(X) - highly manoeuvrable, capable of standing in the front rank of the main body of its unit at need, but also may support the unit's sphendonistai (sling) and akontistai (javelin) skirmishers.  The chappies count as Bd(S) (superior) against 'knights' (as defined in the DB* rule sets), and as Bd(F) (fast) otherwise.  I was considering treating them a 'Axemen' but with just 2SP. Probably I should add another line to the list above: 
Menaulion 2SP, Move: 3, Weapon Range: (-), Close Combat modifier: +1 vs charging cavalry or cataphracts

2.  I have given the artillery just 1SP. One imagines that if any enemy actually makes contact with them, they wouldn't last long. But even just 1SP shooting at long range is likely to do some damage before the enemy get close. However, it may turn out to be desirable to add +1 to shooting at all but light troops (foot or horse).

3.  I want to look at extending the Portable Wargame unit activation system.  After rolling for initiative for each IGoUGo turn, the side moving rolls for the number of units that may do something
1 = median -2
2 = median -1
3 = median
4 = median
5 = median +1 
6 = median +2 
The result, if an army has, say, 12 units, is that it may move anything from 4 to 8 units, depending on the roll.                          

4.  Close Combat is initiated by moving the front of a unit to overlap a grid area containing an enemy. This counts as moving 1 grid area. If the combat remains unresolved at the end of the turn, it continues to be fought out in subsequent turns unless and until one or other side breaks off, is destroyed or retreats. The idea behind this is the notion of 'holding attacks' to pin the enemy down and/or to gain time to bring up reserves. The foot troops in particular are suited for this role; less so the horse.

5. At just 2SP, the horse will be pretty fragile for the most part, especially compared with close order foot. This is experimental, but I am hoping it will lead to more 'realistic' handling and effects.                                                                                        

Extra double-stands to be added to the other 
red and blue-shield units.

A play test to come...


Tuesday, August 13, 2024

Insurrection: The Gatonegro War of Independence


I discover that it was six years ago (!) that I began what was to be a 'campaign of battles' - a war of independence set somewhere in Latin America. Somehow, I became distracted, and never got back to the battles.  This, despite doing a fairish bit of on-line searching out the campaigns and battles of the real wars of Independence. 


Well, a couple of weeks ago, I played out what was based (supposedly) on the Battle of Maipu, April, 1818, between the Royalist Army and the insurrectionists styling themselves as 'Patriots'. This was the decisive action of the Chilean campaign of that year. As it turned out, 'Maipu' this Gatonegro battle was not, as the narrative of events will reveal.

After the early success at Arabispo, the insurrection caught popular fire, and the Reine de Oro had a serious rebellion on its hands.


Seeking to break the centre of the rebellion, the Royalists gathered what strength it could to confront the growing menace. For their part, the self-styled Patriots found recruits flocking to the nascent colours. When the clash came as the Royalist Army marched upon Maipu del Guano, they were to find themselves considerably outnumbered. Confident in the superior training of his army, General Mariano Osario drew up his force along a line centred upon rising ground close by Casa de la Espagne, a hamlet set among cherry orchards.

The Royalist Army comprised:
Commander: General Mariano Osario

1st Brigade: Colonel Ordonez
    Regiment Concepcion ... 28 figures
    Regiment Infante Don Carlos ... 28 figures
    Coy Sappers ... 7 figures
    Dragoons Ordonez ... 9 figures (under strength)
    Artillery ... 3 figures, 1 cannon
        Brigade totals: 63 foot, 9 horse, 3 artillery = 75 figures

2nd Brigade: Colonel Morta
    Regiment Arequipa ... 28 figures
    Regiment Burgos ... 28 figures
    Lancers Morta ... 9 figures (under strength)
    Artillery ... 3 figures, 1 cannon
        Brigade totals: 56 foot, 9 horse, 3 artillery = 68 figures

3rd Brigade: Colonel de Riviero
    Converged light and grenadier companies ... 28 figures
    Artillery ... 3 figures, 1 cannon
        Brigade totals: 28 foot, 3 gunners = 31 figures

Army totals: 147 foot, 18 horse, 9 artillery = 174 figures, 3 cannon

Marching to meet them, the Patriot Army comprised:
Commander: General Jose de San Martino

Division Las Heras:
    3 Regiments @ 19 figures = 57 figures
    Mounted grenadiers ... 12 figures
    Artillery ... 4 figures, 1 cannon
        Division totals: 57 foot, 12 horse, 4 artillery = 63 figures

Division Alvarez: 
    3 Regiments @ 19 figures = 57 figures
    Caballeros de los Andes horse ... 12 figures
    Artillery ... 4 figures, 1 cannon
        Division totals: 57 foot, 12 horse, 4 artillery = 63 figures

Division Quintana (Patricio Hernandez O'Hogg commanding):
    3 regiments @ 19 figures
    Escort Cavalry ... 6 figures
    Husares de la Muerte ... 6 figures 
    Artillery ... 6 figures, 2 cannon
        Division totals: 57 foot, 12 horse, 6 artillery = 65 figures

Army totals: 171 foot, 36 horse, 14 artillery = 221 figures, 4 cannon

A couple of points here:
1. My original order of battle had four Divisions, each with just two infantry regiments. A 'Reinforcement Division' under Bernardo O'Higgins would have been the fourth formation. I have no recollection as to why I changed it!

2. The considerable disparity in numbers I thought would be offset by the superior training and morale of the Royalist regulars. We'll see how that turned out.    
Regiment Concepcion's first volley.
Woeful: the pips scores count only on rolls of 4 or less... 


Prospects to begin with seemed unpromising for the Royalists, drawn up in a single line with, apart from the insignificant sapper company, not a single reserve. By contrast, the Patriots began advancing with two of their Divisions, Las Heras on the left and Alvarez on the right. As the leading Divisions engaged the flanks, O'Hogg's Reserve marched onto the field, straight towards the centre of the Royalist line. 

Just about the first Royalist unit to give fire, Regiment Concepcion, let fly a woeful volley. Where it went no one knew - certainly not the intended target. Under my own combat system, at this moment, the 'Die Range' for shooting was 4 - that is to say, the pips scores counted only for dice rolls of 4 or less.  This is precisely the same as subtracting 2 from the raw pip score, but without the actual subtraction. The unit could reasonably have expected to score 6 or 7 hits (modified by my 'normalising' system, which would have yielded 4 or 5 casualties). 

This was more than matched by the Regiment Infante Don Carlos, whose valley shredded the 1st Regiment of Las Heras Division. Perhaps the powder had been left too long in the breech, and damp reduced the effectiveness of the first volley. 

At any rate, as the action became general along the front, Royalist fire became much more accurate and effective.  The Patriot columns came on, to form lines of battle to engage in a protracted firefight all along the front. And they were getting the worst of it.
Outnumbered, the Royalist Dragoons put the 
Patriot horse to the rout!

Hoping to sweep aside the dragoons guarding the Royalist right flank, Las Heras's mounted grenadiers were brought up on the extreme patriot left. The royalist horse didn't hesitate. Though outnumbered 4 to 3 (which actually made the combat equal given Royalist training) the Royalists gave rather better than they got, inflicted 5 casualties for 2, and sent the Patriot horse packing.
The height of the Patriot attack: all along the line.
So far losses have not been too serious...


The Patriots seemed to be doing better on the other flank. The Caballeros de los Andes horse braved Royalist gunfire to ride over the de Riviero's guns. Incoming musketry also caused Regiment Burgos to fall back a short distance although they maintained their good order, and continued to face the enemy.

That was pretty much all the success, as it transpired, that the Patriot Army was to show this day.  Accurate Royalist musketry cut Patriot infantry to ribbons. De Riviero redeemed the loss of his guin battery with a devastating counter-attack onto the Patriot right flank. Soon, all over the field, routed patriot foot and horse could be seen making their way to the rear.
It's all to no avail. Apart from forcing back Regiment Burgos,
and overrunning a battery, the Patriot Army has hardly dented 
the Royalist line. Several Patriot units have broken and are
fleeing in rout.

There was no doubt about this result: a devastating Royalist victory.

Somehow, I think I got the balance totally wrong. Such a one-sided result simply wasn't supposed to happen! I rather think this battlefield will be revisited, but with the 4 division, 8 regiment ORBAT for the Patriots, and their soldiery having the battlefield experience, next time around, to match the Royalist firepower...


Border Troubles (2)


The Nimruz Expeditionary Force (NEF) made first contact  upon the round hill marking the right flank of the Tchagai garrison defence line. There Brigadier Mugglethwaite had placed the Recon Group: a motor rifle company with Spartan APCs and Saladin armoured cars. 


Three of the Tchagai rifle companies formed the rest of the front line: 'A' about the railway station, 'B' on the ridge nearby, and 'D' upon Snake Ridge on the other side of the road. 'C' Company occupied the town with the 25pr batteries emplaced on either side, and the armoured squadron on the other side of the railway. Mugglethwaite could call on air support - a flight of Spitfires.


The Nimruz forces advanced on a broad front. First Battalion's objective was Snake Ridge, to drive off the defending company and take the 17pr gun position. Second Battalion aimed for the ridge flanking the railway station, whilst 3rd Battalion stormed the station itself (bypassing the clearly visible minefield), as well as the round hill. In support of the latter, the SU85 and SU76 assault guns kept pace with the infantry, the latter adding its firepower to the Battalion's mortars upon the occupants of the hill. The Support group's SU122 company added its firepower to 2nd Battalion's assault upon the middle ridge.


The middle ridge pounded, not very effectually, by 2nd Battalion's mortars, the SU122s and even machinegun fore from the Tank Battalion's BA64 armoured cars, 'C' Company of 2nd Battalion was the first to begin mounting the slopes. Their assault was immediately successful (requiring a '6' to hit, the effect was a '4', driving the defending company's right back upon the Coy HQ). 


Following up, the attackers scattered the enemy as they retreated. By this time the other two companies, 'B' frontally and 'A' from a flank, attempted to storm what remained of the Tchagai company's defence line... 


... whilst 'C' Company pushed their attack upon the enemy HQ and Battalion support weapons. Here they met a check. The early success had yet to effect a complete breakthrough.


First Battalion, facing Snake Ridge, advanced with 'A' and 'C' Companies leading, 'B' Coy in reserve. 
Very soon they were clambering up the northern slopes of the ridge, the defenders' fire seemingly insufficient to slow them down, let alone stop them.

Meanwhile, at quite the other end of the battlefields, Tchagai's Muddi River Horse were fairly easily driven off the round hill. Combined gun, mortar and machinegun fire were enough to force the motor company to give up the position. The armoured cars exchanged a brief fire with the Nimruz Support Group before they, too, slid back down the rear slope of the hill. 

Following up this success, Third Battalion met an immediate check by the half of Tchagai's 'A' Company entrenched close by the railway station. 

An immediate check: Tchagai 'A' Coy rolls a '6' to hit; a '1' for 
an SP loss. This is the second SP lost to 'A'/3 Coy.
The '3' rolled = no damage to the garrison.

Tchagai 'D' Coy rolls '5' to hit and '5' again to force a retreat.
Nimruz 'C' Coy rolls the '6' they need to hit, and the '1' to
inflict a strength point loss.

Returning to the other wing finds a fierce battle raging over the Snake Ridge defence line. The right half of Silliputti 'D' Coy throws back their assailants, but at some cost. So began the loosening of Tchagai's grip upon Snake Ridge.

A strafing attack knocks over a strength point.

'B' Coy under heavy pressure from the whole of Nimruz's 2nd Battalion, Mugglethwaite at last called up his supporting air - the flight of Spitfires with which to strafe the enemy infantry close by the road. This attack had some immediate success, a quarter of 'A'/2 Coy biting the dust, thereafter the fighter was unable to achieve much. 

A brief word on this. The rules seem to indicate that single seater fighters strafing get 12 dice (4MGs, notionally) in attack.  To my mind, that seems a tad generous, unless, perhaps, a '6' is required to hit. So I have formed a convention of just one D6 per MG, still requiring 5 or 6 to hit. That seems to me reasonable, with a better than 80% chance of scoring a hit, and a decent show of scoring more. With 12 dice, you could expect 4 hits (if a '5' is sufficient) and a fair chance of a whole 4SP (4-stand) company obliterated. Mind you, I could be selling air power short!

Middle ridge cleared, 'A'/2 Coy catches the retreating 
Tchagai 'B'/Silliputti Coy on the road.


1st Battalion overruns the Tchagai trench line

That success did not stop 2nd Battalion. Aided by a flank attack from 'A', 'B' Coy swept over the last of the Tchagai troops on the middle ridge. As the survivors fled towards the town, 'A'/2 coy, having shaken off the shock of air attack, intercepted the fugitives on the road.  The brisk fire fight there finally broke 'B' Coy, but weakened 'A'/2 Coy further.

Upon Snake Ridge, the leading companies of 1st Nimruz Battalion threw the defending company 'D' right off the feature and into the plain below. The battalion commander brought up his supporting mortars, whilst 'B' company assaulted the anti-tank battery position entrenched in a col near the eastern end of the ridge. 'C' Company joined in a flank attack from the heights to the right. It would not be long before the entire ridge was in Nimruz hands.

Nimruz has cleared the whole of the Tchagai front line.

Apprehending a breakthrough in the centre, Brigadier Mugglethwaite brought forward his armoured reserve. This move was probably premature, as the Nimruz T34 tanks were still out of range, and seemed to have no particular desire to close. But the Nimruz infantry were by now swarming all over the front line positions that had been held by the Tchagai task force, including the fortified line in front of the railway station. Little remained of the Tchagai companies that had defended those lines.


On the other hand, the Nimruz infantry were paying a fearful price for their successes. Pressing on past the railway station, 3rd Battalion ran into stiffening resistance from the Tchagai Recon group and what remained of 'A' Company. Third Battalion's own 'A' Company briefly overran the whole terminus, before being driven back to the rail construction timber piles at the north end. 

Nimruz attempts to push on and captures the 
railway station, they are reaching the end of 
their resources.


Frustrated by the tack of meatier targets, the Centurions engaged and destroyed the BA64 platoon before it could bug out. Whilst 'A'/2 Coy scuttled up the east end of Snake Ridge out of the way (and forcing the 17pr AT guns to hitch up and drive off), the leading T34s pushed though the pass between Snake and middle ridges.  


The exchange of fire between the respective armoured groups was brief and inconclusive. Neither side took harm, but the T34s bethought it meet to permit the Centurions to come to them, neutralising, with luck, the latter's superior gun range.


It was becoming plain that their very success had led the Nimruz assailants to outrun their remaining strength. Having reached their exhaustion point, they lacked the strength to push on to clear the town and the plantation. 


The action didn't end there - not yet. It was just possible that the Tchagai forces might be induced themselves to attempt to recover the lost trench lines. Accordingly, the Nimruz drew back a little, to take up reverse slope positions along the ridge lines. Although not yet 'exhausted', as Mugglethwaite could see, yet there seemed little prospect of successfully chasing the Nimruz forces out of their positions. They would have to be waited out. The battle sputtered to a close, neither side willing or able further to try conclusions.


A tactical draw was of course a strategic victory for the defenders, although three of Tchagai's infantry companies were scarcely even shadows of their former strength. For their part, the forces of Nimruz debated whether, regathering their own strength overnight, a renewed effort might be made on the morrow... 

POSSIBLY to be continued...


Wednesday, August 7, 2024

Border Troubles - from the Chronicles of Harad

 Long time readers may recall from a few years back a campaign set in the arid Nawabate of Tchagai in which a revolutionary army led by one Colonel Peenut Buttahjars came within an ace of capturing the capital, Nawabisbad, seizing the reins of government, and doing away with the Nawab, Maibiwih Khan himself. A long campaign led eventually to the crushing of the revolt, the dispersal of such revolutionaries as had survived, and the disappearance of the revolting Colonel into the desiccated mountains of Nimruz. 

I don't use this playing surface often, but it is just right for 
battles in arid regions. Nimruz infantry going in, alongside
the Support Group.

At the time, Tchagai was still subject to the suzerainty of the Ruberian Imperium of Rajistan, the grip of which, however, had been for some time weakening. Turbulent events led to Sangria's independence from Ruberia, Stanispak's independence from Sangria, and Tchagai's independence from Stanispak. To the north of Tchagai lay a region of stubbornly independent hill peoples who refused outright to acknowledge Tchagai's overlordship, and who eventually form a nebulous confederation of tribes styling itself the People's Republic of Nimruz. 

As the years went by, a great deal of interest, domestic and abroad, began to centre upon the northern fringes of Tchagai, where the Nawab's writ extended into the foothills of the border mountains. Much had been discovered there in the way of potentially lucrative minerals, ores and, of course, the ever sought-after oil and natural gas - in other words, to interest Western mining conglomorates. Inevitably, the tribal leaders of the Nimruz got wind of this interest, as did a much more powerful realm far to the north, the Communal Confederation of Collaborative Peoples. Certain agents from the CCCP whispered tempting whispers into the ears of the tribesmen, offering vast wealth, and 'Ooo, look: we can offer you some shiny new weaponry with which to take and to keep what is rightfully ours - we mean, of course, yours'. 

Any and all dissent from succumbing to the wiles of these foreign agents being overborne by sharp reproof, keen wit, and pointed argument - not difficult among the war-like tribal leaders - those in power proved rather more eager than the CCCP agents expected or desired to test the metal of their nascent military. At once they planned by coup de main to seize and to hold the Tchagai mining town of Jawanabit, a few miles inside what Tchagai claimed to be its frontier (and, naturally, the corresponding distance within the territory claimed - with more doubtful legitimacy - by Nimruz). 

Staff Battle Map. Pink is Nimruz


Little of these developments passed by the aged, but still wick, Nawab, whose well paid agents kept him well informed of the inner workings of Nimruz governance. He had already established at Jawanabit a garrison of all arms, including a squadron of his newest tanks - Centurions, upgunned versions with the powerful 20pr main gun. The garrison, commanded by Brigadier Ebeneser Mugglethwaite* comprised:

'A' Squadron/ 5th Aagravaa Armoured Regiment, Centurions (superior) = 3SP 
31st Kashinkari Rifles with:
    4 Rifle Companies (A-D) @ 4SP
    'HQ' Coy with 3-inch mortar @ 2SP
        attached: 17pr AT gun @2SP
          prime mover @2SP ... = 22SP
1st Muddi River Horse with;
    'A' Squadron, Saladin Armoured Car @3SP
    'C' Rifle Company @ 3SP
    Spartan APC @2SP ... = 8SP
1st Regiment, Tchagai Artillery
    Batteries A, B/ each with 25pr gun/howitzer @2SP
          and Quad prime mover @2SP ... 8SP

In addition, the Brigadier could call up a flight of fighter aircraft - Spitfires (SP3) - for ground attack or, if need be, air cover. He also had time to prepare defence works:
two fortified posts, enough field works to cover the extended front of three companies, and a minefield covering the nearest approach to the railway station.

Overall: 
12 Units (including aircraft), median 6, activate 5-7
50SP: Exhaustion point = minus 17SP; Rout point =  minus 25SP.


Moving with undue haste as they were, the Nimruz high command managed to gather considerable intelligence of the Tchagai garrison. Focusing on mobility, they rushed forward a reinforced brigade of troops,
 one Imzamam el Jhamjhars commanding. However, minus artillery and air support, the brigade augmented its battalion mortars with a battalion sized support group of assault guns. This Expeditionary Brigade comprised:

Force commander Imzamam el Jhamjhars, staff, CCCP 'advisers' and HQ vehicles = 6SP 
Tank Battalion with 
    BA64 armoured car, MG only, 2SP
    4 T3/85 tank @3SP ... = 14SP
1st Rifle Battalion with
    3 Rifle Coys @ 4SP
    1 82mm Mortar @2SP
    1 truck @2SP ... = 16SP
2nd Rifle Battalion with
    3 Rifle Coys @ 4SP
    1 82mm Mortar @2SP
    3 truck @2SP ... = 20SP
3rd Rifle Battalion with
    3 Rifle Coys @ 4SP
    1 82mm Mortar @2SP
    1 truck @2SP ... = 16SP
Support Group with
    1 Su76 assault gun @2SP

    1 Su85 assault gun @2SP
    1 Su122 assault gun @ 2SP ... = 6SP

Totals: 
26 units, median 13, activate 12-14.
78SP, Exhaustion Point = minus 26SP: Rout Point = minus 39SP

The Battle Narrative: to be continued...

* A note on Ebeneser Mugglethwaite. A prominent figure in opposing the revolt of the Baluchistan Armed Revolutionary Front (BARF) ( See 'Long Live the Revolution'), Lt-Col Mugglethwaite was offered and accepted service in the Tchagai Army following independence. A brief visit to his Ruberian homeland persuaded him to wind up his affairs there - such as there were, considering his long Imperial service in Sangria - and to settle finally in his adopted homeland. A grateful Nawab soon awarded his full colonelcy, and not overlong afterwards the third pip to go with the crown on his shoulder. Though not far short of his retirement, the Brigadier was still on active service when the Border Troubles began...

Sunday, August 4, 2024

Byzantiad -


Looking at the dates of these pictures indicates this battle was fought out more than three months back - at the end of April.  How time flies! The thing was a kind of experiment, using my 15mm metal armies on my large(ish) hex board. Of course, the single, DBA-style mounted elements would look lost within hexes 10cm across, but, having plenty of figures and elements to play with, that was the point of this action.
Each element represented a strength point (SP), and could be removed whenever on was lost. As the skoutatoi  and kataphraktoi (klibanophoroi) were double-based, they had to have a SP loss indicator. All units had 4SP, being differenced by weight, otherwise the whole thing was Portable Wargames as she is spoke.


The action purported to be fought somewhere in the Balkans: a large scale raid by Bulgars, or perhaps a Byzantine punitive expedition into Bulgaria. The armies comprised:

Byzantine:
Commanded by Emperor Dementius himself - single element 6SP
1 unit kataphraktoi - Cataphracts (mace/lance/bow), 4SP (elite) 
1 units tagmatic kavallarioi - Heavy Cavalry (lance, bow), 4SP (elite)
2 units thematic kavallarioi - Heavy Cavalry (lance, bow), @4SP (average) = 8SP
1 unit prokoursatores - Lance/Bow  Light Horse (lance, bow), 4SP (average) 
1 unit Varangian Guard - Close Order Spear, 4SP (elite)
2 units skoutatoi - Protected Bowmen (spear, bow), @4SP (average) = 8SP
1 unit peltastoi - Loose Order Spear (spear, javelin), 4SP (poor)
1 unit akontistai - Light Infantry (javelins), 4SP (average) 
1 unit sphendonistai - Light Infantry (sling), 4SP (poor) 

Totals:
12 units, median 6.
50SP: Exhaustion Point = minus 17; Rout Point = minus 25

Bulgar: 
Commanded by Kavkhan Attaboi - single element 6SP
2 Heavy Cavalry (javelins, bow), @4SP (elite) = 8SP
5 Bow Light Horse (javelins, bow), @4SP (average) = 20SP
4 Close Order Spear, @4SP (average) = 16SP
1 Bowmen, 4SP (poor)
1 Bow Light Infantry, 4SP (average)

Totals:
14 units, median 7.
58SP: Exhaustion Point = minus 20; Rout Point = minus 29.

The slight difference in overall strength points in favour of the Bulgars is (supposedly) offset by the slight qualitative advantage that the Byzantines have, especially in the weight of their mounted arm.

Let's look at some pretty pictures of the Byzantine army: 
Peltastoi and thematic kavallarioi.
More thematic kavallarioi, kataphraktoi (with the Emperor), and the two units of skoutatoi. Note that in some war games army lists the kavallarioi are called kataphraktoi, and the heavier type, klibanophoroi. I tend to favour the terms used in the Praeceptor of Nikephorus II.
Tagmatic kavallarioi obscured by the Varangian Guard. Akontistai javelinmen form the skirmish line on this flank.
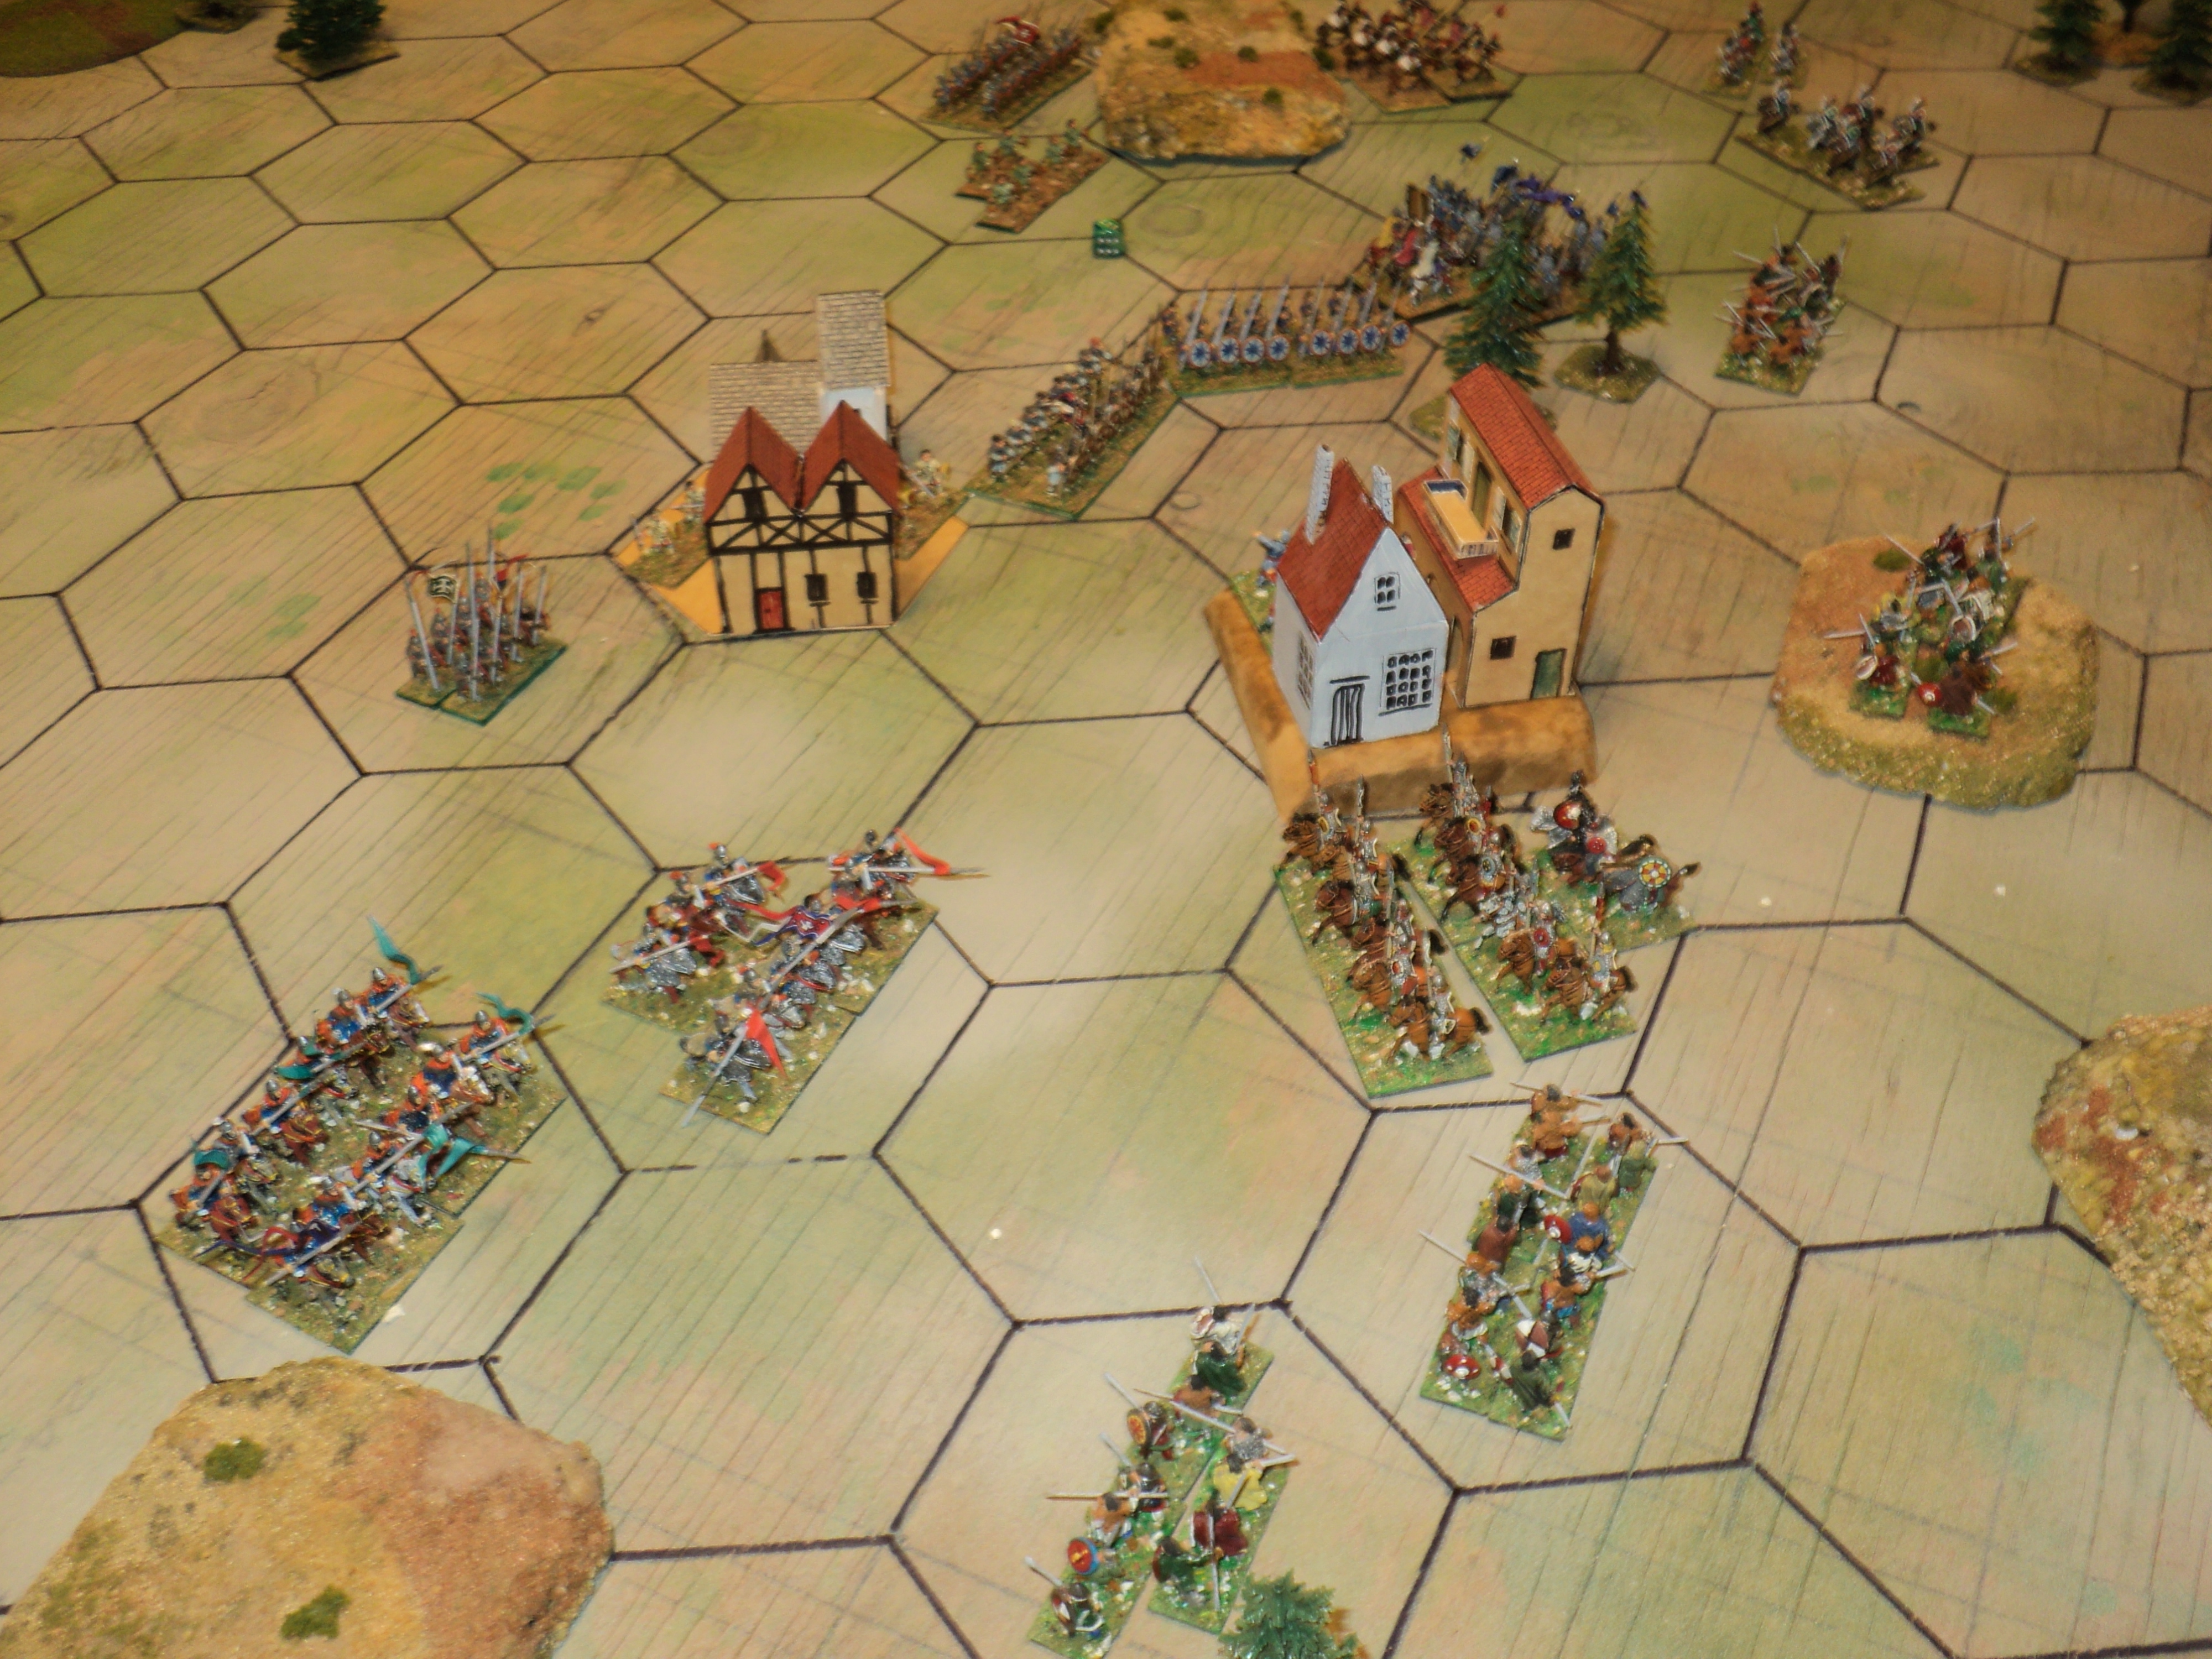
Early moves. The Bulgars seize the villages, filling the forward central village with light infantry javelinmen. As the Byzantine foot move up, enemy light horse begins to harass their line. The prokoursatores, a far-flung left flank guard, is coming under pressure from Bulgar horse archers. One of the thematic cavalry units (white shields) goes off to lend them a hand. 
The blue shield skoutatoi push for the gap between the twin villages to their right and rising ground to their left. The peltastoi mount the ridge (off the top of the above pic, clearer in the pic below), whilst the light slingers provide the link between the two. The red shield skoutatoi have taken some hurt from the javelinmen in the village, but the akontistai have inflicted the same upon a light horse unit as the Varangian Guard range up alongside.


An archery battle begins on the Bulgar left. The flanking spearmen take a loss, but the Byzantines early on take worse hurt. The Bulgar heavy horse archers cause losses to the tagmatic cavalry, and the javelinmen in the village halve the strength of the Varangian Guard - rather bad luck for elite troops.


This does no more than annoy the Byzantine cavalry, which engages enemy heavy horse led by the kavkhan himself. The impetuosity of the charge throws the Bulgars back (the Byzantine combat roll overcame the advantage to the Bulgars' presence of their commander).


Meanwhile, action on the Bulgar right is little more than skirmishing. The Byzantine light horse is driven back, but at heavy cost to the Bulgars. Between them, prokoursatores and kavallarioi annihilate the lead Bulgar horse archers before their comrades could lend help. The heavy horse moving up to assist are intercepted by the peltastoi on the ridge, and lose a strength point to a flank attack with javelins.


As the Bulgar heavies reel back, in come the Byzantine cavalry, to strike a heavy blow. The Bulgar heavy horse archers lose a second SP. 


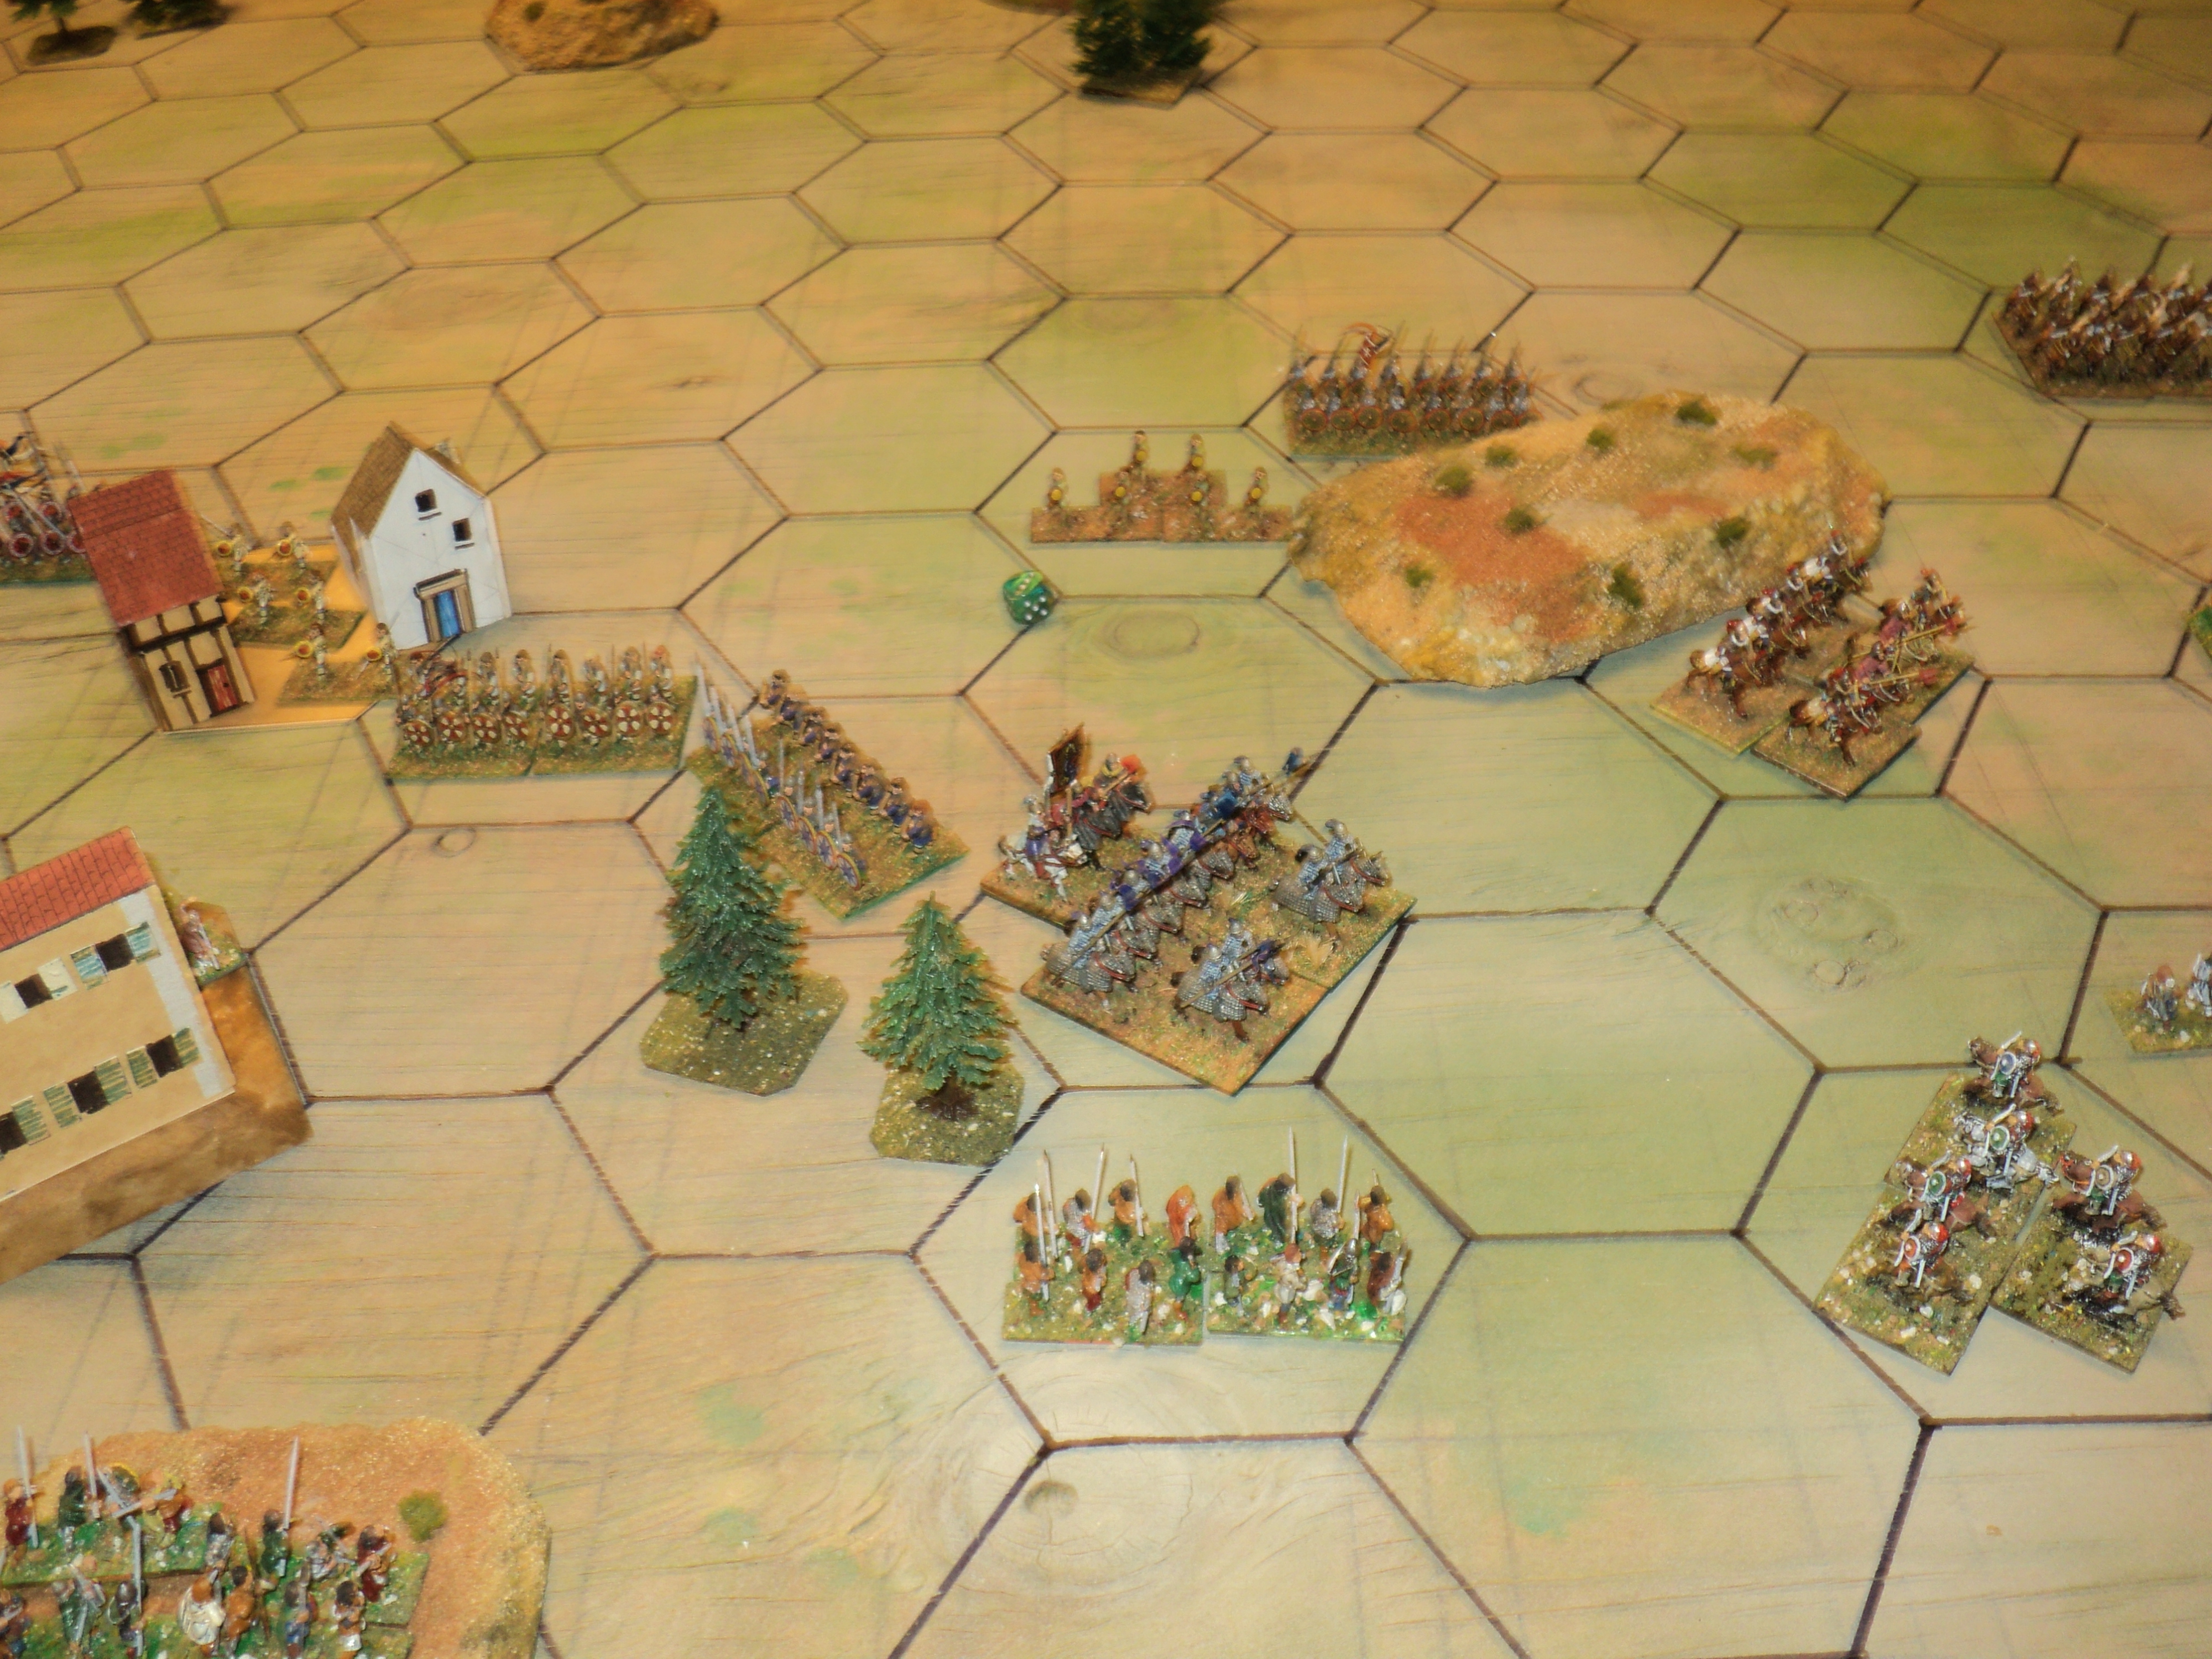
Perhaps the Bulgars might yet retrieve the situation on their right, but for the pressure mounting in the centre. Both skoutatos units are entering the pass between village and the peltasts' ridge, led by the super-heavy cataphracts. The Bulgars have a couple of spear units close by, and a weakened light horse unit (having exchanged pleasantries with the slingers at the cost of a SP each) rides in to deliver volleys of arrows. 

The Bulgar left, meanwhile, draws back a little, the solid line of spears linked to the hilltop village, to which the Bulgar javelinmen have withdrawn, by Attaboi's heavy horse. The front village having been abandoned by the Bulgar light infantry, their Byzantine counterparts occupy it. 
The Byzantines advancing in the centre, the skoutatoi turn their attention to the hilltop village and begin a storm of arrows (with which the Byzantines are lavishly supplied) upon the place. In rear of the village, a unit of spearmen stands, seemingly reluctant to move from their fine position.

As the skoutatoi turn right, the Emperor turns the kataphraktoi left, his eye upon the spearmen standing beside a small wood, and a light cavalry unit farther off. The prokoursatores near the ridge have them covered.

That there are three Bulgar mounted units to hand facing two Byzantine - the latter's slingers and medium foot some distance off - might make things a bit tricky for the kataphraktoi facing the spears, but all three have taken some damage already- 4 strength points among them, for the loss of one slinger stand.


The Byzantines continue to press on the right. The red shield skoutatoi storm the hilltop village and wipe out the defending javelinmen. The kavkhan's horse nearby have to draw back away from the place, but continue to present a front, along with two spear units.

By now the Byzantines are well and truly in the ascendancy. Urged on by the Emperor, and the presence of 'Our Lady of Bachernae' the kataphraktoi charge into the spears before them, and destroy half the unit. On the far left, the white shield kavallarioi charge the depleted heavy horse, whilst between the two heavy horse units, slingers and light horse engage the enemy light horse and bowmen. Dare the Bulgar light horse attack the flank of the kataphraktoi?

Seems not - and by now the Bulgars are no longer capable of mounting counter-attacks. The Byzantines are pressing all along the front, driving back the kavkhan's retainers, shooting the spearmen off their hill, and the Varagian Guard have avenged some of their losses upon another spear unit.

The battle ends with the Bulgars exhausted and defeated, and their centre completely pushed in, only remnants of units still forming any kind of line. Reducing the Bulgars by 20 strength points, the Byzantine loss was maybe half that - an emphatic victory.


A comment on the battlefield and the troops.
As a pick-up game, I generated the terrain using Bob Cordery's method, modified for the size of my board. The Balkans being, I am supposing, pretty hilly in places where it is not mountainous, I based the generation upon that premise.

The kataphraktoi you might observe is formed of two double-stands with the figures forming a trapezoid 2+4 on each. Really they would be 'better' (for a given value of...) forming a quad-stand with the figures forming a trapezoid 6+8.  It turns out that a few weeks ago I found a lonely and long-lost kataphraktos figure amongst a bunch of spare Byzantine figures I didn't know I still had. It ought to have been shipped off to Oz with some other such figures about 6-7 years back. So this last figure could fill the gap in the front rank. Maybe.  Just as a loose figure you understand.

One of the stands is entirely lance armed - the original weapons carved away and replaced with something longer and more pointy - modelling wire and the head of a pin held together with tin-foil or paper pennons. Discovering a little more about these fellows, I arranged the next stand with
  • front 2-figure rank armed with maces (plastic, cribbed from a Revell 100YW box);
  • outside 2 rear-rank figures armed with lances;
  • inside 2 rear-rank figures horse-archer figures armed with bows.
Each in their way are handsome looking units, I think.