|
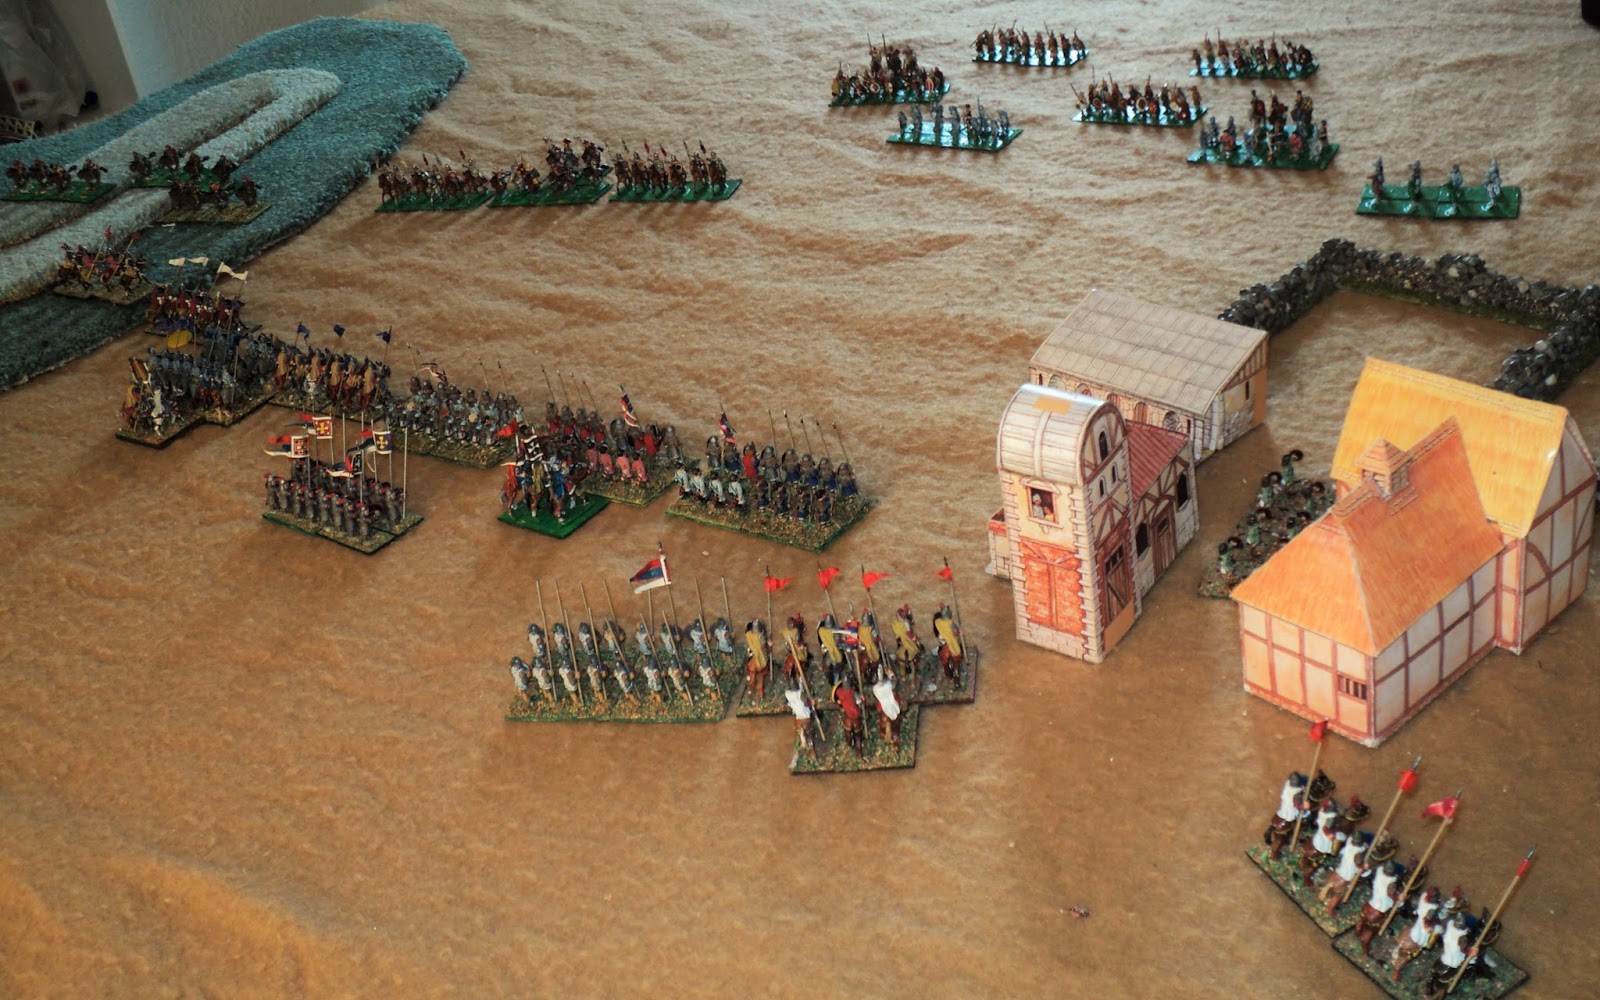
Byzantine vs Bulgars. Bulgars (on the right) seize the initiative
and advance rapidly into action. |
Lately I have been trying out Paul Liddle's simple rules for Ancient/Mediaeval battles. Not having seen action for a long, long time, my Byzantines and Bulgars were keen to 'have at it'. I thought I'd make it a fairly sizeable action. In the photos to come you will observe that some of my Bulgars are lacking in 'finish'. My apologies for that.
 |
| Scene from behind the Byzantines, facing southwest. |
The armies were;
Early Bulgar (c.1000AD):
Commanders Tsar Attila, Boili Atalik and Boili Attaboi:
3 units heavy horse archers
4 units light horse archers
4 units spear heavy infantry
2 units archer medium infantry
1 unit javelin light infantry
14 units total; Byzantine objective: destroy at least 7.
 |
| Bulgar horse on their right flank. |
Byzantine (c.1000AD)
Commanders: Emperor Dementius, George Maniakes, Dimetrios Psychopathes.
1 unit lance/bow
kataphraktoi (elite Cataphracts)
2 units lance/bow Tagmatic
kavallarioi (Heavy Cavalry)
2 units lance/bow Thematic
kavallarioi (Medium Cavalry)
1 unit lance/bow
prokoursatores (Light Cavalry)
1 unit Varangians (elite spear Heavy Infantry)
3 units
skutatoi (spear/bow Heavy Infantry)
1 unit
peltastoi (spear Medium Infantry)
1 unit
sphendonistai (slinger Light Infantry)
12 units total; Bulgar objective: destroy at least 6.
 |
Byzantine centre and left. The Varangians and peltastoi
have been kept in reserve. |
The observant reader will see that most of the units on both sides are armed with bows. The only other missiles are the slings and javelins of the respective light infantry. The Byzantines had two and the Bulgars four units not so armed, all of them foot.
 |
Looking down the Byzantine
line from left to right(south to north) |
Action:
Without going into a lengthy narrative, the action went like this. The Bulgars seized the early initiative (i.e. won the die roll to see who moved first), and scored some damaging hits on the Byzantine horse on the left flank, including on the cataphracts.
 |
| The exchange of horse archery has disordered both sides... |
As the picture below indicates, the Bulgar advance was somewhat impetuous, but I was figuring to get in a few blows with the faster moving archers, so that the spears could eventually close against some damaged opposition.
 |
| Bulgars hurrying into action hoping to get in the first strikes. |
The village of Marsople anchored the Byzantine right flank. The slingers advanced through it, whilst a medium cavalry unit passed by on the north side (i.e. to the left of it from the Bulgar (camera) point of view).
 |
Slingers have seized the village, which will serve
to anchor the Byzantine right flank. |
The pictures below show that as the horse closed on the southern flank, the Byzantines had already taken some damage. The Emperor probably should have stayed with the cataphracts, for they succumbed fairly soon. Neither side seems able to rally their wavering units (I think the Bulgars had one and the Byzantines no successful rallying rolls all day). Worse for the Byzantines was that their flanking Prokoursatores were being enveloped by the enemy light horse.
 |
The Byzantine cavalry are getting the worse of their
scrap with their Bulgar counterparts. The nearest Bulgar
unit seems to have recovered its morale, before
Attaboi moved to help against the cataphracts. |
On the other hand, in the centre, although the plan was for the Bulgar bowmen to inflict some damage before the 'push of pike', they were getting decidedly the worst of it.
 |
General view. The Byzantine foot have outshot the
Bulgar archers, and the Tagmatic horse damaged
one of the spear units as well. Not looking
so good for the Bulgars in the centre, then. |
As the battle seemed to be shaping, so it continued. Once the cataphracts disappeared, the Byzantine left flank horse gradually crumbled away, and only the intervention of the Varangian spearmen from the reserve line kept up a semblance of a line in that sector. In the centre, though, it was the Byzantines who gained the upper hand, and in favour of whom the balance tilted more and more until the Bulgarian foot collapsed
So close was the fighting overall, that the issue remained in doubt until the very end, when the destruction of two units in one turn decided the battle in Byzantine favour: 8 Bulgar units destroyed for 5 Byzantine.
 |
| Now you see 'em... |
Comment:
 |
| ...now you don't: the cataphracts overwhelmed... |
One of the things I had to get used to was the 'conkers' IGoUGo system. I have run across it before in some of the Games Workshop's games (specifically, Space Crusade) . Such a system takes a little getting used to, especially in the type of open ended war games such as this.
The system favours aggression, that's for sure: get stuck in, and get in your first licks. That's the caper.
 |
...followed by a Bulgar heavy and a light horse unit, the latter
despite the flank attack striking into the prokoursatores' flank. |
Let me illustrate by oversimplifying a bit. Forget about the 'wavering' rule for a minute, and imagine that a hit immediately eliminated the enemy. Imagine, too, two equally matched units, RED and BLUE, facing off.
 |
Byzantines close in for melee action. There was probably no real
to do this, as distant shooting seems equally effective. |
For no better reason than I mentioned it first, RED moves into close combat and strikes the first blow.
It has to roll 9 with 2D6 - a 28% chance of immediate victory. But if it misses, then BLUE will get to strike in his turn, with the same probability. So it will continue until one or the other is eliminated, or something terminates the action.
 |
General view. Byzantine left flank crumbling -
not looking too good! |
Now, let us go back to the beginning: who has the advantage? Obviously it is RED, who gets the first strike, and if necessary, the third, fifth and so on. Blue gets the right of reply only if he survives each time.
Given a fight to the finish, the probability that RED will win works out at a whisker over 58% (odds of 29:21 in RED's favour). That is a significant margin. This imbalance does not necessarily invalidate the combat system. Rather it encourages aggression for one thing, places a premium on missilery for another, and, I suspect, might also place a premium on tactical manoeuvre. That last will have to be tried.
 |
| Prokoursatores struck, front and flank. |
A couple of points might be worth looking into.
1. Breaking off.
There are no rules that might allow a faster moving opponent to break off a close action. Whether this is desirable I'm not sure, but during the course if this, and a subsequent, battle, it occurred to me that lighter troops that get themselves into trouble might want to try a break clear. The jury is still out on this one.
 |
General melee in the Bulgar right-centre. Whilst engaged to
its front with heavy Byzantine horse, Tsar Atila's horse has been
hit in the flank by a unit of skutatoi led by George Maniakes.
To the rescue comes Attaboi's horse, striking the skutatoi in
the flank. |
2. Retrograde moves.
This goes to evades and, if it is deemed a good idea, breaking off moves. Now, units are permitted a 'free' turning/pivot/swivel move at the end of their standard move. Evading units probably ought to be allowed this turn at the beginning of their move, ending their evasive move facing away from the danger being evaded. In fact, light troops should probably be allowed to make this pivot at any time during their move. The impact on the mobility of light troops would make them formidable opponents.
I am wondering what their facing should be at the end of the evade move: towards the enemy, or in the direction of movement. I assumed the latter, which went rather badly for a couple of Bulgar light horse units in a second battle (of which, more in another posting). One evaded at a crawl, and the Byzantines had enough movement remaining promptly to catch them, hack their rear, and ride them down. The other ended up being chivvied and chased to the table edge, and was also eventually caught and eliminated.
 |
Having survived the flank attack, in its turn
the skutatoi turn to face Ataboi's cavalry. |
 |
Peltastoi about to intervene in the indecisive action on
the Bulgar right. |
3. Missilery vs Melee.
During this action, I allowed bow armed units to close to hand to hand without really considering the desirability to do so. Byzantine skutatoi don't really need to close: their best tactic is to stand off and let the non-bow-armed enemy come to them.
Where it got tricky was with bow armed horse on both sides. I could equally well have had one or both sides stand off and shoot it out. The question is whether there ought to be some differential in the effect of shooting and melee. One possibility that crosses my mind is that instead of destroying a 'wavering' mounted unit, a second 'waver' result from shooting causes it to flee, if it can. This 'fleeing move' might be adjudicated in the same way as an evade move.
 |
Kavallarioi charge Bulgar light horse, whilst the light infantry stand off.
I forgot the Bulgar 'psiloi were javelin armed, to that
the slingers should not be carrying a 'waver' marker. |
4. Ordinary movement.
One thing I didn't really pick up on was just how flexible, or proscribed, the system of movement is supposed to be. I tended to allow wheels and whatnot, simply measuring the outside of the wheel. It did occur to me that the author intended that all movement be in the direction faced, with a pivot at the end, if desired. Your comments, Paul?
 |
| Bulgar centre begins to crumble... |
5. Turning to face.
In a few instances, melees developed into a kind of 'staircase' arrangement when successive flank attacks and counter-attacks failed to achieve a decisive result. I assumed that in such circumstances, a unit, in its own turn, could - possibly should - abandon its flank attack, and face the enemy to its own flank. If so, ought this move be optional or mandatory?
 |
... whilst the Bulgar light horse begin to envelop the Byzantine left.
I could have handled this a lot better, with the horse
archers fetching a much deeper sweep into the Byzantine rear. |
I also assumed that in the even of a frontal attack combined with a flank attack, both attacks were adjudicated separately, which seemed to me reasonable. Two bites of the cherry. The chances of scoring at least one 'waver' result in such circumstances is about 70%, and there is about a 16% chance of wiping out the target unit in one go. Oddly enough, both sides proved on the day to be a lot more resilient than these probabilities would indicate.
 |
| Bulgar reserve spearmen enter the fray. |
 |
Bulgar javelinmen in trouble - left in the lurch be evading
horse archers... |
 |
| Bulgar centre showing signs of cracking. |
 |
Byzantine left has practically vanished, with the Varangians
holding the place formerly held by four horsed units. |
 |
Varangians see off Bulgar heavy horse, just as they
are hit in flank by the lights. One Bulgar
unit stands ready for a rear attack. |
 |
| Thinks looking bleak for the Bulgar spearmen. |
 |
| Peltastoi victorious! |
 |
| Spear unit destroyed before the flank attack can come in... |
 |
| Bulgar javelinmen shrug off attack from front and flank... |
 |
End of the action. Bulgar centre collapses altogether, before
the same could happen to the Byzantine left. Close call
for the Byzantines, who win, 8-5. |
That was my first play test, and it has to be said, the thing went with a swing.