Sunday, December 18, 2016

'Stonewall' in the Valley (3): The Campaign Begins...


The CSA Army of the Valley, commanded by
Major-General T. J. (Stonewall) Jackson.

I thought I should begin the narrative in medias res - sort of ... jump right in the middle.  The action at Kernstown was some six weeks back, and then General Jackson had taken his own Division, leaving General R.S. Ewell's at Pine Run Gap, and struck a blow at part of General Fremont's command at McDowell.  Now he was back at the head of the Shenandoah Valley, his Army united, and ready to strike ... and set the Union army once more into a frenzy of action.

In the following I thought I would relate the story more by way of the mechanics, just interspersing it here and there with the historian's narrative.

The campaign begins - in medias res.
Evening 18 May 1862


Jackson in the Valley Campaign

I'll make a start on the Shenandoah thing today, beginning with the location of the forces, and weather charts. Logistics will be handled by line-of-communication.  My preliminary thoughts are these.
Dispositions of the 3 Union positions begin (roughly) as they were on Sunday 18 May 1862. The campaign opens on  Monday,19th May.

Sitting in his headquarters, Major-General Nathaniel P. Banks was feeling more than a little lonely as cut off from the rest of the world.  A few days before his army was at Harrisonburg, far up the southern end of the North Fork valley of the Shenadoah River.  Where had Jackson gone?  And now, he was back here at Strasburg; thirty miles to the south, the Confederate Army of the Valley had once more made its appearance, and with a very bellicose look about it.  General Banks figured he needed support, and needed it fast.  

First off, he detached part of his command to Front Royal - a precaution against anything the Rebs might try via the South Fork valley.  Then he telegraphed Washington to request assistance from the Command of Brig-Genl James Shields, known to lie half a day's march east of the Blue Ridge Mountains.  He had already sent a courier with a small mounted escort to General Fremont of the Mountain District.  Even so, it would be several days before either could intervene...

UNION:
- Fremont is at Franklin, his leading Division having received a knock at McDowell:
- Shields is off the map somewhere a half day's march east of Warrenton, with  (possibly) a small detachment at Rectortown (Brig-Genl Geary). Shields moves onto the  map at Warrenton at the beginning of Campaign move 2.
- Banks is at Strasburg, having prepared defences against attack.  He has left a detachment at Front Royal (probably dice for this) against a flanking move up the South Fork valley.
- Saxton remains at Harper's Ferry


Situation: Noon to Evening 19 May 1862.
Uncertainty reigns in Union headquarters.
 Where is Jackson?


CONFEDERATE:

Begin at Harrisonburg.  Two possible moves:

A:   Move straight up the North fork Valley to Strasburg and attack Banks whilst he is isolated from his pals.  He can arrive in front of at mid day  20th May. In view of this he may delay a half-day to arrive at nightfall, for attack on the 21st (Tuesday).

B.  The historical move: march up the North Fork valley to New Market, then cross the Massanutten mountain range, take the White House Bridge, into Luray and then up to front Royal, with the view to carrying or seizing the river crossings to Cedarville and take Strasburg in the rear.  If unopposed, the army would arrive at Front Royal at mid-afternoon on the 20th.  
C:   Allegheny Johnson is at McDowell looking as menacing as he can.  

One of A or B is a 'ghost' - Dame Rumour roaming the countryside.


Major-General Thomas J. "Stonewall" Jackson, 'Old Blue Light' to his loyal soldiers, had at last decided it was high time to strike a serious blow in the valley; really make Washington notice.  Kernstown had not been very satisfactory, though it had succeeded in drawing off some support from the major Union effort in tidewater Virginia.  McDowell had eased the pressure in the southwest mountain passes.  But they had been pinpricks, and tactically indecisive at that.  There was Banks's command - no help for days.  Time to strike!

Let's call the situation at noon 20th May.
UNION:
- Fremont has marched hard to reach a half-way point between Petersburg and Moorefield.  He has kept his cavalry by him, one leading, the other covering his ... rear.
- Shields is a half day's march east of the Manassas gap.
- Banks is quaking at Strasburg wondering whether to go or to stay.  

The detachment (if any) at Front Royal will have been joined by the detachment under Geary (if any) at dusk the previous day.

Dawn  to Noon 20 May 1862
General Banks in a quandary  Is Jackson marching directly upon
him, or has he crossed the Massanutten Mountains into the
South Branch Valley?

Issues:

- 1.  


I have been talking of a 12-move day game, which I reduced from a 24-move that goes with my figure and ground scale (900:1 ground; 30:1 time).  But a 6-move half-day battle is too short, let alone a 3-move late afternoon one.  I think I'll have to retain the 24-move battle game.  You will see what the impact of this decision is later on.  That:

- a) assumes, that if he marches direct on Strasburg, Genl Jackson will order a frontal attack on the place, which I think he must.  No need to roll a die for this: TJ came to attack, attack he will. 

- b) Banks has to decide whether to stand and fight, or retreat.  This must be decided BEFORE we roll to see whether the forces on the other side of Fisher's Hill are real or rumour.  It can be done on a die roll, or I can simply decide he'll stay.  General Banks might not have been the cleverest general, but he was prepared to fight, so I reckon he's likely to stay.  This was in fact determined by a die roll, but I made it two-to-one on his staying put, He did.
- 2


I suddenly realise that I have issued far too many cannon, 18 Union and 9 Confederate. What was I thinking?  Was I thinking?  I've halved the numbers, except that Chew's battery remains part of Jackson's cavalry command.  Fremont and Shields have three, and, to redress a mistake I made concerning Banks, his command gets four.  One of these has been detached and is with Col Knipe at Front Royal.

Continuing the narrative:


Having decided that Banks will accept battle we roll the die. 50-50 call: ODDs real, EVENs, rumour... AND IT'S... ... rumour.

Probably just as well.  I've looked at the Strasburg area, and it looks like a tricky place to attack from the south - awkward on account of a big loop of the Shenandoah across the right half of the front, and an enormous forest de-marking the field on the left (it would have formed a table edge.)

What that means is that the real force is identified as three hours south of Front Royal.  If the Union has any force at that town, it will have to fight for 6 late afternoon game moves - supposing Jackson marches directly upon that place...

It turns out there was no detachment under Brig-Gen Geary at Rectorstown (I had a range of possibilities ranging from nothing (D6=1,2) to 2 Ft, 1 Cav and 1 gun (D6-6) from Shields's Division .  I rolled a 2, but Banks had stationed at Port Royal a force of 2 infantry regiments, 1 Cavalry battalion and a section (1 gun) of artillery.  The CSA has 6 hours to clear away this force and to carry the bridges.  As it transpired, Col Knipe was left at Front Royal with an artillery battery, and yet Banks still has three with him as events will show.  But giving Banks four batteries retains the overall two-to-one ratio of Union to Confederate ordnance (10 to 5 from 18 to 9).  

Afternoon 20 May 1862
Banks discovers there is no threat to his front, but that
surely means...?


Meanwhile, Genl Banks, made aware that a large Rebel force is about to descend upon his flank guard has to decide what to do about it: nothing, retreat, or take part or the whole of his command at Strasburg off to help.  Even if he marches at once, (starting at midday) he will not reach Front Royal but will still be just across the South Fork River from Front Royal at dusk.  Shields will be closer, to the east, having crossed the Manassas Gap during the afternoon. On these grounds, Banks makes an uncharacteristically bold decision.


This could be interesting, depending on Banks's decision, with the Rebs caught between two Union Divisions come the morning of 21 May.

What does Banks do?
1. Nothing
2. Fall back to Middleton
3. Send balance of brigade at once to Front Royal after '1 hex (one hour)' delay ( 2 infantry)
4. Send balance of Brigade (2 infantry regiments) to Front Royal immediately
5. March with whole force to Front Royal after '1 hex' delay.
6. March with whole force to Front Royal immediately, sending the cavalry battalion on ahead (Cav arrives FR at 4pm).

The roll was a ‘5’ – Banks took an hour to gather together his army and march to Front Royal.  He will be two hours short of the place at nightfall.

Late afternoon 20 May 1862.  General Banks has found
Genl Jackson's Army.  Though it is perhaps fairer said that
Jackson's army has found him!

Late Afternoon 20 May 1862

Genl Jackson had arrived at McCoy’s Ford, and not having yet made contact with enemy, took the opportunity of further mystifying the enemy.  The peregrinations of the Army of the Valley was to take another strange turn.  Would they continue straight on to Front Royal, or, having reached McCoy's ford across the Shenadoah South Fork, take that route and place themselves between the commands of Banks and Knipe?


There being no contact at this point, it was possible, and reasonable to create a second 'ghost' army.  The options were:
A. March straight on to Front Royal and carry the place (ODDs roll); or
B. Cross the ford and strike for the Starsburg-Front Royal Road (EVENs roll).
I made the decision a 50-50 call, but as pushing on would have been the more likely (not to say historical!), a 66-33 bias would have been reasonable. 

As contact with the Front Royal garrison takes place slightly before that with Banks, the roll was made with 6 'game' moves (3 hours) left of the day, I simply decided to determine which was the real army, which pretty much was going to lead to a fight. Probably I was being generous to Col Knipe.  In the real campaign, one Col Z.T. Conner (CSA)  was to be left in command of the place, and didn't make much of it. 

'Do you call that fighting, sir?' was Stonewall's blistering response to Conner's abject report.

The roll clearly determined that 'Dame Rumour' has once more given vent to her lies, and that Jackson, though close, was not on the road directly south.  As there was no occasion to call into being another 'ghost' army (which must always begin its moves from the same point as the real one), there was going to be a collision towards the end of the day. Four game moves remain of the day.  Will General Jackson engage at once using what remains of the afternoon?  Or will he await the dawn? 


General N.P. Banks's command, less detachments at
Front Royal.  In the coming encounter at 'Passage Creek'
they will be outnumbered, two to one.
And what of the commands of Shields and Fremont?  At this time, Fremont was still a good two days' march from Strasburg.  But Shields was closer, much closer.  Already his columns were snaking through the Blue Ridge Mountain pass at Manassas Gap...

To be continued: 20th May 1862: Battle of ‘Bridgewood Farm’ or ‘Passage Creek’ .

Saturday, December 17, 2016

Update on Army Men...

Some pics of some recent items acquired and painted up...
Carrier Artillery tractor with crew.
This is by way of an entr'acte between postings on the Stonewall in the Valley campaign narrative. On that score I already have enough material for a good three or four postings, but still have to put together the narrative.  A late afternoon and a morning action have already been fought, and another is imminent.  It is possible that 'Stonewall' Jackson has placed his head in a noose!
Infantry gun and friend...

The spring mecnanism on this one is in working order.
Won't be using it, though.

Armoured car in Raesharn livery camo.
A Kiivar Reconaissance aircraft overflying a Raesharn column
in bivouac.  This was a toy plane I think I picked up abandoned in the street.
It was going to be an interceptor, but I thought it more
suited to a less bellicose role...

Sunday, December 4, 2016

Stonewall In the Valley - Part 2.

A Division of Infantry with the bases (finally!) flocked. The flags
are all hand drawn or painted.
 Now that I have begun thinking about an American Civil War project, I have bethought me at last to finish off and tidy up my plastic armies.  In particular, I have reorganised and rejuvenated the cavalry, and reformed them in units larger than they were, as described in my last posting.  In the last week of so I finished the flocking on 92 cavalry plus maybe a dozen other mounted figures.
Overhead view.  The small Zouave d'Afriques unit was fashioned
from Airfix French foreign Legion figures, with plasticene
turbans.
 But since then I've been carrying out the same task - flocking the bases - of my infantry.  In about a week I have flocked the bases for 351 Union and 397 Confederate figures - a total of 748!  In the picture below, only the Zouave d'Afriques unit has already been flocked, but there I had to repair a couple of figures that had snapped off just above the ankle.  The flags are all home made.  The distant ones are tin - milk-bottle top, I think.  The nearer are paper, the design drawn with pen and the colours applied by felt-tip pens designed for overhead projector transparencies (do people still use those?).
A third photo from sheer self-indulgence.  The small bunch of
mounted troops are CSA cavalry officers and replacements.


A powerful CSA brigade of three regiments and
two battalions.  The Louisiana Tigers are in the
centre of the line.
In the picture to the right and  below, the nearer 'Army of Northern Virginia' flags were also drawn on paper and coloured with felt pins. The 'Stainless Flag' of the farther units were painted on foil - milk-bottle-top again.  I have considered replacing them, but haven't had the heart.

Meanwhile I have been researching the 1862 Valley Campaign as part of my project to 'try out' Don Featherstone's 'Stonewall Jackson in the Shenandoah Valley' campaign.  A couple of changes I wanted to make. The first was that as the single Confederate army was identical in size and composition to the three Union columns, it seemed to me unlikely that General Jackson could afford more than two battles, or three if he managed in all of them to attack much smaller forces.  It seemed to me more realistic if the Army of the Shenandoah were rather larger than each of the columns facing it, but that overall the Union numbers combined - should they ever combine - would be too much to cope with.


That nearest unit could stand a bit of paint.  The product
of a recent reorganisation of this brigade.


I also felt that the thing might be more ...erm ... verisimilitudinous ... if there were a Union garrison stationed at Harper's Ferry, at the confluence of the Shenandoah and Potomac Rivers, and the small army of Brig-Genl Edward 'Allegheny' Johnson stationed in the southwest corner of the campaign area.  These forces were to have 'walk on' or maybe 'walk off' parts to play in the unfolding events.
Research materials: my copies of Battles and Leaders of the
Civil War
, and Col. G.F.R. Henderson's biography
of Stonewall Jackson (1898/1919).  

Some of the troops who received flocking of their bases
this last week.  Actually the guys in the north-west box
were flocked probably 20-odd years ago.  But still, that's
6 Union regiments in the  other Union box, and a whole
10-regiment CSA Diviiosn in the CSA boxes.  
There was something else, though.  Where did Mr Featherstone place his columns at the outset of the campaign?  Where were their starting points?  Paul - 'Jacko' of the blogspot 'Painting Little Soldiers' - was good enough to lend me his copy of John Curry's edition of Donald Featherstone's Wargaming Campaigns. Very enlightening it was, and all. Apart from the pictured Battles and Leaders, I had the National Geographic maps of the ACW, a SPI article, and Terry Wise's little ACW volume Battles for Wargamers, and Mark M. Boatner's handy, if somewhat flawed, Civil War Dictionary.  All these helped with the decision making.

The original concept had the three Union columns placed a fair proximity at the foot of the Valley, at Martinsburg, Harper's Ferry and Winchester.  The latter formed the apex of a triangle pointing straight up the valley.  Jackson's army was encamped at the head of the valley, at Staunton.  'The Don' had also pitted Generals Phil Sheridan, Crook and Ricketts against the Stonewall, a bit of historic licence presumably to avoid someone having to take the role of Nathaniel P. 'Confederate Commissary' Banks, Fremont and Shields!  Of course, one might equally well attempt the campaign 'Old Jubilee (Genl Jubal A, Early) in the Shenandoah Valley'.  


The flags here were all painted on tinfoil or other thin
metal I could find.  Milk bottle tops from the days of glass
milk bottles were useful sources ...
Fun read as the following narrative was, I felt that I really had to go more with history, and the situation as it stood in April 1862.  So my column commanders were to be placed as follows: Fremont at the outset in the west, at or about Franklin:  Shields off the map to east of Ashby or Manassas Gap, and our pal, Genl N.P. Banks waiting ...tremulously? ... nonchalantly? ... at Strasburg.  The Kernstown battle was a month back, and  Stonewall Jackson himself, having dealt his blow at McDowell with his own Division, has just rejoined General R.S. Ewell. The combined Army of the Shenandoah begins the narrative at Harrisonburg.  Game on.

For the rest, my hex map indicates something like 14 hexes spanning the 30-mile distance by road between Harper's Ferry and Winchester. So the map scale is roughly 2 miles the hex.  That distance the hard marching Confederates could cover, if they needed to, in about 24 hours.  It is clear, then, there would have to be at least two and possibly three or four 'campaign turns' for each daily period of daylight.  Possibly a single 'night march' turn ought also to be considered, though I find it hard to administer these well.  Obviously the night marchers will need to catch up on rest.  When will that be taken?  On balance we might as well ignore night marches, though it might be possible to send courier messages overnight.


Slightly different painting styles shown on the right of the picture.
The right-most unit began life as part of the Airfix Wagon
Train box.  These days I would, after some alterations to the
 firearms, painted these as Louisiana Tigers with straw hats.
These 'campaign moves' will equate to a number of 'battle-' or 'game-moves' as Don Featherstone termed them.  Now, his rule set allowed 8 game-moves for the period of daylight.   That seems to me a little bit on the short side, and it probably not so surprising that according to the 'Featherstone' campaign narrative, Jackson's whole army could not quite in that time force Brig-Genl Getty's 'Division' from its dogged tenure of the Manassas Gap passes.  This, even at five-to-two odds.
A unit painted and based flocked a long, long time ago.
The ground scale for my own Bluebellies and Graybacks rule set is 1:900 - that is 1-inch to 25 yards, or 1mm per yard.  That suggests to me a time scale of 1:30, which indicates 24 30-minute turns to represent a 12-hour period of daylight.  As it happens, though, I have scaled down the armies somewhat, as the last posting's Orders of Battle will indicate.  A 12-game-move day seems pretty reasonable.   Using the Featherstone movement rates translated from his squares to my 'hexes' yields the following.

Two campaign turns represents one day - a morning turn and an afternoon turn.  Each turn, therefore, equals 6 game-moves.  It is necessary to be aware this in the event of calculating the ETA of any troops 'marching to the guns'.  

Federal Forces:
   Infantry - 4 hexes per campaign turn.
   Mounted - 6 hexes per turn
   Artillery - 4 hexes per turn

Confederate Forces:
   Infantry - 6 hexes per turn
   Mounted - 6 hexes per turn
   Artillery - 6 hexes per turn.

These are all 'road' moves.  Cross country moves are halved, mountains are impassible.  If weather were to be brought in ( a decision by no means yet made) then the black outlined roads (such as the Valley Turnpike), being Macadamized, are all-weather roads.  The others become quagmires after one campaign move of rain and reduce movement to cross-country speed if the rain continues for a second or more consecutive campaign moves.


Depending on wind direction (rolled for when there is any such prospect) forces within a campaign turn (a half-day;s march) might hear the sounds of distant battle. Its reaction - do nothing, send some troops, march the whole force - should be diced for.  

6 Union regiments, bases newly flocked.  The flags they
had formerly been issued having become tatty, I replaced
them about two years ago.  These new flags are a bit rough, but they'll do.

The objectives of this campaign are interesting, especially from the Confederate side.  Historically the Army of the Valley existed to create a 'threat in being' to Washington DC.  As such it was to draw upon itself the attention of as many Union troops as it could, consistent with its maintaining itself in the theatre.  Shortly before this campaign narrative begins, Jackson's 6000-strong Division had brought into the area 40,000 Federals.  This led to CSA General Ewell's reinforcements being sent in. 

So the Confederate objective is to remain in the theatre for as long as it can, whilst keeping the Union forces occupied.  To achieve this it must keep the Union columns separate as much as possible.  The Confederate supply base and recruit assembly area is Staunton,  The main Union supply and recruit assembly base is Harper's Ferry.  The Union objective is, if they can't destroy the Army of the Valley, is to drive it out of the Shenandoah Valley altogether.

Saturday, November 26, 2016

Stonewall in the Valley - After Don Featherstone.


..
CSA Cavalry.  At last I have finished reorganizing
paint touch ups, and flocking on my mounted troops
at least.
..
Stonewall in the Valley - campaign map.
The following 4 are each quadrant. 
Another ACW campaign I have long had in mind was based upon a idea mentioned in Don Featherstone's book War Games Campaigns.  This was 'Stonewall in the Valley', in which Stonewall Jackson commanded a force of ten infantry regiments, with horse and guns, operating in the Shenandoah River valley.  The Union Army had three identically similar corps operating in the same area, setting about to trap the Confederates or to drive them from the Valley altogether.

The only advantages that the CSA enjoyed were their central position at the outset, their celerity of movement (Stonewall's 'foot cavalry'), and the secrecy of Jackson's plans (one dummy and one real army).

I have always liked the concept, but felt that the numerical disadvantages could not be overcome by what amounted to greater mobility, as once battle was joined, any Union corps was the equal of the sole Confederate one.  As it transpired, the Featherstone (CSA)  - Tony Bath (USA) campaign lasted two battles: a costly rearguard action in (I think) the Blue Ridge Mountains' Manassas Gap, in which Jackson's corps took most of the day to overcome a 4-regiment blocking force; and a final battle at Front Royal, won by the Union.    As Tony Bath remarked in his book Setting Up a Wargames Campaign, Jackson was after that 'not in much shape to continue'.

It seems to me the idea has promise, though.  Retaining the celerity of movement and the 'dummy' force, I thought that if Stonewall's Army of the Valley was larger than any single Union column, but was outnumbered overall in the theatre by two to one, we might get an even, tough, sort of campaign.
..
NW
Here is a suggested Order of Battle, using my own organisations:

Confederate Army of the Valley:

Maj-General T.J. Jackson

Jackson's Division:

   'Stonewall' Brigade (Winder):  3 x 27-figure regiments
   Taliaferro Brigade: 3 x 27-figure regiments
   Artillery: Poague's and Cutshaw's light batteries (2 guns each)

Ewell's Division:

   Trimble's Brigade: 3 x 27-figure regiments
   Taylor's Brigade: 2 x 27-figure regiments
                               1 x 23-figure battalion (Louisiana Tigers)
   Artillery:  Lusk's and Raines's light batteries (2 guns each)


Steuart's Cavalry Brigade:

   Munford's Regiment (2nd Va) @ 23 figures
   Ashby's Regiment (7th Va) @ 23 figures:
   Chew's flying battery (1 gun only, 4 gunners)

Totals: 320 infantry, 46 cavalry and 40 gunners with 9 cannon.

(Optional: but only if the Union includes the optional Harper's Ferry Garrison)
Army of the North-West (elements): B-Genl E.  (Alleghany) Johnson:

  Brigade; 2x27-figure regiments
  Artillery: 1 light battery of 2 cannon and 9 gunners
May operate only on the westernmost North-South road.  If forced off it, will disband.
NE


Union Army:  

Banks's Command (ex II Army Corps): Maj-Genl N. P. Banks

   Division B-G A.S. Williams:
      Brigade: Col Donnelly: 4x27-figure regiments
      Brigade: Lt-Col G.H. Gordon: 4x27-figure regiments
   Cavalry Brigade: B-Gen J.P. Hatch: 2x15-figure Battalions
   Artillery: 2 light batteries each with 3 cannon and 13 gunners.


Mountain District: Maj-Genl J.C Fremont

   Brigade:  B-Genl Julius Stahel: 4x27-figure regiments
   Brigade:  B-Genl H. Bohlen: 4 x 27-figure regiments
   Cavalry Brigade: B-Genl G.B. Bayard: 2x15-figure battalions
   Artillery: 2 light batteries each with 3 cannon and 13 gunners.

Shields's Command (ex V Army Corps): B-Genl J. Shields

   Brigade: B-Genl J. Kimball: 4x27-figure regiments
   Brigade: B-Genl Erastus B. Tyler: 4x27-figure regiments
   Cavalry: Major D.B Nelson: 2x15-figure battalions
   Artillery: 2 light batteries each with 3 cannon and 13 gunners.

Totals for each column: 216 Infantry, 30 cavalry and 26 gunners with 6 cannon.

Total overall: 648 Infantry, 90 cavalry and 78 gunners with 18 cannon.

(Optional, only if CSA includes the detachment of The Army of the North-West):

Harper's Ferry Garrison: B-Genl Saxton
   Brigade: 3x27-figure regiments
   Cavalry: 1x15-figure battalion
   Artillery: 1 light battery with 3 cannon and 13 gunners.
For defence of Harper's Ferry only, and may not be drawn on to replace losses to the field armies.  If Harper's Ferry falls to the Confederates, this garrison will disband.
..
SW
It seems to me 'Stonewall Jackson' would still have his work cut out even with his foot and guns moving at 'cavalry speed' on the map, and with a 'dummy' army.  The latter might tend to discourage detachments, but they ought to be allowed.  Even so, there can be only one 'ghost' force on the map.
..
SE


This is solo playable, I think. It is the presence of Stonewall Jackson's force that is diced for - 50-50. If evens, there he is with his army.  If odd, there he is not, and it is the other 'reported' command that is the real one.  

If the CSA does make detachments, then those detachments aren't diced for.  Whatever force accompanies Stonewall Jackson himself  is the indeterminate one.  To take a possible example: Jackson leaves Ewell's Division with one cavalry regiment near Port Republic, and heads off with the rest to strike a quick blow elsewhere.  But here the solo player has to determine two plausible courses of action, and then make sensible Union responses bearing in mind either force could be the real threat. One course of action is that Jackson takes his Division off the McDowell to deal with a threat developing in that region.  The other is that he takes a quick march up the Shenandoah South Fork valley to seize or capture Front Royal and the river crossings there. That threatens to cut off Banks's column where it stands at Strasburg. Two widely divergent blows. Which is the real one?  Bear in mind that the Union commander knows also there is a Confederate presence at Port Republic.  He will also 'know' that Jackson has split his army.

Confederate cavalry Division of 4 23-figure regiments.
Mainly Airfix '7th Cavalry' figures, with a few Atlantic
The real march is determined only by enemy 'contact' with one or other of the columns, and the die rolled to reveal a real force, or 'false intelligence'.  But the Union might be allowed the option to try to refuse battle.  As Jackson's troops are the faster moving, this can not be achieved indefinitely if they decide to pursue,  Action may be delayed one day (or one campaign move) whilst the Union conducts a retreat, possibly (though not compulsorily) pursued by the Rebs.  Nor can the Union dig in if they do choose to retreat before being forced into battle.
My CSA cavalry en masse.  

If the Union refuses battle, the Reb force is not yet diced for whether it is real or rumour.  This happens only if, and after, the Army of the Valley force pursues to force a battle.  If the CSA force proves to be a 'ghost' the narrative would probably run that in the course of its headlong retreat, the Union force in question realised there was no real pursuit.

My Union cavalry Division of 6 15-figure battalions...
waiting for the flocking to dry.  Airfix '7th cavalry' figures.

All the same, a retreat even of a single campaign move might draw an exposed CSA force nearer to a friendly column that could be in a position to 'march to the guns', say.  Delaying battle for half a day might also give the Confederates less time (12 'afternoon' battle moves) to effect a decisive result.

These preliminary thoughts suggest that, though limited - there would have to be a time limit for the Union to bring this operation to a victorious conclusion - this might prove to be an interesting and challenging campaign.

Sunday, November 20, 2016

War of the Spanish Succession - Work in Progress

Three line infantry, one cuirassier and one dragoon
regiment, and the four generals, all in various stages of
recruitment and training...  All figures are
Wargames Factory.


Hoffman- von Diesbach Grenadiers in line.
The battalions are differenced by the colour of their
weskits: red (Hoffman) and blue (von Diebach).

A bit of a 'filler' posting this, but it has been a while since I've said anything about this particular project.  So here a few pictures of my Wargames Factory figures assembled and in the process of being painted as an Imperial Army of 1702-1715. 

The Army comprises:

General Officer Commanding
Two General Officers of Foot
One General Officer of Horse

Foot:

Hoffman-von Diesbach Grenadier (19/39)
Alt-Heister Infantry (4)
Brandenburg-Bayreuth Infantry (9)
De Wendt Infantry (11)
Holstein Ploen Infantry (21)
Kreichbaum Infantry (27)
Osnabruck Infantry (32)
252 Foot.

Horse:

Darmstadt Cuirassiers
Lobkowitz Cuirassiers
Lyrnburg-Styrum Dragoons.
72 Horse.

Guns:

Two batteries each of 2 cannon and 8 gunners.
16 Gunners.

Total: 344 Figures.

Why Imperial?  I pretty much figured most would go for British or Anglo-Dutch, or French.  But I also liked the idea of helmeted cuirassiers wielding pistols, so two of my 24-figure Horse regiments are heavies, the remaining one are dragoons.
Hoffmann-von Diesbach grenadiers again.  The flags
don't really belong, but I wasn't going to let it go to waste!

Of the seven infantry regiments, six are line infantry, the other being a 'provisional' grenadier regiment. All 36-figure units may be split into 18-figure battalions, each with Foot officer, flag, drummer, and 15 fusiliers.

One grenadier, and three of the line infantry regiments;
one cuirassier and the 4 guns.

As you can see from this, I haven't been doing one unit at a time but poking around whichever one takes my fancy at the time.  I paint the bases - usually green, but sometimes black or brown - before flocking them.  They will be done last.
De Wendt Infantry. looking rather dark.  Some highlighting
indicated here, methinks.


Monday, November 7, 2016

More on Campaigns.

Sixcubia West

Sixcubia East
In my previous posting I mentioned an open ended campaign in which Kingdoms were chosen at random from a map comprising 216 cities.  I have since discovered that I had made an enlarged version of the same map, which I have printed here.

Thinking about the responses to that posting has led me to a fair bit of thinking, hence the delay in producing this..

The first thing to note is that movement of armies in many campaigns is from 'area; to 'area', be those areas provinces, say, or a field of squares or hexagons superimposed upon the map. In others, such as upon the maps pictured here, the movement is from point to point.

Broadly speaking there is no topological difference between area-to-area and point-to-point movement.  Consider Chess. Chessman move from square to square on a field of 64 squares.  You could still play exactly the same game 'point-to-point', that is to say, on the corners.  Indeed, Chinese chess is played in precisely that manner, as is Go.
Chinese Chess opening set up.  Note that the pieces are placed
on the points - the corners - of the squares, not the square areas.

The advantage of 'area to area' move is that it is easier to locate playing pieces - especially multiple pieces - on an area than it is upon a point.  On the other hand, point to point moves can be made more flexible, for example, if you measure distances along connective routes.  In this posting I will touch upon that type of campaign.

In the Fantasy/Fictitious campaign of the 216 cities - let's call it Sixcubia, because my imagination is slow today - the moves are point-to-point, the distance between adjacent cities held to be pretty much constant throughout the whole 'continent'.  There are all kinds of ways one might conduct such a campaign - from something played solely on the map in the manner of Diplomacy or The Warlord/Apocalyse, to a more elaborate system, but with abstract armies and battles similar to Shogun
or the computer game Civilization III.  I was planning to enlarge on this specific campaign only to a limited extent, but I'll leave that to a future posting.

Instead I will talk about map-movement campaigns designed to bring about table-top battles. Readers of Charles Grant's The War Game will recognise some of this, as will two readers of this blog who have participated in least one such campaign.

We begin with a Napoleonic campaign I ran and played in some 25 years ago.  This was a three way campaign in which the French, commanded by Napoleon, had to defend Paris against an invasion by an Anglo-Russian force from the north, and an Austrian from the east.  Given that no one's Napoleonic collection was then very large, the premise was a limited campaign seeking a quick decision.

Napoleonic campaign: Map 1.


The narrative ran that within months after Waterloo, a desperate band of Old Guardsmen aboard a fast schooner descended upon St Helena and spirited away their Emperor.  Returning to France to a hero's welcome, Napoleon at once began recruiting an army.  An appalled Europe was caught completely unprepared, but small forces were gathered in the hope that by a quick thrust to Paris, even a small force might yet achieve the third overthrow of the Corsican Tyrant.

Napoleonic Campaign: Map 2.

To give some idea of the small sizes of the forces involved for this undertaking, as Archduke Charles, I had 190-odd figures, and even that number was reached only by adding a 36-figure contingent of Black Brunswickers.  The 'Duke of Wellington's' force was slightly larger - maybe 230-240 figures - and included Russians: two foot and one uhlan regiment.   For his part, Napoleon had an army of perhaps 360 figures, about a quarter of which were gathered around Soissons (F6 in the maps), the rest in and about Paris itself (C9).  The numbers being so small, for narrative purposes, each figure represented 100, though nominally, for the rule set we were using (mine) the scale is actually 1:25. The Anglo-Russians opened the campaign from Valenciennes (G1), the Austrians, from memory, in St Dizier (L10).


Napoleonic Campaign: Map 3
This campaign used Charles Grant's technique of movement being measured along roads, and the presence of troop movements being announced by the presence within a given square at the end of, or a square having been entered during the course of, the half-day campaign move.  Squares exited during the move were not announced unless it was also entered during the same move - that is, the square was passed through.  This applied mainly to cavalry moves.
Once opposing forces entered the same square, then a sub-square would be added to the call.  The entire intelligence received was this list of squares - until the same sub-square was read out by opposing forces, whereupon both sides had to reveal what was there.  Instead of 4 campaign moves per day, I limited it to a morning and afternoon moves. I think from memory I allowed night moves, but they required that within 48 hours the troops take day-move for rest.  The margin was to allow a battle to be fought, it being presumed that a night march might be made for that purpose.  I don't actually recall any night moves being made, though.

Early on there was some fierce skirmishing between the Allied and French light horse in the north, with honours fairly even, as both sides endeavoured to penetrate the enemy cavalry screens.  As they involved small numbers of cavalry, they were conducted by die rolls.  The fourth such action took place near Soissons, where the Russian uhlans found and destroyed a French supply depot. 

Things were more subdued on the Austrian front, both sides avoiding costly skirmishing.  With just twenty horse figures - eleven cuirassiers and nine uhlans - I was not inclined to be profligate with them!  At one point, pickets on both sides got caught, trapped, on a lateral road somewhere southwest of Chalons-sur-Marne, when the enemy sealed off the T-junctions to their rear.  Neither wishing to try 'conclusions to the death' that a fight would have amounted to, we negotiated the situation that allowed both sides to escape.
napoleonic campaign: Map 4.


I won't go into a lengthy narrative of the campaign.  The first clash took place at Rheims between the Austrian Corps and what seemed at first an isolated French column that turned out to have large reinforcements arriving from the north.  The Austrians tried again later, and successfully stormed the town.  Napoleon by this time was fully involved with the Anglo Russians.  In a series of three battles at Craonne (H6), St Gobain (F4) and Verberie (D6), Napoleon gave as good as he got, but with Austrians advancing into his right rear, was unable fully to commit to an all out drive to throw Wellington's Army back.  In fact, at one point the Austrians were looking forward to a battle at Pierrefonds (E6), but the French there slipped away.  The final action found all three armies in a big battle at Louvres and Dammartin (C8).  Napoleon just barely held the ill-coordinated Allied attack, whereat a tot-up of the armies at this point showed that all three had reached the point of exhaustion that would put them out of the fight.  What happen was that I discovered that my own Austrians had passed the exhaustion mark, but out of curiosity asked for the status of the other two.  They were in like case!

In effect, Napoleon had won.  Sort of.

A page from the Southern Sortie narrative of the 1816
Napoleonic campaign of 1991.  I've touched up the campaign
map for ... I hope ... added clarity...
Successfully reaching a conclusion - if an indecisive one - this late winter/early spring campaign made a fine prequel to a much larger summer campaign had we wished.  It is entirely feasible, my Austrian Army having trebled its size since then, and having acquired a British and a Prussian one.
..

Not long after this, I  based a 'Second ACW' campaign, using similar ideas, on the premise that Gen. Geo. McClellan narrowly defeated Abe Lincoln in the presidential election of 1864, whereat an armistice was drawn up at the end of 1864, and Peace signed in January 1865.   However,  the evacuation of some of the occupied regions, particularly in Tennessee, was carried out in dilatory fashion, under the cover of which escapee slaves and even 'free men of colour' migrated in their thousands across the borders into Kentucky and Ohio.
ACW 2 Campaign: Tennessee Campaign.


It wasn't long before Southern sabres once more began rattling; protests to Washington fell on receptive enough ears, but orders thence to the army commanders were apt to be grudgingly obeyed, with all kinds of reasons and excused adduced.  The War that broke out towards the end of March, 1865, was limited solely to the state of Tennessee itself, with the Union main Army HQ still at Nashville, the Confederate army having just recently set up an HQ at Chattanooga. Smaller forces of both sides were operating along the banks of the Mississippi River, and in the Knoxville area...

One of the enlarged sectors.  The roads are drawn without curves
 such as to make measurements easier.


Although there were several battles fought, the really big one at Pulaski on 7 May 1865 (I8 in the above map) was the harbinger of the campaign's demise.  The Confederates having seized the place, they set about building fortifications that stretched from the Duck River across the northern face of the town, before turning southward to present a front protecting the right flank.  My Union Army turned up with 23 regiments facing 17 and attempted to storm the Confederate lines. Although we penetrated  the centre and then the salient where the rebel trench-line bent southwards, at neither point could the break-in be exploited into a break-out.  A fresh brigade arriving off the march from Wartrace Depot struck the open south flank of the trench line only moments before Secesh reinforcements arrived betimes to stall that attack.

..
Battle of Pulaski - the biggest and toughest fight of the
campaign

Far from defeated, the Union sat down and invited the Confederates to try their hand, which they declined to do.  A lull ensued in this part of the world whilst the Union dug in and both sides recast their plans.  I think the South tried to build up their army by train from the east, but had to negotiate the flank guards I had left in that direction. They would have brushed them aside easily enough but it would have meant some delay, and the Union would have received some warning. 
..

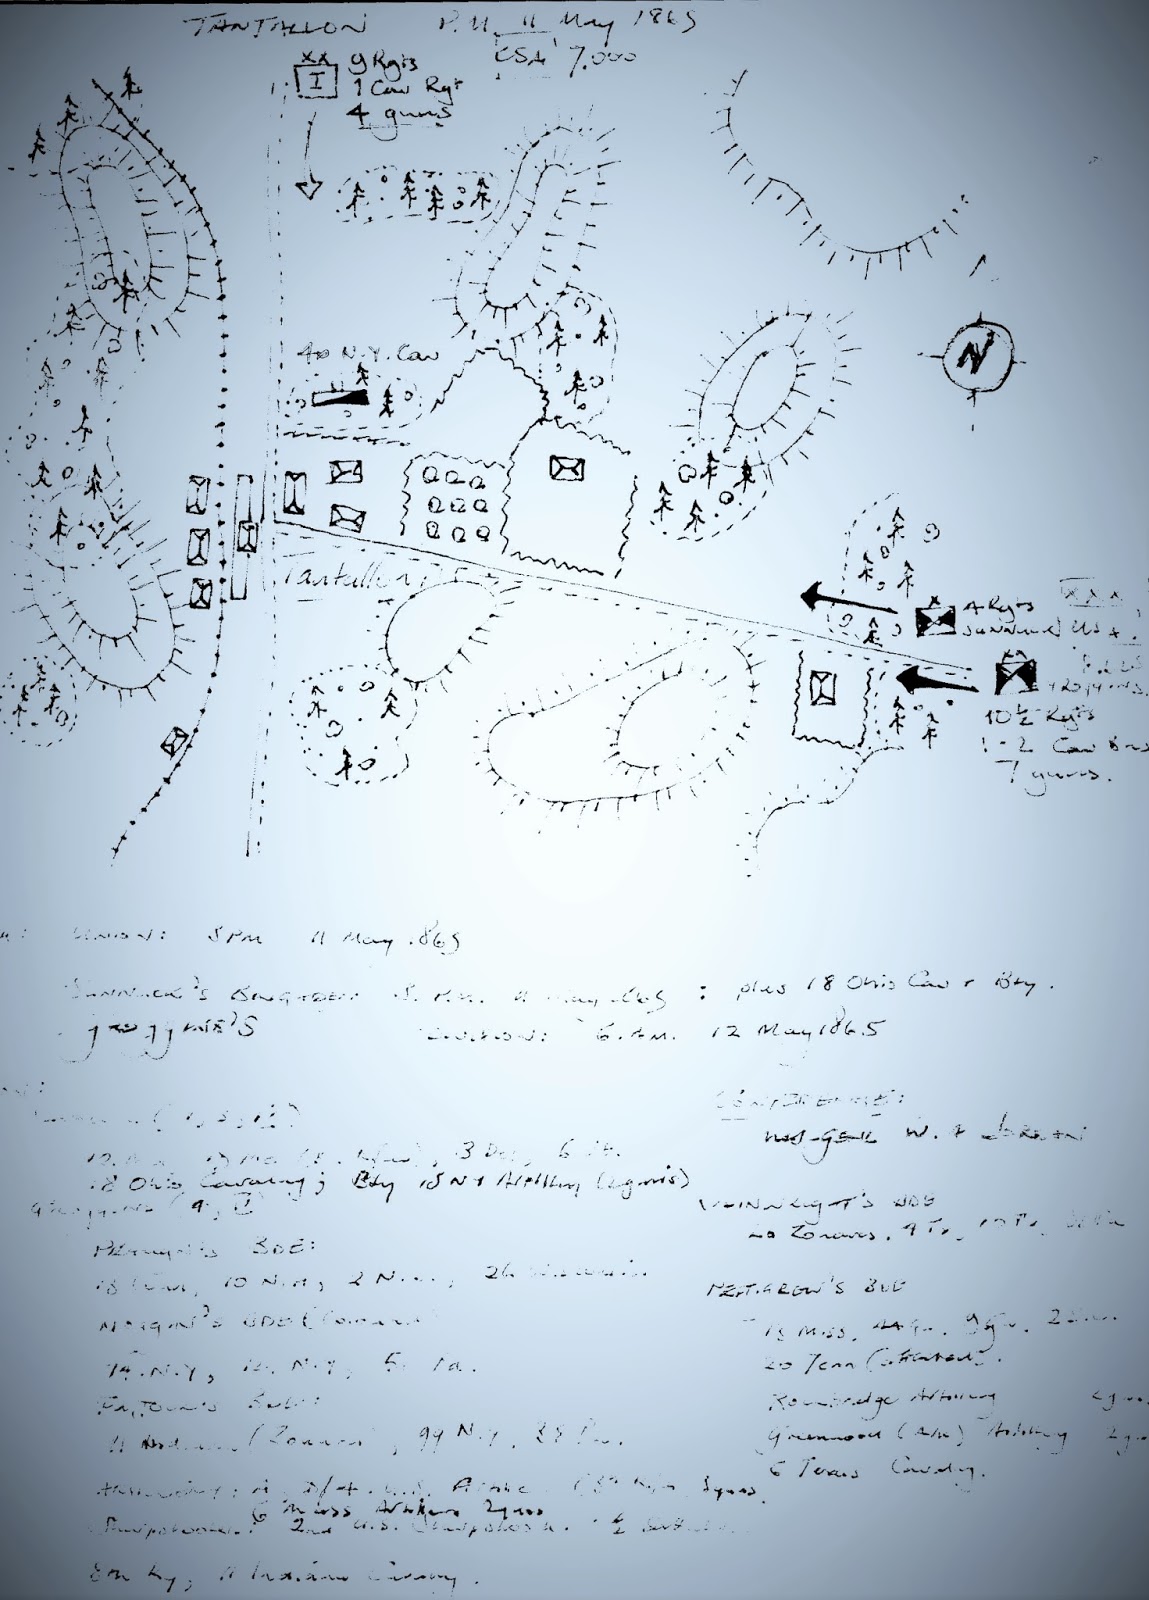
Tantallon: the battle that never happened.  As
troops arrive during the course of the day,
 their actual arrival times would  have been
diced for, varying by one or two game
moves  either side of their ETA.

May 9 saw a couple of slight affairs at Middleton (I8) close by the Mississippi border, and another at Wartrace Depot, between sizeable forces, but which were abandoned after little more than light skirmishing.   The campaign itself was abandoned, rather unfortunately, on May 11, before the interesting looking action at Tantallon could be fought out.  There a retreating force of some 7000 Confederates under General Jordan were marching towards the town from the north, whilst a larger Union   force (over 8,000) was racing westwards towards the same place.  In the town itself stood the battalion of 40th New York Cavalry, whilst a gap had developed between Sunnuck's Brigade of Knott's (Union) Division, and the Division of Major-General J. Pierpont Groggins, which was not due to arrive until the 12th.  The Confederates would have to break through in about three hours (the action opening at 3pm) or else have a real fight on its hands the following day.  As Jordan's and Sunnucks were expected to arrive at the town at 3pm, much depended upon the celerity of movement of both sides whether indeed there would be a battle at all, or the Confederates would pass by under the noses of the Union forces approaching.  I have just rolled a couple of dice to see what might have happened.  The CSA rolled a 2, which indicated considerable celerity of movement; whilst the USA rolled a 3.  So the Confederates would arrive a half hour (one battle move) earlier than the Union brigade.  It seems fairly likely the CSA might have brushed aside the lone cavalry battalion in front of them and slipped by without a battle after all...

I won't go into the immediate reasons for the campaign's demise, but I wasn't altogether sorry.  This style of campaign is probably not suited to a large number of players if one of them happens to be a major participant. But the fact was, it was somewhat under-prepared, to the extent I was never very happy with it.  It lasted several - at least a half dozen combats - though only one reached the 1100-odd figures of the Pulaski battle.  But the Tantallon action, had it occurred, an gone to a second day, would have employed well over 600 figures.
Source of details for my Stonewall in the Valley
Campaign map.


During the course of this campaign, there were some naval or combined operations going on along the Mississippi River.  The Confederates had forced the surrender or abandonment of a couple of forts, a cottonclad vessel had run the guns of a Union fort, and got away with both guns knocked out, and, its funnel riddled with holes, a 3-knot reduction in speed.   According to my campaign notes, the Union fleet had orders on the 11th May to chase the Rebel fleet out of B3, which suggests a naval action might have been imminent not far south of New Madrid.

Running such a large campaign (in terms of toys available) I would never again play in it at the same time.  That was a mistake, but the sort one has to make in order to learn from it.  What works for a two or three player campaign won't for a 6-player.  

Another ACW campaign I have long had in mind was based upon a idea mentioned in Don Featherstone's book War Games Campaigns.  This was 'Stonewall in the Valley', in which Stonewall Jackson commanded a force of ten infantry regiments, with horse and guns, operating in the Shenandoah River valley.  The Union Army had three identically similar corps operating in the same area, setting about to trap the Confederates or to drive them from the Valley altogether.

Stonewall in the Valley - Campaign Map.
More on that, next time...