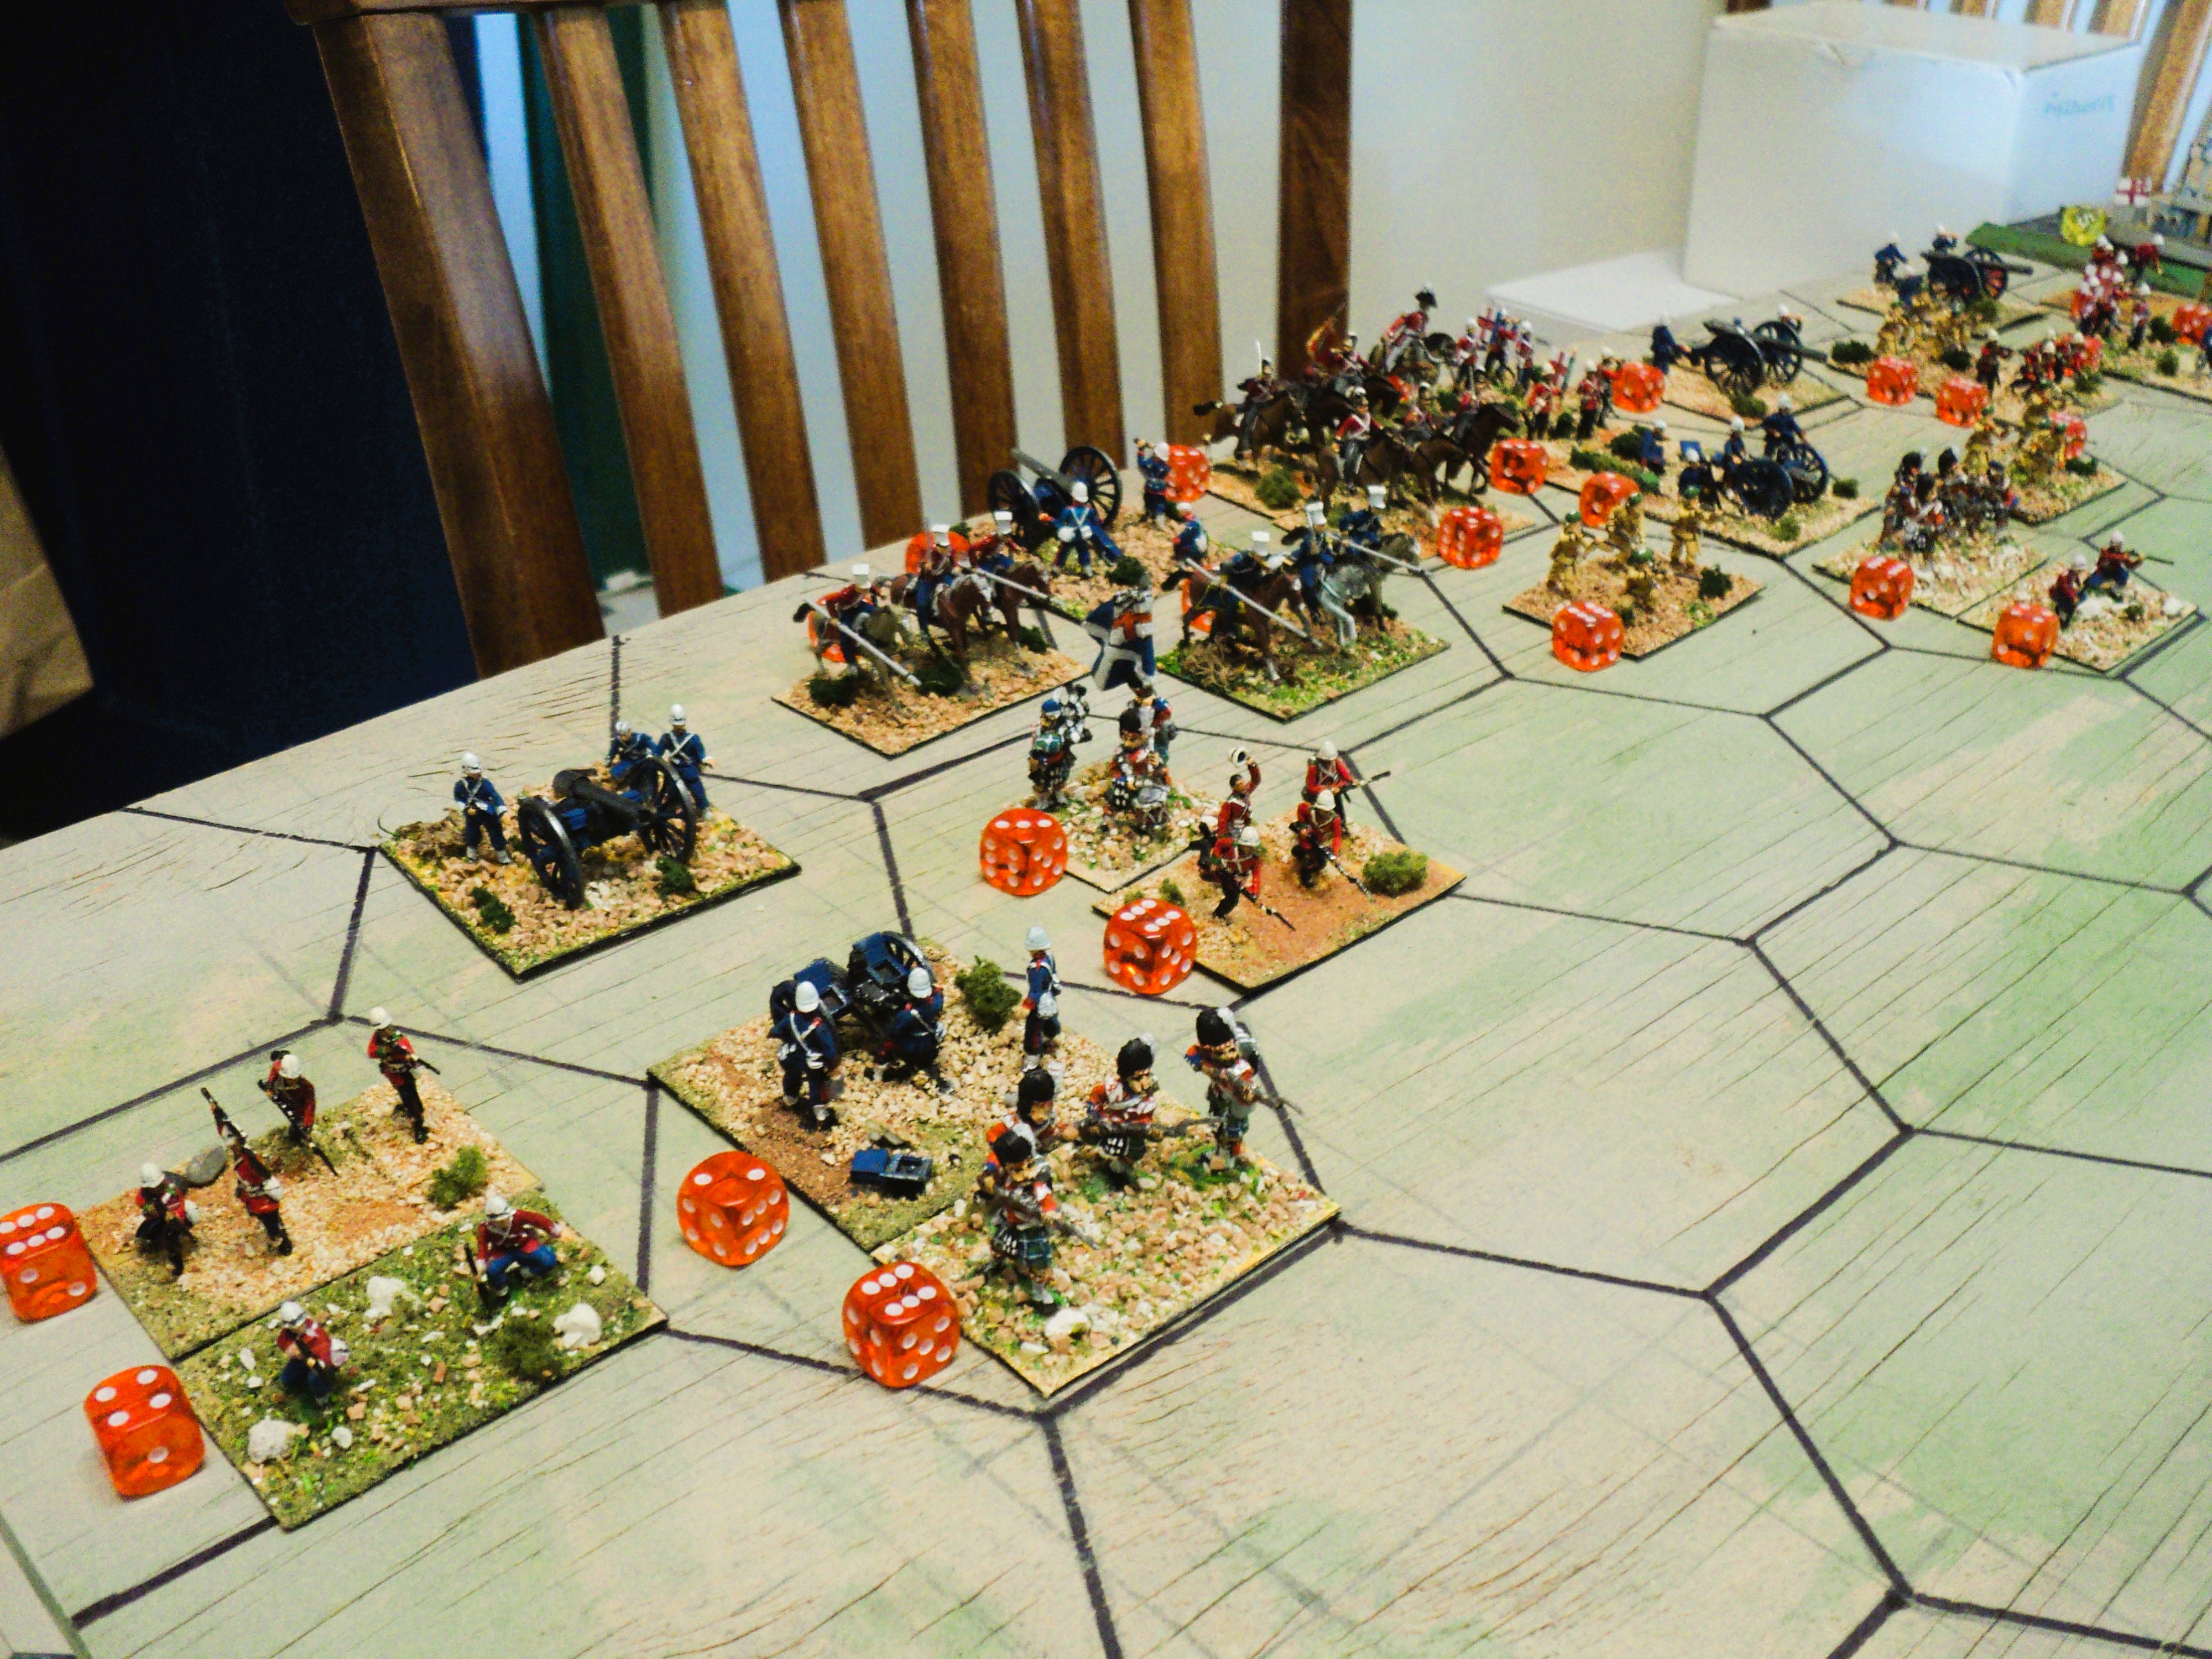
However, as I was setting up this action, I decided upon a slight modification that ignored battalion columns, but allowed single-stand units to double-up in tandem within a grid area. There would be no 2-hex move for columns; all foot movement would be one grid area only. However, as paired units could be activated to move with just one activation point, a certain celerity of movement was possible with compacted brigade-sized formations.
The trade-off was added vulnerability of such formations to incoming gunfire. Instead of rolling once for both units in a grid area, I rolled for each. Statistically, the expected loss is the same, but the probability of getting at least one hit is higher (56% against 33%), and the probability of getting two (22% against 33%), or of getting none (44% against 67%), is lower.
Although the 'W-at-W' rule set doesn't call for activation draws, I used my dice method, rating the respective commanders as average. Because not all the Turcowaz army was up, their activation rolls were reduced according, becoming the standard rate for the army once (if ever) the 52nd Division arrived on the field. However, as their role was static defence, it became simply a matter of prioritising defensive fire, the artillery and machine guns first, and then any remaining activations being distributed among the rifles in the forward trench. Given the reserves of cavalry and the command stands, that meant a top activation roll permitted all rifle units to shoot in a given turn.


As 6th Jat Light Infantry began their assaults across the trench lines, Nasr ed Din Pasha began casting anxious eyes northward. Where was 52nd Division? The arrival of that large reinforcement was to be determined by a die roll at the end of each turn once attackers had crossed over the earthworks. A roll equal to or less than the number of attackers that had penetrated the first line, would bring on 52nd Division next turn. Jat Light Infantry being the first, and so far only, a D6 roll of '1' would herald their arrival.
The northern skyline remained empty. Disappointed, Nasr ed Din turned back to the battle.
The northern skyline remained empty. Disappointed, Nasr ed Din turned back to the battle.

Close by the riverbank, 97th Deccan-Decca also reached an undefended section of trench line. Chunking up the river, the gunboat Shoofly was engaging targets on either bank, eventually focusing upon III/ 103rd on the far bank.

Here I made a bit of a mistake, I think, as the rule set really charged the Leicestershires to assault one or other of the Turcowaz infantry battalions. It probably would have been the most sensible attacking option anyhow.

If the assailant is repulsed and has to retreat, he has to vacate the grid area from which he is attacking.

The vagaries of the activation dice were forcing the 35th (beside the river) and 19th Brigades into piecemeal attacks - or you could say, that the attacking lines were becoming more ragged as they approached the Turcowaz earthworks. Under flanking gunfire, 92nd Deccan-Decca began attacking the right flank of I/ 104th Battalion. Far ahead of the rest of 35th Brigade, they were, for the time being, on their own.
At the other end of the 104th Regiment's line, the Napier Rifles had fallen back reduced by 50%. The Seaforth Highlanders surged through the retreating rifles right up to III/ 104th, where stood Duya ed Din Pasha, directing the defence. Twenty-eighth Punjinjab swung right to engage the machine gunners linking the 104th and 105th Regiments.


The whole of the eastern half of the main Turcowaz defence line was now under heavy close assault. The whole of 21st Brigade was now heavily engaged with the two battalions of 105th Regiment, with 28th Punjinjab of 19th Brigade keeping the Turcowaz machine gunners busy. The non-appearance of 52nd Division led Nasr ed Din to order a cavalry counter attack against the Jat Rifles and relieve II/ 105th of the pressure on its left flank. Not that that availed them much, as 41st Dogra Infantry swept up to the trench lines in front. Beside them, the Brigade commander, Colonel Ross, led 9th Bhoped's assault upon I/ 105th. Such leadership was needed: 9th Bhoped was already down 67% of its original strength.


They arrived when prospects for 35th Division looked their bleakest. Storming across the III/ 104th trench line, Seaforth Highlanders flung back the defenders with loss. Caught up in the retreat, Duya ed Din Pasha was hit, badly wounded and trampled in the rout. It seemed by now that the whole of the first trench line must fall to the attackers.


Yet that collapse seemed imminent, especially on 104th regiment's front. Although practically surrounded, still defending their sector of the first line, II/ 104th had so far endured only slight loss (1SP). Driven back almost to the second line, III/ 104th had also got off fairly lightly so far, and the pressure had been relieved by the intervention of the Turcowaz light horse. But I/ 104 had lost 50% of its strength, and the army guns had already once had to beat off an assault from the Deccan-Decca infantry, and were engaging in a gunnery duel with the Shoofly gunboat. Although taking a couple of damaging hits, Shoofly seemed disinclined yet to pull out of the action.

So matters stood, both sides tearing chunks out of each other. Though taking very heavy casualties, 105th Regiment was giving at least as good as it was taking. I/ 105th finally repulsed 9th Bhoped Dogra for good, the scant survivors (0SP) fleeing to the rear. Their front cleared, they brought 21st Brigade's MG company under effective fire. 41st Dogra was still hung up in a close quarter struggle with II/ 105th, whilst the Jat light infantry was also caught up in an indecisive duel with Turcowaz light horse. 105th Regiment had lost two-thirds of its strength (8SP) but but the Barrelly Brigade losses were even higher (13SP). The 35th Division Nordenfeldt MG company had been destroyed, but took out much of 28th Punjinjab with them. The latter was now down to one-third of its original strength.

A considerable gap having been punched through the centre of the Turcowaz line, however, induced General Reddington to order up the cavalry. Perhaps a massed cavalry charge might decide the action?

Equally promising seemed a renewed attack by 37th Dogra Infantry upon the Turcowaz army gun line, where stood Nasr ed Din Pasha himself, directing the defence. Though supported by Shoofly's gunfire, the Dogra infantry remained stalled upon the glacis of the earthwork protecting the guns.


On Garwhal Brigade's front, at last the II/ 103rd resistance collapsed, and the whole of the first line was overrun and the surviving defenders (0SP) taken prisoner. But the Leicestershire Infantry had been thrown out of the gun emplacement they had earlier captured. Chagrinned, the Leicestershires return to the attack, supported by the 33rd Queen Adelaide's Own cavalry charging 61st Tribal Horse nearby. Under cover of this renewed battle over the Turcowaz second line, III/ 154th Infantry quietly filed into the Sheikh Sa'ad quickly to place the village into a state of defence.

The hard fighting that had taken most of the Turcowaz front line had by now taken too too much of a toll upon the Ruberian strength. Their morale boosted by the arrival of 52nd Division, even though the latter had not even fired a shot and only a single battalion had inserted itself even partially onto the battle; even though two of 103rd Regiment's battalions had been wiped out; and even though 103rd and most of 104th Regiments had been driven back to their second line; for all their losses, 35th Division remained in the fight.

It might be of interest to the reader to see what the 'butcher's bill' looked like. Losses were heavy on both sides, but it might serve to show what attacking a trench line is like under this rule set.
Army of Ruberia:
Seventh Meerut Division, Lt-Genl Sir Aylmer Reddington ... 6SP
19th Dehra Dun Brigade (Col Wm Dennys) ... 3SP
- I/ Seaforth Highlanders ...6SP (elite) -4 = 2SP
- 28th Punjinjab Infantry ...6SP -4 = 2SP
- 92nd Punjinjab Infantry ...6SP -6 = 0SP
- 125th Napier's Rifles (Skirmishers) ...4SP -2 = 2SP
- Gatling detachment ...2SP
Total 19th Bde 27SP -16 = 11SP
28th Garwhal Brigade (Brig-Genl Geo. Kemball) ... 3SP
- II/ Leicestershire Infantry ...6SP -4 = 2SP
- 51st Hydansikh Infantry ...6SP -4 = 2SP
- 53rd Hydansikh Infantry ...6SP -5 = 1SP
- 56th Punjinjab Infantry ...6SP
- 62nd Punjinjab Infantry ...6SP
- Gatling Detachment ...2SP
Total 28th Brigade 35SP - 13 = 22SP
35th Brigade (Brig-Genl G.B.H. Rice) ...3SP
52nd Division: Abdullah Jemal ... 3SP
- I/ 5th Buffingtonshire Infantry ...6SP -3 = 3SP
- 37th Dogra Infantry ...6SP -4 = 2SP
- 97th Deccan-Decca Infantry ...6SP -2 = 4SP
- 102nd King's Own Grenadiers ...6SP
- Gatling Detachment ...2SP
Total 35th Brigade 29SP - 9 = 20SP
21st Barrelly Brigade (Col G Ross) ...3SP
- II/ Black Watch ...6SP (Elite) -1 = 5SP
- 6th Jat Light Infantry (Skirmishers) ...4SP -2 = 2SP
- 41st Dogra Infantry ...6SP -3 = 3SP
- 9th Bhoped Infantry ...6SP -6 = 0SP
- Gatling Detachment ...2SP -1 = 1SP
Total 21st Bde 27SP - 13 = 14SP
6th (Indian) Cavalry Brigade: (Brig-Genl R. Thered) ...3SP
- 14th King's Hussars ...4SP (elite)
- 4th Cavalry ...4SP
- 7th Harian Lancers ...4SP
- 33rd Queen Adelaide's Own Light Cavalry ...4SP
- 'S' Battery, RHA (Horse artillery) ...2SP
Divisional Artillery:
- IV, IX, XIII Brigades, @2SP = 6S
Gunboat:
- HRMS Shoofly, ...8SP - 2 = 6SP
36 units, 153SP, Exhaustion Point -51SP.
Total losses: 53SP
Army of Turcowaz:
Corps Command: Nasr ed-Din ... 6SP
35th Division: Duya ed-Din ... 3SP KIA -3SP
- 103rd Regiment, 3 Bns (stands) @6SP = 18SP - 12 = 6SP
- 104th Regiment, 3 Bns @6SP = 18SP - 7 = 11SP
- 105th Regiment, 2 Bns @6SP = 12SP - 8 = 4SP
- Nordenfeld MG Company @2SP - 2 = 0SP
- Artillery, 2 batteries @2SP = 4SP - 1 = 3SP
Cavalry:
- 43rd, 44th Regular cavalry @4SP = 8SP - 2 = 6SP
- 75th, 76th Irregular Sipahi @4SP (poor) = 8SP - 2 = 6SP
- 61st, 62nd Tribal Light Horse @4SP (poor) = 8SP -3 = 5SP
Reinforcements (off table, and remained unengaged):
52nd Division: Abdullah Jemal ... 3SP
- 154th Regiment, 3 Bns @6SP = 18SP
- 155th Regiment, 3 Bns @6SP = 18SP
- 156th Regiment, 3 Bns @6SP = 18SP
- Nordenfeld MG Company @ 2SP
24 units, 140SP, E.P. -47SP
Total losses: 37SP + Division Commander, 3SP = 40SP total.
This was a decisive victory for the Turcowaz army.
Appalled at their losses and the outcome of the whole campaign, the remains of General Sir Aylmer Reddington's army retreated the 300 miles down the Pardis River, all the way to the Gulf of Parthia, there to await what might be the sequel. Might Ruberia mount a more powerful invasion of Medifluvia? Who knew what machinations took place in the hallowed halls of Ruberian High Command?
Total losses: 37SP + Division Commander, 3SP = 40SP total.
This was a decisive victory for the Turcowaz army.
Appalled at their losses and the outcome of the whole campaign, the remains of General Sir Aylmer Reddington's army retreated the 300 miles down the Pardis River, all the way to the Gulf of Parthia, there to await what might be the sequel. Might Ruberia mount a more powerful invasion of Medifluvia? Who knew what machinations took place in the hallowed halls of Ruberian High Command?