Tuesday, November 12, 2024

Battle of the Laroc Sea: The Invasion Convoy

The Invasion Fleet turns to escape the Kiivar
warships...


Whilst the Ra'esharn Navy was winning some sort of victory off Petosi Point, the Kiivar Task Force 34 was concentrating its efforts against the Invasion Convoy in the Lindisfarne Strait. The lead vessels rashly having entered the narrow waters, the lack of sea room offered problematical chances of escape as Kiivar's two big warships closed to short range. 

At this point the problem of turning circles required a review. The distance across a hex represented a couple or so nautical miles, but I didn't want ships darting hither and thither at will. For this action, I enacted that the convoy's ships could face about, but, in so doing, could not in the same turn move from the hexes within which they stood. It was this delay that brought them under the guns of Task Force 34.


Since then I have provisionally formulated this rule:
If a vessel travels 2 or 3 hexes in a Turn, it may change direction up to 60 degrees during its move;
If a vessel travels 1 hex in a Turn, it may change direct up to 120 degrees during its move;
A vessel wishing the change direction more than 120 degrees, must do do in the same hex, with no lateral movement at all.

So it was with the Convoy. All the ships turned 120 degrees to escape the trap. But the situation was becoming dire.


Some relief was to be had as RNS Barbatos approached from its victory over SNS Hakawai. At first the main island of the Petosi Group masked the approach of KNS Harrier, so the first salvoes hit the cruiser, Heirax. But as the Harrier came into view, Barbatos found itself  'crossing the T' of the Kiivar battleship. The result can be imagined. Already having taken damage from earlier encounters, Harrier took a deal more than it was able to inflict in return. All the same, Harrier used its secondary armament, and Heirax its own guns, to pound the leading Ra'esharn transports. Soon the two leading - now rear - vessels, MSS Chubbi Maru and Barracuda were stopped, dead in the water, and aflame from end to end. 

And then the air attack came in.

After beating off a Ra'esharn air attack (see previous episode) SNS Bake-kujira had completed rearming its own bombers, and launched them in an air strike against the Invasion Convoy. The fighters  unavailable owing to their recent sorties, the bombers flew without escorts.


Under strict instructions that the transports were the priority targets, they overflew the escort carrier. The attack was somewhat reduced on account of earlier losses, a dozen aircraft aimed towards the MS Ramjam, alongside the carrier, and eight took on the lead vessel in each column, MSS Shagnasti and Mangla.


The fighters from Angra Mainyu naturally intercepted the strongest attack, and drove the bombers away from Ramjam, though losing some aircraft (1FP) in doing so. But the other attacks went in with nothing to concern them but the light flak. The bombers got through to Mangla without loss, but were unable themselves to score a hit. Only four (1FP) torpedo bombers survived the flak to attack Shagnasti. Their determination reaped its reward: a torpedo strike amidships (the single die threw a six) that stopped the transport vessel dead in the water. In a near sinking condition, the ship had to be abandoned. Casualties among the soldiery and the loss of equipment left the battalion being carried unfit for operations for a long time thereafter.

At that, the following ship, Ramjam, very nearly ran aboard the stricken Shagnasti.  


With the sinking by gunfire of Chubbi Maru and Barracuda, and the rout of the rest of the Invasion Force, the Kiivar squadron concluded it had done enough to save Port Fewersby. Harrier was under damaging close range gunfire from Barbatos and taking a deal more damage than it was handing out. The Saabian Task Forces had been scattered, and there was little more that the Allies could achieve. The Battle of the Laroc Sea was over.


For ever afterwards, historians would argue who 'won' the Battle of Laroc Sea. Undoubtedly the Ra'esharn Navy had borne off the tactical laurels, as indicated by the respective damage to the rival forces:

Ra'esharn losses:
1 cruiser sunk,
3 destroyers sunk
2 cruisers critically damaged 
1 light carrier moderately damaged
8 fighters (2FP) and 28 bombers (7FP) shot down 

Allied losses:
1 battleship sunk
1 fleet carrier sunk
3 destroyers sunk
2 cruisers critically damaged
1 battleship (KNS Harrier) badly damaged (-14FP out of 24)
4 fighters (1FP) and 36 bombers (9FP) shot down.

But against that slight disaster to the Allied Navies, the invasion fleet had been stopped dead. Of the five transports, two had been sunk and a third had to be abandoned and scuttled.  Could the still distant carrier group have still carried the invasion fleet through? Possibly, but for the fact that the 3000-strong brigade group had effectively been wrecked. There was no chance that what was left of it, no more than a couple of battalions, could have taken and held Port Fewersby...

On the whole I was rather pleased with the way this playtest went. I wanted a complex action, with plenty and various events happening. I was moderately surprised at the result, it didn't seem to me 'out of the way'. When I do something similar in future, it will be on a field larger by 50% - 6 hex sheets instead of 4. I'm also looking at giving a Midway a try, and part of the Leyte Gulf battle: Surigao Strait. 

* * *

My apologies to readers for the week-long gap that separated postings in this series. I really ought to have resisted the temptation to allow myself to be sidetracked into what will be the topic of my next posting...


Battle of Laroc Sea - Action off Petosi Point


Action of Lindisfarne Strait. RNS Charun and R21 have taken
a terrible battering, but KNS Harrier has been holed by a torpedo.

As the Kiivar Task Force 34 brought concentric fire to bear upon RNS Charun and S21, RNS Choronzon and S22 were just rounding Petosi Point to the east. The invasion convoy itself had entered the Lindisfarne Strait - a move akin to sticking their heads in a noose. For the moment, however, TF34 concentrated their firepower against the battered enemy warships nearest to hand. 
Action joined off Petosi Point
The planned intervention by the other half of the escort squadron very quickly found their intervention interdicted. Coming up fast from the east, two destroyers led the rest of TF7 - a battleship (SNS Hakawai)and a cruiser (SNS Sarimanok). Closing rapidly into torpedo range, they opened a brisk fire upon Choronzon and S22, a fire as keenly returned. Lurking beneath the growing battle, submarine SU19 awaited its chance. To complicate the situation, the Ra'esharn Covering Force was also approaching from the northeast. The battle was about to become confused and frenetic. 
TF1 throws itself in the way of the Ra'esharn 
Carrier group south of Guanocanal.

Far to the east the gun-armed vessels of TF1 threw themselves into the path of the much more powerful Ra'esharn Carrier Group. The submarine SU47 having made its unsuccessful torpedo attacks soon found itself under depth charge attacks by destroyer R26. That abruptly ended SU47's part in the battle - and the war.
Action off Guanocanal

By this time a gunnery duel had begun between the Ra'esharn major units and SNS Gullincambe. Once SU47 had been dealt with, R25 and R26 set about dealing with the nearest enemy destroyer, S11. For the moment, S12 was too distant to offer much help. Before the range had closed, RNS Bushyasta had fired off a salvo or two at extreme range against SNS Bahamut, causing a certain amount of damage and a few fires. However, the carrier's operational functions remained unimpaired. As the cruiser Gullicambe and its consorts closed the range, Bushyasta and Cimijes had enough to do to clear them out of the way of their progress westward.


Ra'esharn takes some losses off the Petosi
Island group

Here was where the climax of the surface action was being played out. RNS Charun finally succumbed to the gunfire from Harrier and Heirax; and R21, heavily damaged tried to crawl away from the action. Choronzon also took a fair bit of incoming from Harrier, and began to withdraw northwards towards the Retosi Gap.  As the Saabian destroyers swung north to face the fresher Ra'esharn units, it was left to SU19 finally to put R21 out of its misery. Whilst the gunnery battle developed between TF7 and the Ra'esharn escort - such as survived -  and covering groups, the carrier Baki-kujira altered course to the southwest, and nearer to Bahomet, well south of the main action. 
Saabia carriers steering clear of the surface action.
SNS Bake-kujira is bombing up its aircraft for a strike...
against whom?


After a gunnery exchange with Ra'esharn's light units, Task Force 7's destroyers became the vanguard of the task Group. As S78 and R22 engaged in a running duel, S77 ran bull-headed, straight for the Barbatos. Releasing its forward torpedo at the battleship, S77 launched a battery at the cruiser, Chemosh. Dashing and bold as was this reckless charge, it received scant reward. Incoming fire from Barbatos's secondary armament and from Chemosh quickly sent S77 to the bottom. None of the destoyer's torpedoes hit their targets. 

By this time the main duel had begun. Hakawai and Sarimanok were facing Barbatos and Chemosh; but the latter duo had the destroyer R24 - and it was well within torpedo range of the enemy battleship. 

The end of SNS Hakawai.


The difference was decisive. The Ra'esharn concentrated most of their firepower against the Saabian battleship. Only the destroyer faced off against the Saabian cruiser. At that, Ra'esharn gunnery proved as good as it has always been (don't know why, but the dice always seems to run Ra'esharn's way, as previous actions have shown). The superior gunnery of Barbatos was augmented by torpedo strikes - the first from Chemosh, and the second from R24. That finished Hakawai. On fire and dead in the water, the battleship blew up, and sank.

Not that the Ra'esharn had come off unscathed. Although the damage to Barbatos was scarcely worth mentioning, Chemosh had taken a fair battering from less hard-pressed Sarimanok. Speed reduced, 'B' turret out of action, and smoking from several fires, Chemosh began to turn about, out of the action. Meanwhile, the duel between S78 and R22 left both in a sinking condition; and the cruiser Charonzon, lucky to survive the one-sided exchange of fire with TF34, was also staggering northwards, hoping to get by through the Petosi Gap. 

General view looking westwards

It was about this time that the Ra'esharn Carrier Force launched its air strikes against the Saabia carriers. Those attacks went in just as the battle off Petosi Point was reaching its climax.
Saabian carriers under air attack!

With fighter escorts, the squadrons from Azi-Dahak attacked Bahomet; whilst, some miles to the northwest, those of Achlys drove in on Bake-kujira. The fate of the attacks were very different.

Taking the latter first, the carrier, quite without escort, had only its own resources with which to fight off the attack. The fighters of both sides neutralised each other at the cost of four Ra'esharn escort fighters (1FP). 

Nor did the anti-aircraft fire prove effective in stopping the bombers. Already having taken losses earlier in the day, the three bomber squadrons between them comprised just 28 aircraft (7TF). 
Seven dice rolled: 2,2,3,3,4,5,5 => zero hits! Weaving and dodging as best it might under a deluge of bombs and torpedoes, SNS Bake-kujira survived the lot! 

What happened to SNS Bahomet?

So ... what happened to Bahomet? The attack that went in was about as strong as that against Bake-kujira. Again, the fighter escort kept the interceptors off the bombers, even shooting down some (1TF) of their number. Anti-aircraft fire, however, accounted for as many Ra'esharn bombers. Also reduced from earlier sorties, the bombers lost further aircraft, and reduced to 24 aircraft (6TF). Greatly determined, the attacks went in...

Six dice rolled: 2,2,4,5,5,6 - a hit.
... but what a hit! A six is required to score a hit, but any (and all) fives rolled with it also count towards the damage. Sixteen FP of damage Bahomet took. Added to the slight damage incurred a short while back, that was enough to finish off the aircraft carrier. The radio traffic crackled with the triumphant shouts of the jubilant pilots.

The orphaned Saabian fighter squadron could count itself lucky to find refuge upon the still afloat and operational Bake-kujira.

The defeat of TF1

Meanwhile south of Guanocanal, the overmatched TF1 'gun' vessels were being overcome. S11 disintegrated under gunfire and two(!) torpedo hits; and Gullincambe was reduced to a smouldering wreck, its after turret out of action, and forced to reduce speed (10FP damage) . Although Cimijes had taken a few damaging hits, it was still in good shape for further action. Bushyasta had received but one slightly damaging hit (1FP). Nothing could stop the Carrier Force joining the main action nearer New Sterling.


There, in a short space of time, Saabia had lost a battleship and an aircraft carrier - two major and valuable units. For their part, the Kiivar Task Force was still well and truly in being, only K43 being too knocked about to stay in action. Harrier and Heirax closed in upon the head of the invasion convoy, just then scrambling to escape from the bottleneck of Lindisfarne Strait.  But Ra'esharn had at the same time pretty much lost the services of three cruisers; Charun (sunk), Choronzon (crippled) and Chemosh (also barely afloat and under way).  Although TF7 had been effectively repulsed, there remained the convoy to protect.
Wild action in the Lorac Sea...
  The battle as yet was still far from over!
The invasion convoy - with large enemy units
far too close for comfort!

To be continued: one last air attack, and more surface action. Can the invasion group yet force their way through?

Sunday, November 3, 2024

Batle of Laroc Sea - Action at Lindisfarne Strait

Ra'easharn escorts gallantly engage 
Kiivar Task Force 34. What was that about 
'crossing the T'?

As the Kiivar Task Force 34 moved to head off any enemy force coming through the Lindisfarne Strait, Ra'esharn's  starboard escort column (RNS Charun and R21) had sped ahead in an effort to clear the way. Bursting through the strait, they saw at once ahead of them the formidable Kiivar warships. The larboard column, RNS Choronzon and R22, were slightly more distant, just about to round the Petosi point, the east end of the Petosi Island group. At once the starboard column came under fire from all three Kiivar vessels.


Saabia Task Force 7 spots not only part of the Invasion Group
Escort group, but also, far to the north, another 
enemy battle group. 


Meanwhile, the Saabian Task Force 7 not only observed the larboard escort column rounding Petosi point, but spied far to the north the smoke betokening the approach of another column of Ra'esharn warships. Leaving the destroyers to deal with the escort ships, the battleship SNS Hakawai and cruiser SNS Sarimanok turned onto a 330-degree heading to meet the unidentified distant force. The aircraft having just shortly before returned from their air attack, it would be some time before they would be available for another sortie.

As SNS Cockatrice crawls badly wounded to the south, 
the rest of TF1 moves westward. Made aware of 
the enemy carrier group, SNS Gullinkambe, followed by
destroyers S11 and S12, turn to face them...

To the east, the Ra'esharn Carrier Strike Force was just rounding the last of the Guanocanal Island group. Observing their approach, the submarine SU47 let fly with its bow torpedoes against the battleship RNS Bushyasta. Both torpedoes missed - possibly on account of the battleship's heading (not that I have any differentiating rule); but now the presence of the submarine was known to the escorting destroyers. This was not going to be SU47's lucky day. 
Submarine SU47 lets fly with its bow torpedoes...


Such were the developments just as the gunnery battle began near the Lindisfarne Strait. And this is how it went:

Kiivar:

Battleship KNS Harrier 
  •     Primary armament vs Cruiser RNS Charun: medium range, 9xD6 roll: 1,1,1,2,2,3,6,6,6 => 3 hits
  •     Secondary armament vs Destroyer R21: battle range (3 hexes), 6xD6 roll: 1,3,4,6,6,6 => 3 hits (good shooting!)


Cruiser KNS Heirax

  •     Primary armament vs Charun, long range, 6xD6 roll: 1,2,3,3,4,6 => 1 hit 
  •     Secondary armament vs R21, battle range, 6D6 roll: 2,2,3,5,5,6 => 1 hit


Destroyer K43:

  •     Guns vs R21, battle range, 2D6 roll: 3,4 => no hits
  •     Torpedoes vs Charun: battle range, 3D6 roll: 1,5,5 => no hits

Ra'esharn:

Cruiser RNS Charun:
Owing to the angle of approach, this cruiser could engage only with its forward guns:

  •     Primary armament vs Destroyer K43: battle range, 4D6 roll: 1,5,6,6 => 3 hits!

Destroyer R21:

  •     Guns at battle range vs K43: 2D6, roll: 3,4 => no hits

Already in torpedo range, R21 let fly with its sole bow tube at KNS Harrier - a forlorn gesture, perhaps?

  •     Torpedo at battle range vs battleship: 1D6, roll: 6 (!!) => 1 hit, 6FP damage. A superb shot!


Results of the opening exchanges:


Ra'esharn:
  • Cruiser RNS Charun - 4FP of damage
  • Destroyer R21 - 4FP of damage, and must now attempt to withdraw from the action.

Kiivar:
  • Battleship KNS Harrier - 6FP of damage
  • Destroyer K43 - 3FP of damage. Just able to continue the action. One of its starboard torpedo batteries expended.

Action around the Petosi Island group

The action ended not there. Just as Destroyer R22 rounded the Petosi Island group, it was to discover that a Saabian submarine (S77) was lurking not far off the point. Fortunately, for the destroyer at any rate, the submarine's aim was off: no hits. 

As the battle was raging just south of the Lindisfarne Strait, the air attack launched by the Ra'esharn escort carrier, RNS Angra Mainyu, two squadrons, one carrying bombs, the other, torpedoes, struck at the already wounded Harrier. Up came the flak; down went a third of the bombers.


  • Battleship AA: 4D6 roll: 1,5,6,6 => 2 bomber FP shot down.

There remained the bombing attack:
  • 4 FP remaining, 4D6 roll: 1,1,4,5 => no hits! The chagrin of the Ra'esharn aircrew may be imagined!
Air attack against KNS Harrier

I reckon that's enough excitement for this posting. More to come later. For the rest of the action I took rather fewer notes (unfortunately) so there will be a deal less of the blow by blow accounting of strikes and hits. Suffice to say here, though, the action was just beginning. A considerable surface action was developing around the Petosi Island group. Far off to the east, south of Guanocanal, the gun armed ships of Task Force One were throwing themselves into the path of Carrier Strike Force, as it was making its best speed westwards...

To be continued -


Friday, November 1, 2024

Ship Building - Aside


KNS Pteranodon - heavy cruiser

I don't really think I have any kind of obsessive compulsive (convulsive??)  disorder, but I simply had to build one of these: a heavy cruiser. The smallest navy - Kiivar - gets it; a desperate measure, perhaps, in the face of the vastly superior Ra'esharn cruiser fleet. From start to finish to make: the course of an afternoon and evening, off and on.

Serial 83

It dimensions are pretty much the same as those of all the other cruisers in the three fleets, but this fellow, KNS Pteranodon, has nine primary guns in three triple turrets - half as much again the firepower of the 6-gun cruisers. I reckon into the bargain I'll give it 15FP (Flotation Points) instead of the standard 12.


Below are comparative pictures, top to bottom: battleship, battle cruiser, heavy cruiser.


The comparison is clearer from this overhead photo. 


Itch scratched: I don't reckon I'll be making any more of these...

Battle of Laroc Sea - Saabia's counterblows

The Ra'esharn air attacks upon the Saabian Task Force 1 having badly wounded the cruiser SNS Cockatrice, it was the turn of Saabia to mount their own attacks. Minus the fighter squadron, the entire bomber complement of SNS Bahamut took off to attack the enemy Carrier Striking Force. A hot reception awaited them.

Attack on the Carrier Strike Force
Having held back their fighters, Ra'esharn were able to match two-thirds of the incoming bombers. One squadron of bombers went after SNS Achlys (11). Half the Ra'esharn fighter intercepted them.
Fighters' attack roll: 2,2,4 => no effect
Bombers' defence roll: 2,4,5 => no effect
The bombers are neutralised.
Now came the flak: 
Destroyer: 1, 6 => 1 hit
Battleship: 2,3,4,6 => 1 hit
Carrier: 1,1,1,5 => no hits.
The bombers lose 2FP

Right here it is starting to become plain that the flak ought not to have been directed at a bomber squadron that had, in effect, been driven off. At the time the thought didn't cross my mind - and worse was to happen!
Attack on Carrier Strike Force

Two squadrons directed their attentions upon SNS Azi Dahak (14). One was intercepted by the fighters:
Fighters' roll: 4,5,6 => two hits on the bombers
Bombers' roll: 1,3,3 => no hits on the fighters
So, one bomber squadron neutralised: 
Now for the flak:
Destroyer: 3,6 => 1 hit
Cruiser: 2,3,4,6 => 1 hit
Carrier: 1,3,6,6 => 2 hits!
Four hits on the surviving bombers. That would have wiped out the last of the bomber squadrons, and the total force lost 8 out of 9 FPs (or, if you like, 32 out of 36 aircraft).

As it happened, I wrote down, I discovered later, a careless note that suggested the whole bomber force was wiped out. 
Attack on Carrier Strike Force

This was phenomenal shooting by the Striking Force, but I think the effect was somewhat overkill. The first two squadrons having been intercepted, they would have been driven off, jettisoning their bomb loads into the ocean and returning to their Task Force. The third squadron having made it through to the ships would have been shot out of the sky. Note that the battleship, Carrier 11 and the larboard column destroyer would have been out of range of their AA weaponry. 

So, according to the combats above, the Saabian bombers would certainly have lost more than half their complement (4FP remaining out of 9FP). The Task Force would still have had a bomber strike force in being.

At about the same time, Task Force 7 was conducting it own air attack, this one against the invasion convoy. The whole aircraft complement of SNS Bake-kujira struck at the troopships and the light carrier RNS Angra Mainyu

Attack on Invasion Convoy
As the carrier was the top priority target, the fighters escorted the squadron to which that target was assigned. Sure enough, the carrier launched its fighter squadron, the escort engaged it, neither side lost aircraft. That gave the bombers a free run - give or take the flak. The results were as follow:

Attack on MS Mangla (rear of larboard column). As it happened, I gave the transports no air defence of their own. Probably they ought to have at least 1AA point, possibly 2, per ship. 
Versus MS Mangla
    Bomber rolled: 2,3,5 => all missed, no effect
Versus RNS Angra Mainyu
    Flak rolls: 1,2,4,5 => no hits.
    Bombing run: 2,2,6 => 1 hit, 6FP of damage!
Versus MS Barracuda:
    Flak from overflown cruiser Charonzon: 2,4,4,4 => no hits
    Bombing run: 1,2,4 => no hits.
Attack on Invasion Convoy


Well, that was moderately disappointing for the attackers - just the one hit on the carrier. Following my previous posting Martin Rapier remarked on the desirability of striking carriers that were in the process of refueling and rearming aircraft that have returned from their own sorties. During this action, the thought did cross my mind that aircraft in a damaged ship might have taken some hurt, but that one I let go for examination later. Had the carrier taken further damage, the aircraft would certainly have remained out of the battle, unable to have been launched.

As it happened, these aircraft were soon to mount a strike of their own...
Battle of Lindisfarne Strait - Invasion fleet escorts take on
the Kiivar Task Force 34.

Shortly after this air attack, the Kiivar ships of Task Force 34 were approaching the other end of the Lindisfarne Strait through which the invasion convoy was about to pass. The starboard escort column, R21 and the cruiser, RNS Charun burst through the strait, just as the larboard column swung off to pass around the Petosi Point. This effected something of a surprise, as upon sighting the opposing forces were already in fairly close range. 

Two destroyers and two cruisers were hardly a match for battleship cruiser and destroyer, but two bomber squadrons (unescorted) from RNS Angra Mainyu were already on their way. Better yet, realising it had the range, however long, R21 launched its single forward torpedo - a hopeless gesture...

To be continued: a building surface fleet action


Tuesday, October 29, 2024

Battle of the Laroc Sea - An Overture to Action

Task Force 7

Well... not just the action. For this and subsequent postings the battle narrative will be interspersed with commentaries upon the issues that came up and possible methods of resolving them - if they seemed to need resolution. I thought I would begin with the opening passage of arms with an air attack...


The Ra'easharn objective - and whom they have to get 
past


The Invasion Convoy

Ra'esharn 'Covering Group'


Task Force 1 - the first target for Ra'esharn aircraft.


As the dawn of May 4, 66942 spread itself over the sunlit Laroc Sea, the Ra'esharn and Allied fleets sought each other out - the one to force a passage through to Port Fewersby for the invasion force; the other to keep that passage firmly closed.

It was the Ra'esharn 'Carrier Striking Force' that opened the ball. Scout aircraft having found to the south, heading westward, the Saabian Task Force 1, Rear Admiral Mazota ordered at once a powerful strike. All bomber aircraft from both fleet carriers - six squadrons - were ordered to obliterate the enemy group, especially the carrier. Six squadrons - eighteen 'flights' - 72 aircraft, let's call it.
The Carrier Striking Force launches its first air attack


Before continuing, a couple of issues have already cropped up.

(1) Playing this thing solo, I felt the want of a 'proximate' cause of sending out an air attack. How  was the enemy force discovered? The thought occurs that the respective fleets would send out scouting aircraft to look for them. It seems reasonable to subject this to a die roll. Call it a 50-50 proposition, although the probability of discovering anything of interest might depend on how far away is the object of the search. 

(2) This brings up the matter of weather. Now, early on during the course of the Coral Sea operations, enemy fleets were hard to find  anyway, but cloud cover made reconnaissance even more problematic. I thought of determining cloud cover for each quarter of the battle theatre by a die roll - a 'six' on a D6, say. This one I also let go.

(3) A third issue I will bring up here, but discuss more fully later on: how many moves between sorties by a given squadron? 
Task Force One under air attack!

As there was no shooting in the first Turn, we went straight into the moves, beginning with the launching of the air attack. I found it convenient to take the aircraft about halfway to their objectives, keeping them out of the way of moving the ships subsequently. After the moves, we move on to Turn Two - and the aircraft are moved up to their targets.

The bomber squadrons divided their attack as follows: one squadron against the cruiser SNS Gullicambe (to larboard of the carrier), three against the carrier SNS Bahamut, and two against the cruiser SNS Cockatrice. The Saabians sent up their fighter squadron - 3 flights or 12 aircraft. As the enemy priority target was obviously the carrier, the fighter took on one of the squadrons attacking it. 


Now, the fighter and the bomber squadron automatically cancel each other out, but there is still the combat to be resolved. 
Air-air combat:
  • Fighter dice rolls: 3,3,6 => bomber FP (a third of the bomber strength) shot down
  • Bomber dice rolls : 1,4,5 => no effect.
In effect the fighter squadron drives off one enemy squadron, shooting down a third of their strength.

Anti-aircraft fire:

  • Gullicambe vs bomber Sqn: 2,4,5,6 => 1 bomber FP shot down
  • 2 destroyer plus carrier vs 2 bomber squadrons: 4,4/5,6/1,2,3,5 => 1 bomber FP shot down
  • Cockatrice vs 2 bomber squadrons: 3,5,6,6 => 2 bomber FPs shot down.
Just 11 FP remain available for attack, 5FP having been shot down and 2FP driven off.

Bombing attacks:
  • 2FP attack Gullicambe: 1,5 => no hits
  • 5FP attack Bahomet: 1,2,2,2,4 => no hits
  • 4FP attack Cockatrice: 2,3,5,6 => 1 hit - the 5 added to the 6 => 11FP damage!
So, for the cost of twenty out of 72 aircraft (5 out of 18 Flying Points) the Ra'esharn has effectively knocked a Saabian cruiser out of the action. Speed reduced and a primary gun turret and some secondaries knocked out, SNS Cockatrice has to crawl southwards from the battleground and hope to make it to port somewhere in Terra Australis.
Task Force One launches a retaliatory strike


Task Force One had to respond. The fighters were of course unavailable, on account of their recent air action. So, in their turn, the three bomber squadrons - 36 aircraft, say - flew off to the north. It was a powerful force that awaited them.
In the distance, what TF1's aircraft will be facing...


For their part, Task Force Seven were at the time also launching an air attack. The objective: the troop and aircraft carriers of the Ra'esharn Invasion Force.
TF7's air strike being launched. This one is going after
 a different objective - this one with a fighter escort.

To be continued: More air strikes...

Monday, October 28, 2024

Battle of Laroc Sea - a BIG Playtest

Possibly the most interesting of the naval battles of the Pacific during World War Two, was the inconclusive action in the Coral Sea that induced ('forced' seems too strong a word; 'persuaded' perhaps more apt) the Japanese command to call off their attempted seaborne landing at Port Moresby, New Guinea. Methought something along those lines, but at a smaller scale, would make a fine, and fairly comprehensive playtest of the Gridded Naval War Games Rule set that I have been assembling. Tell you what: it was a lot of fun!


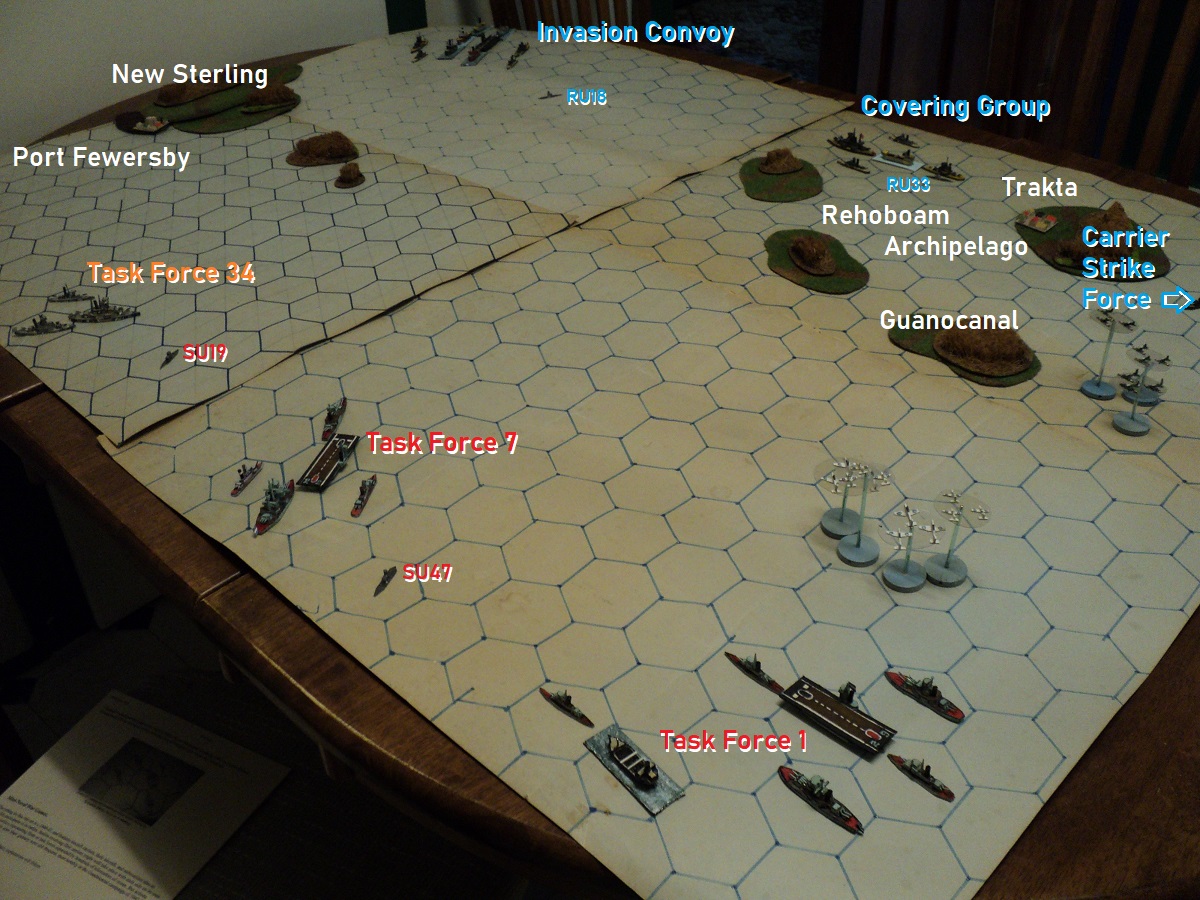
Having neglected to take a picture of the original set up - hiatus valde deflendus - I show the above, with the action well along, but yet to reach the crisis. (Edit: turns out I did take a pre-game picture, but it was in a different folder. See below).

The playing area comprises 4 sheet of thin card stock upon which the grid array had been drawn. It turns out I have as many more of these (two of which two make up a Bloodbowl field I had completely forgotten about!). This action will be repeated on a 3x2 arrangement, instead of this 2x2). The islands are terrain pieces for land war games, and the towns (Trakta and Port Fewersby) a couple of those tinytowns that this project seemed to call for. 

This turned out to be a very complicated game, although it did not take very long to play. It did, however bring up a vexed question of spatial and time scales. At the moment, I've settled upon each 5cm hex representing a linear distance of 3 nautical miles/ c.5400 yards/ c.5000 metres (roughly). This would suggest to me a time scale of a little over 3 hours per Game Turn. Call it 3 hours; 4 game turns representing the hours of daylight. The question of night moves arises of course. For this game I just carried on through as though the sun had slowed down. I didn't count, but I think the action went for 7 or 8 Game Turns, which would represent a day and a night (24 hours) or maybe two days of daylight hours.

Situation, morning 4 May, 66942


Background Narrative:

As part of their programme of imperial expansion, Ra'easharn had invaded the north coast of New Sterling with the view to advancing across the island and down the peninsula to capture the Port Fewersby. The operation went badly. The local defenders, poorly equipped though they were, slowed the enemy advance, finally bringing it to a halt well west of their objective. To break the deadlock, Ra'esharn High Command resolved upon sending a landing force - a brigade group loaded into 5 merchant vessels - to seize the vital seaport. In view of the risks involved in making the passage of the Lindisfarne Strait, this expedition was to be escorted by a small group that included a light carrier,  and supported by a 'Covering Group' built around the battleship RNS Barbatos, and a 'Striking Force' that included two fleet carriers.

The whole organisation comprised: 

Raesharn Expeditionary Force:

Invasion Convoy: Rear Admiral Honduki
  • Light Carrier RNS Angra Mainyu (12FP) (Flotation Points)
    to include 1 Fighter and 2 Bomber squadrons @3FP (Flying Points)
  • Cruiser RNS Charun 12FP
  • Cruiser RNS Charonzon 12FP
  • 2 Destroyers: R21, R22 @ 6FP
  • 5 Transports: Chubby Maru, Ramjam, Shagnasti, Mangla, Barracuda @6FP                                    carrying Brigade Group of 3000 men
The Invasion Convoy
Covering Group: Rear Admiral Suzumaha
  • Battleship RNS Barbatos 24FP
  • Cruiser RNS Chemosh 12FP
  • 2 Destroyers: R23, R24 @ 6FP
  • Oiler Tanker Trampas 6FP
Striking Force: Admiral Mazota
  • Battleship RNS Bushyasta 24FP
  • Fleet Carrier RNS Achlys 12F ( 1 Sqn fighters, 3 Sqn Bombers @ 3FP)
  • Fleet Carrier RNS Azi Dahak 12FP (1 Sqn fighters, 3 Sqn Bombers @3FP)
  • Cruiser RNS Cimijes 12FP 
  • 2 Destroyers: R25, R26 @6FP
The Carrier Strike Force, and in the distance west of 
Trakta, the Covering Group.

Ra'esharn also had two submarines, patrolling the area: 
RU18 roughly half way along a line between Trakta and Port Fewersby,
RU23 somewhere within the area of the Rehoboam Archipelago.

Working overtime, with a partially cracking of the Ra'esharn naval 'Code Mauve', the Saabian intelligence services knew something was afoot in the area of the Laroc Sea. Whether it was further landings in the Rehoboam Archipelago, or perhaps something to do with the impasse on New Sterling, they could not be sure. Their anxieties driven by the amount of radio traffic concerned the Allied Area Commander sufficiently to order the gathering of forces to oppose anything the enemy might develop. This opposition comprised three Task Forces: two, TF1 and TF7 supplied by the Saabia Navy; and TF34 by Kiivar. 

Allied Regional Defence Force:

Saabia Task Force 1: Rear Admiral Fitcher
  • Fleet carrier SNS Bahamut 12FP (1 Sqn fighters, 3 Sqn Bombers @ 3FP)
  • Cruiser SNS Cockatrice 12FP 
  • Cruiser SNS Gullinkambie 12FP
  • 2 Destroyers: S11, S12 @ 6FP
Saabia Oiling Group:
  • Oiler Oumanaka 6FP
  • Destroyer: S20
Saabia Task Force 7: Rear Admiral Flett (overall command)
  • Battleship SNS Hakawai 24FP
  • Fleet Carrier SNS Bake-kujira 12FP (1 Sqn fighters, 3 Sqn Bombers @ 3FP)
  • Cruiser SNS Sarimanok 12FP
  • 2 Destroyers: S77, S78 @ 6FP
Kiivar Task Force 34: Rear Admiral Craze
  • Battleship KNS Harrier 24FP
  • Cruiser KNS Heirax 12FP
  • Destroyer K43
Kiivar Task Force 34.

There were also two submarines patrolling well south of the Rehoboam Islands, SU19 somewhere southwest of the westernmost Rehoboam island; SU47 due south of Guanocanal.

One issue that cropped up in this action was that at 18FP, the carriers would prove a little bit to resistant to bombing attacks. So I brought them back to my first thought: 12FP only. 

The Coral Sea battle that this action is supposed to resemble involved no battleships. However, I thought it would be interesting to include two on either side. This isn't really a 'refight' of Coral Sea - or even a 'might have been'. On the other hand the oilers on both sides really served no function for this game other than simply to be there. But it does raise the question how they might functionally be incorporated into the set of rules.

During the course of the action a number of issues cropped up that this action was intended to discover. They will be treated as they arise in the narrative. The main one was recording damage, and expenditure of certain types of weapons, to wit, torpedoes and depth charges (yes, a submarine was sunk during the course of this battle!). I have worked out a system better than the pen strokes I used on this occasion.

An issue also arose concerning air attacks on shipping - especially when intercepted by fighters. At present, I have the defending fighters taking on ONE attacking squadron, and neutralising it. They still fight and take losses, but even if the attackers take no loss (which happened at least once) they have been forced away from their objective. The remainder carry on. To make their attacks, they have to survive the flak.

Flak fires once only. However, if 2 squadrons are attacking, and the defence scores 2 hits, the loss may be shared between the 2 squadrons. Bombers that survive the flak (not the fighter intercept) carry out their bombing attacks. Late in the action two identical air attacks were carried out in the same Game Turn against two carriers. The results were almost as completely disparate as they could be!

I said this was a pretty complicated exercise. There were at least seven air attacks I can think of (which raised the issue of turnaround time for second sorties), but there was some surface action as well. The latter probably led to heavier losses than the air attacks did ... possibly.  At any rate, there was plenty of incident.

I'll leave the story of the battle for next time...
To be continued...