Monday, January 9, 2023

Kavkaz Campaign - a Busy Week.

Turcowaz attack at Zugdidi - afternoon, June 11, 1875


Kavkaz Campaign - developments from 7-15 June

Campaign moves:

7 June: J  
  • Coastal Column detaches 1st (Grenadier) Division to reinforce Kavkaz Column (2 hex move);
  • Troop convoy travels down the sea coast (2 hex move).
8 June: 4   
  • Kavkaz Column carries out moderately effective recon at Gakhomela - 2 days' march SE of       Zugdidi (Recce DR = 5);
  • Troop convoy continues down the sea coast (1 hex).
9 June: 6  
  • Troop convoy continues down sea coast (1 hex);
  • No action by Zugdidi garrison (Coastal Column).
10 June: 5 
  • Trebizond Command carries out reconnaissance of Zugdidi. Discovers indications that the garrison has been weakened by detachments (Recce DR = 4);
  • TNS Hamidiye patrols northeastward towards Inguri River mouth (1 hex).
11 June: 3  
  • Trebizond command attacks: Second Battle of  Zugdidi;
  • TNS Hamidiye patrols NE towards Inguri River mouth (1 hex)
12 June: 9   
  • Izumrud-Zeleniya Coastal Command retires one day's march up coast road to Sakhumi;
  • Troop convoy continues SE (1 hex).
13 June: 7   
  • Kars Command carries out recce of Zeleniyan position at Gakhomela (Recce DR =  4)             and discovers that enemy has been reinforced;
  • TNS Hamidiye continues NE (1 hex).
14 June:  4   
  • Coastal Column halts its retreat;
  • Convoy alters course to approach shore at the point where the coast road veers inland (1 hex move).
15 June:  5   
  • Kavkaz Command strikes the Turcowaz column led by Abdul Ameer: Battle of                      Gakhomela; 

  • Convoy prepares to land its troops upon the shore.  No sign yet of any Turcowaz naval activity.
(16 June: JOKER drawn)

Strategic situation up to 15 June.

Since my deck does not distinguish the Joker by red or black (it being a Canasta deck - actually Samba, three deck Canasta), I diced for which side was affected by a Special event (see Portable Colonial Wargames - p109 in my hardback copy).  Odds, Turcowaz; evens, Izumrud-Zeleniya.  Rolled a 5, Turcowaz affected.  Then rolled a '1'.

Disaster!  'The side may not move any of its formations for four turns of the cards'. The way this is designed, it would have the effect of the enemy rolling four black cards in a row. For some reason, the Turcowaz Forces have stalled. A logistical breakdown perhaps? I can foreshadow right now that this will have a serious impact upon the whole campaign.

Drawing the Joker also heralds a reshuffling of the card deck.

To be continued: Second Battle of Zugdidi.

Saturday, January 7, 2023

Kavkaz Campaign - Surprise Attack (2)


Action at the West ford:
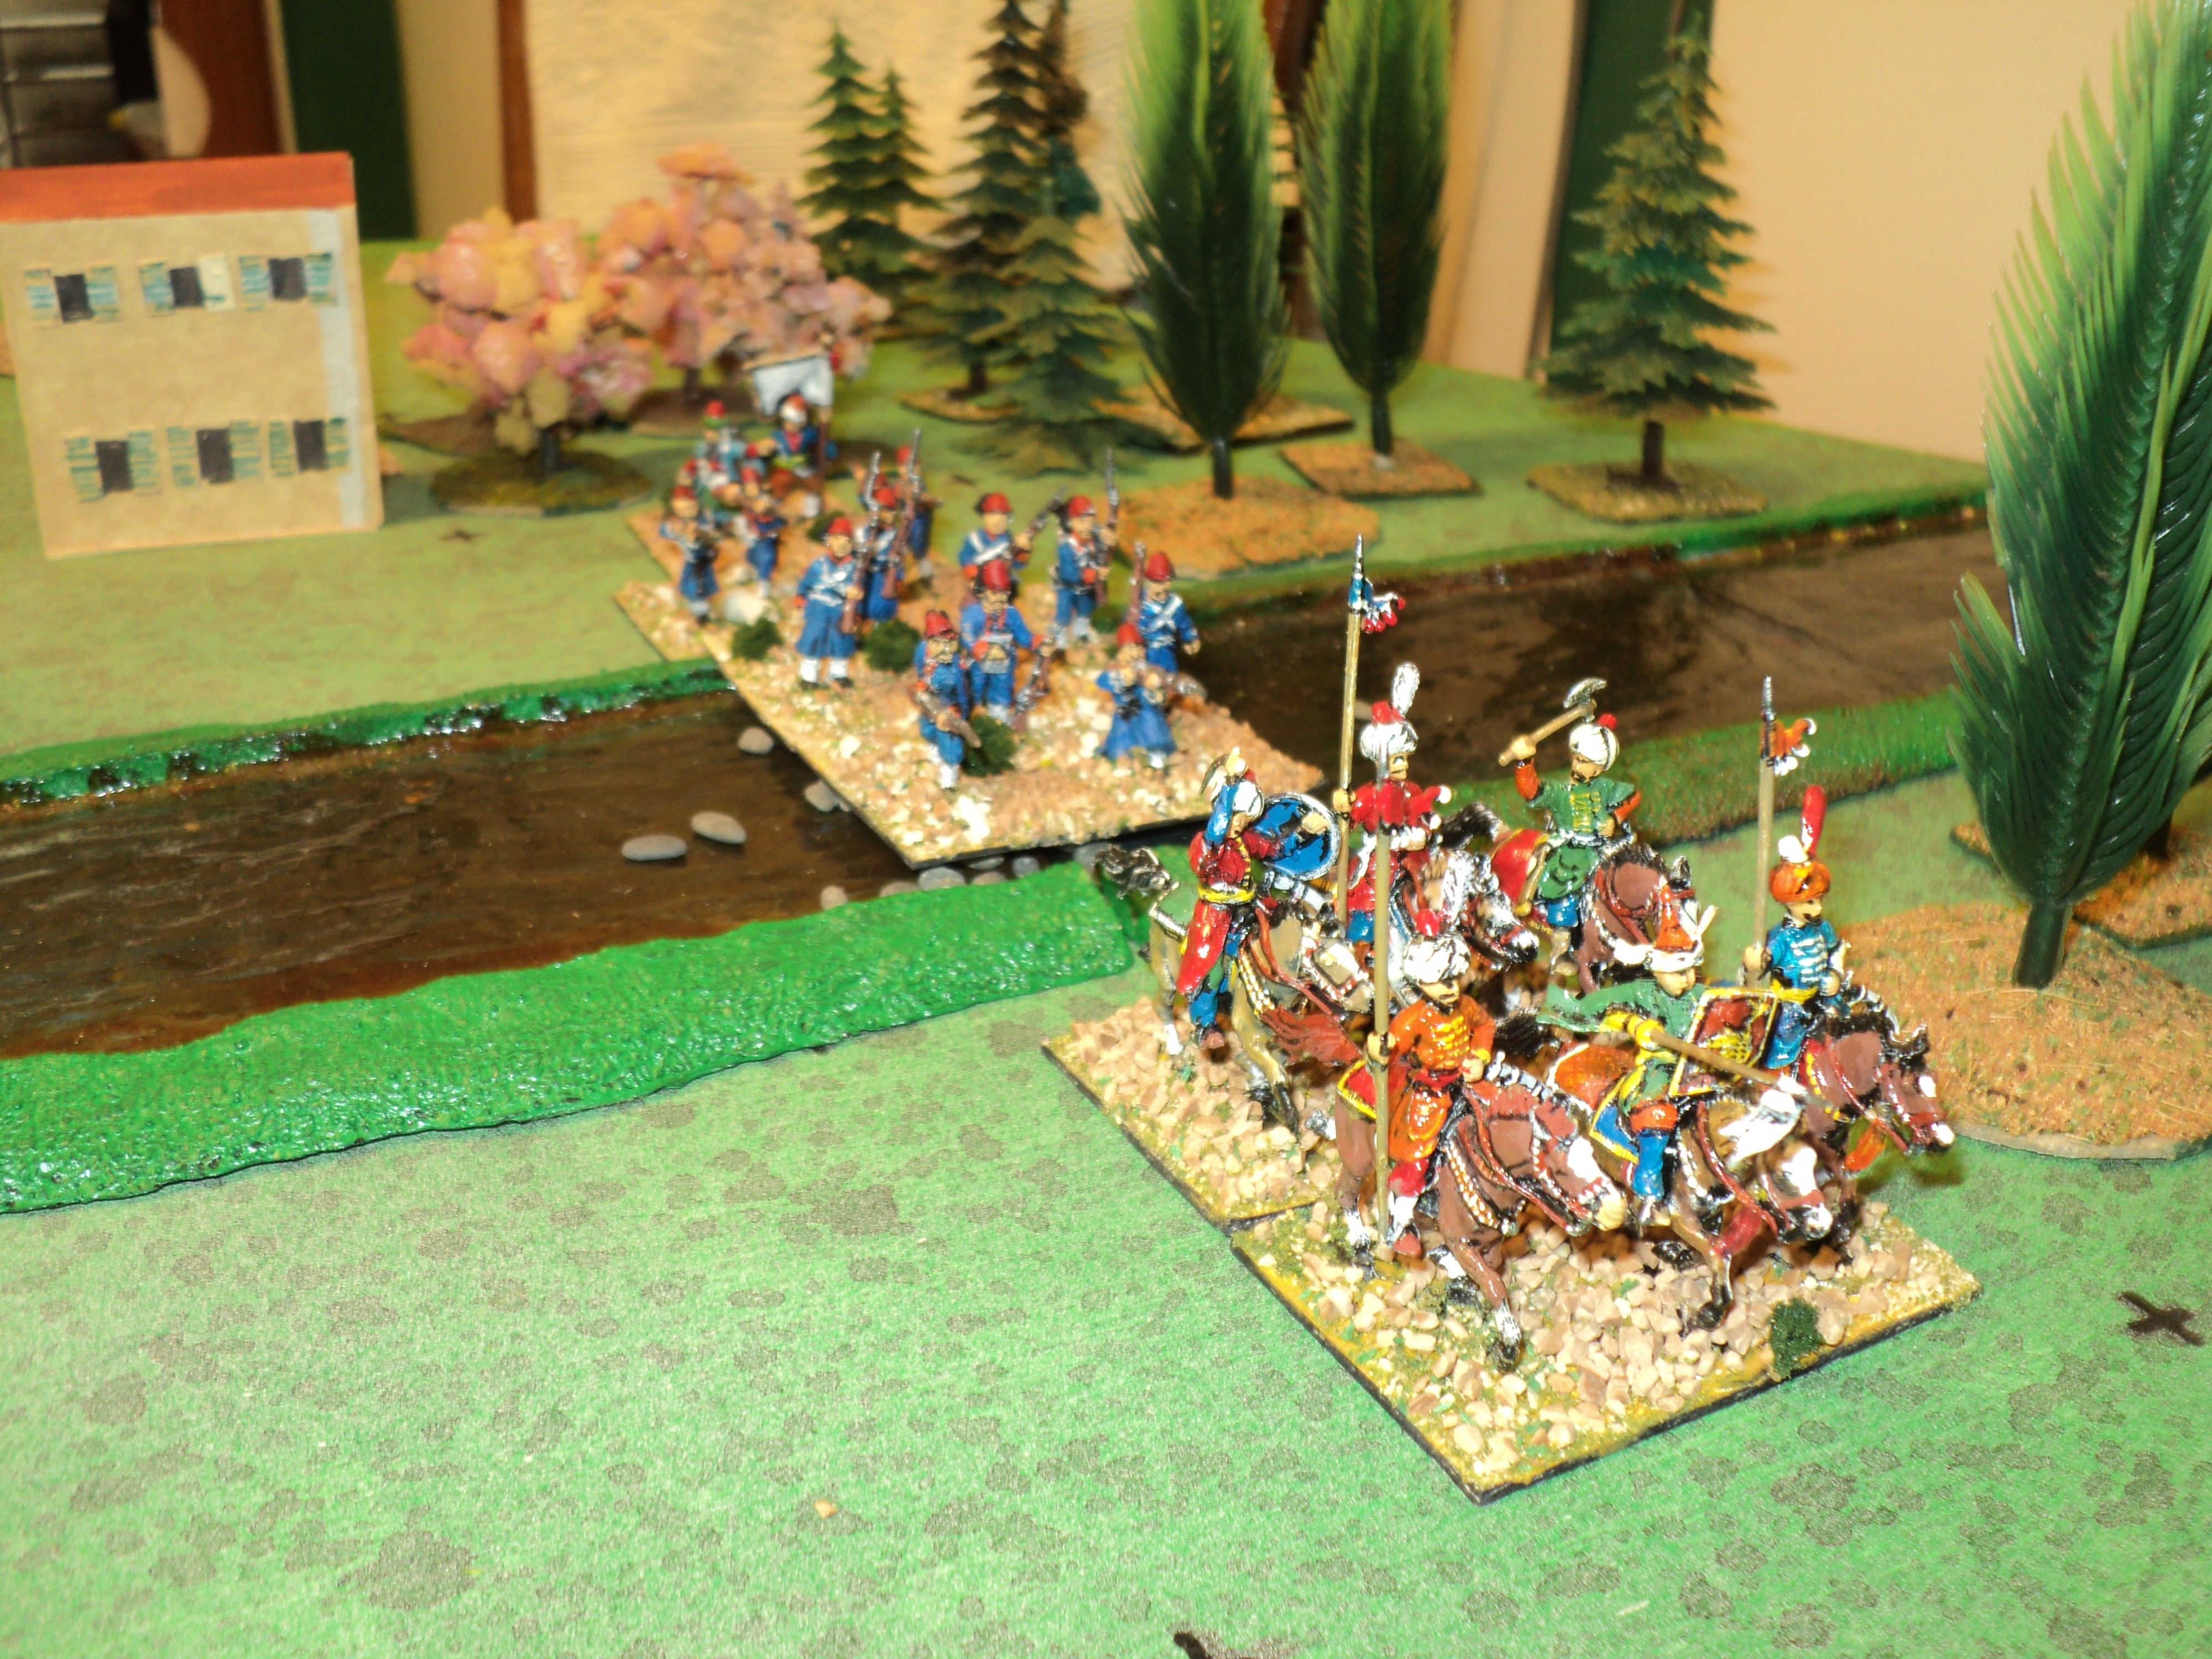
As the first sliver of sunlight gleamed over the distant East Kavkaz mountains, the Tucowaz cavalry had already forded the stream close by the farm hamlet, and the head of the 1st Division almost across.  At that moment, the artillery of Izumrud-Zeleniya opened fire with considerable effect upon the leading horse.  So destructive were those opening salvos, that fully two-thirds of the 1st Turcowaz Cavalry's strength was laid low or scattered. 


Nothing daunted, the gallant horsemen pressed on towards the bend in the road at the right flank of the Zeleniyan line. The immediately available Zeleniyan horse and foot at once converged upon the column, harassed by Turcowaz gunfire from across the river.


To begin with, such pressure as the defenders were able to mount was insufficient to prevent the Turcowaz expanding their bridgeheadalong the riverbank towards the town. For a brief period, 1st Zeleniyan Cavalry had to battle the assailants alone, even overthrowing the remnants of the lead enemy cavalry unit. Pushing out from the orchard posting towards the flank of the remaining enemy horse, 1st Grenadiers came under a galling flanking fire from the Turcowaz field artillery, and very quickly lost half their strength.
The Turcowaz column was going to be no pushover...

... especially as the build up of their Zeleniyan adversaries was going to require a considerable amount of time.

Zeleniyan efforts to contain the Turcowaz bridgehead along the riverbank were faced by the enemy gunfire, and the Turcowaz gunners were as good as their counterparts on the other side of river. The ferocity of the fighting might be measured by the heavy attrition of strength on both sides.

As the Zeleniyan reserves gradually entered the fray, it was becoming for the Turcowaz a fight for survival rather than an effort to storm the Zeleniyan lines.  Having eventually contained and boxed in the enemy, the Zeleniyans were now bent upon their annihilation.

They were not having it all their own way, however. Having reached the riverbank, 3rd Grenadiers tried to roll up the beachhead's inner flank, but were themselves chased back into the orchard close by the hill occupied by the sailors' artillery. From the cover of the trees, and with the aid of 4th Hussars, the Zeleniyans attempted a counter-attack, but were thrown back beyond the orchard and under the naval guns. Fortunately just at that moment there had been a pause in the fighting at the bridge, into which 3rd Grenadiers might have become entangled.


Such setbacks served to exasperate rather than to depress. Back came the Grenadiers. The Turcowaz column was already looking tired - some 9 strength points down from their original 21. The Division commander, Ali Khat, having taken a rifle bullet to the leg, was still able to exercise command of his beleaguered force.

For a brief moment, 3rd Cavalry broke through to the riverbank, cutting off and isolating 2nd Turcowaz Infantry close by the orchard. Having taken heavy losses making it so far, 3rd Cavalry's attempts to exploit on were dashed against 3rd Turcowaz Infantry's defence, under the eye of Ali Khat himself. 2nd Tucowaz was able then to fall back upon their comrades' position and restore the integrity of the bridgehead.
Even then, the Turcowaz were being inexorably driven back towards the ford.  
The badly depleted 2nd Infantry found themselves driven in into the flank of 3rd Infantry's line, facing a whole fresh Zeleniyan force - 4th Grenadiers. In the fierce fighting that ensued, the resistance of 2nd Turcowaz finally collapsed...
... though 4th Grenadiers were to know they had been in a fight!  [aside: the dice in the pictures tell the story; both sides 'hit' (I'm using the PW combat convention rather than the Colonial PW).  The Turcowaz lose their last SP (Ali Khat unhurt), and the 4th Grenadiers take the hit rather than the retreat.]
By this time very little remained as formed units of the column that had crossed the river at dawn. The horse had all scattered, and almost half the foot as well, though 1st Infantry was doing well enough holding up heavy cavalry attacks along the road. With no chance of achieving more on this front, events elsewhere indicated a withdrawal.
The Turcowaz were not, however, about to go without handing out a few licks.  In almost the final action of the day, the supporting artillery dropped a devastating gunfire into the flank of 4th Zeleniyan Grenadiers on the opposite riverbank: 2 salvos, 2 hits, 2 'kills'.  There, on this front, the action ended.

Action at the Middle Bridge:


Although the 2nd Division column got off the a slightly slower start than the column at the ford, it was really the first into close action.  The supporting Gardner guns had actually reached the bank at the river bend before the infantry column arrived at the bridge.  But this meant that the 4th Infantry could at once, with MG support, attempt to force the defile of the bridge.  

Actually there was a ford alongside that would have permitted the following 5th Infantry to make an immediate attempt upon the town as well, but for some reason, such an effort was not forthcoming. I have absolutely no idea why - I'm talking solo play here; talk about 'Burnside's Bridge! Possibly General Ispesh Ali wished to keep the line clear for the artillery.
The Middle Bridge (so-called) was defended locally by the Naval Artillery Detachment (popularly 'the NADS' by anyone prepared to pick a tavern fight with them). The Gardner guns, from the woods though which the main highway passed, covered the bridge approaches, with the naval guns fortified on the hill to their right. To their left was the southernmost quarter of the town, which provided cover for 9th Infantry of 3rd Zeleniya Division.

The early attack by 4th Turcowaz Infantry was met by a hot fire that laid 50% of the regiment low before they even made it to close combat. Once there, the close quarter fighting appalled both sides sufficiently to cause both to fall back - the Turcowaz across the bridge to make way for 5th Infantry; the sailors out of the woods.  


Meanwhile, 9th Zeleniya had also found the climate at the south end of town rather warm for their liking, and had pulled back. The Turcowaz had won their bridgehead.


The Zeleniyan 3rd Division Commander, General-Major Ivan Ivanitch Ivarilibaditch, quickly organised the counter-attack. Sliding 9th Regiment to the right to confront the Turcowaz in the woods, he led his reserve, 10th Regiment, onto the 9th's left flank, whereat they poured their rifle fire into the trees. 
Very soon, Ivarilibaditch joined the 9th and led them into a decisive counter-attack that at once recovered the wooded stretch of road, and drove the enemy out into the open.  This achieved, the whole enemy column, reduced by about 50% of their strength, faded back across the river, and declined to try a fresh attack.  It seems the battle was over on this front as well.  


But... what of the attack by 3rd Division?


The picturesque riverside at Zugdidi. the stones indicate 
the forded stretches (decided by die rolls).

Action at the East Bridge:


The tale here is soon told. In many respects, 3rd Turcowaz Division had the easier objective, as not only was there a bridge at the east end of the town, but the reaches of the river as it rattled by the town were almost everywhere fordable. There was some prospect of support from 1st Artillery Regiment, their main priority was nearer their front.


The fact remained that, having farther to go to reach the enemy, 3rd Division got off to a very slow start.  The battles in the other sectors were fairly under way before the leading elements of 3rd Division began to come under scattered fire from the town's garrison.   


The defence of the bridge itself had been entrusted to 12th Zeleniya, whilst the 11th was so placed as to cover by enfilading rifle fire the fords by which the enemy might reach the south and east end of town.  
Led by General Ibrahim Bazbug, 7th Infantry shrugged off its early losses and stormed across the bridge. The close quarter fighting was going on without result, and the rest of the Division poised to force a crossing, when the order arrived: break off the action.  
At the Middle Bridge, 2nd Division had essayed just one more assault. Overrunning the woods and routing 9th Zeleniya, 5th and 6th Turcowaz turned upon the 10th, which unit had reoccupied the southern end of the town. Attacked front and flank, the gallant Zeleniyans threw off their assailants, and the actioned drew to a close.

The final actions had finally brought the Turcowaz army to its exhaustion point. They had no more attack left in them. Perhaps surprisingly, the Izumrud-Zeleniyan army was barely in better condition, having lost 22SP (slightly less that their exhaustion point) as against 25SP by the Turcowaz (slightly over their E.P.).  

These were very heavy losses to both sides, in numbers, about 6,250 Turcowaz and 5,500 Izumrud-Zeleniya. It was an undoubted repulse by the latter, but no more than that (the Turcowaz get half their lost SP back, instead of just one third). But though something of a tactical victory, it had come at a very high cost. Time would tell just how high.  

To be continued:
1. Further campaign moves - and where is the Izumrud-Zelenian fleet?
2. Two more actions to come: a 'Baylen' moment?


Monday, January 2, 2023

Kavkaz Campaign - Explanation of Map Moves.

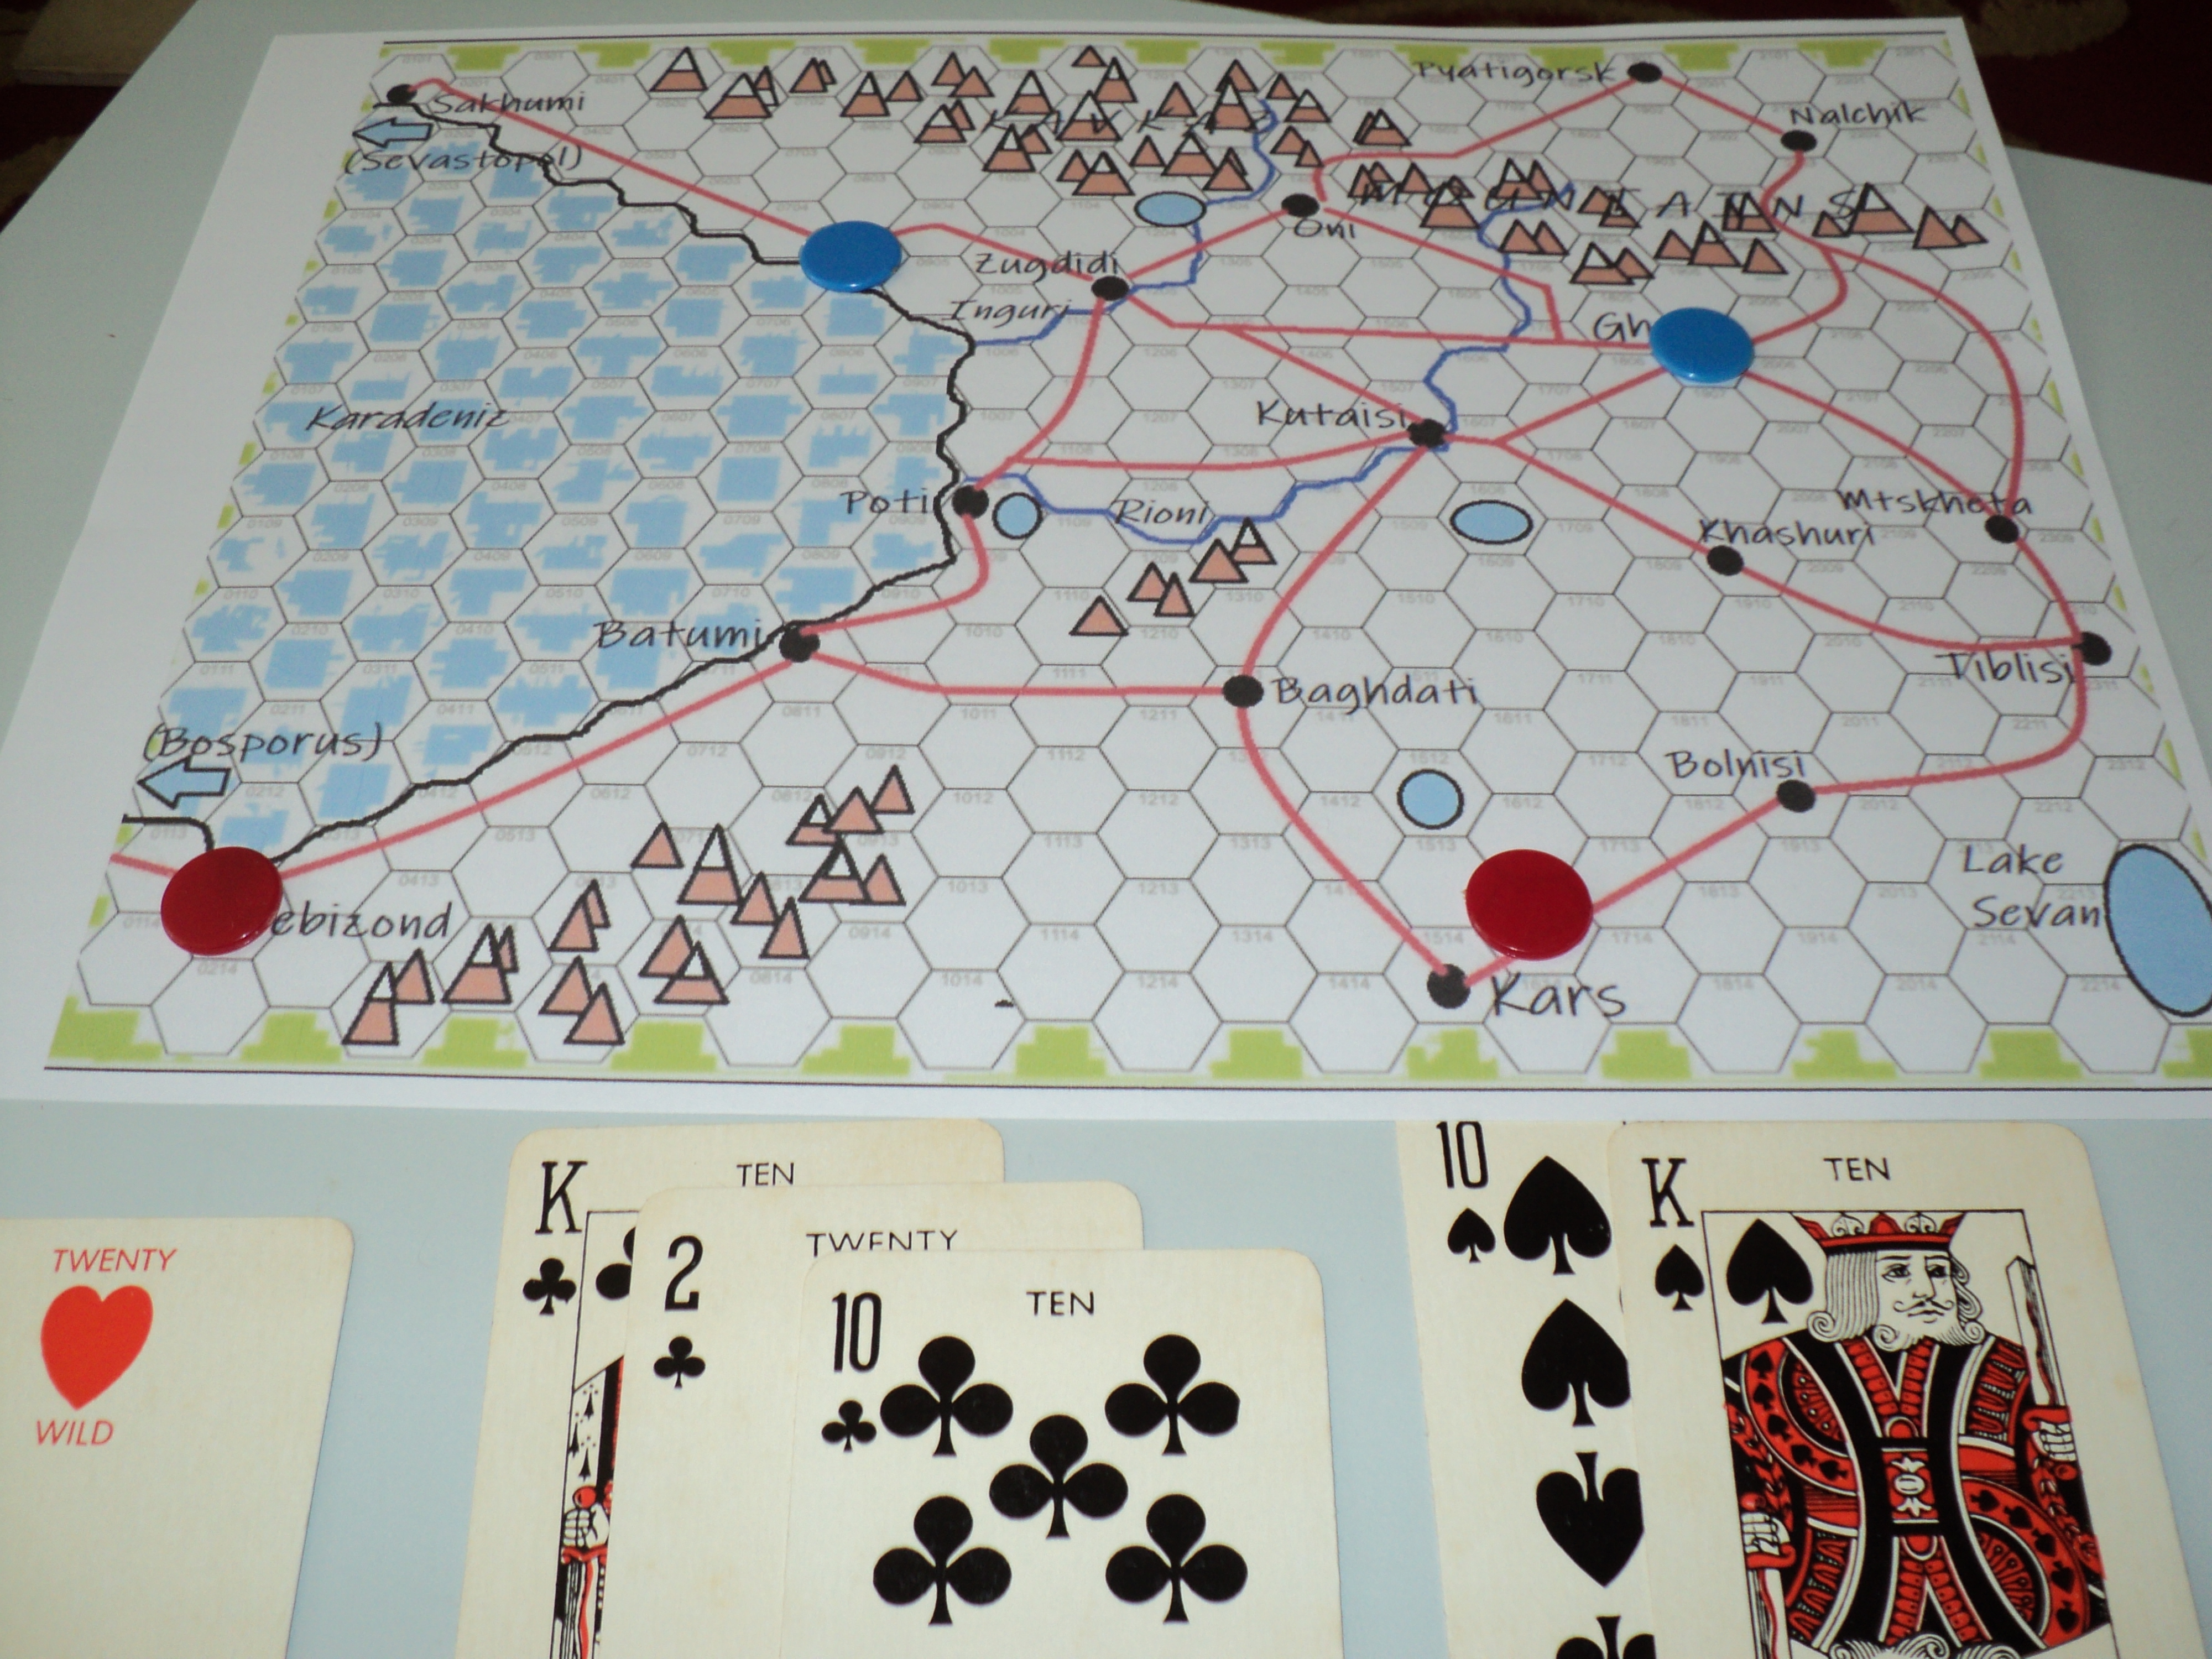
 About a fortnight back, I was asked to explain how I was using a card system for generating the campaign moves. To begin with I'll refer you to the second article - Opening Moves - for this campaign.

From a well-shuffled deck, the cards are drawn one at a time, each allowing one side or the other to perform some action - usually a move, but perhaps a reconnaissance or to fight a battle. Now, 'per spec' one side is given the BLACK cards, the other the RED.  However, for this campaign I elected to subdivide further: 

CLUB: Izumrud-Zeleniya - Coastal Column
SPADE: Izumrud-Zeleniya - Kavkaz (Inland) Column
HEART: Turcowaz - Trebizond Command
DIAMOND: Turcowaz - Kars Command

I started out by including the naval elements within the respective Coastal Column and Trebizond commands.  But as sea travel is apt to be speedier than the land, I allowed them an automatic activation when the colour and denomination turned up, irrespective of the specific suit, and irrespective of whether or not the land formation also was activated.  It seemed to me the naval units would get about a deal faster, without having to mess about with added move distances.  Aces were also a special case, as depending on colour,  both commands and naval elements could move.

I also developed a practice for solo campaigns (such as this) of drawing cards in a string until a suit gets repeated, after an interval.  Strings of a single suit are continued.  When a repetition appears, it is returned to the top of the unused card deck where it will be drawn first next time. 

The first campaign draw went 
2, K♣, 2♣, 10♣, 10♠, K♠, K


The K was returned to the main deck. Note that otherwise the card draws are without replacement.
Note too that the strings of clubs and spades are continued, and it was not until the reappearance of a 
that the draw was stopped and the map moves made. Instead, a diamond would have continued the draw, but another club would have ended it.
 

The Kkicks off the second campaign turn:
K♥, K♦, Q♦, 3♣, 3♠, 2 

The 
Qdidn't trigger the end of this draw; the 2 did.

Now, the cards themselves permit certain actions. These are taken from Bob Cordery's Portable Colonial Wargames book:

A numbered card allowed one unit to move one space.

A court card allowed movement of more than one space (the number depends upon the card's rank), which might be carried out by one formation, or be shared among more than one.  So far in this campaign the formations have tended to stay in one piece, but one is about to be split in two.  The consequences I will discuss in due course.


An Ace permitted all formations to move one space.


Instead of moving, a formation could instead 
- Carry out a reconnaissance (mandatory if one wanted to bring on a battle)
- Bring on a battle (after a reconnaissance has been carried out)

Finally, each card drawn represents one day.


Now, this being a solo campaign, one might enquire into the value of reconnaissance, since what may be discovered is already known to the soloist player. I use it to confer certain advantages upon one side or the other.  The recon is by die roll, and is directed against an enemy one is considering attacking.

1 - Attack regardless.  The action happens instead of the recon.  For solo play, the defence gets to set up some kind of ambush.
2 - Ineffective recon.  No information obtained.  Formation stays where it is pending an improved recon.  Before this late battle at Zugdidi, the Izumrud-Zelenian recon was 'very poor' in this way, and that justified my deciding that there was a river ford they didn't find.
3 - Mediocre recon - finds how many units, but not in what strength.  I'd probably use this to confer some similar disadvantage to the side reconnoitering.
4-5 - Reasonably informative recon - you know what strength the enemy has, but not how distributed among its units. Before the late battle the Turcowaz recom rolled a 5, which was good enough to my mind to know about the ford the enemy overlooked.  But it was not so good as to pull off a complete surprise.
6 - Very good recon: you know what units the enemy has and in what strength.  For solo play, I would use this roll to pull off a real surprise attack.  This would have had the Turcowaz columns much further advanced at dawn of 6 June, and possibly the off table Zeleniyan units being harder to activate.

Much of this, as you might appreciate, is pretty ad hoc.  But it makes the thing interesting!


Kavkaz Campaign - Surprise Attack!

The Attack Begins...

 
At first light of 6 June 1875, the Turcowaz columns were already on the march to force the river crossings at Zugdidi. The commander was under no illusions about the difficulty of this proceeding, but the rewards of success seemed to justify the risk of a repulse.


His army he divided into three columns. On the right, 3rd Division was to march up the side road to the bridge crossings and fords east of the town. In the centre, supported by the 1st Artillery Regiment and the machine gun company, 2nd Division was to storm the main highway river bridge and the woods and the town beyond. 

Much reliance was attached to the operations of the third column. A ford, unknown to the Izumrud-Zeleniyans, had been discovered a considerable distance west of the town.  Led by the cavalry brigade, and supported by the 2nd Artillery Regiment, 1st Division was ordered to cross the river and attack the town from the west. 


For their part the Coastal Column of Izumrud-Zeleniya had arranged its defences with care. Third Division occupied the town. Ninth Regiment stood at the southern end, the 11th covered the fords at the northern river bend, and the 12th covered the east bridge. Together with the Division Commander, General-Maior Gennady F. Stukhin, 10th Regiment stood at the north west quarter of the town.  

The sailors, meanwhile, covered the centre: the Gardner gunners in the woods, covering the river bridge, and the artillery within earthworks on the hill alongside the woods. West of the town, only pickets had been posted: 1st and 4th Cavalry Regiments, and 1st Grenadiers. The Army artillery commanded the approaches from the river. The rest of the Army was just rousing themselves in their camps when the lookouts send the alarm - the Turcowaz were across the river!

To determine how far the Turcowaz columns had reached, I rolled a die for each, plus a separate one for the machine-gun company.  The die roll score indicated how many squares in from the table edge the column had reached, except that a '1' counted the same as a '2'. 

The third (west) column rolled a six!  This placed the cavalry leading the column across the river already, when the dawn broke.  The central column (2nd Division) rolled a 4 which placed its lead elements astride the main highway almost up to the bridge.  The Gardner gunners were even ahead of them, forming a battery position at the bend of the river where it trended from south to west.  
But for some reason, the 3rd Division column had got off to a slow start - rolling a '2' - having progressed no further forward than the gun line of 1st Artillery. Having further to march to reach its first objective, this was not a fortunate augury for the success of 3rd Division.
Although the whole of the Izumrud-Zeleniyan 3rd Division and the naval artillery detachment, were alert and ready for action, the rest of the army column was caught at least partially by surprise. Only half the cavalry were deployed betimes, and just one Grenadier unit, but the guns at least were so placed as quickly to come into action.   

Now, I'll continue this battle narrative another time, but there are a couple of points I want to make here. You might find the occasional pic of artillery facing a corner of a grid-space, rather than, per rules, the side. Now, I like to have the option - even when using hexes. It goes to firing arcs, and doesn't affect the range (still measured through the sides of the grid-spaces). The other point is that the scattered stones on the river sections denote the fordable stretches. The river reach between the bridge and 1st Division's ford was entirely unfordable.

... Oh, yes - I almost forgot.  You will also notice two units in a single square.  One 'activation point' would allow them to move together, or, in the case of the Turcowaz artillery regiments, shoot together. However, if one activation permitted the pair of gun units to shoot, they had to be at the same target, even though a shooting die was rolled for each gun. One of the effects of the Turcowaz 'surprise' attack, was that the Izumrud-Zeleniyan units off table had to be activated separately to enter the action. As it turned out, this was not to be a problem...

Battle of Zugdidi - initial positions and Turcowaz 
assault plan.


You might recall that the Turcowaz had a good, but not outstanding reconnaissance, and the Izumrud-Zeleniya an altogether ineffective one. I wanted to translate this into some kind of advantage to the Turcowaz that fell short of a complete surprise. Hence the not quite well coordinated Turcowaz assault; and the Zeleniyans' incomplete state of readiness...

To be continued...  

Sunday, December 25, 2022

Yorktown Inventory

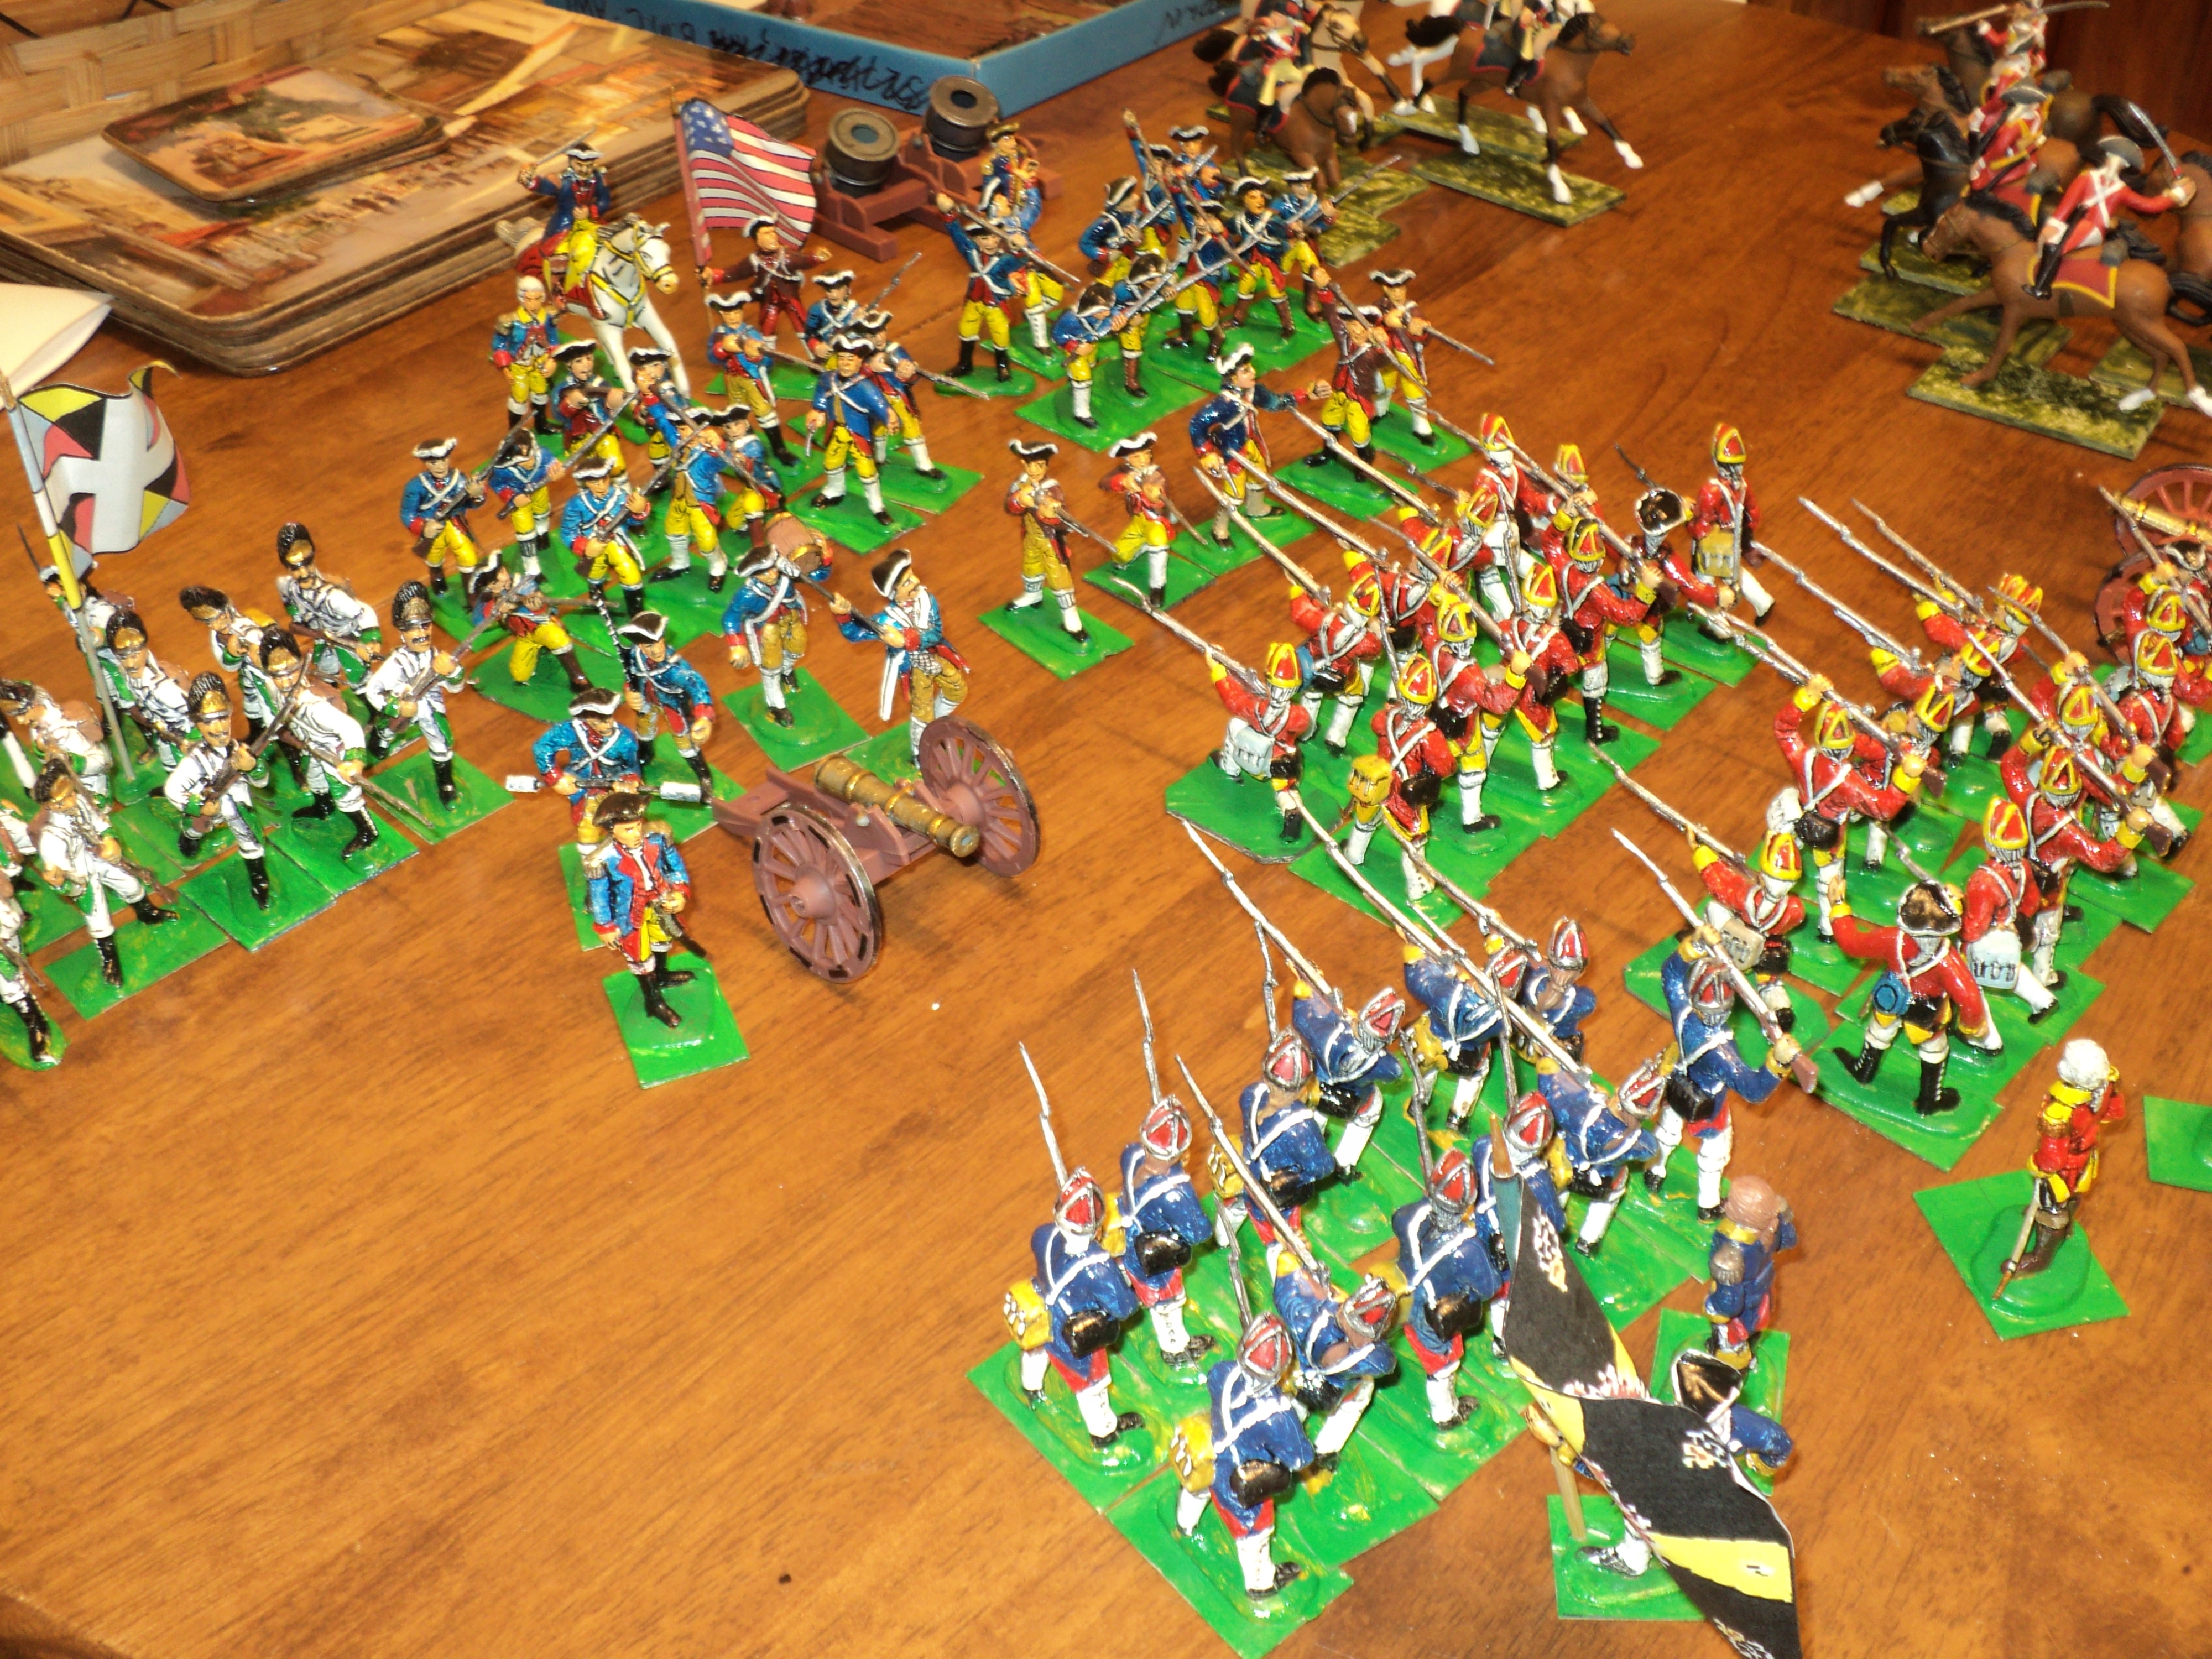
Having recently bought 10 horsemen to add to my small collection of BMC Yorktown figures, methought it time to take an inventory of just what I have. Here they are, laid out on my kitchen table.

I've placed them in 'units' of 10-12 foot figures, but have no real formal organisation except insofar as the larger contingents represent the major principals of the American War of Independence; the smaller the  allies (French) or paid mercenaries (German - I've painted them up as Brunswickers, and given them a Brunswick battle flag).  The battle flags are my own modifications on some of the figures, the pole made from slender skewers, and the flags printed off from some online source.  Before printing, I used Microsoft Paint to skew the image vertically, to give the flags better 'drape'.

Inventory:

1 Field Emplacement
2 Field cannon
2 Siege Mortars

USA:
5 Cavalry
5 Artillery (Officer and 4 gunners)
1 Mounted Field Officer
2 Officers on foot
1 Flag
3 NCOs
24 Musketeers (4 wearing brown jackets + NCO may represent a skirmishing group)
Total: 41 figures

French Allies:
1 Mounted Officer
1 Foot Officer
1 Flag
10 Musketeers
Total: 13 Figures

British Red Coats:
5 Cavalry
5 Artillery (Officer and 4 gunners)
1 Mounted Field Officer
2 Foot Officers
1 Flag
2 NCOs
22 Musketeers
Total: 38 figures

'Hessians' (actually Brunswickers):
1 Foot Officer
1 Flag
12 Musketeers
Total 14 figures.

Overall that gives me 54 on one side and 52 on the other. I have deliberately made the gunners fairly ambiguous, as I can think of scenarios in which the cannon will be on one side or the other, rather than evenly split.

This has been one of those little sidelines that have been sadly neglected for years, yet the limited numbers ought to make gaming with them quite convenient.