In this posting I don't propose the kind of narrative that accompanied my pictures of that battle, but rather let the pictures, aided by what amounts to captions, to tell the story. As the battlefield is rather a busy one, and the action itself fairly complicated - as encounter battles are wont to be - the captions will not be placed upon the pictures themselves, but as text betwixt and between the illustrations. You might observe that the Prussian troops have been 'colour coded' - the line regulars denoted by blue Strength Point dice markers, the landwehr by green. The dice markers for the French are simply what were conveniently to hand.
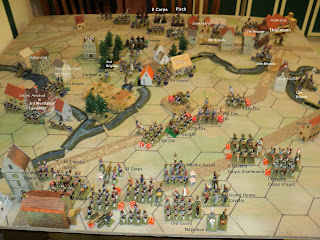

The first four photos - and the map - show the starting positions, the point of view circling eastwards from due south looking north, around to due north, looking south. A few issues emerged in this battle that wasn't very apparent in the earlier battles using the Portable Wargame Army Corps level rule set, and I am aware that they are due to the extensions I made for army-level games. These I will discuss in due course.
This game was played solo; the French opened the ball. I didn't use the 'arrow' chits, simply dicing for activation (did the orders go through?). And, wouldn't you know it: the starting gun went 'bang' ... and Vandamme's III Corps didn't budge. Three 'ones' in a row, right at the start of the battle. The cannons fired, but the three formations that could move - 3rd Cavalry and 8th and 11th Infantry Divisions - stayed right where they were. Infuriating! Uttering vitriolic utterances, General Vandamme rode to the head of 11th Division...
Now, for Army level action of this size, unit activation is predicated upon proximity to the respective Corps commanders. General Vandamme might have been better placed with one of his lead units - the 11th, say - which at least would have got that Division advancing without recourse to a die roll. Too bad: it was not a good augury to the battle as ensued.
That activation system had its effects later on, too, when Count Lobau's VI Corps moved to its right in the direction of Boignee and Balatre, there to lend its weight to the efforts of Pajol's and Exelmans's Cavalry to force the river crossing at the latter village. Traffic problems ensued when the Guard Heavy Cavalry stalled, blocking the march of at least one of Lobau's Divisions. Later, they were to run into one of Exelmans's dragoon brigades, at a further cost in time. However, the unengaged Prussian II Corps were to encounter their own checks and hold-ups as orders failed form time to time to get through.
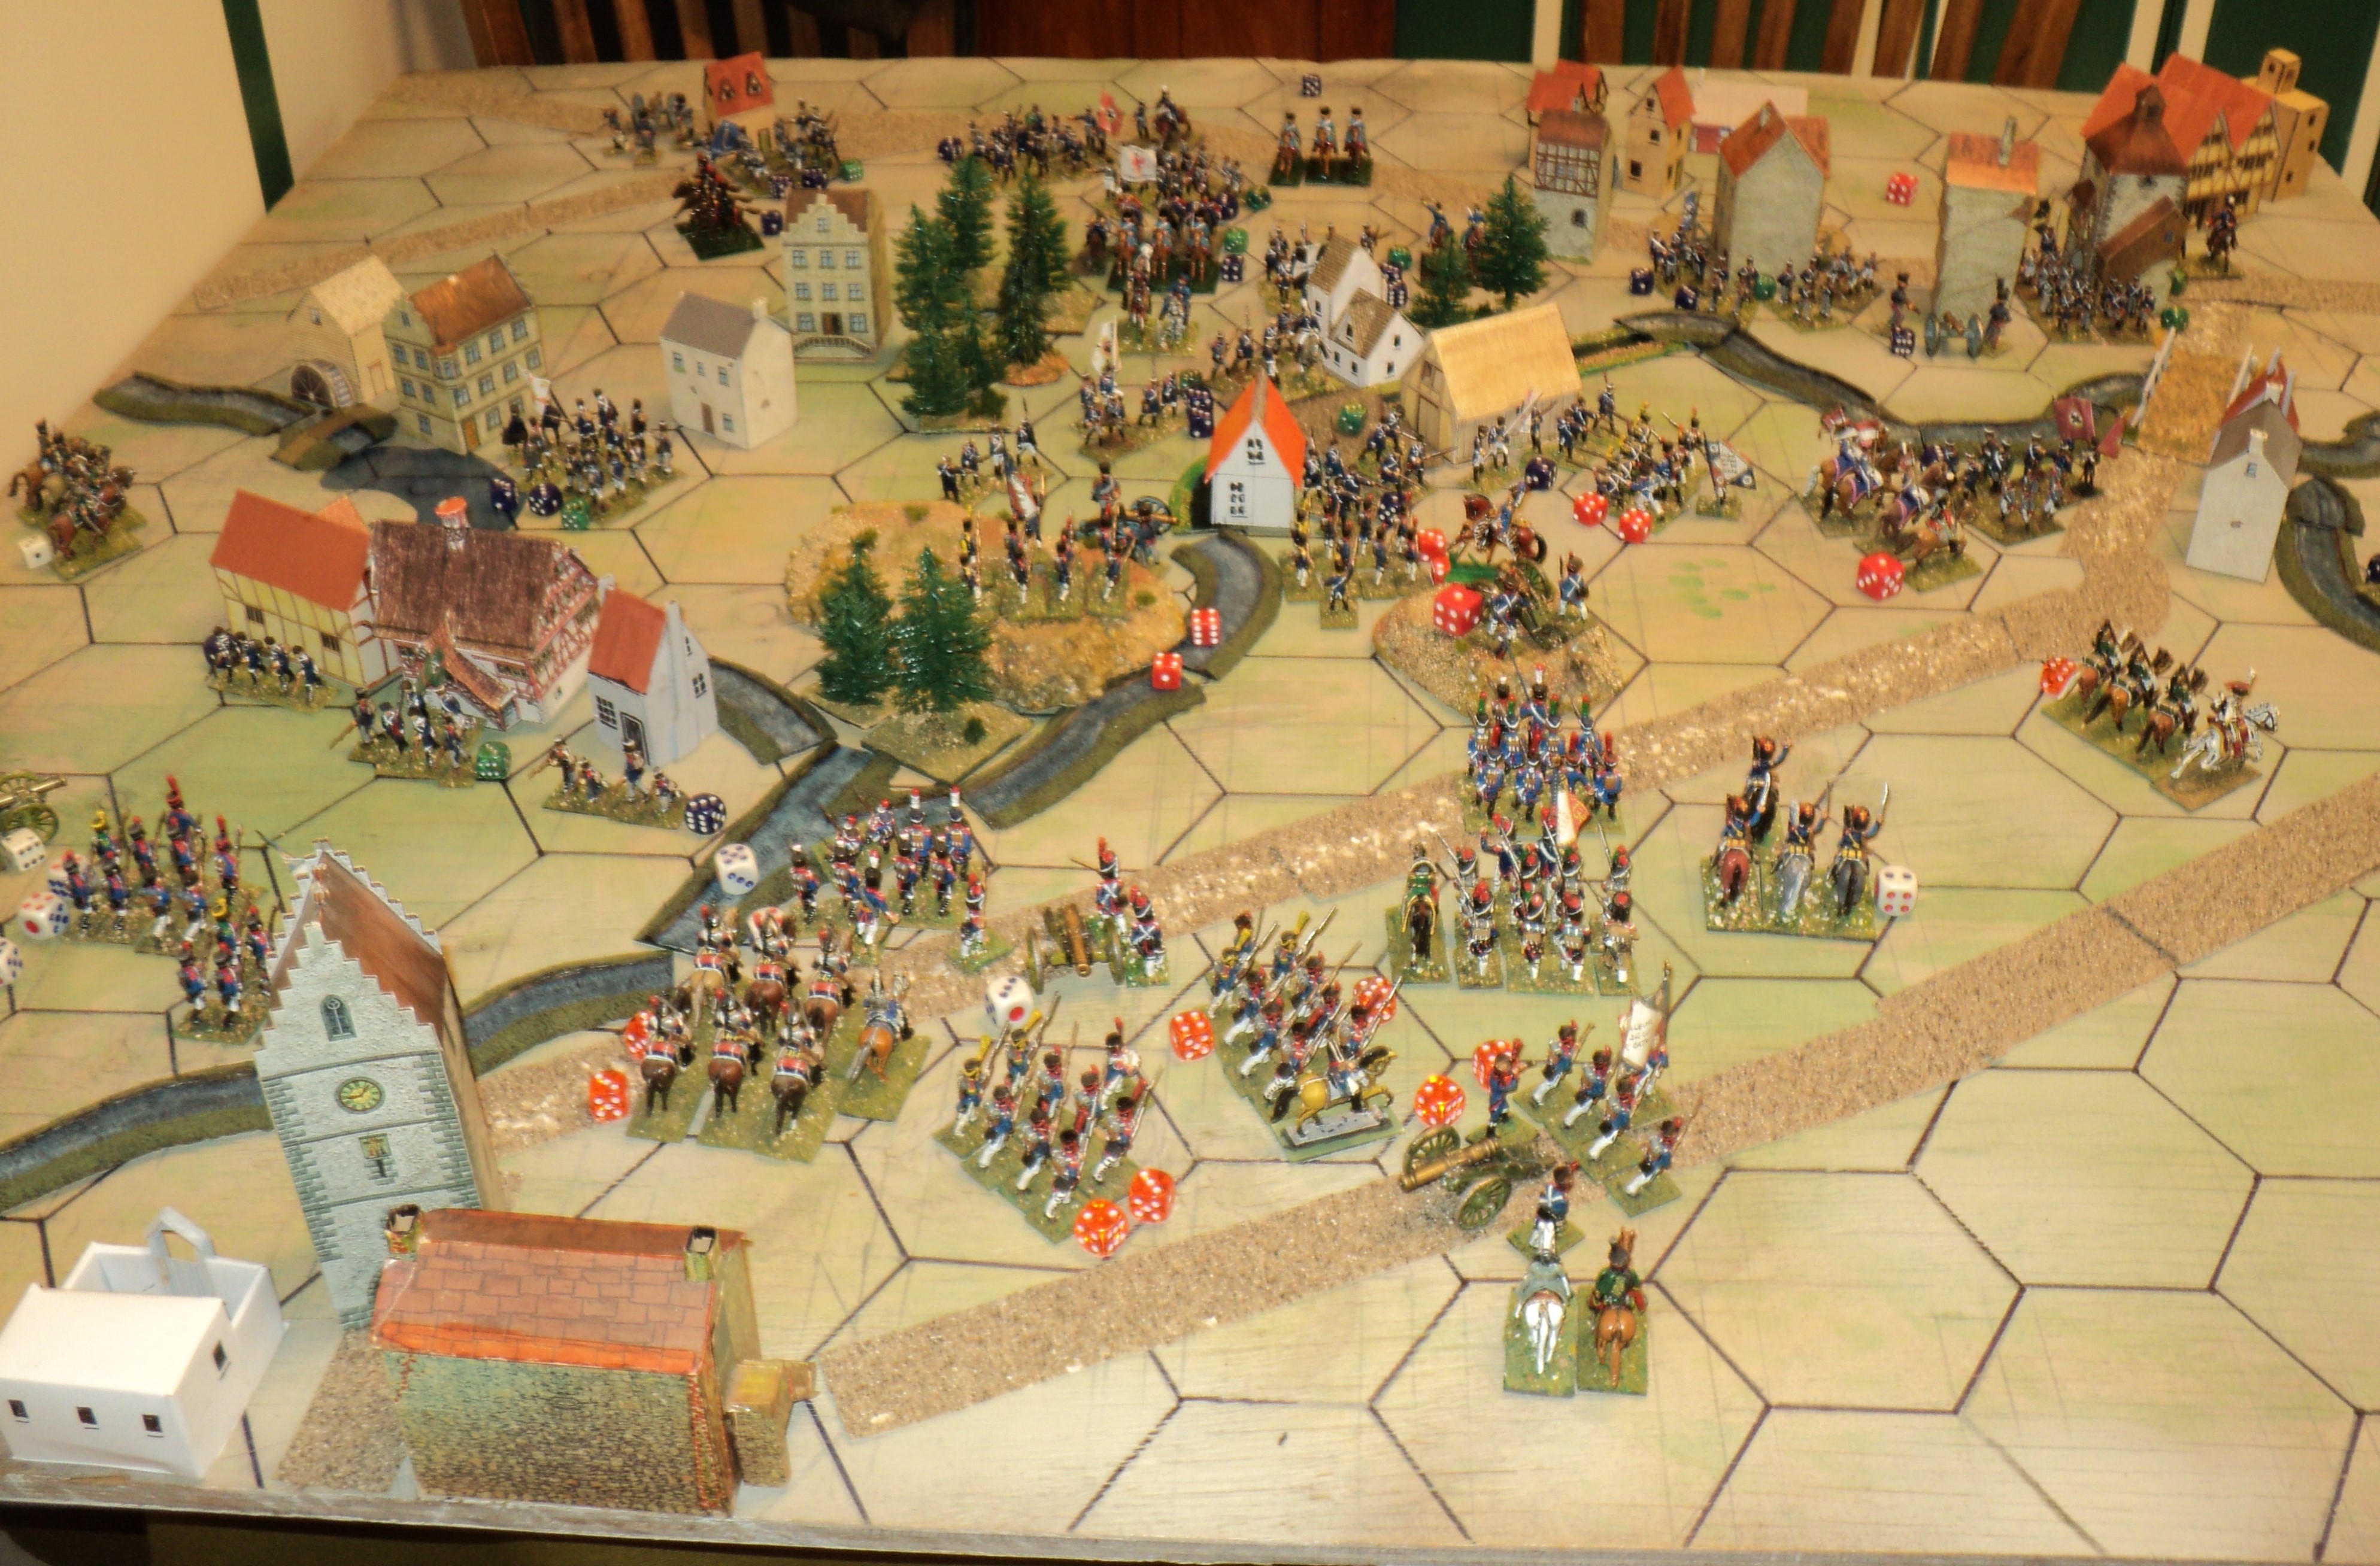
The above picture shows III Corps getting set to advance against Saint Amand village. Vandamme has placed himself at the head of 11th Division in an effort to get his stalled line to advance. I ran out of flags, it seems, which is why 10th Division (in reserve) has a mounted Divisional command. The Prussian 3rd Brigade prepares to defend the whole of the village (bear in mind, the Prussian brigades were the size of the Divisions in the French Army; their regiments the size of French brigades). The Young Guard, near Fleurus, lower right, advances...
In the foreground, the Imperial Guard pushes forward towards Ligny, whilst VI Corps (General Count Lobau) begins its move to the right. A little bit of a traffic problem is developing - not helped by unaccountable delays (activation dice rolling 'ones'). The Guard Heavy Horse at least once snarled up the VI Corps' march.
IV Corps set to attack the Ligny garrison. Jacquinot's 7th Cavalry Division moves to guard the Corps' right flank; and on the left end of the line, 13th Division prepares to cross the Ligny stream and seize the heights beyond.
First clash on the right flank: Pajol's Corps of Light Cavalry engages the Prussian III Corps cavalry in equal strength (H'mmm... that 5 should not be a 5). The Prussian 11th Brigade about to cross the stream.
View looking west along the Prussian line: III Corps artillery between 12th and 9th Infantry Brigades, with the 10th disappearing out of the picture across the river bridge. In the distance, II Corps is slowly moving up. The next couple of pics show the situation from other points of view behind the Prussian positions.
Prussia's II Corps moving up, mostly toward the right and Wagnelee. But 8th Brigade is being held behind Ligny.
General view from behind the French centre. IV Corps assaults are fairly under way. 13th Division has seized the heights and are now menacing the Prussian I Corps gun line. Ligny under heavy assault; whilst Hulot engages the Prussian 10th Division. Meanwhile, III Corps attacks have still not begun, much to Napoleon's exasperation.
Having said that, the 3rd Prussian Brigade must be viewing the French approach with considerable trepidation. Nine strength points are about to come under assault from 48SP, plus the III Corps artillery. Behind them, 1st Brigade hastens to place Wagnelee in a state of defence.
IV Corps assaults go in. Both sides have taken some loss. The Middle Guard is moving up behind the IV Corps artillery upon the Grab hillock.
Early success by the French Cavalry on the right, chasing Hobe's troopers across the river at Balatre. But Exelmans's dragoons are stopped at the river crossing. In the distance beyond Tongrinelle, Hulot's cavalry, down to just 1 SP, are finding the 9th Brigade too strong by themselves to contain.
A general view, but it is clear that 4th Brigade's hold upon Ligny is becoming tenuous. A third of the Brigade's strength has already been lost. So far IV Corps has lost just 1SP from each of the artillery (an early Prussian success from I Corps Artillery's counter battery), and infantry (12th Division). But the 7th Cavalry are in a bad way and can't last much longer.
View from behind French centre. III Corps assaults at last going in on the left; VI Corps hurrying off to the right.

The storm now breaks over Saint Amand. 7th, 11th and 8th Divisions attack the south-western face, whilst the Young Guard crosses the stream to assault 29th Regiment's left flank.
The IV Corps assault is much less powerful, only 3 Divisions involved, and one of those (13th) yet to clear a path through the Prussian artillery to reach the outskirts of Ligny.
On the French right, 11th Brigade crosses the stream at Tongrinelle, and comes under heavy attack from French dragoons. The next few pics give a general impression of the battle's overall situation.
The unengaged units of Thielmann's Corps are breasting the stream, whilst the 10th and 11th Brigades try to brush aside the opposing French cavalry...

... and Pirch's II Corps seems to be taking an unconscionable time to come to the aid of Ziethen's embattled brigades. Foot can, of course, move just one grid area at a time, and the odd 'one' for activation is not designed to speed them on their way. They are doing their best!
That is no consolation for 3rd Brigade. Both ends of Saint Amand have been conquered, the 7th Regiment destroyed, and the 29th Regiment flung out of the place and across the brook behind. Encouraged by the presence of their Division commander, only 3rd Westfalen Landwehr remain, their last remnants (1SP) holding out in the centre of the village. The Prussian 3rd Brigade loss of 6SP has cost III Corps just two, at most.

Whilst 8th Division occupies the southern end of Saint Amand, the Young Guard pushes across the stream into the light woods beyond, coming up behind 13th Division of IV Corps. That Division has successfully driven back the Prussian artillery, but in following up, were in turn forced back to the heights. The Old Guard are coming up behind 12th Division, now much depleted from its costly assaults upon Ligny. General Gerard has himself taken a hit, but, standing with 12th Division, remains in command of his corps. Not that the garrison has come off unscathed: only the 4th Westfalen Landwehr remain.
Help for the latter arrives betimes in the form of 9th Brigade from Thielmann's Corps. Diverted from occupying the sector of Ligny from which the defenders have been thrown out, 14th Division finds itself not only engaged in a firefight with the 9th, but also under gunfire from across the river. Losses are mounting alarmingly.
Meanwhile, no sooner has 10th Brigade seen off and scattered Hulot's 7th Cavalry Division, than they find themselves facing the dread Imperial Guard - the Middle Guard - led by General Drouot in person (actually, the figure is that of Marshal Bessieres from the old Minifigs 'S' Range... It seemed more or less appropriate). Behind the Guard infantry, the Guard Heavies once more make nuisances of themselves by holding up the VI Corps move to the right.
A private little battle continues to rage around Boignee and Balatre, with the Prussian taking the fight to their enemy. Both sides have taken losses, but the French seem to have come off very slightly the worse. They are certainly no nearer crossing the stream than they began.

Fierce fighting east of Ligny, but neither side has yet been able in this sector to put forth their whole strength. Tenth Brigade - none too strong to begin with - is being overwhelmed, but 14th Division is hard pressed.
Meanwhile, 8th Brigade of II Corps has moved up right behind Ligny. The evacuated sector has yet to be captured by the French, diverted from doing so, but neither have the Prussians retaken the place. On the right, II Corps Cavalry have moved right up to Wagnelee, but decline to try conclusions with the enemy 3rd Cavalry Division opposite. Apart from the exiguous garrison in Ligny, I Corps has formed a line of regiments in rear of that village, right round and into the twin villages of Saint Amand la Haye and Wagnelee.
At this point, this posting being quite long enough, we will break off the narrative, and resume next time. We'll close with the following picture of units destroyed: 7th Cavalry Division and one of 12th Division's Brigades from the French side (6SP); 4 regiments (12SP), all from I Corps, on the Prussian side (plus an artillery SP). There are plenty of knocked about elements still in action! Losses are probably roughly equal, or maybe very slightly in the French favour.
 To be continued...


That’s a really nice representation of the Ligny battlefield.
ReplyDeleteThank you Norm! I can find fault with it (and I have an alternate layout I could have used), but overall, I'm fairly pleased with it.
DeleteBefore I put this together, I found the battle quite hard to understand (I speak in the 'broad-brush' sense, of course), but setting it up and playing it out, have a bit more of an idea. I'm bound to say, though, it looks a horrible battlefield to fight in, so built-up the maps look from which I arranged the table.
Cheers,
Ion
Your battlefield looks lovely Ion. Very nice. Things don’t half look crowded/busy though.
ReplyDeleteAs a (primarily) solo gamer I suspect there’s more going on there than my tiny brain could cope with - my battles tend to be quite a chunk smaller, not only the tabletop size but the number of figures/units too.
Cheers,
Geoff
It certainly 'felt' like a big battle, Geoff. But I guess 166 French figures and 151 Prussian would look a lot on a 4ft square table. However, I have had more!
Deletehttp://archdukepiccolo.blogspot.com/2015/12/retreat-from-smolensk-part-first.html
That was the second of my 'Retreat from Smolensk' 'occasional' series of battles that ended this year.
Cheers,
Ion
A fine game there Ion but I must admit that I find it too busy for me and hard to follow what's going on. I like the PW rules but they work for me with relatively few units on the table for a 'quick' game. I'm not sure I would find they work for me scaled up such as in this battle.
ReplyDeleteHi Steve -
DeleteI'm thinking for my continuation I'll split the action into four sectors, occasionally drawing the threads together. It is possible I have too many pics at that.
I do fight out small actions, too - the Kavkaz Campaigns involving far fewer figures, and they are on 3 and 4-figure bases. I've also tried my hand (early this year) at a campaign involving 3x3 games with 6 stands the side.
But I do like my big battles. I have the kit and like to use it when I can! I have a feeling though, that the way I set this one up, I stretched the game system maybe a little beyond breaking point. That I will discuss later on.
Cheers,
Ion