Saturday, August 1, 2015

The Forgotten Army: Part 1.

Byzantine Horse - Tagmatic and Thematic kavallarioi of the
10th-11th centuries.

Seeing what 'Jacko' of Painting Little soldiers is doing with his 'Ancients' has... incited, I think, rather than inspired ... me to look to my own 'Ancients' Armies, something I have not done for years. And more years. Certainly not since beginning this blog.   So I thought I'd make an examination of my 15mm 'scale' inventory the subject of this and one, or maybe two, follow up articles.

Patzinak (Pecheneg) horse in the service of Byzantium.  These
originated as basic horse archer figures, but some
have acquired shields and javelins.  More later...
During the late 1970s I developed an interest in the Byzantine Empire, particularly the time of Justinian the Great, and his general, Belisarius.  Upon my expressing this interest to the 'TOY Soldier' outfit in Sydney, Australia (whilst placing an order for some Napoleonics, I think), they sent me a sample figure - an 11th Century skutatos.   Not my preferred choice, but I liked the figure enough to look into the history of 10th and 11th Century Byzantium, and think - yeah I could go for that.  From about 800 to 1050 was a period during which the Byzantine Empire was far from declining.  Basil II Bulgaroctonos became something of a hero figure, for mine.  And, for the second quarter of the 11th century, who could resist a commander with the name of George Maniakes?
Patzinak nobles based as Heavy Cavalry.
So I bought a whole swodge of figures.  What to do for a rule set?  The  (Wargames Research Group)  5th and 6th Editions were frankly discouraging: long, slow, complicated and, to my mind, a poor return on temporal (let alone monetary) investment.  WRG Seventh was a vast improvement, but still had two major problems for mine.  One was the large margin for knowledge of the rule set; the other, the constant updates, corrections, amendments and general faffing around.  With a volatile rule set, and a gaming period that isn't my favorite anyway, the games weren't especially enjoyable, even though I think I won more than I lost.
Varangian Guard.  The original figures had axes, but as the
'Axe-Bearing Guard' was (I believe)more a feature after
 about 1070 (with the recruitment of expatriate Anglo-Saxons
 following the Norman Conquest) I replaced the axes
with modelling wire spears.
DBA (De Bellum Antiquitatis), and more especially, DBM (De Bellis Multitudinis), were a godsend. Before DBM hove over the horizon, my Byzantines had been sitting in their boxes neglected already for several years.  It did mean some reorganisation - especially the skutatos units and the 'super-heavy' kataphraktoi.  The double basing and shape of these formations had been based on the nearest approximation that could be reached to those described in the Praecepta Militaria attributed to Nikephoros (II) Phokas, c.960.
The leading light horse are hyperkerastai horse archers
drawn from the cavalry regiments.  Often used as a flank guard.
You would think two elements wouldn't have a prayer facing
horse archer armies, but they did OK.
But DBM very soon ran into the same major difficulty I have always had with 'Ancients' in general, and WRG in particular: they will mess about with the rule set.  Sure, problems will slip through the play testing and development, but before making the mad dash to 'fix' the thing one must, I feel, ask oneself: 1. what the thinking was behind the existing rule (I'm not talking "What were you thinking??!!" here); and 2.  to what extent is this a problem?  
Trapezetoi - Byzantine lance and javelin armed
light horse.  Probably fairly unhistorical by the end
of the tenth century.  But I used the one allowed
element anyway.  I have far too many of these!
Eventually becoming disenchanted with DBM (and frankly bored with stereotypical pick-up games), I slipped out of playing Ancients altogether.  I won quite a few more than I lost, especially with my Byzantines (over a period of nine or ten years following a narrow defeat one Easter weekend in the early '90s, I never lost to a Roman army).  But wanting a historical opponent army (as is my habit), I lit on the Bulgars of c.1000.   They have to have been the unluckiest army I ever fielded.  Their win-draw-loss record of 2-2-14 sounds bad enough, but looks way worse when you learn that their career began with a draw then a win.  

Let's have another look at the Varangian Guard, eh?
Flank marches failed to turn up; the spearmen would collapse in a heap at the very mention of a knight; the 'superior' light horse, getting tore into a bunch of scraggy 'fast' enemy light horse, got simply torn apart... have you ever seen a completely fresh command get dismembered and collapse in half a bound?!  I have, more than once with this army,and it ain't pretty.  It happened to my Byzantines once, but I forgave them...  
A part-finished skutatos unit badly in want of repair!

Then there was the occasion my left-hand Bulgar command, threading its way through a maze of small hills, got stuck there.  My fault: I had them in line instead of columns.  Not that should have mattered too much.  But half way through, my command dice went: 1,1,1,3,1,1,2,1.  A sequence like that haunts you: you just don't forget.  So, by the time this lot cleared the hills, the battle was over: lost.

Group shot of my skutatoi/toxotai units. Two of them have
menavlatoi elements added.
Mind you, the rest of the army fought magnificently.  That it took at least those eight bounds to defeat them at odds of two to three argues a fine performance in adversity.  That occasion was not the only that happened, neither...
Blue 'Regiment' (don't know what other name to give it).  
As it so happens, a lot of the figures I used for Bulgars were reasonably suitable for using as Abasgians - Georgians.  Another 'irregular' army, I think the presence of archers, especially in worthwhile numbers, made a difference.  Perhaps surprisingly, the horse classed as 'fast knights' seemed to do better than 'superior cavalry' when irregular.   Although my Georgians suffered the odd defeat, it performed far better than the Bulgars did. And that is a pity, because I kinda prefer my first choice.
Red Regiment.
So much for past history.  Suffice to say that these guys have hardly been out of their boxes these ten years at least.  I have toyed with FoG, but what I've seen of that rule set doesn't even begin to inspire me to carry out the prep work necessary.
I think these guys are Akritoi (I stand to be corrected on this).
DBM treated them as 'Auxilia', the historicity of which type
I have my doubts (not so much the loose rough-terrain type,
as whom they placed in that category).
Having said all that, I still regard DBM (and DBR, too, though with more hesitation) as conceptually as fine a rule set for 'Ancients' as one is likely to run across.  But it was ruined by too much 'rules lawyering', too many amendments (many ill-considered), a couple of serious, but easily fixed design flaws, and a large section of the 'playing public' who, I think, didn't really understand what the designers were getting at.  The element based system as distinct from unit based had in the early days the effect of developing long battle lines of considerable robustness.  But you will get the type of war gamer who will 'play the loopholes'.  As it happened, I kept the units you see in these pictures, as part of these battle lines quite often, and they worked well enough for me.
Heavy and light foot.  The General behind the nearest unit
looks like my Gheoghios Maniakes.  In the distance,
Dmitrios Psychopathes... Sorry, can't resist this sort
of thing... 
To the figures themselves:  they will need a fair bit of touching up and repair work before they can really take the field once more.  The spear/pike armed skutatoi came with very short spears.  Except for a very few, I lopped off the upper part of the spears at hand level, and replaced them with ordinary pins.  To make them more 'spear' like, I squashed the points to make spear points.  Of course the surface area to be glued was very tiny, so the spears break off easily and frequently.  Now that I have better tools for the purpose, the temptation is to do away with the pins, carve away the bottom and of the spears, and drill a small hole to accept modelling wire spears.  The few I didn't change, kept their short, but thicker spears, were given small, round shields made chads punched from sheet plastic.  These were the menavlatoi.
Sphendonistai - slingers.  Had I already read when I painted them
the Praecepta Militaria, I would have placed them in pale shades
of the heavy regiment colours.  
 The slingers (sphendonistai) came with shields: they kept them.  But the pose looked equally appropriate for javelinmen (akontistai).  So several lost their slings and got javelins made from shirt pins (which I carefully collected whenever I bought a new shirt!).
Slingers and staff slingers.  
I think at this point, it is time to break off this posting, and resume later on.
(To be continued)

Army Men Project: Comparisons are odorous...

Kiivar Armoured Infantry Company, together with a squadron
of Cerberus I and II tanks.  The motor vehicle is a captured
Raesharn model, judging by the camouflage pattern.

...But I thought I would show some pics comparing and contrasting the armoured units in the service of  Kiivar (as seen the preceding posting) and Raesharn (as seen maybe as far back as 18 months ago).

Raesharn Armoured Infantry: 5 infantry sections
  plus MMG section.  Mortar section pending...  The
 tripod  mounted MGs attached to each platoon
count as LMGs
In general I allow the figure inventory to suggest the organisation of units and formations.  The Kiivar "Armoured Infantry", 50 figures, formed a company of two platoons each with 3 6-man sections, plus an 'HQ Platoon' of MMG, LMG and light or medium mortar, with an assault engineer section (a bunch of extra SMGs plus flame thrower) attached.

The Raesharn Company is much more numerous, and hence stronger. Its platoons comprise 26 figures to Kiivar's 20: two sections only, but each 12 figures: LMG, SMG (command) plus 10 rifles.  

MMG section at lower left.  The mortar crew will be
gleaned from the cluster of figures at the bottom
of the picture - or may be drafted from the rifle platoons.


This actually gave me 5 sections - not a very 
tractable number, and even then I had to downgrade the smaller pair of tripod mounted MGs to LMGs (otherwise I had 4 MMGs and just 3 LMGs).  The 5th Section was placed into an 'HQ' Platoon comprising this ('Assault') rifle section, an MMG section of 2 guns, and will also include a medium mortar, when I get around to making these things. 


Overall the Raesharn Armoured Infantry Company comprises roughly 70 figures.  I have a feeling that I ought to have thought through their uniform a bit more carefully.  They look very 'SS' don't they, though I had - and have - no intention of their being any such type.  They are intended to be more cognate to the Panzer-Grenadier types of the Wehrmacht.
Formidable opponents for the Kiivar!

Saturday, July 18, 2015

Return of Army Men Project...

In the last several months since my last posting on this topic, I have been off-and-on continuing work on it.  Recently I finished off the Commonwealth figures to form a scaled down tank-support (armoured infantry?) company.
Kiivar Armoured Infantry Company.
I should have kept the flash on in the subsequent pics:
The colours came out well in this.  I thought it would be too bright.
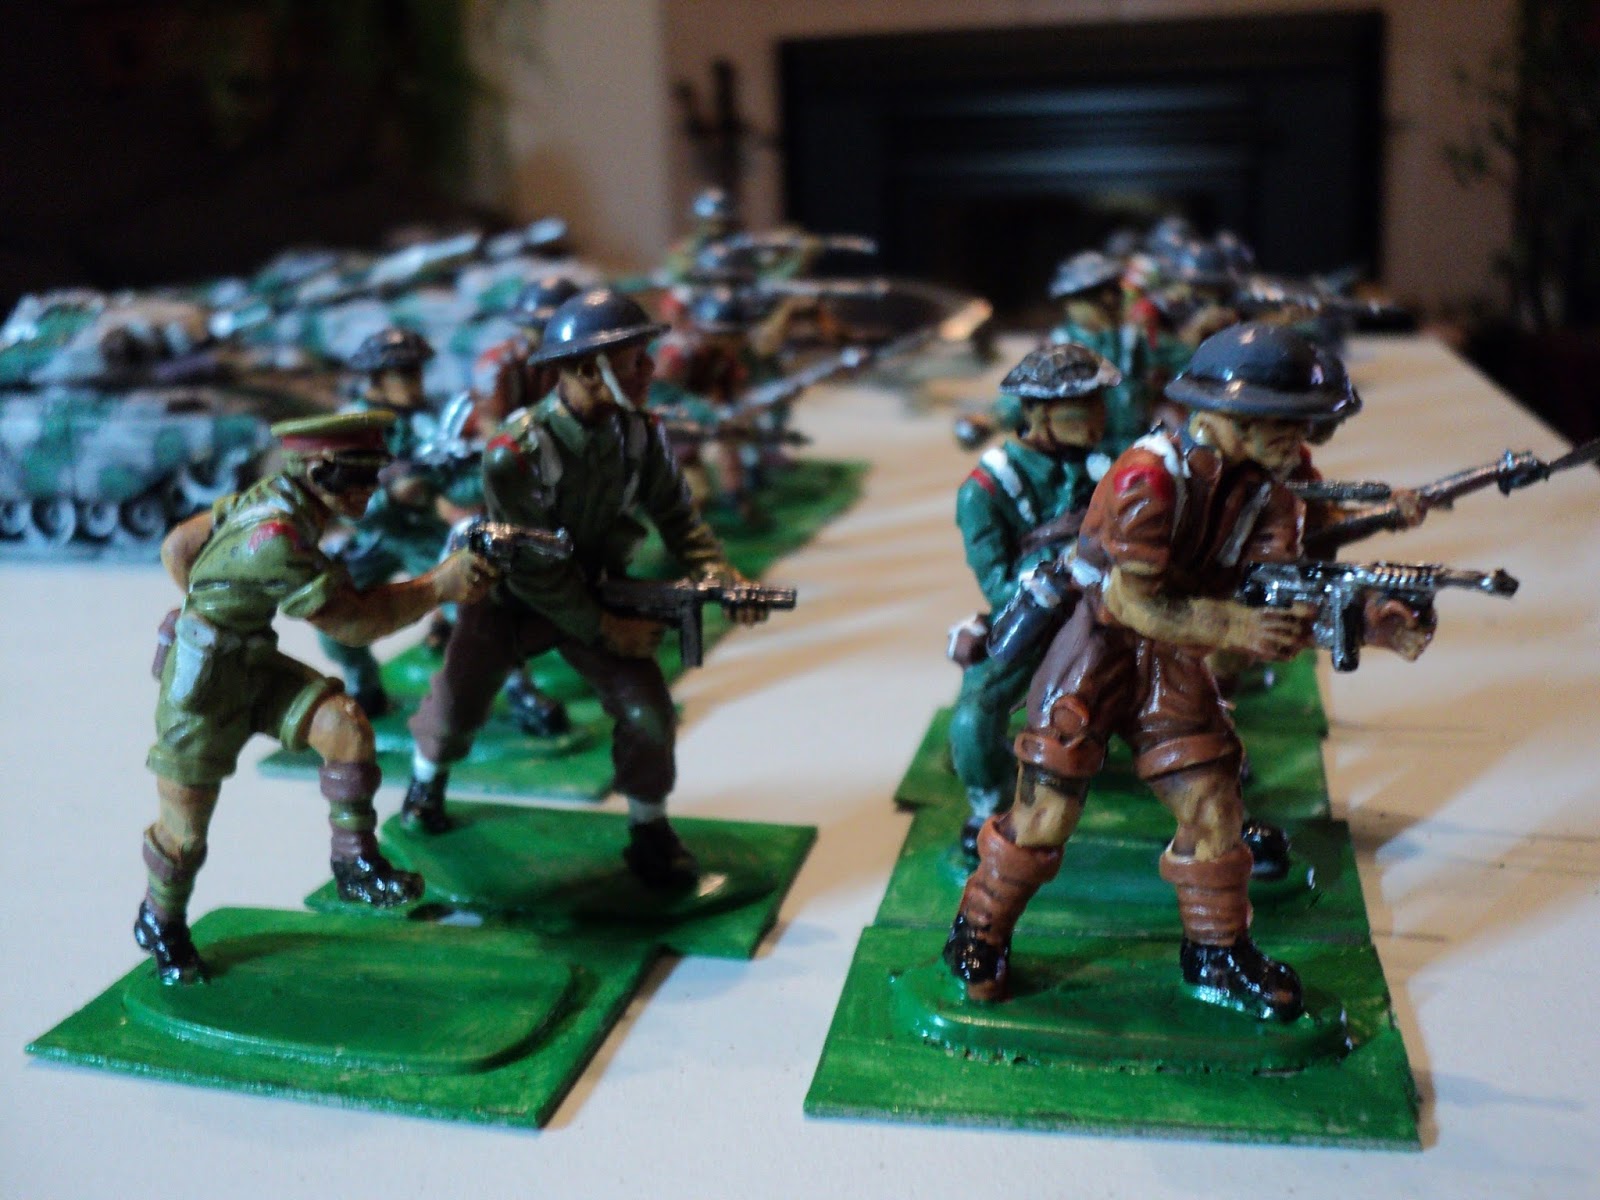
 The first thing to note is the range of uniform colours in the one unit.  I'm not going the Green vs Tan route (though it will be a convenient division among many of the figures I have).  But I have also decided I want to keep painting to a minimum for this project.  So the uniform colours you see are simply the colour of the plastic: greens, browns, tans, beige, even greys.  Aside from painting the details, the uniforms have merely been washed with Citadel shading ink 'Nuln Oil.'
Kiivar armoured infantry.  The uniforms are 'self-coloured' -
the colour of the plastic - with a wash of Citadel 'Nuln Oil'.
 The effect, to mind, is a rather pleasing polyglot appearance to the company, as if it has been in the field a long time, and operating hand to mouth.
These companies are organised according to the figures available.
 As there was a limited number of figures, and I'm scaling down the companies anyway, this gave me a 50-figure unit comprising:
Company HQ: Captain, signaller and senior NCO (CSM);
'Weapons' Platoon:
      Platoon commander;
     1 Vickers MMG plus 3-man team;
     1 LMG with 2-man team;
     1 Medium Mortar with 3-man team.
Nr 1 Platoon:
     Platoon commander plus senior NCO
     3 Sections each comprising 1 SMG-armed NCO commanding, 1 LMG, 4 rifles;
Nr 2 Platoon:
     Platoon commander plus senior NCO
     3 Sections each comprising 1 SMG, 1 LMG, and 4 rifles, as before.
Attached to company: Section Assault engineers: 4 SMG plus flame thrower operator.
Total: 55 figures.

 The assault engineers might seem an odd attachment, but I figured I need to absorb the extra SMGs somehow, not to mention the single flame-thrower.  I guess an alternative might be to add an extra SMG to each section, and add the flame thrower to the 'Weapons' Platoon.  But I quite like the idea of the extra punch offered by the specialist assault section.
Below is the Nr 2 Platoon accompanied by a half-squadron of 'Cerberus Mk I' tanks.  The cognoscenti will observe the uncanny resemblance to the British Centurion tank, except these look quite a bit smaller when measured against the (plastic) human frame.  I have classed these as light-medium tanks: medium anti-tank, light armour.
Platoon with light-medium tanks.


The light blue numbering isn't very easy to read...
 Below is the remainder of the armoured squadron, two up-armoured, up-gunned and up-sized Cerberus tanks.  I'm still in three minds whether the are both MkII, mediums (medium anti-tank/medium armour), both MkII medium-heavies (heavy anti-tank/ medium armour), or they are MkII and MkIII - one of each AT/Armour classification.
The 4-tank squadron.  T100 (farthest from camera) is the Squadron command.
 To explain, the rule set I'm using for this project is my own 'One Brain Cell' set still under development.  The are 3 grades of armour, and 3 grades of Anti-tank gun.  Although, of course, there are other anti-tank weapons about: AT rifles, bazooka types, mines, AT grenades and satchel charges, they are rated according to my 3-tier AT classification. Even flame-throwers will have some effect on armour.
The vehicles are under-scale against these strapping fellows,
which I prefer, on the whole.  But even within this company the figures
 vary in size.  This is not an undesirable thing...
At any rate, you can see that the two tanks added are considerably larger than the others.  In fact Tank 144 is a whisker larger than Tank 100 - the difference is hardly noticeable unless they are side by side.  But the difference between them and the T121 and T125 pair is very marked.
I had painted up the larger two in Raesharn camo, but that seemed to be heading for too much of an armour imbalance between the two sides.  Raesharn already has a pair of 'heavy' tanks (Army Men Pattons) and a company of 4 'medium-heavies'  (Panzer IVs which are, in Kiivar, known as Python IVs).  Once the idea of up-armoured Marks came to mind, I had only to bite the bullet and paint over the former scheme with my Kiivar light beige and green.
 Some close-ups...
 The size differences among these 4 Centurions are quite noticeable in this dive-bomber's view...
To conclude this posting, may I express my thanks to readers' patience during the long 'interregnum' (interduceum?) whilst I recovered some of my morale and motivation. Cheers.

Tuesday, July 14, 2015

Spammed...

I'm finding my Blogger reading list being spammed by some worthless outfit flogging wedding dresses or some bally thing.  Is anyone else experiencing this?  Has anyone any advice or shooting these beggars down?
Ready... Aim...

Saturday, June 27, 2015

Waterloo in Christchurch, 19-21 June 2015.


For this event quite a lot of figures had to be gathered from several collections, especially as we were to be using the General de brigade rule set, modified for this action.  To the forces involved, contributions came from Basil Moscovis, Mark Ottley, Mike Thorby, Paul Jackson, and myself. Richard Shields came up from Dunedin with several more figures from his collection. He was also resplendent as Prince of Orange in dress uniform for the occasion. I know that there were contributions from at least two others, but didn't discover who they were.

I was supposed to Napoleon for the weekend, but, still flattened by a virus that I'd already had for several days, didn't make it for the event as a whole.
Looking east, mid-afternoon 18 June 1815.  The serried ranks
of Bulow's IV Prussian Korps look menacing and powerful. 
On the Friday before the weekend I had laid out what troops were to be transported.  Entrusting the lads (some 520-odd with 11 guns) to the tender care of others for a couple of days doesn't come easy to me.  But in the event there were no losses, not too much damage, and I indeed acquired 6 extra figures somehow.  I'm not sure to whom they belong, but I think I can hazard a guess...  I stayed home, feeling like two ton of old fish heads, all day Saturday.  Finally, on Sunday afternoon I felt sufficiently recovered to crawl down to the club and observe the last hour or so. Whilst there I took some indifferent photos of the troops.
Action around the Hougoumont Chateau.  Paul was commanding in this sector,
and faced by large columns also off to the left of the picture, was treating this
as something of a holding action.

General view of the field looking eastward from west of the Hougoumont. 

Of course I had to include pix of my own troops.  Count Lobau's VI Corps
advancing towards La Haye Sainte (My guys, based in ones and twos,
 are those on sabots specially made for this event). 
 I was told that Lobau's Corps had been ordered forward from the 'Reserve Table' to exploit a success earlier won at La Haye Sainte, where Anglo-Allied defenders had been brought to the verge of collapse.  Unfortunately it took more time for the orders to take effect than had been hoped - their receipt, and action upon them, subject to a die roll.  So by the time Lobau was well on the way, the Allies had somewhat restored the situation, by the look.  At that I might have been inclined myself (who was also intended to play the role of Count Lobau in addition to Napoleon) to bring forward all thirteen battalions (312 figures) and 22 cannon (11 models) into the assault. But there was the small matter of the Prussians to influence the decision of the French command.
Prussians advancing past Frischermont into the French
right flank.

Bulow's IV Korps


More general view of the Prussian menace.  The available French resources
are not over-abundant to offer resistance.

The view from Anglo-Allied positions as Count Lobau advances.

Nassauers? At Papelotte.

British under pressure, east of La Haye Sainte.

A not well constructed photo, this.
  French cavalry at the left of the picture making a determined effort to carry the ridge...

If earlier the Anglo-Allied hold upon La Haye Sainte was
beginning to slip, they have recovered their grip by now...


aaa
Even in mid-winter the sunlight in Christchurch can be very strong.
The Anglo-Allied lines northeast of Hougoumont.  It was only when processing
the picture afterwards I noticed the rocket battery.  I want one.

The garrison at La Haye Sainte.

VI Corps.

Reille's II Corps masking the Hougoumont from the east.  Not a lot
of action on this front, but the French seem to be containing more
than their own numbers of Allies.

Allied troops in reserve behind the Hougoumont.
I think I can see at least one Guards battalion...

Action near Papelotte.  French columns closing in.


Immediately in rear of the Hougoumont, Mitchell's Brigade.
These figures were my contribution to the Allied war effort:
Minifigs, except for the light infantry of the 2nd West Riding:
Hinchliffe.

Northeast of the Hougoumont.

British Footguards, eyeing the approach of the Divisions of Foy and Bachlu,
and the cavalry of Kellerman and Guyot.

The stretch of Allied ridge carried and cleared by elements of General
 d'Erlon's I Corps commanded by Tony and (I think) Nigel.  This
seemed to be a considerable success that might yet have been exploited, given time.

More French success (this might have been Nigel).  However,
this penetrations looks too localised and lacking in follow-up
to permit a lasting penetration of the Allied line.
Having taken this many pictures, the day was already far advanced and pack-up had to begin at 4pm. Although not fought to a finish, the occasion was, I am told, enjoyed by everyone, and, considering the size of the project and the absence of formal game directors to keep people focused, the thing went off very well.  I was impressed by what I saw, anyhow, in the 90 minutes or so I was there.