Wednesday, July 3, 2019

From the Chronicles of Rajistan (3) - The Battle of Hak-al-Kumara

Opening dispositions, General Scarlett's battle plan (opening phase),
and Nasr-ed-Din's early moves.
In the following after-battle report, the narrative will follow the events of each sector in turn: the attack by 18th Brigade around Sinn Station; that of 16th Brigade between the Pardis River and the great Suwara Marsh; and then the flank march of 17th Brigade and 6th Cavalry Brigade. A brief final paragraph will gather the threads of the report.  The action was in fact to develop in this way, the 18th Brigade, with no obstacles to negotiate to reach the Turkowaz lines, making the first contact. 16th Brigade had to cross the canal to reach the enemy, whilst the remainder of General Scarlett's Division had to filter past the Suwara Marsh, and, under fire from a fortified pair of Turkowaz infantry regiments, ease their way into a position from which to attack.
Attack of 18 Brigade against 35th Division

Eighteenth Brigade vs 35th Division.

Eighteenth Brigade advanced astride the railway line in an extended line of battalions. Second Norfolk, on the right, had their right flank on the riverbank. For their part, the 35th Turkowaz Division facing them occupied field works stretching from the low ridge close by the Pardis River bridge crossing on their left, over a second small hill and past Sinn railway station, to the Umm el Karam Marsh on their right. The Divisional mountain guns were placed in support to their rear. 


Cavalry Brigade's flank march - running the gauntlet of
the Canal fieldworks.

The commander of 35th Division deciding that his artillery would be more effective in the line firing over open sights, he pulled 139th Regiment into local reserve to make way for the guns. This probably was a mistake, as it took time, during which Ruberian field and mountain artillery were playing effectively upon the Turkowaz defenders, the Gatling company had dropped into action within effective range, and the Norfolk Battalion had begun clambering the north slopes of the riverside ridge.
16 Brigade attacks against elements of 38 Division.  
So effective was the fire from rifle, machine gun and artillery that Turkowaz losses were mounting a deal faster than the Ruberian (at one point early on 35th Division had taken 6 Strength Point loss to 18th Brigade's 2SP). All the same, the Norfolks' assault upon the ridge was swiftly rebuffed by the defending 140th Regiment. Although the 140th had themselves taken heavy casualties, their effective rifle fire drove the Norfolks back down the slope and well back into the plain. It was the 110th Madasahatta  Regiment on hand to take up the cudgels in the fight for the ridge. 
2nd Dorsets secure a foothold in the Turkowaz entrenchments...
Although 140th Regiment stood off these new assailants, the latter were able for a considerable time to maintain themselves on the slopes. Meanwhile the 35th Division Mountain guns found themselves under heavy gunfire from two enemy gun batteries, and the deadly machinegun fire from the Gatlings. The earthworks proved scant protection; the Turkowaz guns were silenced after about an hour.  

16 Brigade has already lost its Gatling Company and its
Brigadier.
Before Duya-ed-Din could close the gap in the line with 139th Regiment, the 140th now faced a new assailant, the 120th Rajinbul Infantry. The odds were too much. Having faced attacks by three separate Ruberian and Rajistan battalions, with supporting artillery, 140th Regiment at last gave way as 110th Madasahatta surged over their field works. The quickly mounted counterattack by 139th Regiment did, however, check the Rajistanis' further advance. Though the unhinging of the 35th Division's flank might have led to the whole line being rolled up, the Turkowaz infantry simply refused to budge. Losses among 18th Brigade began to mount more rapidly. During the course of the prolonged firefight Turkowaz losses in this sector reached 10SP; the Ruberians' 8SP.
110th and 120th Infantry, 18th Brigade, storming
the bridge ridge.  35th Div losses far heavier than 18th Bde's.
The final defeat of 35th Division coincided with the exhaustion of the Turkowaz Army as a whole. Despite being reduced to a single SP, the depleted 137th Regiment had held on doggedly for several hours (turns) against the 7th Duke of Connaught's Own Raginbul Infantry. Its collapse left both flanks of 35th Division 'in the air'.  At once Duya-ed-Din Pasha led 139th Regiment back across the railway bridge. Itself hardly engaged upon its hill behind Sinn Station, and apparently about to be cut off, the 138th was for a time despaired of by the Pasha. But the slowness with which the Ruberians responded to the victory (the Turkowaz 'won' the initiative roll at this point) allowed them to make off without molestation.  Duya-ed-Din Pasha eventually drew up his attenuated command astride the railway behind the Pardis tributary. Behind him in the town, lay one of the 37th Division regiments, the 146th,  with two field gun battalions between them and Hak-al-Kumara town.
140th Regiment finally routed and scattered and
the bridge ridge carried, but 139th Rgt has restored part of the
35th Div line.

What happened to 16th Brigade?

That formation's troubles began right from the outset.  Formed into columns (designed to activate more units in a turn, at the cost of flexibility and firepower), they took time to cross the canal (I allowed only one unit to cross from each grid area per turn).  Comprising the Dorset Infantry on the right, the Gatling Company in the centre and the Duke of Cambridge's Own Punjinjab on the left, the first line hurried towards the enemy lines, hoping to shorten the range, whilst the remainder of the Brigade struggled across the canal.
Intervention of 40th Sipahi throws the Dorsets out of the
Turkowaz lines.  16 Bde losses severe and mounting.
The Turkowaz line between the Pardis River and Suwara Marsh comprised half the infantry of 38th Division, namely 149th and 150th Regiments. So thin was the line, the local Division commander installed himself there, together with his own battalion of mountain guns. He felt secure in the additional support from the army's field guns behind the Pardis, near the town. Firing over open sights, the mountain guns concentrated upon the Gatling company. The hope that enough might survive to bring them into action were dashed by the accuracy and effectiveness of Turkowaz gunnery. Not only were the Gatlings erased from the 16th Brigade Order of Battle; the Brigade HQ company also came in for a pounding. Sir Rubeus Redmayne was seen to spin on his heel and fall, his left arm shattered. The fainting Brigadier was borne from the field.
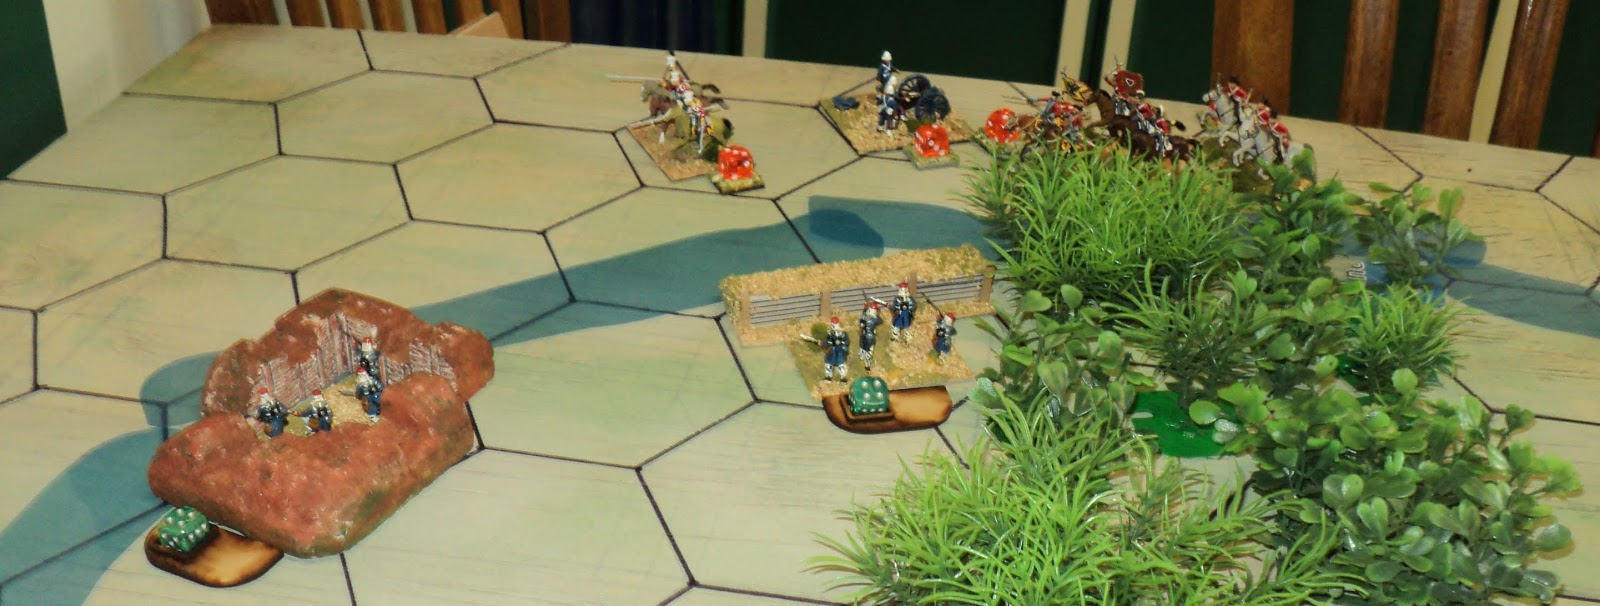
Ruberian Cavalry and Royal Horse Gatlings shooting their way
past 151st Rgt fieldworks.  The garrison has already taken heavy
losses for doing little more than to delay the enemy.

The loss of the Gatlings were bad enough, but it was then found that the Brigade's supporting artillery lacked the range to reach the enemy works. The four battalions had perforce to struggle forward in the teeth of accurate gunnery and effective rifle fire (I discovered during this game something that had hitherto escaped my attention: that direct gunfire over open sights with the presence of the formation general to encourage performance, can not miss! Roll 1 + 2 (direct LOS) +1 (fired at the same target as last turn) +1 (friendly commander in same grid area = 5: Artillery fire lands on the target grid area. Although I let that stand, I decided right from the start that only the nearer of  two stands in the target grid area would take the damage.  Even with that unilateral decision, the Turkowaz artillery fire proved pretty effective all day.  Mind you, the Ruberians couldn't complain too much about their own, with three of their first four salvos rolling 6s to hit).


After surrender of 151st Regiment, cavalry move on to deal with
the Canal Redoubt, defended by the 152nd.
The Dorsets even managed to broach the field works hard by the marsh, where, with the assistance of the Punjinjabi infantry they tried to roll up the Turkowaz line. At the same time 103rd  Madasahatta Infantry tried to storm the gun line. Neither the 150th Regiment, nor the gunners, proved willing to budge. It was not long before this affray drew the notice of the Turkowaz cavalry, advancing north up the canal line. The right hand regiment, 40th Sipahi, directed to deal with the situation, flung itself upon the flank of the Dorsets.  Evicted from the Turkowaz works, the Dorsets fell back with loss.  At about this time, 16th Brigade had lost 9SP; their opponents, 4SP at most.
Counter-attack by 42nd Sipahi, support by
rifle fire from the redoubt, destroys 7th Lancers, and damages
16th Cavalry.
Nor was 16th Brigade to enjoy better fortune to come. Unable to drive home their attacks, the Ruberians were fortunate that 114th Wellesley's Rifle Infantry were able for so long to maintain a close quarter fight against the artillery. Gradually, however, the remnants of the Brigade fell back in disorder towards the canal. At the end of the day, they had lost 14SP, having inflicted not more than one-third of that many (I think 4 only; it was the artillery that finally broke 149th Regiment).
16th Brigade attacks become disjointed.  Desperate assault
by 114th WRI keeps Turkowaz mountain artillery busy...

The fight for the redoubts.

The action west of the Suwara marsh took a deal longer to develop than on the other two fronts, but was to be decisive for the outcome of the action.  This was partly due to the length of time for orders to filter through (Early on, priority was given to 18th and 16th Brigades, the cohesiveness of which formations was quickly compromised.  However, the local commanders' eagerness for close assault was due mainly to my treating all close combats as automatic, requiring no orders. Once the left and centre brigades were reasonably closely engaged, then the 6th Cavalry and 17th Brigades could be chivvied along more briskly. The second problem was the difficult defile by which they could be eased past the Suwara Marsh and the even larger one just off the map to the north of it. The method was to race the leading cavalry (7th Lancers) past the rifle fire from the earthworks manned by 151st Regiment, then bring up the Gatlings.  The Lancers did not come off unscathed).

120th Rajinbul Infantry thrown back, the Norfolks, advancing
up the railway, enter the assault.  Under the direct leadership
of Duya-ed-Din Pasha, 139th Infantry prove hard to shift.
It took some time for the Gatlings to get the range; the 7th Lancers took such losses getting by they soon so depleted as barely to maintain their cohesion (reduced to 1SP); and the next cavalry unit had perforce to drop into fire action to clear the 151st from their earth works. This was sufficient to secure the surrender of 151st regiment (SP reduced to 0), whereat the 17th Brigade found the passage a deal easier.
Canal Redoubt still held, help is on its way: 41st and
42nd Sipahi, and, farther off, most of 37th Division.

Although the 152nd Regiment, ensconced within the Canal Redoubt, now drew the entire attention of the 17th Infantry and 6th Cavalry Brigades, they proved stauncher defenders than their comrades of 151st.  Having tasted their metal, the Ruberian horse was inclined to keep their distance. Meanwhile, two Sipahi regiments (41st and 42nd, the 40th being otherwise engaged)) had crossed the canal and were rapidly approaching. Crossing first, the 42nd (3SP) galloped up to be met boldly by what was left of 7th Lancers (1SP). Although inflicting some loss, the Lancers were flung back.  That was the end of 7th Lancers.  Led by Brigadier Lord Garnet, 16th Cavalry surged into action. 42nd Sipahi in their turn made off, putting as much distance as they might between themselves and the Ruberian heavy horse.
The resistance of 35th Division is starting to hurt 18th Brigade.
Losses are becoming serious. In the distance,
 16th Brigade's attack finally repulsed.
Further help was forthcoming for the 152nd from three regiments of 37th Division (145th, 147th and 148th; the 146th having been held back at Umam al Mansur village to provide a local reserve for 35th Division). However, they were destined never to arrive close enough to make a difference.
Pressure mounting against 152nd Regiment.
16th Cavalry braved the flanking rifle fire from the Redoubt to throw back 42nd Sipahi before the 41st and the Turkowaz Cavalry general could get close enough to help. As the 42nd fell back, all the way to the Dahra Ridge, the 41st beat a hasty retreat back across the canal. 
Counter-attacks fail to save the Canal Redoubt, its depleted
garrison slipping out the gate and back towards friendly lines.
Subjected to heavy machinegun and rifle fire, the 152nd Infantry, reduced to half strength, finally abandoned the redoubt, and began to fall back across the plain. The 37th Division commander at once halted his advance, and drew up his three regiments in a line, slightly to the left rear of the trench line between river and marsh, still stoutly held by the right hand half of 38th Division. It was at this point that, on the far right of the Turkowaz line, 35th Division had at last been forced from their entrenchments and across the stream behind it. Nasr-ed-Din realised that further counter-attack was out of the question, but he also refused to abandon the field just yet - not whilst he still held a defensible line.

Collapse of 35th DivisionDuya-ed-Din leads 139th Rgt
across the rail bridge; 138th Regiment attempts to escape
via the same crossing.

The Battle Ends.

Of course, General Scarlett continued to press. His army had had some success on both flanks. His artillery were all now in action against the part of the line still held by 38th Division - under which storm of shrapnel and hot metal chunks 149st Regiment broke to the rear. But it soon became apparent that any further effort would be beyond his own men (Two turns after the Turkowaz Army reached its Exhaustion Point of 25SP lost, the Ruberian lost its 27th, to reach its E.P.)  

The battle was over.
Remnants of 35th Division form a line on the south bank
of the tributary; on the far side of the Pardis, 38th Div
still hold their fortifications in the centre.
As played out, it was certainly a tough engagement, with all manner of vicissitudes and unexpected events to keep my attention riveted. I have not yet played out a battle to the point that both sides reached their exhaustion points, but this was one in which it was clear that although no longer capable of offensive action, the Turkowaz army was still capable of, and in a good enough position for, defence.  The Ruberian army had by the end of the day, still not forced the line of the Pardis with its tributary.
The battered 16th Bde pinned down under fire.
Losses were not shared equally among the formations of either side:

Turkowaz strengths and losses:


  • Army Command 6SP
  • 35th Division 19SP, lost 14
  • 37th Division 19SP, lost 0 (not seriously engaged)
  • 38th Division 19SP, lost 11
  • 14th Sipahi Brigade, 10SP, lost 4
  • Army Artillery, 2SP, lost 0
Totals: 75SP, lost 29.

Ruberian strength and losses:
  • Army Command 6SP, lost 0
  • 16th Brigade, 19SP, lost 14, including Brig Redmayne WIA
  • 17th Brigade, 19SP, lost 0 (something of a surprise, this, as elements did receive fire)
  • 18th Brigade, 19SP, lost 9
  • 6th Cavalry Brigade, 12SP, lost 4
  • Army Artillery 6SP, lost 0
Totals: 81SP, lost 27.

Canal fortifications taken, but Turkowaz form a new line far
to their rear.
From the Turkowaz point of view, I was very pleased at the manner in which a rather tatterdemalion army stood to their work against the qualitatively superior opponent. 35th division had terrible luck to begin with, the two Ruberian artillery brigades against them rolling 3 6's among their first two salvoes each, and effecting SP losses each time. The mistake of placing the 35th Div artillery behind the line to begin with, probably ought to have been left 'as was', rather than trying to correct it. 
Of course, both sides claimed the victory. The Ruberians had driven the enemy out of its fortified positions on both flanks, and had inflicted heavier losses than they had incurred. All the same, Nasr-ed-Din could feel well satisfied that his army had stopped the invaders well short of their objectives, with his army still in being.  
Close of action.  Not much remains of 16th Bde,
but both armies have reached a state of exhaustion.


Monday, June 24, 2019

The Portable Quatre Bras.

The Quatre Bras battlefield, troops laid out, looking north.
I shall be interrupting the Chronicles of Rajistan postings for the moment and introduce the following whilst I still have the table up. This was to be the final - for the time being - of my little series on Bob Cordery's Portable Napoleonic Wargame. It seemed to me that the Battle of Quatre Bras might be a suitable concluding action.
Westward view.  The far 3 rows of hexes have been
masked.
Posting at this point is also to excuse my delay in posting the AAR of the action at Hak. I do hope you will find, when it is published, it will have been worth the wait.  I have kind of story-boarded my pictures, with notes, and have simply to flesh out the battle narrative.
View from Allied side to the north.  Perponcher's Dutchmen
in position south of Quatre Bras; The Duke of Wellington,
 with Picton's 5th Division, just arriving from the north. 
For now, I'll just leave the pictures by way of a ... trailer.

To be ... resumed.


Friday, June 21, 2019

From the Chronicles of Rajistan (2)

Genaral Scarlett's Battle Plan.

As the Pardis River oozes its somnolent journey from Sakhdad, it interrupts its southward course with a wide detour to the northeast, past the town of Hak, until it reaches the village of Abu Rummar. Having discovered what might be seen there - not much - the stream resumes its former direction, which it retains with no further interruptions until it reaches the Gulf of Parthia nearly 300 miles to the south. So, in the opposite direction, one might have observed during August and September, 1875, a flow of a different kind: the advance of Major-General Scarlett's column of Ruberian and Rajistan soldiery - horse, foot and guns - its purpose to visit the Empire's wrath upon the perfidious Turkowaz. 


Overview, facing north.
  

It was upon reaching this Pardis 'dogleg', that Scarlett discovered a Turkowaz army awaiting him, a fortified line facing northeast astride the Pardis River, its flanks protected by impassible marshes. Protecting the Turkowaz far left flank were not only the marshes of Suwara, and a larger one just off the map to its north, but fortified strongpoints to the west of them alongside the Dahra irrigation canal. The treacherous Pardis River being crossable, apart from the at the towns (the hexsides of Hak and Abu Rummar), only at the bridges and at the Dahra Tower, the Ruberian main effort was indicated to cross the canal, carry the Turkowaz field works and redoubt, thence to force the river crossing at Hak itself.
Ruberian Brigade columns on the march.  The two elements
per grid area will be explained in the text.


To this end, 18th 'Poona' Brigade, with the support of 'X' Mountain Artillery and the 5th Hampshire Howitzer Battery, was to attack along the single track railway line.  Although Brigadier Redmayne understood that he might force the bridge crossings if he could; his instructions were to hold the defenders in place, and, if possible, induce the enemy to commit at least part of his reserve to that part of their line.  Sixteenth Brigade was to cross the Dahra Canal east of the Suwara Marsh and assault the enemy line on the west bank side of the Pardis.

Cavalry leading the flanking march.
Intelligence indicating that 38th Turkowaz Division was rather thinly spread on that side of the river, Scarlett was confident of overrunning the position in short order. Of course it would take time for the main effort, to filter the cavalry and 17th Brigade between the marshes, storm the isolated fieldworks and roll up the enemy flanks, but once underway, the advance upon Hak should meet with little obstruction.

The Turkowaz commander, Nasr-ed-Din Pasha, was not for nothing regarded as the Settee's most able soldier.  He was acutely aware of the qualitative inferiority of his cobbled force - cobbled, because time had been too short to bring the regulars all the way to this remote outpost.  Two of his Divisions he placed behind field works to face the initial attacks.  Behind, he kept a large reserve; one of his three Divisions, and his cavalry as well. As it transpired, he was, almost as the battle began, to commit his cavalry to the left flank.


Battle joined: 18th (near bank) and 16th (far bank) Brigades
closing in on the Turkowaz lines.

I shall interrupt the narrative at this point to discuss the rule set I was using.  This was Bob Cordery's '19th Century' set from The Portable Wargame, but with a few small tweaks to accommodate this scenario.

1.  I added a layer of command between GoC and troops, namely the brigade commanders on the Ruberian (RED) side, and the Division commanders on the Turkowaz (BLUE). They seem to want to be there somehow.  These command elements gave the same plus to combat as the army commanders do, but could stand as substantive fighting elements in themselves. However, it being held that the HQ escorts could be only company sized, I gave them just the ONE Strength Point; but made them elite. The idea was to discourage their employment as extra independent fighting elements except in extremis, as one might expect. 

2.  I allowed two elements per grid area for the purposes of movement - effectively columns of manoeuvre. 
  •  In combat, the extra element added no bonus whatever. Under bombardment, however, only the element nearer the enemy took any hit.  If forced to retreat, that element passed 'through' that behind in the same grid area. The reason for my adopting this is that, having placed the Turkowaz mountain artillery in the front line, I discovered just how lethal direct fire could be, especially with their local Divisional commander standing over them.  
  • Provided the two elements remained together in the same grid area, they required just one activation 'point' to move. However, in crossing the canal, only one element could cross from the same grid area in one turn.  
  • I found these ideas helped the action to rattle along in the early stages, but as the battle developed, these columns split into their constituent elements, with consequent decision making required at activation.
    Duel between 18th Brigade and 35th Division.


3. Terrain effects:
  • The rivers were impassible,  except (a) at the bridge near the confluence of the Pardis and its tributary, (b) at the railway bridge, and (c) at any town or Dahra Tower hex-side, it being assumed that there are sufficient river crossings in those places of one sort or another.
  • The marshes are impassible, their reeds and foliage masking line of sight.
  • The reeds and foliage lining the rivers have no significance other than to give the rivers a slightly more 'riverine' appearance.
  • The canal was crossable by horse and foot, including the Gatling guns.  It could not be crossed by field or mountain artillery, except at Abu Rummar and Dahra Tower.
  • The Dahra Canal Redoubt and the nearby fieldwork offer all round defence for their grid areas.
Thirty-seventh Division already being transferred to the
western flank.  The cavalry Brigade is already across
the river.
4.  Combats - Close combat.
Combats in which the opposing elements are in adjacent grid areas are deemed 'close assault' or 'close combat'.  All such combats were treated as automatic, requiring no order (and therefore no activation point allocation), and played out in both players' turns. The fortified side counted the benefit of fortifications in their own as well as in their opponents' turn.

5.  Turn sequence. I used my 'dice method' of determining which side 'went' first in any pair of turns (higher roll went first), and to determine how many 'elements' could be activated [1,2 - (Median - 1); 3,4 - (Median); 5,6 - (Median + 1)]. 
6.  A comment on play balance:
The forces being fairly close to equal in number - the difference being four Ruberian Gatlings and one Turkowaz field artillery plus fortified position - the armies are quite disparate in quality. This seems to have been so historically, at least at the 'First' Battle of Kut in September 1915. I expected that the Turkowaz defensive posture (with a willingness to counter-attack, given the chance) would go a long way towards balance.  We'll see how far this expectation was realised.

Sixth Cavalry Brigade running the gauntlet of fire from
the field works of 151st and 152nd Regiments

For now, this posting being already of sufficient length, I'll resume the battle narrative another time.

To be continued...


Thursday, June 20, 2019

From the Chronicles of Rajistan...

...
The Turkowaz depredations upon the Ruberian Imperium of Rajistan, in the Sangrian sub-continent, had in recent times become more than could be contained by the overstretched border command of Sir Redfers Carmine, and in consequence more than a mere nuisance. 

'The overbearing Sultan Azraq Arslan must be taught a sharp lesson!' quoth the choleric General and Vice-Regent Sir Grinmore Scarlett, '... and I am the one to administer it, by the Powers!' After several weeks of preparation, General Scarlett assembled a Division sized corps of all arms. With this Expeditionary Division, he undertook to enter Medifluvia, advance up the famous Pardis River, take the fabled city of Sakhdad, strip the place of its wealth and raze it to the ground. By, as he averred, the Powers.

In the natural course of things, the weeks of assembling troops, supplies and associated impedimenta did not go unnoticed in Sakhdad, the seat of the local Medifluvian Governor, the Bey of Bassorah. Clearly, this was going to be far beyond his local levies and few regular forces to cope with. An appeal was despatched betimes to the Sultan in his Settee capital, Ionople. The normally somnolent Sultan, apt to be awakened into action by the threat of violence to his realm, sent his best commander Nasr-ed-Din Pasha, with instructions to pick up such troops as he could along his journey to the distant province, and bring the Ruberians and their Rajistan sepoys to a halt well south of Sakhdad, and to destroy them in the desert.

Nasr-ed-Din managed on the march to gather enough infantry to form three small Divisions, though he could not hide from himself their general lack of training, even such as might have been got on the march. His cavalry were of better mettle, and his artillery good. His best troops, few as they were, were to be found in the personal entourages of his commanders. Arriving at Sakhdad, he continued on south to meet the Frankish foe.
Area of Hak battlefield.  The cartographer has mislabelled the 
River Pardis as 'Tigris'.  The square marked 'D' represented a
small column that General Scarlett decided against sending.


On the Ruberian side, but for delays that added weeks to the operation, the advance had proceeded without trouble, nor any real sign of the enemy. At last the Ruberians reach the point along the River Pardis where the stream made a sharp loop, such that for a few miles along its length one might stand on the west bank and watch the sun set behind the east. Nestled in this loop was the desert market town of Hak.  It was in this area that Nasr-ed-Din had chosen to take his stand (see map).

The Pasha had with him:

Medifluvian Defence Army: General Nasr-ed-Din Pasha (TURQUOISE) 6SP


35th Division: Duya-ed-Din Pasha (and entourage) (1SP - Elite)
     137th Regiment (4SP - Poor {levy})
     138th Regiment (4SP - Poor)
     139th Regiment (4SP - Poor)
     140th Regiment (4SP - Poor)
     35th Mountain Artillery (2SP - Average)

37th Division: Abdul Kerim Emir (1SP - Elite)
     145th Regiment (4SP - Poor)
     146th Regiment (4SP - Poor)
     147th Regiment (4SP - Poor)
     148th Regiment (4SP - Poor)
     37th Field Artillery (2SP- Average)

38th Division: Ali Sait Akbaytogan (1SP - Elite)
     149th Regiment (4SP - Poor)
     150th Regiment (4SP - Poor)
     151st Regiment (4SP - Poor)
     152nd Regiment (4SP - Poor)
     38th Mountain Artillery (2SP - Average)

14th Cavalry Division: Ahmed Fayzi Pasha (1SP - Elite)
     40th Cavalry Regiment  (3SP - Average)
     41st Cavalry Regiment  (3SP - Average)
     42nd Cavalry Regiment (3SP - Average)

13th Field Artillery: (2SP - Average)

24 units; Median 12
75 Strength points; Exhaustion Point -25.

Medifluvian Defence Army

Rajistan Expeditionary Division (RED): Major-General Sir Grinmore Scarlett   6SP


16th 'Poona' Brigade: Brigadier Sir Rubeus Redmayne  (1SP - Elite)
    2nd Dorsets  (4SP - Elite)
    20th Duke of Cambridge's Own (4SP - Average)
    114th Duke of Wellesley's Rifles (4SP - Average)
    117th Madasahatta Infantry (4SP - Average)
    'Poona' Gatling (MG) Company (2SP - Average)

17th 'Ahmednagar' Brigade: Brigadier Sam Vermilion-Jones  (1SP - Elite)
     1st Ox and Bucks (4SP - Elite)
     22nd Punchnjab Infantry (4SP - Average)
     103rd Madasahatta Infantry (4SP - Average)
     119th Myulshu Infantry (4SP - Average)
     'Ahmednagar' Gatling Company (2SP - Average)

18th 'Belgaum' Brigade: Col. Sir Redfers Carmine, Bart. (1SP - Elite)
     2nd Norfolk Infantry (4SP - Elite)
     7th Duke of Norfolk's Own (4SP - Average)
     110th Madasahatta Infantry (4SP - Average)
     120th Rajinbul Infantry (4SP - Average)
     'Belgaum' Gatling Company (2SP - Average)

6th Cavalry Brigade: Brigadier Salmond Lord Garnet (1SP - Elite)
    7th Lancers (3SP - Elite)
    16th Dragoons (3SP - Elite)
    33rd Queen Victoria's Own Light Horse (3SP - Average)
    Gatling Detachment, RHA (2SP - Average)

Division Artillery:
   'X' Mountain Artillery Brigade (2SP - Average)
   1st Rajistan Mountain Artillery (2SP - Average)
   5th Hants Field Howitzer Battery (2SP - Average)

27 Units; 14 Median.
81 Strength Points; Exhaustion point -27SP.


Rajistan Expeditionary Division (RED)


The knowledgeable military historian might observe an uncanny resemblance to the Battle of Kut, an incident during the course of the campaign conducted by a certain Major-General Sir Charles Vere Ferrers Townshend in Mesopotamia, 1915-16. I've had this project in the pipeline for several months, now, and finally got to play it out. I was hoping to involve 'Jacko', using a very slightly adapted Portable Wargames rule set for the 19th Century, from Bob Cordery's first book of the series, but as he was unavailable, played it out solo.

More, later...
To be continued...

Sunday, June 9, 2019

D-Day Celebration...


Over this last weekend, the Christchurch War Games Society - a section of the Woolston Club in Christchurch - staged a war games event to commemorate the D-Day landings in Normandy, 6 June, 1944.  There were two large games, one of the beach landings (SWORD Beach, using 15mm scale figures), the other more 'generic' bocage fighting (28mm figures), though one end of the very long table featured Pegasus Bridge.  There were several displays of uniforms, weapons and models as well.


I didn't participate, myself, not having the appropriate kit (mine being entirely 1:76/1:72).  Here are some pictures I took of the event.
More on Sword Beach


.....

The following pictures are from the Bolt Action game, which featured I think 7 players a side, each commanding elements of separate Divisions. Unfortunately, I didn't take a pic of the whole length of the table. The action was not intended to be historical, with 6th (British) Airborne Division up one end of the table, and 82nd (US) Airborne at the other. The British Airborne faced off against 716 Infantry Division, the US 82nd against 352 Infantry or 17SS Panzergrenadiers (I'm not sure which).


Pegasus Bridge - more of a display piece, with the action
taking place on the opposite (west) bank.

Some really amazing terrain pieces that featured in - well
both games, really.


I think the aircraft were there for display.  The list against the
wall shows at least the German Divisions featured.  PLD
is, of course,  the Panzer Lehr Division.


Here's a link to Craig's Wargaming blog, with a good deal more about the event.