
Continuing on from the previous posting, and having played out one small battle using Mark Cordone's '3x3' grid battlefield concept, I thought I'd try out a few small modifications in a series of battles that I called 'Bagrat's Raid'.
It appears that late in the reign of Emperor Manuel Ponos, a certain Abasgian Atabeg Bagrat, casting covetous eyes upon the riches that might be had for the taking just over the frontier in Eastern Byzantium, resolved upon a raid. Any and every sort of plunder he sought to his own profit. No sooner conceived, than the project was put in motion. In the early summer of 997, he crossed the frontier with a mixed column of horse and foot.
Word quickly spread throughout the eastern fringes of the Empire, punctuated by columns of smoke from burning villages and farms. It so happened that the Emperor was making a state visit to the outlying city of Trebizond, accompanied by his elite Kataphraktoi. At once determining upon a personal intervention, he placed himself at the head of his escort and a gathering of local Thematic troops, and set off to intercept the raiders.

The Plain of Amphorae
Marching rapidly, the emperor intercepted the raiders in the Plain of Amphorae, two or three skhoinoi* southwest of Trebizond. He had with him:
Imperial Army:
Emperor Manuel Ponos I commanding with
1 unit Kavallarioi personal bodyguard, part lance, part bow
1 large unit of Kataphraktoi, heavily armoured horse, part mace, part lance, part bow
1 unit of Hyperkerastai light horse, bow only
1 unit of Skoutatoi heavy infantry, part long spear, part bow
1 unit of Peltastoi medium infantry, spear only
1 unit of Akontistai light infantry, javelins
Both sides hastily drew up their forces in what amounted to an encounter battle.
Abasgian Raiders:
The Bagrat Bey had brought along with him:
1 unit personal bodyguard, heavy cavalry, lance
2 more units of heavy cavalry, lance
1 unit of Ossetian (Alan) light horse, bow
1 unit of heavy foot, spear
1 unit of medium foot, bow


The force sent was formidable: the heavily armoured wedge of Kataphraktoi, armoured head-to foot, horse and rider. The Emperor himself supported the attack with his own elite tagma of horse. The spear held, but with some loss (a strength point). The early clashes redounding to his disadvantage, Bagrat threw in his reserves: his own bodyguard to support the spearmen, the other horse unit to supplement the lead, thence to resume their attack on the left. On the right, the battle settled down to an archery duel.
Aside:
As I don't have small sized or single figure command stands, my generals will be permanently attached to their own units. Now, I'll probably class such units as elite, though for this, my first '3x3' PW battle, all units were classed as ordinary. In fact I maintained this convention throughout this raid.
However, the generals all counted towards aiding combat (+1 for shooting or close combat) for their own unit, but also for any unit in the same grid area. In effect, if the general were supporting or being supported, the unit directly engaged would receive +2 in combat.

As it transpired, the Abasgians got the better of the archery duel on their right, the spearmen gradually pushed the Byzantine heavy horse in the centre, and the heavy horse forced back the skoutatoi on their left. Although the Abasgian line of spears eventually collapsed, the rout of the skoutatoi on the Byzantine right decided the battle. The Emperor's column was forced aside, and the raiders continued on their way. Both sides had lost 4 Strength Points.
 |
| The Emperor Manuel Ponos 'fleeing the field' (from a hostile chronicler...) |

* * *

Duke Doukas intervenes:
The Emperor left far to the rear by the raiders, a local landed magnate, the Duke Doukas, had also hastily brought together such local troops he could assemble, and set off to intercept the intruders before they could do more damage. At the time the Abasgians had reached the market village of Komicros, and it was in and around this place that the battle took place.

His military resources limited, Doukas was able to assemble fewer troops than he would have desired,
having with him just 5 units:
1 unit, Kavallarioi personal bodyguard, part lance, part bow
1 more unit of Kavallarioi
1 unit Prokoursatores, light horse, part lance, part bow
1 unit Skoutatoi, part spear, part bow
1 unit Sphendonistai, light infantry, sling
1 unit, Kavallarioi personal bodyguard, part lance, part bow
1 more unit of Kavallarioi
1 unit Prokoursatores, light horse, part lance, part bow
1 unit Skoutatoi, part spear, part bow
1 unit Sphendonistai, light infantry, sling

The raiders seized the village first, and the woods alongside (the placement of village and woods was random - each decided by 2xD3). The open flank, Bagrat covered by his light and a unit of heavy cavalry. Placing himself in the rear of the village, he also kept a heavy cavalty unit in reserve. Doukas at once launched an attack on the village, and sent most of his horse to try and clear the open flank. On his left, his psiloi slingers faced off against the Abasgian bowmen, a risky proposition, as the latter enjoyed the cover of the woods.
Aside: Although the slingers and archers were in adjacent squares, it seemed to me reasonable that both might engage in shooting action only. The difference is that if one side was forced back, the other would not be in a position to follow up. That consideration decided me that the light infantry would in fact close assault. The hope was that they might 'get lucky', and they could always 'take a hit' instead of retreating. In the event, they held on for a considerable time.

In fact the slingers did take an early hit, and the Byzantine light horse was also forced to flee. But the heavies didn't remain unsupported for long. The prokoursatores quickly rallied and re-entered the fray.

The cavalry fight proved a deal deadlier than the fight over the village, both sides taking heavy losses, until finally the Abasgian heavies collapsed (2SP = unit destroyed or routed)


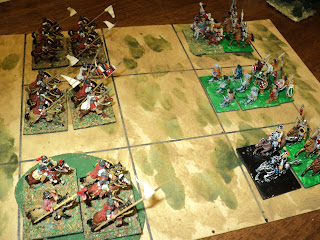
 |
| Byzantines attacking the village of Komicros. |
 At once Bagrat threw in his reserve heavy cavalry. They at once reversed the fortunes on the open flank, just as the Byzantine foot finally broke into the village. That success was not, however, to be sufficient. The right now weakened, left both flanks vulnerable.
Although Doukas tried to press his advantage in the centre, his heavy foot had already taken some loss. In the climactic battle in the around the village, the Byzantines were thrown back out of the place, but the Abasgian spearmen also fell back, badly depleted. The miraculous victory of the Byzantine light horse, who forced the enemy heavies to fall back, was not enough to save the battle.

For at last the slingers had given way, to be followed up by the Abasgian archers. The raiders were again victorious.

This was - or would have been if losses were cumulative in this campaign - something of a pyrrhic victory for the raiders, really more of a drawn battle. Losses had been very heavy on both sides, though to be sure, the Byzantines had slightly the worse of it: 5 SP to 4.


***
Duke Doukas pursues...
The victory won, the raiders were left free for the time being to carry out its tasks of burning and plundering. The Emperor was still distant, but the Duke, Doukas the Dauntless, was not yet bereft of resource. Gathering together as much of his Thematic cavalry as he could muster - five units of kavallarioi and one of prokoursatores, he set off in pursuit of the raiders. Heavily laden as they were with plundered loot and looted plunder, the Abasgians turned to face the pursuers. At once, they attacked.
This proved to be the quickest battle of the campaign, as the Abasgians simply swept the Byzantines from the field. The cavalry on the rise on the right of the Byzantine position managed to hold fairly comfortably, but the dogged spearmen and Bagrat on the raiders' right just bulldozed their way through. Although the raiders lost 2 strength points, they were able to break clear and continue on their way.


The Emperor Once Again...

Once again this battlefield was garnished with two pieces of terrain, a woods on the Abasgian right; and the Emperor standing with his bodyguard and the kataphraktoi on the rising ground in the centre of his line. The forces engaged were identical to those of the Emperor's first attempt to intercept the raiders.

Bagrat of course occupied the woods with his archers, where they faced the Byzantine foot - psiloi and peltastoi (Here I made a mistake and thought of the psiloi as slingers - sphendonistai - rather than the javelinmen - akontistai - they were supposed to be. In my view javelinmen ought to have a shooting range of 1 square only in this 3x3 version of the Portable Wargame).

As they had in every battle so far, the Abasgian raiders took the fight to their enemy (in fact, they must have 'won' at least 80% of the initiative rolls this whole campaign). Although the heavy horse drove back the kavallarioi on the Byzantine right, it was not without the cost of a SP, and the prokoursatores were able for the time being to maintain their position there. Bagrat's personal unit held their own in the uphill fight against the katapkraktoi, both sides taking a loss. Meanwhile, having driven back the akontistai, the Abasgian archers took the fight to the enemy spearmen whilst their own came out of the reserve. This probably was not the way to go, for the bowmen were routed from the field before the spearmen could properly relieve them.


 Now was the Emperor's moment. The Abasgian assaults beaten off, the whole Byzantine line surged forward. There was no stopping them. It was bad enough that the Abasgian left was driven from the field. The decisive moment for the entire raid was the outright collapse of Bagrat's personal unit. He himself escaped harm or capture, but that was about all the profit he got from the raid. Without a sufficient force to escort the plunder, the Byzantines recovered nearly all of it..
 This was indeed a costly battle for the Abasgians, no fewer than 8 SPs lost (not counting the 6SP for the commander) against 3 lost to the Byzantines. The Emperor had more than recovered Byzantine fortunes after three successive defeats.
* * *
This campaign was pretty much a play test of Mark Cordone's original idea. It took a couple of actions to get used to; and questions arising from how shooting fitted into the whole scheme had to be addressed. Now, it is true that Mark answers that question to some extent in his original rules (a copy of which I took the liberty of printing out). The problem I had was that some of my troops - especially Byzantines and Bulgars, are built as much for shooting as for eye-balling up close.
By half way through Bagrat's raid, I settled upon this routine for each 'bound':
Afterword
This campaign was pretty much a play test of Mark Cordone's original idea. It took a couple of actions to get used to; and questions arising from how shooting fitted into the whole scheme had to be addressed. Now, it is true that Mark answers that question to some extent in his original rules (a copy of which I took the liberty of printing out). The problem I had was that some of my troops - especially Byzantines and Bulgars, are built as much for shooting as for eye-balling up close.
By half way through Bagrat's raid, I settled upon this routine for each 'bound':
- Shooting (range: 1-2 squares; both sides dice)
- Dice for initiative
- Top score moves
- Close combat (both sides dice)
- Bottom score moves
- Close combat (both sides dice)
This routine seemed to work quite well, I thought.
I have been wondering about double armed troops shooting whilst moving into contact. I mentioned it to Bob Cordery somewhere (blog or fb), but I think I'll leave that one 'under advisement' for the time being. Maybe units that don't 'do' close combat (light troops and archers) simply take a minus when they find themselves in one.
One convention I did adopt, though. Byzantine horse and foot tended to be part-armed with lance, and part-armed with bow. I gave the horse a minus for shooting (in other words they hit on a six, or a five if not moving) But since these guys are usually interested in getting tore in, I doubt if they did not get the extras very often, if at all. The skoutatoi I decided won't get the minus. The reason is that historically (at least in theory) they were issued with a heck of a lot of arrows - two quivers, 40 or 50 to a quiver if I recall correctly. Furthermore, they had ammo carts close by to replenish. The Bulgar horse archers were all individual double armed, javelin and bow. So they don't count the minus for shooting. On the other hand, they have to face the lance if the latter move into contact...
* 1 schkoinos - about 5 kilometres, roughly.
Fantastic mini-campaign Archduke which highlights how these small fast-play games can be effective. A most enjoyable read and your illustrations are wonderful!
ReplyDeleteThanks, Maudlin Jack -
DeleteThese 3x3 games have a 'beer and pretzels' feel to them, but they are fun, and constitute a fine way to resolve action in a broader campaign and war context.
Cheers,
Archduke Piccolo
Good stuff, very inspiring. I'm pondering how to turn this system into something workable for multi player remote games. Remind me how you 'win' battles. Is it literally just getting one unit onto the enemy baseline?
ReplyDeleteYes, occupation of one or more of the enemies base line squares at the end of their turn ( they get one chance to counter attack) results in victory. I have seen other people use different victory conditions, such as holding a village for a set number of turns and then his has worked too. I think it's really up to the individual players, this seems to work well with a number of different ways to play.
DeleteHi Martin and Mark -
Delete'Getting a unit to the enemy baseline' has been the way I've been playing it, but I am thinking that if the enemy has something in hand in the 'reserve' zone, he should be allowed 1 turn to counter-attack. Judging by Mark's comment, I had that one right.
I am also wondering if, absent an enemy in the immediately adjacent front square, a unit can turn to face an enemy to a flank. The opportunities to do so will probably be very rare (not to say, risky), but it might be worth considering.
An exciting campaign. How did you decide on the number of battles to fight? After your post on the Portable Wargames Facebook page regarding shooting and mixed units I came up with some rules additions to better address this. I play tested them and they seemed to work well but I am very interested in your opinion. I like the -1 modifier for mixed units.
ReplyDeleteHi Mark -
DeleteIt seemed to me that four battles was a nice number to go with, though it might have been a deal fewer had the Emperor won his first battle! For a while I thought the Byzantines would win the second combat.
'Mixed' units - of course - a better expression than 'double-armed'. The fact is that the Bulgar and some Pecheneg units ARE 'double-armed' - javelins and bows issued to everyone. The Byzantines are mixed, apart from the 'trapezitai' light horse, armed with lance and javelins.
If bows can shoot 2 squares, probably the javelins ought to be allowed 1 only. Roman darts, similar. In the 'phase' system I was using, a great deal hinges upon the initiative roll. For instance, suppose a Byzantine cavalry unit faced off against Bulgar heavy horse archers. Both shoot in the shooting phase. Bulgars hit on a 5 or 6; Byzantines on a 6 only.
Now comes the initiative roll. If the Byzantines win, they can charge into close combat, and count the lance, charging. If the Bulgars win, they can charge, don't get the lance bonus, but pretty much neutralise the Byzantine lance.
Now, I used this system during this campaign, and I have to tell you, Byzantine shooting was pretty dismal for the whole raid. Bulgars were better (of course) but still pretty mediocre.
I haven't yet seen what you have suggested along these lines.
Cheers,
Archduke Piccolo
I will await your input. Thanks for taking the time to try this out and offer your observations.
DeleteA fun mini campaign and interesting read. I do like the creative drawings.
ReplyDeleteCheers, Peter -
DeleteI find the Skylitzes illustrations and those of similar sources, just charming.
Archduke Piccolo.