
At last driven back to the cradle of the BARFist Revolution, Colonel Peenut Buttahjars and his revolutionaries remained holed up in the regional capital, Madasaiwannabe, at the head of the Maimajikwand Valley. The months of battle that had taken him to the country's capital, Nawabisbad, and back again had depleted his revolution of personnel, equipment and enthusiasm. A certain amount of fortification work was completed before the scouting screen espied distant clouds of dust - 'no bigger than a man's hand' - far to the west. They were approaching fast.


At last, I finally got around to a closing-off episode in a major chapter of the History of the Nawabate of Tchagai. Would it be a final stand? Might it yet lead to a resurgence? For the earlier narratives of the 'Long Live the Revolution' campaign, I commend you to the labels on the right. Once this is finished, I will be posting a 'Table of Contents' post for this campaign. Then one can read it as a continuous yarn. For now, here are links to
... the previous chapter, and
... the beginning of the campaign.
... the previous chapter, and
... the beginning of the campaign.

As the first battle in the campaign was fought on a square grid rather than the hexes for the other battles, I went back to the squares. Although the field is not as large as the hex board, I still went with my adaptation of the Portable Wargame method of allocating Strength Points for the respective forces; that is to say, increasing the base number and dice rolls by 50%.
The Revolutionaries, defending, got 18 + 3D6 SP. The roll was average: 11, so the BARF forces amounted to 29SP.
The Government, attacking, got 18 + 6D6. Again, a fairly average roll: 21. So they got 39SP.
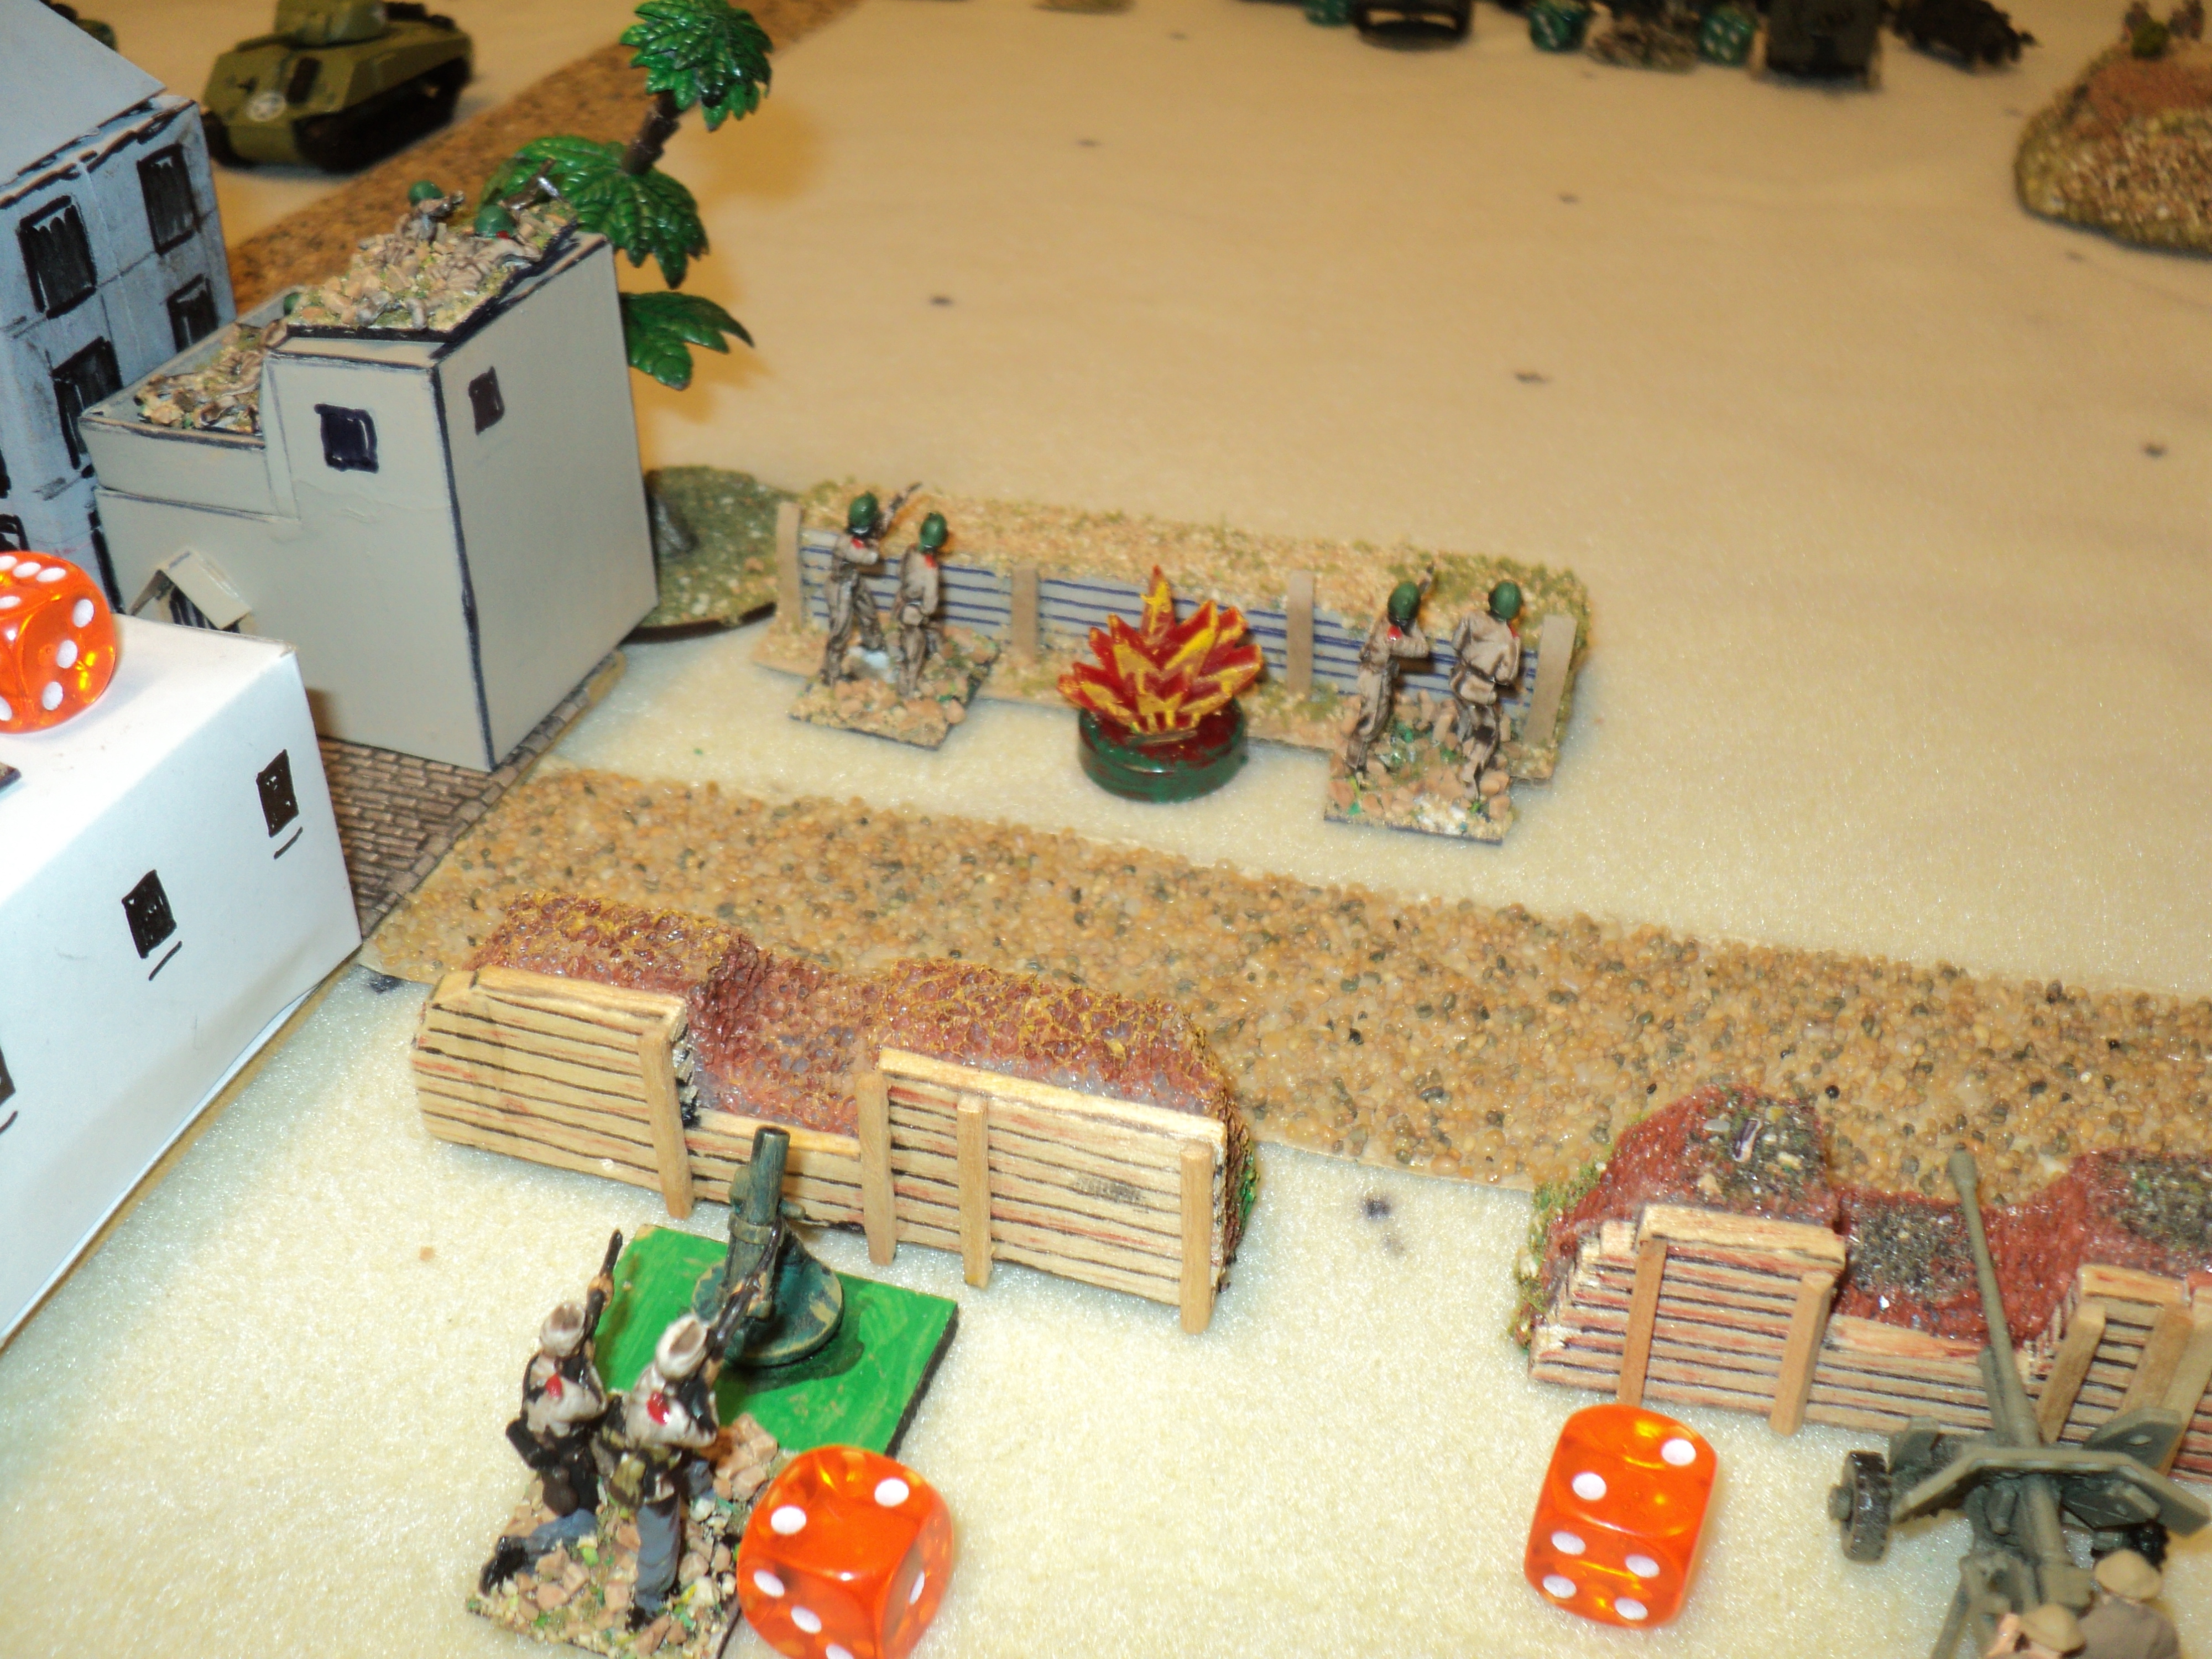
During the course of the campaign, I allowed the defenders half the difference in SP for defence works. These amounted to 5 stretches of field works @ 1SP each. Two were placed each side of the town, somewhat refused from the west face of the built up area. The last extended the front of the town's face to the right. Behind this last earthwork and the one on the ridge to the south, stood a company of infantry. The remainder protected a fixed anti-tank gun company either side of the town, and the Rebels' sole support unit of mortars. A third infantry company garrisoned the town, along with the machine guns. The Colonel's HQ was also within the town's precincts.
The Revolutionaries, defending, got 18 + 3D6 SP. The roll was average: 11, so the BARF forces amounted to 29SP.
The Government, attacking, got 18 + 6D6. Again, a fairly average roll: 21. So they got 39SP.
During the course of the campaign, I allowed the defenders half the difference in SP for defence works. These amounted to 5 stretches of field works @ 1SP each. Two were placed each side of the town, somewhat refused from the west face of the built up area. The last extended the front of the town's face to the right. Behind this last earthwork and the one on the ridge to the south, stood a company of infantry. The remainder protected a fixed anti-tank gun company either side of the town, and the Rebels' sole support unit of mortars. A third infantry company garrisoned the town, along with the machine guns. The Colonel's HQ was also within the town's precincts.

The Forces were:
Revolutionaries (defending):
Commander: Col Peenut Buttahjars, plus staff, stalwarts and stooges, and HQ truck = 6SP
3 (understrength) Infantry Companies (Nrr 1,2,3) @ 3SP = 9SP
1 MG Company = 2SP
1 Mortar Company = 2SP
3 (understrength) Light Armoured Squadrons @2SP = 6SP
1 6pr (medium) AT Gun battery = 2SP
1 2pr (light) AT Gun battery = 2SP
All units count as 'Average'.
Totals:
11 Units, activate 5,6,7 depending on die roll
29SP, Exhaustion Point -10 (Rout Point - 15); 5SP of field works added.

Government (attacking):
Lt-Colonel E. Mugglethwaite, plus staff and scout car = 6SP
3 (understrength) Companies of the 18th Siliputti Regiment @3SP = 9SP
1 MG Platoon of 18th Siliputti Rgt = 2SP
3 (understrength) Companies of the 17th Choklit Ghandi Regiment @3SP = 9SP
1 MG Platoon of 17th Choklit Ghandi Rgt = 2SP
3 Sherman medium tank Squadrons (A, C, D) of 6th Bananarahmaputra Hussars @3SP = 9SP
2 x 25pr Field batteries @2SP = 4SP
Totals:
14 Units (counting an artillery unit and its tow as a single unit, something I ought not to have done).
Activate 6,7, or 8 units, depending on die roll.
39SP, Exhaustion Point -13SP (Rout Point -20)


The Government artillery scored an early success, bringing accurate fire upon the trenches occupied by the rebel Nr 1 Company and causing several casualties (1SP = 1 stand). At the same time, 'C' Company Choklit Ghandi followed the road to bring the 6-pounder anti-tank position under fire. The guns having no transports - a chronic lack for the Revolutionaries - could defend themselves only with the small arms available to the crews for self defence. This minor attack was off to a flying start.


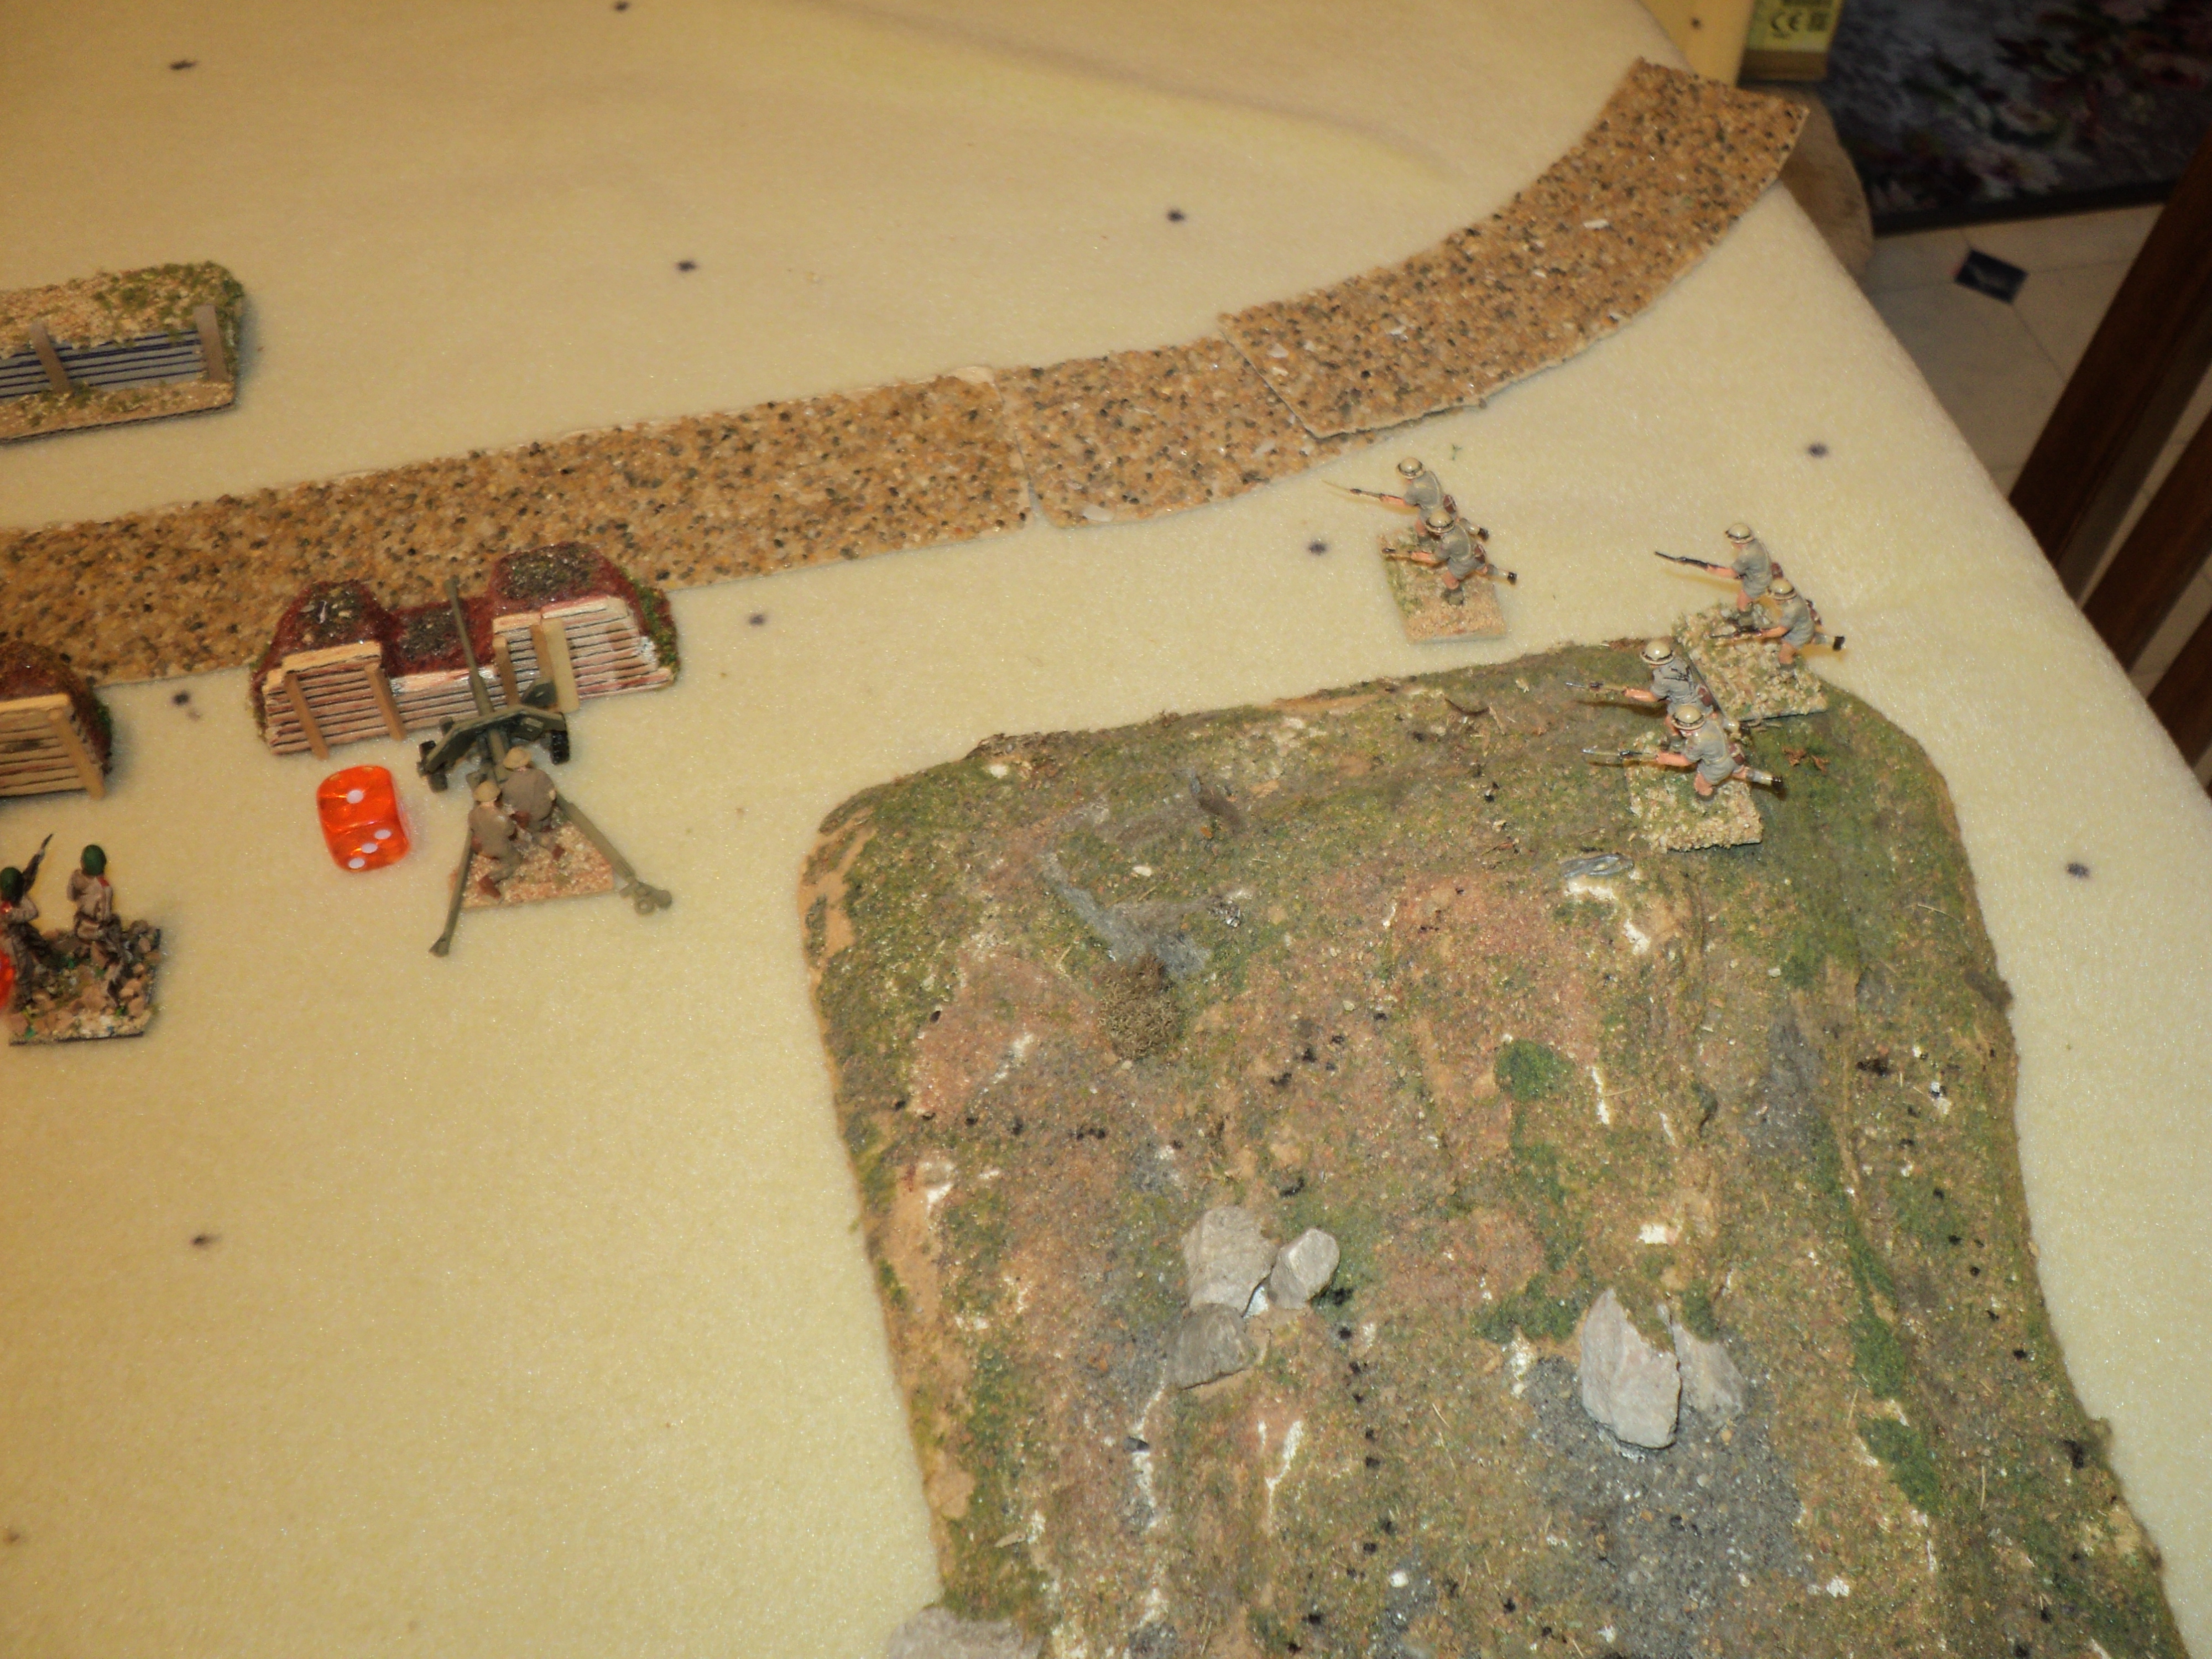
 They were enjoying more success on their left. Mounting the high ground, C Company Choklit Ghandi brought the anti-tank gun position under close assault. The fighting was brisk and short. Half the gun crew was brought low, but their staunch defence threw back the Government infantry. The dice tell the story. Both rolled '6' on the 'to hit' dice, then rolled high on the effect. The guns being fixed had to take the SP loss (reducing it to the '1' shown in the pictures); I elected to pull the Government infantry back up the hill to bring the remaining guns under fire.


The situation on the south wing remained unpromising for government. Standing off to shoot up the 2-pounder anti-tank position, rather encouraged the rebel armour to advance. Meanwhile, the infantry had almost all been driven back almost behind the hill that formed their start line.

1 Mortar Company = 2SP
3 (understrength) Light Armoured Squadrons @2SP = 6SP
1 6pr (medium) AT Gun battery = 2SP
1 2pr (light) AT Gun battery = 2SP
All units count as 'Average'.
Totals:
11 Units, activate 5,6,7 depending on die roll
29SP, Exhaustion Point -10 (Rout Point - 15); 5SP of field works added.

Lt-Colonel E. Mugglethwaite, plus staff and scout car = 6SP
3 (understrength) Companies of the 18th Siliputti Regiment @3SP = 9SP
1 MG Platoon of 18th Siliputti Rgt = 2SP
3 (understrength) Companies of the 17th Choklit Ghandi Regiment @3SP = 9SP
1 MG Platoon of 17th Choklit Ghandi Rgt = 2SP
3 Sherman medium tank Squadrons (A, C, D) of 6th Bananarahmaputra Hussars @3SP = 9SP
2 x 25pr Field batteries @2SP = 4SP
Totals:
14 Units (counting an artillery unit and its tow as a single unit, something I ought not to have done).
Activate 6,7, or 8 units, depending on die roll.
39SP, Exhaustion Point -13SP (Rout Point -20)
Colonel Mugglethwaite's plan was more a right hook than a double envelopment. The Siliputti Regiment, accompanied by the Bananarahmaputra Hussars' armour, was to storm the ridge south of the town, then exploit on into the rear of the place. A secondary left hook, supported by the artillery, was charged with seizing the heights flanking the rebel position, then take the enemy in flank. This 'left hook' was to be carried out by 'C' Company of Choklit Ghandi Rifles. The other two rifle companies and the machine guns would bring on a fire action against the main enemy front.

The Government artillery scored an early success, bringing accurate fire upon the trenches occupied by the rebel Nr 1 Company and causing several casualties (1SP = 1 stand). At the same time, 'C' Company Choklit Ghandi followed the road to bring the 6-pounder anti-tank position under fire. The guns having no transports - a chronic lack for the Revolutionaries - could defend themselves only with the small arms available to the crews for self defence. This minor attack was off to a flying start.

Much was expected of the main attack on the Government Forces' right wing. The Siliputti infantry, 'A' and 'C' Companies 'up' with the machine guns, and 'B' in immediate support, pushed towards the defended heights whereon the rebel Nr 3 Company was entrenched. To the left of Siliputti advanced the armour, 'A'and 'D' squadrons leading; 'C' squadron in close support. Facing them, the light, 2-pounder guns waited behind entrenchments, and Nr 2 Infantry watched from their corner of the town.

Now, Col Peenutbuttahjars had retained his armour directly behind the town, whence it could intervene wherever a major threat developed. Seeing how the assault was shaping, the Colonel at once ordered his armour to counter the enemy moves against his left flank. The campaign so far had worn down the armour of both sides, but the Rebels' had been harder to replace. They were reduced to just three weak squadrons (2SP apiece), totally perhaps half the size of a regular regiment. But the Government armour was lacking one squadron, they at least were more or less up to strength (3SP). Even so, the Government were to find that the boldly handled light tanks, which had continually outfought their opponents during the whole campaign, were not to go down easy.
Just as the Stuarts drove up, the rifles on the hill sharply repulsed the Siliputti attack just as it got fairly within range. The machine gun company was shot up and A Company reduced to about platoon strength (1SP remaining). Overall, Siliputti had lost 5SP for no loss to the enemy. Not auspicious for the Government forces.
Just as the Stuarts drove up, the rifles on the hill sharply repulsed the Siliputti attack just as it got fairly within range. The machine gun company was shot up and A Company reduced to about platoon strength (1SP remaining). Overall, Siliputti had lost 5SP for no loss to the enemy. Not auspicious for the Government forces.


Forward came the Stuart light tanks of the Revolution - hastening to bring the enemy armour within range of their pop-gun 37mm cannon. The name of the commander of the light tanks has been lost to history, but would otherwise shone brightly this day. Outnumbered (3 to 2) and outgunned, the lights were, once more, not outfought. Almost at once 'A' Squadron found itself short two or three Shermans (1SP), burning or immobilised. The day was going badly, it seemed.

Not that the Government armour was too discouraged. Although never having established the expected ascendancy over the rebel tanks, they had at least kept themselves in the fight. They were rarely defeated outright.

The 2-pounders finally being knocked out, scene was set for the final showdown between the contending armour. Under cover of this fight, what was left of the Siliputti battalion once more tried the defence upon the heights facing them.

The company-sized 'left hook' having been stalled, A and B companies of Choklit Ghandi were slowly closing in on the west face of the town. All day, the field guns had played upon defences on this end of the rebel position. The 6-pounders and mortar positions ground down, the former fieldworks were taken over by the rebel Nr 1 Rifle Company, itself badly depleted. The rebel machine gunners reoccupied the position formerly held by the rifles, and brought the Government C Company under fire. For all the losses the government forces had taken, the pressure was becoming intolerable. Nr 2 Company in the town had taken fearful losses from machine gun and artillery fire, its scant survivors falling back from the west face of the town. But a few sharp words from Colonel Buttahjars was enough to drive them back again. Eventually the colonel himself would join the front line, determined upon, if the need arose, a final stand.

 |

That Lt-Col Mugglethwaite declined to do. His small brigade group had almost exhausted itself, losses heavy amongst his infantry. But the Revolutionaries were in worse shape. No counter-attack was possible with what remained in hand, and the Government retained one weapon against which he had no counter: the field guns.
It so happened that Government losses had slightly exceeded the BARFists' - 12SP to 10, but it was the latter army that reached its exhaustion point. Had the Government pressed its attacks, no doubt that one remaining SP loss to reach their own would have brought the battle to a halt anyhow.
It so happened that Government losses had slightly exceeded the BARFists' - 12SP to 10, but it was the latter army that reached its exhaustion point. Had the Government pressed its attacks, no doubt that one remaining SP loss to reach their own would have brought the battle to a halt anyhow.

The battle might be over, and the Revolutionaries remain undefeated in battle, the reality stared the Colonel and his commanders and staffs in the face: the war itself was finished. The last stronghold gone, there was no longer any rallying point. The writing had been on the wall all those months ago when the BARFists had dashed themselves to pieces at Nawabisbad. After a council of war in a dimly lighted cellar in the middle of the town, the hard-core BARFist Revolutionaries slipped out of the town, and, trudging up the main road, disappeared among the hills at the head of the Maimajikwand Valley. Colonel Peenut Buttahjars had at least escaped Government retribution.
The sun was well above the eastern horizon when Lieutenant-Colonel Ebeneser Mugglethwaite was made aware of the disappearance of the BARFist revolutionaries. He lost little time reoccupying the former rebel stronghold, and, with a few judicious arrests, restoring Government control.
Of course, the Nawab Maibiwih Khan expressed his undiluted joy at the news. His seat as the nominal head of state of at least his portion of the Ruberian Raj remained secure, and kept him well placed once the Jewel in the Imperial Diadem had slipped from Imperial fingers. He could never be sure that the good Colonel Buttahjars and his Revolutionaries would have appreciated the political tightrope he had been walking all these years. No, it was well that the revolution had failed. The Nawab knew how to play the long game...
To follow: a post 'Table of Contents'.
Good to see these rivals slugging it out again. Nice one 👍🏼👍🏼. Many changes from the PW/DPW rules?
ReplyDeleteNot many, Martin. The main one is how I activate the units - (a) roll for initiative (high roll goes first) and (b) number of units activated by dice, rather than cards. Everything else is, I think, pretty much 'per book'.
DeleteCheers,
Ion
Great stuff, keeping it simple always appeals in these quarters 👍🏼
DeleteActually, there was one slight and one major change to Bob's original campaign premise. The major one was my addition of the sea port battle(s). The minor one was to permit the defence some field works.
DeleteCheers,
Ion
Archduke Piccolo,
ReplyDeleteA gripping finale to the revolution … or is it?
You’ve really set the scene for a return to the Nawabate of Tschagi in the future … and I hope that you do so.
All the best,
Bob
Funny you should ask that, Bob -
DeleteI have in mind a little border post-Independence border dispute with a neighbour, the object of which is hinted at in my battle maps for 'The Railway Station'. By this time, the Nawab has acquired for himself more modern equipment, including aircraft, but the neighbour's army has been supplied with vast quantities of WW2 equipment from the Collaborative Collective of Confederated peoples...
I'm in two minds whether to use PW or Tim Gow's 'Little Cold Wars'. A couple of small armed clashes might decide me...
Cheers,
ion
That was a touch “off the beaten track” Ion - but interesting nevertheless.
ReplyDeleteIt did put me rather in mind of Alan Coren’s tales about Idi Amin. Any dissent always seemed to be followed by something like an “unfortunate ricochet” or some other unlikely/unusual fatal accident.
Cheers,
Geoff
Hi Geoff -
DeleteI probably ought to have shoved into the thing somewhere a link to (a) the previous chapter and (b) the beginning of this campaign. That would have put this posting in some sort of context. I'll do that now. Thanks for the reminder!
I have to admit that the 'return journey' from the battle for the nation's capital took far too long.
Cheers,
Ion.