
The action in the campaign was so convoluted and complicated, that I'm not sure my memory is altogether able, despite so many pictures, to recall the events with 100% accuracy. Which just goes to show that the narrative of the Duke of Wellington's proverbial ball is a complex undertaking. Having said that, no doubt the histories of Baron Jomini and Major-general Marbot will follow much the same storyline as here inscribed. Note that in the following, Austrian commanders and formations are given in italics.
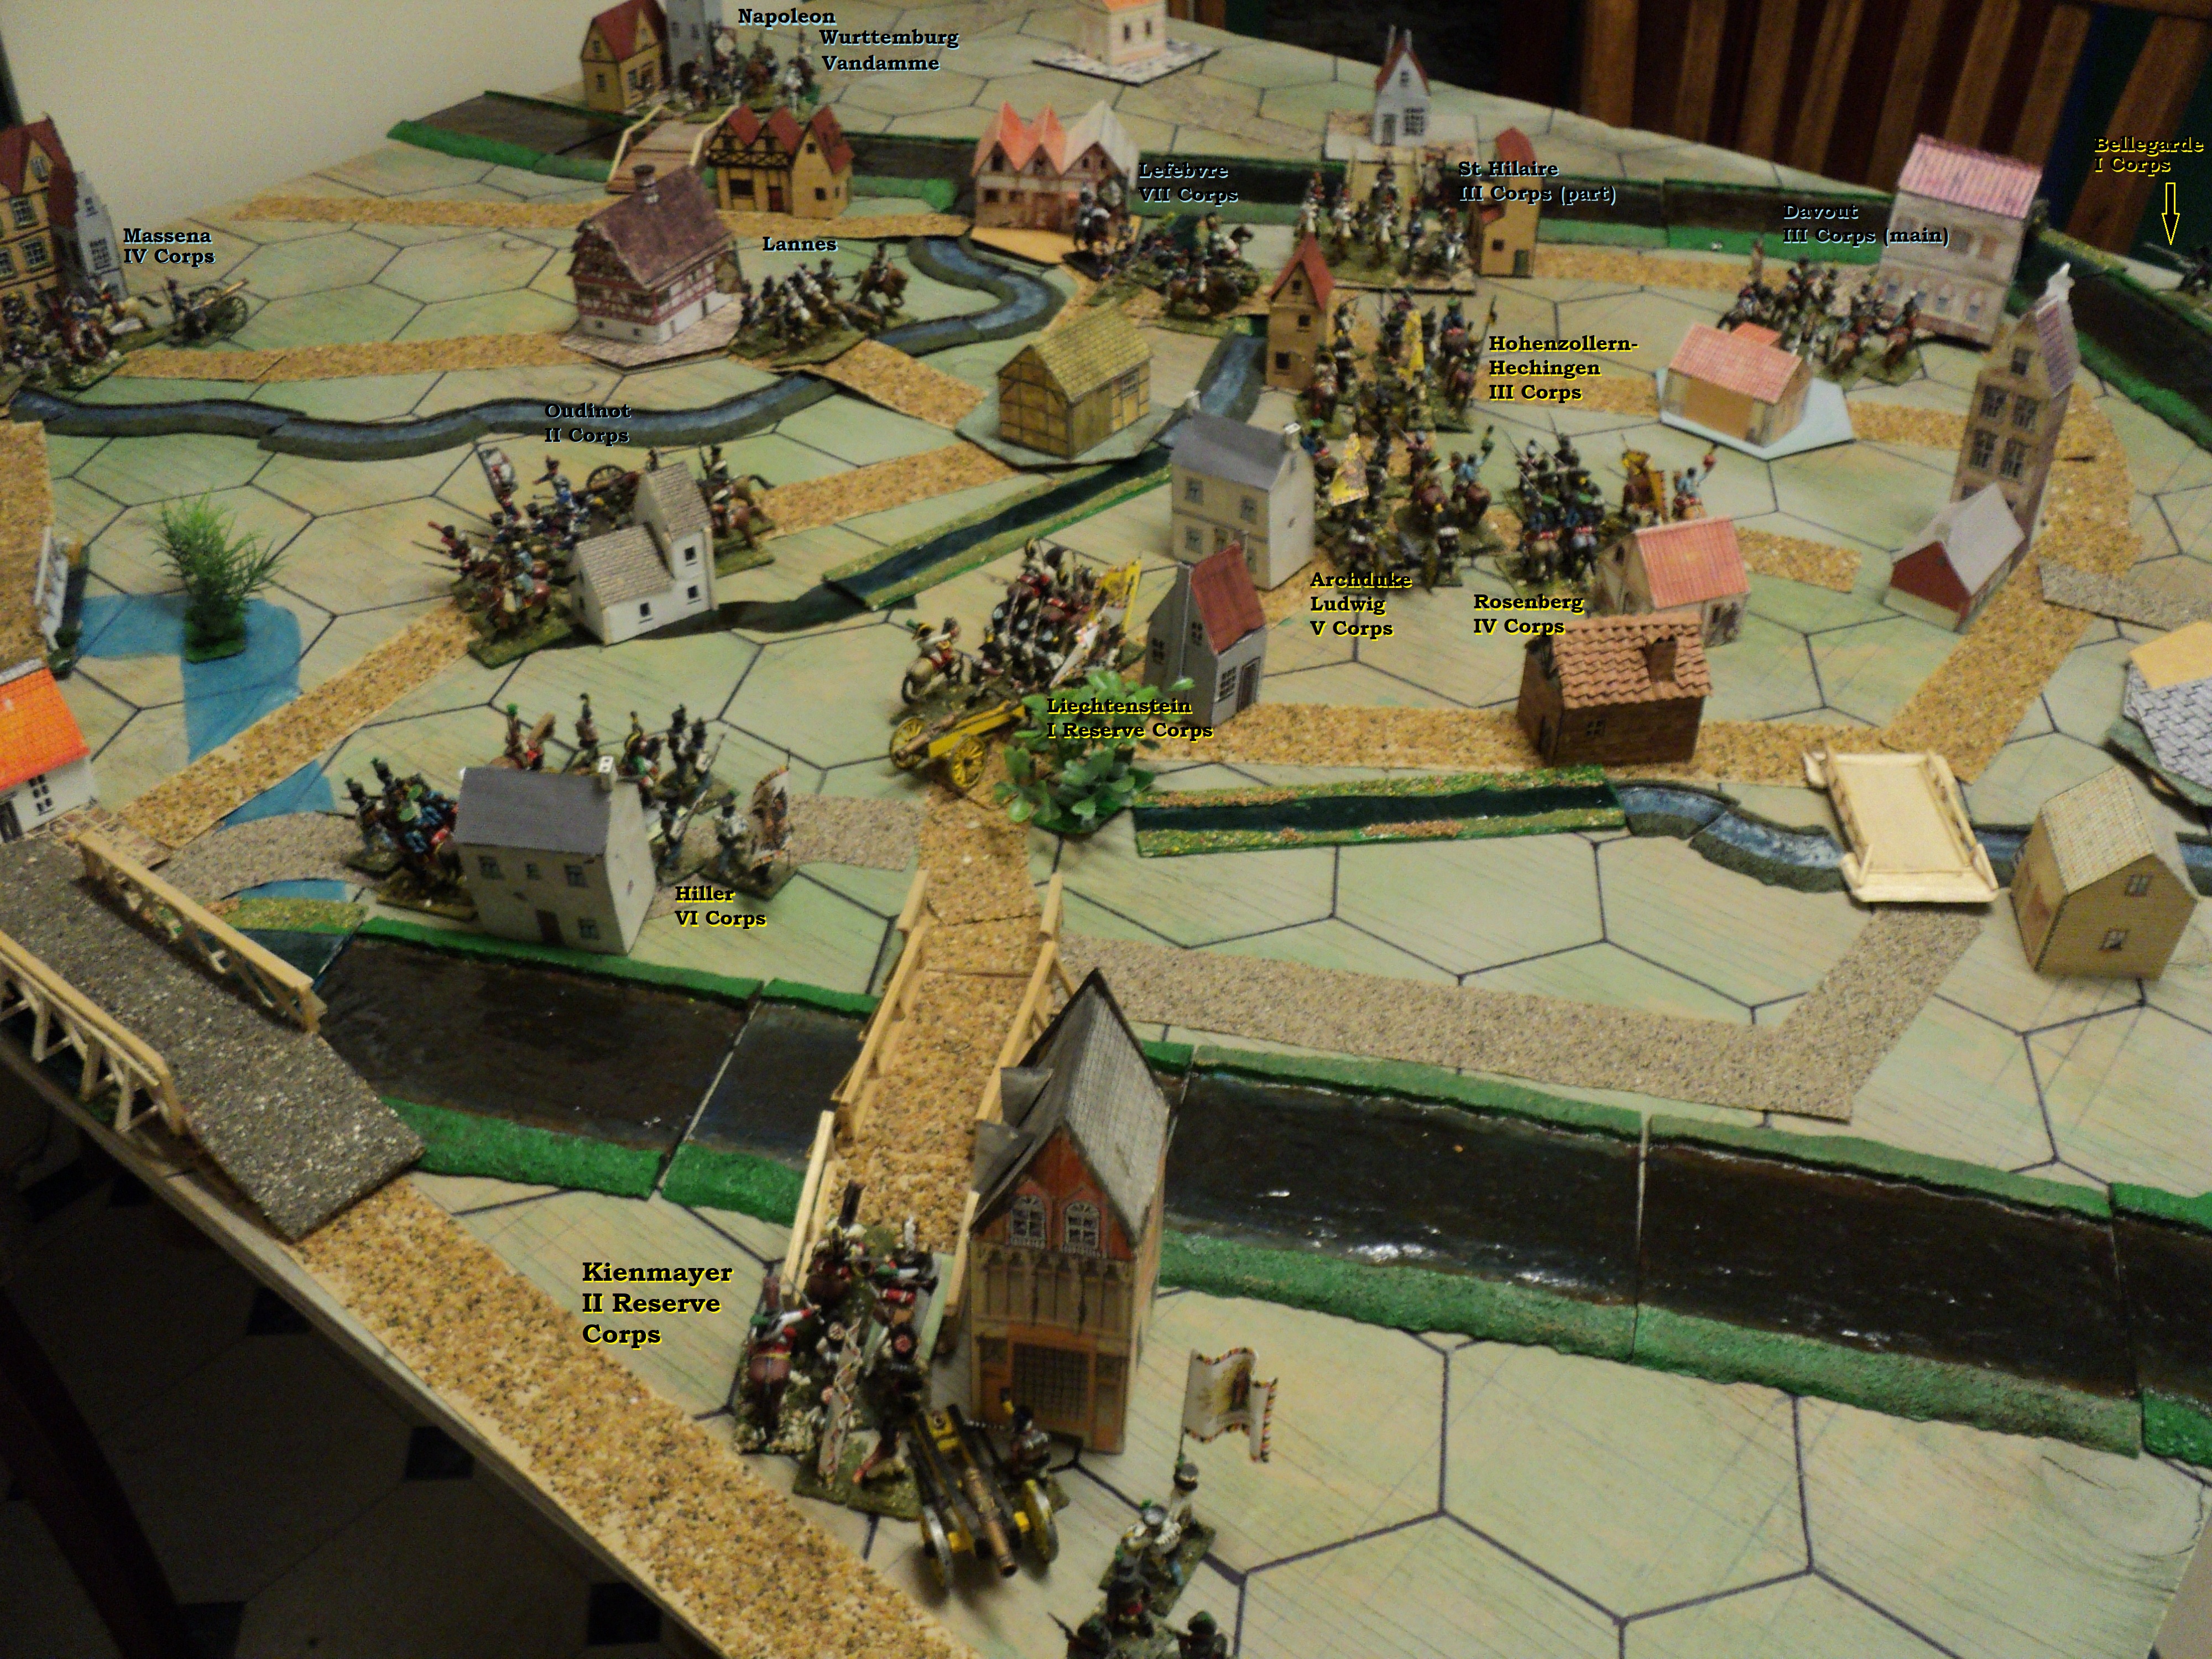
Napoleon's arrival at Ingolstadt late 18th April came not a moment too soon. Early the following morning, the Austrians seized the initiative, the III Corps, followed by Archduke Charles accompanying the V Corps, moved upon Feking, at that moment occupied by part of General Morand's wing of the French III Corps.


To the south, meanwhile, Oudinot's II and Massena's IV Corps were in full march towards the vital point, Freising, the nearest crossing of the Isar river. This was a race, for Freising had been left with no garrison. Originally earmarked for the march north from Pfaffenhausen, Hiller's VI Corps had turned about at Moosburg, and were making all haste to reach the place first.

Hiller barely made it (a fortuitous initiative dice 'win' for Austria - the initiative was to continue switching from one side to the other during the course of the whole campaign). On the march, the light cavalry had to be left on the north bank of the Isar tributary, the Ammer stream. This circumstance was to leave them out of the subsequent action, and to have further consequence later on. Hurrying up, Oudinot declined to launch a quick attack 'off the march', preparing a full scale attack for the following day. Wresting the initiative following day, Oudinot's attack found Hiller without his light horse.


This was not to mention Bellegarde's command, just then commencing its first trans-riverine assault upon Regensburg. The first probes received a quick rebuff, but it could be only a matter of time before the garrison would be overcome.


The following pics tell the tale of Hohenzollern's first attack. Totting up the figures and arms engaged, both sides rolled ten dice. Matching pairs eliminated - the crossed dice in the photo - the remainder indicated the losses.
 |
 Blue first: the French eliminated 2 Austrian foot, and both gunners. The third '1' is redundant.
  ... and here were the rolls for his fate. The '6' renders him hors de combat - dead, seriously wounded or taken prisoner.
 Overall, this was a defeat for Morand, but if the following picture doesn't lie, it seems that a quick counterattack during the French half of the turn recovered the village.

Bellegarde continued to batter away at Regensburg, but by evening of the 20th, half the garrison was still grimly hanging on.

Day three, 21st April, was a successful one for the Austrians. Rosenburg's powerful attack drove Marshal Davout out of Teugen - the first of many changes of hands throughout this campaign - and a renewed Austrian attack again took Feking. Following III Corps, the archdukes, Charles and Ludwig, brought V Corps up to Arnhofen before Lefebvre could bring his men across the Abens. Davout's whole III Corps was now cut off from the rest of La Grande Armée.

For the whole three days, Davout's Corps, split into three parts counting the Regensburg garrison, had been in battle with three Austrian corps (I, III, and IV, with a fourth (V) in the offing. But six French and Allied corps were making the best speed they could to redress the balance. General Oudinot was about to attack VI Corps at Freising, and Massena was not far distant on the other side of the Ammen River with IV Corps. Lefebvre was also ready to force the River Abens in the face of V Corps, and Marshal Lannes was not far behindhand, approaching Siegenburg.

All the same, as evening drew in on 21 April, the strategic situation was looking rather more rosy for Archduke Charles, than it was for Napoleon.

Day 4: 22 April
This day, it was the French who opened the ball. Before Hiller could call in his light cavalry, still on the road from Moosburg on the far side of the Ammen, Oudinot threw his entire II Corps into the attack at Freising. It was at once successful, the French broke into the town, and Hiller beat a hasty retreat across the Isar, towards Landshut. Realising too late the threat to that vital point, Prince Liechtenstein directed his I Reserve Corps - made up of elite grenadiers and cuirassiers - thereto. They were still over a day's march distant when Freising fell to Oudinot's corps.
This day, it was the French who opened the ball. Before Hiller could call in his light cavalry, still on the road from Moosburg on the far side of the Ammen, Oudinot threw his entire II Corps into the attack at Freising. It was at once successful, the French broke into the town, and Hiller beat a hasty retreat across the Isar, towards Landshut. Realising too late the threat to that vital point, Prince Liechtenstein directed his I Reserve Corps - made up of elite grenadiers and cuirassiers - thereto. They were still over a day's march distant when Freising fell to Oudinot's corps.

Matters were drawing to a head, too, throughout the day around Teugen. Recapturing Feking for the second time, General Gudin, having replaced the unlucky Morand, followed up III Corps as it withdrew. Lefebvre forced V Corps were forced back to the southeast out of Arnhofen. The three Austrian army corps formed a compact triangle in and west of Teugen.

They were facing a lot of pressure from the French. Marshal Lefebvre had at last forced the crossing at Arnhofen, and Marshal Lannes, with his Provisional corps, also crossed the river at Siegenburg. Altogether, Lannes, VII Corps and elements of III Corps were facing III and V Corps. To the east of Teugen, Marshal Davout was preparing his own counterattack against IV Corps...
To be continued...
You’ve certainly been a busy chap Ion - lots going on there and much of it to-and-fro.
ReplyDeleteI look forward to reading further “despatches from the front”. Naturally I’m cheering on the Austrians. ⚔️⚔️
Cheers,
Geoff
Geoff -
DeleteBusy ain't the half of it! And the outcome was in the balance until almost the end
Cheers,
Ion
Excellent! The Corps marching along the roads in column look magnificent. This looks like another campaign I will have to set up and try. I hadn't realised you were using an initiative throw each turn, that certainly makes things more interesting.
ReplyDeleteMartin -
DeleteI do like the larger formations I used for this campaign than those I had for the Waterloo campaign. They gave the formations more 'heft' somehow. My usual experience with initiative rolls is that they don't change much during the course of a game - maybe once or twice. In this one, the initiative continually switched back and forth, with the effect of fluctuating fortunes for both sides.
Each IGoUGo pair of moves represented one day. At the end of each day, half that day's losses on both sides were returned to units. Priority went to the formations that needed them most, though I could have used a more 'formal' method of distribution. The effect was to mitigate the effects of attrition - but not to eliminate them outright. Marshal Davout's command was looking pretty ragged come the finish!
Some points that I will probably be making in a 'debrief' posting:
1. Loss of (both) gunners did not imply the loss of the gun, as there was a good chance of one of the gunners being returned. If the lost gunners could not be replaced, THEN the gun could be removed. No gunners meant no plus for the artillery arm, of course, even if the gun was still present.
2. On one occasion a formation was reduced to the commander and the flag. The formation remained 'in being' until half the losses could be made good.
3. Although in this one the Commander and flag did not form part of a road column, in future I think they should. At any rate, the way the thing worked, one did give some thought to the order of march!
Cheers,
Ion
Excellent start there Ion and looking forward to part II, hoping desperately that the Austrians give the Corsican Ogre a bloody nose!
ReplyDeleteSome big battles developing there, Steve!
DeleteGreat start! Will Davout manage to hold out? And what of Morand? Was he killed?
ReplyDeleteMark -
DeleteI do believe General Morand did meet with his demise. He's out of the battle at any rate. He has been replaced, if memory serves, by General Friant. That replacement comes with the other overnight returns of stragglers, strays and shirkers...
Meanwhile, there's still a lot of fight left in the Iron Marshal!
Cheers,
Ion
Grand looking gaming, lots of drama as well. Here's to the White Horde prevailing.
ReplyDeletepancerni -
DeleteThe White Horde is doing pretty well so far...!
Cheers,
Archduke Piccolo,
ReplyDeleteThis is a magnificent start to your mini-campaign battle report. I look forward to reading the next part,
All the best,
Bob