Sunday, January 29, 2012

My British could use some work...

A couple of weekends back I had my first Panzer Marsch game since... oh, it must be April last year. This time I decided to field a British Army force, Northwest , against Tony Ormandy's Germans. A fossick among the long neglected infantry discovered what I had available, and what work needed doing. They had come through the earthquakes of the last 15 months (yep, we are still getting them from time to time...) more or less OK, but I hadn't even looked at these guys in all that time.

This action broke out on the 8th June 1944, whilst the situation in Normandy remained in a state of flux, about the village of Ste-Mere de la Croix. The high command on both sides had suddenly become aware of the importance of the road network in the neighbourhood of the place, and were determined to occupy, seize or carry the village for their own use.

The opening picture - a distant shot of Tony's fine German panzer grenadiers - A weak platoon of 2 Panthers, another of 2 Jagdpanzer IV/48, and a company of what we would now call 'armoured infantry'. This Kampfgruppe was commanded by Hauptmann Werner von Wiener, a highly experienced commander of armoured infantry.

I opted for something pretty straightforward: an infantry company and an armoured squadron:

A Company, 1st Battalion Codswallop Regiment;
3 Rifle Platoons (7th, 8th[mounted on M5 half-tracks], 9th)
1 Support Platoon
Section 2xVickers MMG
Section 2x6pr AT guns with tows
Section 2x3-inch Mortars, with carrier mounted FO.
Team PIAT
C Squadron (less one troop), 4th County of Yeoman Londonry; [Note: CYL, not CLY :)]
HQ: 1xM4 Sherman
3 Troops each comprising: 2xM4 Sherman; 1xM4 Sherman Firefly.

Here is 7 Platoon, advancing on the right accompanied by the 6pr guns, the Vickers section, and the Support Platoon's PIAT team. Unfortunately, this force was unable to find a decent position to hold, being on foot for the most part, and the enemy mounted upon half tracks.


The British (commanded by Major Hugh Billinghurst-Thorpington) made their main thrust upon their left, to the east of the village of Ste-Mere de la Croix.


Eight Platoon, mounted upon half-tracks, were to advance until they reached a point due east of the village, then wheel and assault its east face. The armour were to advance a little farther before wheeling into the rear of the place. Nine platoon were to push up the road at their best speed and seize as much of the village as they could, before the Germans intervened.


Awaiting the British armour, lay the Panther platoon, lurking hull down upon the east end of the ridge south of Ste-Mere. On the road leading in to the village, the Jagdpanzers were also waiting. Four German tanks against ten British... hardly a fair contest, is it...?

Here's the general view of the field, looking northwest from behind German lines. German tanks, lying in wait; panzergrenadiers advancing towards the village and through the wooded country to the west.
Jono laid out the terrain, and it's quite a nice tract of country he designed. Unfortunately Tony and I ought to have allowed him more room to lay out terrain at the extreme ends of the table. The British in particular were to feel acutely the want of a solid position at which to anchor their right and centre.

The County of Yeoman Londonry and the mounted platoon of Codswallop Infantry sweeps up the left flank. The platoon has dismounted as the armour begins to come under fire...

...and the Germans naturally single out the Fireflies for attention. Both from the leading troops (#1 and #3) are taken out in short order. But the German armour does not come out unscathed. A lucky hit from one of the M4 Shermans damages the drive sprocket of one of the Jagdpanzers on the road south of the village; and #3 Troop's Firefly strikes right hand target panther (#121) somewhere near the turret ring, causing heavy damage and jamming the turret so that it can no longer traverse.


The British armour charges on. The last surviving Firefly (#2 Troop) scores a remarkable hit upon the undamaged panther (#113) - a hull down target into the bargain - and knocks it out. But this strike is swiftly avenged.

Meanwhile the British were starting to bring mortar fire down upon the intersection in the middle of the village - the observer being ensconced in the bell tower of the church a short distance to the north of the place. The first salvo took out a vehicle and a few infantry, but after that the British mortars proved ineffective for anything except setting buildings on fire. By the end of the action some 80% of the village was in flames, forcing its abandonment.

Minus its Firefly, #1 Troop wheeled to the west to assist an action against German infantry in the woods opposite the hamlet. These might have remained hidden, but had opened fire upon the #1 Section of 9 Platoon as it advanced through the fields northwest of the place. Retribution was swift: mortar, tank, Machine-gun and rifle fire reduced the panzergrenadier section to two or three survivors, and put them out of action for the duration.

Lacking targets, the Jagdpanzers were directed to intervene against the British armoured attack by the remains of #2 and #3 Troops. Here we both forgot that one of the Jagdpanzers had earlier been immobilized (a critical hit). It probably would not have made much difference, and I didn't remember until after the game, by which time, of course, it was too late. Possibly the aid to forgetting was the Shermans' failure subsequently to inflict further critical damage. What happened during the action, we can infer, was that the damage wasn't as severe as first thought, and the crew was able to effect a repair sufficient to get the assault gun moving again.

At any rate, the last Firefly and two Shermans were knocked out for trivial damage to the Germans, whereat the remnants of #2 and #3 troops made off back whence they came.
Away over to the west, 7 Platoon was trying to establish some kind of defence line against the oncoming German infantry. The latter had established a Mortar OP in the tree line at the north end of the ridge in front of 7 Platoon. A stonk had cost #2 Section three men, and then, when the Anti-tank section attempted to set up a position, and as #1 Section passed through it to take up a position along those same trees, another bombardment wrecked both guns, though without loss to any of the crew.

The village proving rather inflammable under British mortar fire - the British having to abandon one building when a short knocked over a couple of men and set their building alight as well - the Germans made a virtue of the necessity of evacuating their buildings, and subjected the British hold on the northern part of the place to a heavy close assault. British countermeasures were slow and muddled (my response was slow and muddled), and they were bundled out of the place with heavy loss.

On the right, 7 Platoon's #1 Section had discovered the German 4-man OP team among the trees as they approached. A brisk close range firefight cost both sides three men, the sole German survivor running off on foot.

But it was clear that, after successive defeats on the left and centre, and the right in an untenable position, the British would have to call off the operation as a whole. The Germans had won.

The butcher's bill reflected the result. The Germans lost about 20 men, a soft-skin vehicle, and one tank destroyed, another heavily damaged and (possibly) one immobilised. The British had to deplore the loss of 39 men, 5 tanks (including all three Fireflies) destroyed, and another with light damage, and 2 anti-tank guns wrecked.

Hauptmann von Wiener could rest content. For Major Hugh Billinghurst-Thorpington, it was not a good day.

Thursday, January 19, 2012

DIY terrain


It was a recent discussion in one of my yahoo groups on the subject of collecting or making one's own terrain pieces for wargames that has led me to begin an occasional series on the subject. The lead photo shows buildings, bridges and sections of pave that have all been scratchbuilt in some way. Only the river sections are manufactured items, though I've had to paint them myself.

The above building was constructed from a sheet of stone or brick patterned card I think originally designed for the facing stonework for the entrances of railway tunnels. Of course they are adaptable to a multiplicity of purposes. Buildings such as this simple design, for one. The roof tiles are made of cardboard strips (thin card is best)marked and notched along their length. The strips are about one-and-a-half to twice as wide as the tile rows to give the next row something to overlap and anchor to. The tile rows are then built from the bottom up to the ridge. The whole roof was painted with water colours.

This next building was made some 15 or 16 years back from cornflake packet - except for the 'railway tunnel' stone/brick card around the ground floor. The black timber work was made separately and applied (the pictures will show where wear and tear in the intervening years have caused some to fall out. Though it is true the plaster was supposed to be built out flush with the timbers, the '3D' effect of the applique timbers looked quite good, I thought. Took a bit of a while to make, but I feel I really ought to make more of these.

With a limited budget, it became a habit to look for the terrain potential in any piece of garbage lying about. Same goes for model scratchbuilding, whence comes to that.

Here is a clearer view of the 'brick paper' used for the ground floor. I had used a sheet of this stuff for stone walls, and the remainder seemed suitable for the purpose here.

You will observe in these last two pictures that the building stands upon a stretch of cobbled pave. What I did there was take the rather dark brick paper of the first building in this article and scan it as a picture file on my machine. Then I played around with the colours to get a lighter tone, and print out on paper.

As the paper was a bit thin, I pasted them onto something a little thicker, seen in reverse here (cornflake packet again).

And here they are: 3 areas of cobblestone pave. These sections can be used as open spaces such as town or village squares; or instead as the profiles (footprints if you will) of build up areas, with buildings and what have you placed on top.

Several years ago a friend received a whole wodge of timber off cuts of very interesting shape. Flat along one edge, the other formed an arc of a circle. These were maybe 10 inch to a foot long, and about an inch or so thick. The immediate thought was: bridges.

Individually, they were not going to be wide enough, but two carefully selected pieces glued side by side looked very promising. Then out with the stonework card, cut and paste gave us the sides. Originally I had two arches, but that looked odd with my river, so I settled for a bigger, single arch. As you will observe, I had no truck with cutting out the wood to make the arch, simply painting the area black. Good enough for me! The paving was provided (once more!) by my scanned and printed stonework paper.

The brick paper for the second bridge was provided by a different brick paper pattern from a piece that was unearthed during a clean out at the club and about to be thrown away. True, this card wasn't in the best condition, but I rather like my stuff having a well-used look. At any rate, there wasn't really enough to make a factory building from (which was my first intention), but when I at last got around to the bridges, its purpose became apparent.

I'll close here with some more pics of a few of my scratchbuild terrain pieces.

Quite a bit of the stonework paper got used to make pave sections for European village streets. These were backed on rather thicker card than the BUA/town square sections, because I felt for that purpose they needed to be more robust.

Tuesday, January 17, 2012

ACW Riverine ... Part V

Somewhat belatedly - and with apologies for my tardiness - here are some pics of my riverine craft with my Airfix figures by way of comparison. The tape measure in the background gives some clue to the dimensions of the vessels, but I will give some actual figures in another posting.

The heading picture was set up to show the potential for introducing a pseudo-perspective to pictures using the disparate scales between figures and models. The CSA artillery here, by the way, are a couple of scratch-made 20pr Parrotts, and a Whitworth muzzle-loading rifle. Well, that's what I call them anyhow...


In the above picture you can compare very roughly the relative sizes of the vessels. The tape measure in the background is only a rough guide, as the Carondelet should be only 180mm (representing 180ft) in length, as is the nearer steam ship. The gunboat has a 52mm beam.

The CSS Tennessee is 200mm long by 45mm wide (approximately); the tugboat 100mm long; the mortar barges 60mm. All the vessels are intended to be 1:300 scale, or close to it.

Note the comparison between the 1:76 scale figures and 1:300 scale vessels. Quite a difference. But together on a table top in combined operations, they look surprisingly compatible.

Finally, I've included a picture of republished copy of Thomas Scharf's book (originally published c.1887) History of the Confederate States Navy. Considering the lack of resources, and the enormous odds the CSN had to contend with, they did surprisingly well, and this volume is commensurately interesting.

Saturday, December 31, 2011

ACW Riverine - Under Construction ... (Part IV)


At last, a couple of CSA ironclad gunboats under construction. First, CSS Tennessee.

Some details need to be added, such as coamings around what seem to be netted openings in the roof of the casemate fighting compartment (?). I presume these openings existed in order that there be a bit of light for the gun crews and others to work with. It seems reasonable that some kind of netting be drawn across these spaces as protection against shell fragments and shrapnel.

I also want to build up the bow and stern a bit, and add steering chains along the rear deck. Not sure what to use for chains, to be honest.

And, of course, the gun ports need guns and port lids. The latter were the swivel kind. As for the guns, although the Tennessee had ten ports, she carried 6 guns: a pivot Brooke Rifle fore and aft and two guns in each broadside. I'm planning on showing guns 'run out' through the fore and aft ports, and the middle two broadside ports, whilst the other broadside ports will be shown closed.

Now: the following is my 'first pass' attempt at constructing CSS Arkansas.

Not a success, as you can see. Part of the problem is a lack of information, though I have recently found out the vessel's dimensions - a big help! This ... erm ... model turns out to be too short by about a centimetre.

As it transpires, there is some disagreement as to what the boat looked like: one model maker depicting her as having vertical sides (which i suspect is a misunderstanding of the 'straight line' hull for at least the length of the casemated fighting compartment). Others show a distinct gap between the foremost broadside gunport and the other two. Here's an example from Stephen Lund and William Hathaway's downloadable PDF Modelling Civil War Ironclad Ships.There is no evidence that I can discover to suppose any arrangement different from what I have assumed here.
But clearly something has to be done about the the vessel forward and aft of the casemate. Can the thing be reconstructed, or do we start all over again?

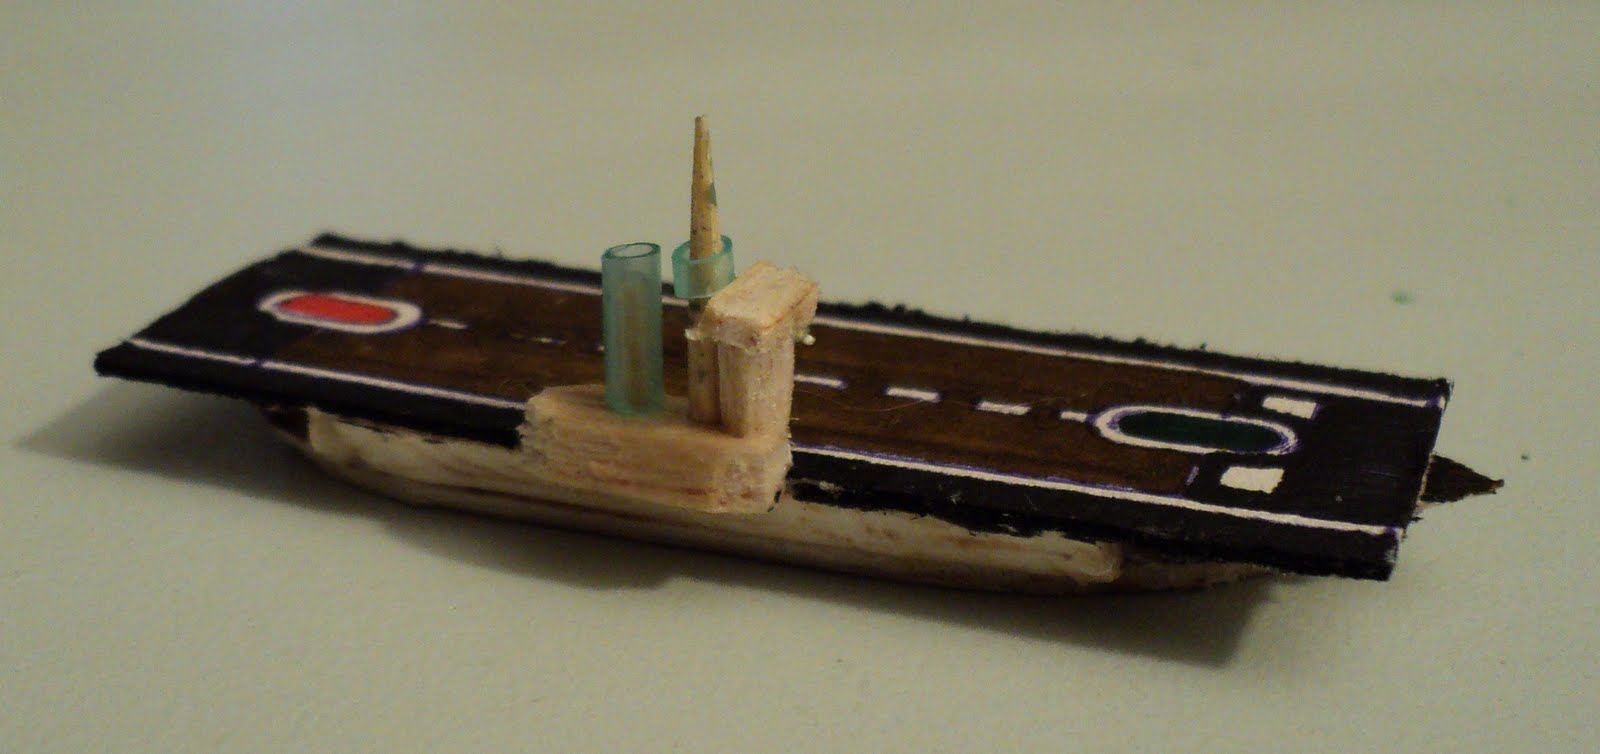
Meanwhile, on a different note - introducing a third belligerent in the wars of Jono's World: Sideon IV: the Archepelago of Sarbia. Here is one of its three aircraft carriers...


... and a squadron of light tanks from the Sarbian Army.

These were got from packets of Army Men type soldiers that included an over scale jeep (which will become a light truck) and a slightly under scale tank (which, with its gun cut back, becomes a light tank). Tank #234 is actually a water pistol (yep: the thing can actually shoot!) that has been kicking around the house for x-teen years or more. It has become a close support tank with a rather large gun.
(The packet also contained small 'stealth' fighters that will be hard to find uses for...)

Cheers - and my best wishes to you all for the New Year.
Ion A. Dowman

Tuesday, December 27, 2011

ACW Riverine - Under Construction (Part III)


Every fleet needs support vessels by way of tenders and tugboats. Vessel #1 is a small unarmed tugboat that might be used to help with mooring larger vessels, or towing cargo barges.

Vessel #3 is slightly larger - large enough to carry a 32pr rifled cannon for self-defence. To be honest, I don't really know if such vessels did indeed carry ordnance, but it seemed a reasonable proposition.

Vessel #6 is another large tugboat or tender, slightly larger than #3. I don't think any future constructions of this type of vessel will be any larger than this...

Mortar barges. Crude looking they are, but they were constructed from an illustration in Battles and Leaders of the Civil War. Three seemed a sufficient number for my purposes...

There remains a question about crewing these vessels. I do believe they might be a little over-scale anyway, but they look right. Maybe 10mm figures will have the right appearance...


Below are three views of a Kickapoo class monitor - two turrets, funnel and conning tower.

As yet, not a particularly convincing model at all. I'll probably add lifeboats and other gear to give it more of a lift, and scribe somehow the deck plates in the 'brick' pattern the Union seemed to favour for this type of vessel.

The hull will need reshaping as well into something more canoe-like. Then paint white around the tops of the turrets, funnel and conning tower... M'mmm, yes: it might look the business yet! I'll have a think about the turrets, too - possibly they are too tall.


To be concluded: CSS Tennessee and CSS Arkansas...

Monday, December 26, 2011

ACW Riverine -Under Construction... (Part II)


Above: the first of a number of Confederate steam rams/ gun boats. After all this time, I still haven't figured out how to build the 'walking beam' arrangement. It looks as though this vessel is missing a bowsprit, too. The masts could stand revisiting: the topmasts look rather too thick, as well.

This was intended to be a fairly 'generic' sort of vessel.
More CSA gunboats, armed fore and aft with rifled ordnance. Well... they would be if I had got around to completing those guns...
Rather than build specific gunboats, often named for Confederate generals and which survived maybe one or two serious actions, I gave them other names. The letters on the funnels serve as aides-memoire for Atchafalaya, Pontchartrain and Maurepas.

Here we have a generic Union vessel that might be a troop transport or maybe one of Col. Ellet's steam rams. This was made on the basis of a wood engraving, I think from Battles and Leaders

Another steamboat that might serve as a transport or as a steam ram. I don't recall what the basis for this vessel was - I think it might have been a picture of someone else's model. At the time I was building these, information was very hard to come by as to dimensions, design - even colours. At that, even professional modellers apparently have to make guesses as to what these vessel really looked like...

I think a little touching up might be in order, such as railings around the decks, lifeboats, that sort of thing...

Next time: A monitor, and some auxiliary boats and barges...